Please help me identify what I'm looking at

Elizabetty

Original poster
Member
Dec 2, 2022
191
Wisconsin
I know I have a million irons in the fire right now and I will get back to all of my posts as I move forward but before I finish something I'm always running into something else and trying to see how everything plays together.

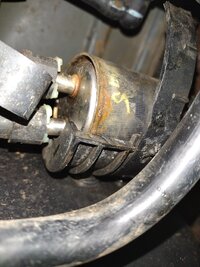
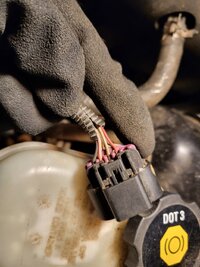
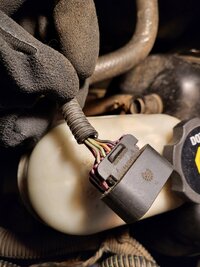
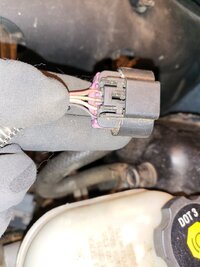
The question about the fuel filter is probably something that can't be answered with 100% certainty but I'm curious. I had this fuel filter put on in December, sometime in the first or second week and I live in a snowy state with road salt. I noticed it isn't secured and has a lot of wobble so I'm going to make sure that gets secured but it seemed overly rusty to me, not the connections which weren't replaced, but the actual filter around the rim. Does this look new? Is this how quickly I should expect something like that to rust? I ask because I don't want to accuse anybody of anything but I found it odd that they said it would be 15 to 20 minutes before a filter was delivered and they would change it out for me and the next thing you knew 5-10 minutes later they said they were done and I was like oh you got a filter? And they said yeah you're all set. I look at it today and it just doesn't appear to be very new but perhaps this is how quickly the type of metal on this part would rust.

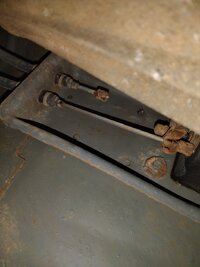
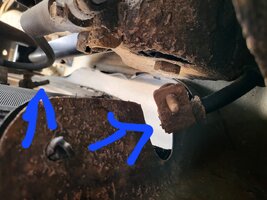
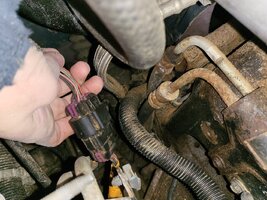
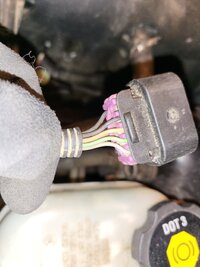
Another picture is where there appears to be a short metal line that is cut off at a rusted connector or end part and the one below it runs all the way across. What am I looking at and should it be two lines there with one short and one long that continues or am I looking at a broken/missing line of some sort?

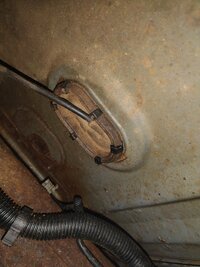
The third pic is an oval straight up above me also on driver side and I'm not sure what the line is that goes into it and where it continues to beyond that oval.
 

Attachments

  • IMG_20230218_105852291.jpg
    IMG_20230218_105852291.jpg
    331.8 KB · Views: 60
  • IMG_20230218_105943996.jpg
    IMG_20230218_105943996.jpg
    528.8 KB · Views: 62
  • IMG_20230218_105832875.jpg
    IMG_20230218_105832875.jpg
    637 KB · Views: 23

TollKeeper

Supporting Donor
Member
Dec 3, 2011
8,084
Brighton, CO
Pic 1 is parking brake cable being broken.
Pic 3 is the fuel filter I am pretty sure
Not sure on pic 2.

Looks fairly new to me, they did not secure that plastic strap, or the strap is broken.
 
  • Like
Reactions: Elizabetty

Elizabetty

Original poster
Member
Dec 2, 2022
191
Wisconsin
Pic 1 is parking brake cable being broken.
Pic 3 is the fuel filter I am pretty sure
Not sure on pic 2.

Looks fairly new to me, they did not secure that plastic strap, or the strap is broken.
Okay. I'm confused on the parking cable because I thought a line I found in the back was where it snapped when it snapped the day I lost my handbrake. Near the rear tire there's a thick cable that seems to have busted off from a partial cable I see in the wheel well that I thought I identified as a break cable but maybe I have to look at things because when it snapped, I would think once it snaps in one place it can't continue to snap in a second place and it's weird to me that it would snap in 2 places all at once when all I heard was one loud pop. In my mind, tension wouldn't work like that. In case my first picture in a different thread wasn't good, here's a picture of what I thought was my parking brake cable in the rear from the day it snapped.
 

Attachments

  • 20230218_113432.jpg
    20230218_113432.jpg
    438.3 KB · Views: 11

mrrsm

Lifetime VIP Donor
Supporting Donor
Member
Oct 22, 2015
7,775
Tampa Bay Area
This Image shows the Single Cable Housing for the Emergency Brake where the Cable Housing passes THROUGH the Floorboard of the Cab and connects to a Bell Crank under the Center Console and gets worked by the adjacent Emergency Brake Lifting & Lowering Handle and it probably does NOT need to be replaced:

img_20230218_105943996-jpg.106870


THIS Other Image tells ANOTHER Story altogether because is shows that when the Emergency Park Brake Handle is Lifted to apply the Parking Brakes.... Only One Side will respond... and very poorly at that.

This is because One of the Two E-Brake Cables leading either to the Left or Right Rear Brakes has Slipped through the Stamped Steel "Load Splitter" meant to take the energy coming from the Single (Pull Handle) Cable and then Equally Divide the Force into being distributed to BOTH the Left and Right Rear Wheels' Emergency Brake Levers via their Unique (L) and (R) Emergency Brake Cables. They are NOT Inter-Changeable:

img_20230218_105852291-jpg.106869


Your Rusty "E-Brake" Load Splitter is still there... BUT it SHOULD look very similar to THIS One when those Two E-Brake Cables are properly routed and in their correct, adjusted positions:


E-CABLESPLITTER.jpg

THIS is what the RARE Stock OEM cable and Housing looks like for the Right Side of the Vehicle... and THIS is where you can can get a Used One. Take Note that ALL of the Rusted In Fasteners holding the E-Brake Cable Plastic Outer Housing via those Small Metal Brackets MUST be conserved AND Re-Installed when replacing this Brake Cable... Otherwise THE EMERGENCY BRAKE WILL NOT WORK:

2002 CHEVROLET TRAILBLAZER 1/2 TON REAR RIGHT EMERGENCY PARKING BRAKE CABLE


s-l1600d.jpgs-l1600d.jpgs-l1600b.jpgs-l1600a.jpg

This is the RARE Left Side Version of that E-Brake Cable and WHERE you can get One:

2002 CHEVROLET TRAILBLAZER LEFT PARKING BRAKE CABLE OEM 120137


s-l1600EE.jpgs-l1600CC.jpgs-l1600BB.jpgs-l1600AA.jpg

An Excellent Rear Brake R&R that INCLUDES the R&R of the Emergency Brake Cable that describes just how *Tricky* that can be:

 
Last edited:

Mooseman

Moderator
Dec 4, 2011
25,387
Ottawa, ON
Looks like your parking brake system has broken cables in multiple places. If you want it to work, you may need to replace all the cables, including the one from the lever through the floor (pic 2). I've had that one break at the splitter.
 
  • Like
Reactions: mrrsm

mrrsm

Lifetime VIP Donor
Supporting Donor
Member
Oct 22, 2015
7,775
Tampa Bay Area
These images will emphasize what the 'receiving ends" of the Emergency Cables attach with and engage when that area has been fully re-built with New Hardware. This work was necessary because Rust had seized the displayed New Inner Drum Brakes installed to replace the Worn Out Shoes and the Discs-Drums with their Rusted Inner linings of the Rear Wheels of my Y2K Chevrolet Silverado. Just know that GM never wastes Basic Engineering...so for the most part...what you can see here will be well exemplified at the Rear Wheels of your own GMT360:


It is very tedious repair work, indeed ...but well worth knowing that once completed, those Emergency Brakes WILL work whenever needed... especially in real emergency situations and that E-Brake Handle gets found by your Right Hand and Yanked Skywards ...should the need for it ever arise.

Amazon carries the Parts & Pieces as needed:


This Image of "How to Attach the Dog-Leg Link on the end of the E-Cable to the Rear Brake Components" Illustrates the benefits of having the GMT Nation Full Service GM OEM Manuals provided by @Mooseman and available for Download HERE:

This Image is an excerpt from Page 145 of the Brakes.PDF that is TOO BIG to attach to this Post:

EMERGENCYBRAKECABLEHOOKUP.jpg

And THIS Video provides even more intimate details of this area...

 
Last edited:

Elizabetty

Original poster
Member
Dec 2, 2022
191
Wisconsin
Thanks everyone. This is one of my last "what is this" for a bit. C1 splits to this connector and it's been flopping around not connected to anything for support getting crusty. From the connection, the other end runs into the harness under the manifold. I'm working in a dark shop without my phone that I downloaded manuals to at the moment. I take pictures but the colors aren't coming true and I'm having a hard time seeing what might be faded or a true color etc. Both ends of this are so full of gunk inside around the pins. I'd like to clean it up but I was just wondering what exactly this connector is or what I'm looking at for matching wires to where they go when tracing if needed. If that's too lengthy of an answer, maybe supply colors and I'll try to look when I get to my other phone.
 

Attachments

  • 20230219_150743.jpg
    20230219_150743.jpg
    511.1 KB · Views: 19
  • 20230219_111057.jpg
    20230219_111057.jpg
    717.5 KB · Views: 22
  • 20230219_150730.jpg
    20230219_150730.jpg
    479.4 KB · Views: 23
  • 20230219_150556.jpg
    20230219_150556.jpg
    455.7 KB · Views: 18
  • 20230219_150543.jpg
    20230219_150543.jpg
    483 KB · Views: 18

mrrsm

Lifetime VIP Donor
Supporting Donor
Member
Oct 22, 2015
7,775
Tampa Bay Area
View THIS Image (after a Deep Zoom) and the Connector you are looking at is probably THIS One (Circled in Red) as part of the Under Fuse Block Harnesses:

frontfuseblock1-3696155340.jpeg

Note that in and around yours ...there are indications of Green Connector Corrosion therein and the Very BEST Stuff for cleaning out any Electrical Connectors and Switches that will actually work when the solvent is still Wet is called:

CRC Lectra Clean Heavy Duty Electrical Parts Degreaser, 19 Wt Oz,(Pack of 12), 02018CS


71wVBhxVjgL._SL1500_.jpg
 
  • Like
Reactions: Elizabetty

TJBaker57

Member
Aug 16, 2015
2,907
Colorado
I think that may be X100 sometimes labeled C100. The red/blk is your AC high pressure sensor signal. I don't have (or cannot find) a 2002 pinout for it but a lot of it matches the 2006 pinout I have.
 
  • Like
Reactions: Elizabetty

Mathoran

Member
May 3, 2012
54
I could be wrong on this but the single cable with the oval rubber seal looks a lot to me like the shifter cable where it passes through the floorboard.
 
  • Like
Reactions: Elizabetty

Forum Statistics

Threads
23,352
Posts
638,263
Members
18,560
Latest member
Gdub2306