P0014

Mike7468

Original poster
Member
Dec 9, 2016
10
Akron
Okay since mid october I have been battling a P0014, at the time it had a P0017, and a P0128, those two have gone away. I have replaced the VVT 2x with a dorman and still got the code, so I broke down and got an ACDelco from the dealership, two weeks ago and replaced it. I have changed the oil twice since October. I have also replaced the thermostat which was stuck open, camshaft sensor last week, replaced the crankshaft position sensor and took it to a shop to do the CASE relearn ( which he didn't charge me for)?
The mileage on the truck is about 127,000.
I put off an oil change which really gummed up the original VVT. Right now there is STP 5w30 and stp filter.
Added Seafoam to crankcase and waiting for about a hundred miles or so to rechnage the oil. Then after that I guess its a dealer or shop unless I can get it figured out. Thanks, in advance.
 

HARDTRAILZ

Moderator
Nov 18, 2011
49,665
You have cleared the code and it is coming back?
 

Mike7468

Original poster
Member
Dec 9, 2016
10
Akron
I've had the battery disconnected each time I've replaced it. Have also had them clear it at AZ. While the engine is warm it will not come back on. After it sits overnight, or about three restarts cold it will come back on.
Truck runs good by the way, doesn't seem to be misfiring.
 

djthumper

Administrator
Nov 20, 2011
14,950
North Las Vegas
If I get that code before an oil change I add engine flush to the oil to help clean things up.
 

Mike7468

Original poster
Member
Dec 9, 2016
10
Akron
I added some seafoam to the crankcase should that work? Or is there something else I should also use?
 

djthumper

Administrator
Nov 20, 2011
14,950
North Las Vegas
It should but the engine flush is normally in there just before the change. How long until your next oil change?
 

Mike7468

Original poster
Member
Dec 9, 2016
10
Akron
Ways off from the next scheduled but I will be doing it within the next 200 miles, just for the fact that I put the sea foam in.
 

Sparky

Member
Dec 4, 2011
12,927
I wonder if it is the phaser itself.
 

Mike7468

Original poster
Member
Dec 9, 2016
10
Akron
That's not the answer I want to hear. Hoping its not! I've tackled the wheel hubs, alt, thermostat, tie rods, ball joints, don't know if I have the patience, or skill to deal with that.
 

Sparky

Member
Dec 4, 2011
12,927
I know. I'm just thinking of the various possible causes
 

Mike7468

Original poster
Member
Dec 9, 2016
10
Akron
It's only been about 40 miles since I put the seafoam in, tomorrow I have to drive 40 plus miles one way on the highway so hopefully it starts breaking anything in there loose for the next oil change. Then I may try castrol 5w and an AcDelco filter.
 

Mooseman

Moderator
Dec 4, 2011
25,347
Ottawa, ON
If that shop you went to was using a Tech 2, they can test the cam phaser for proper operation.

When I had a failed phaser twice, I got a P1345 that just wouldn't go away until I replaced it.
 

07TrailyLS

Member
May 7, 2014
423
Toledo ohio
@djthumper does that engine cleaner actually work?
 

djthumper

Administrator
Nov 20, 2011
14,950
North Las Vegas
It will get the crap out of there and help clean the carbon build up.
 
  • Like
Reactions: mrrsm

Mike7468

Original poster
Member
Dec 9, 2016
10
Akron
If it was the phaser wouldn't it be running like crap? It wont be going to the shop till the week after xmas, is why I'm asking.
 

Mooseman

Moderator
Dec 4, 2011
25,347
Ottawa, ON
It didn't for me. Ran fine. It may depend how or when it fails and how advanced/retarded the cam is. I wouldn't have bothered with it except that I had to replace it to pass emissions.
 
  • Like
Reactions: Redbeard

Mike7468

Original poster
Member
Dec 9, 2016
10
Akron
Same here with the testing. Any idea on what the labor cost at a shop may be? I have to have something done to it by the 31st?
 

Mooseman

Moderator
Dec 4, 2011
25,347
Ottawa, ON
It's actually not too bad of a job to replace the phaser if you have the timing chain holding tools. I'd say about 4 to 6 hours.
 

Mike7468

Original poster
Member
Dec 9, 2016
10
Akron
What scares me to try to do it myself is the whole tdc, afraid I will screw that up and ending up screwing something else up and screwing the whole motor cause of it. Maybe I will grab a chiltons and do a little reading.
 

mrrsm

Lifetime VIP Donor
Supporting Donor
Member
Oct 22, 2015
7,737
Tampa Bay Area
@Mike7468 These two videos will be helpful for the limited actions you will need to do to change the VVT Cam Phaser. But you might want to review @Mooseman ’s Epic Post on doing this job as a MUST READ FIRST to get your initial bearings and mind around the preparation needed to do the job:

http://gmtnation.com/forums/threads...am-phaser-aka-vvt-actuator.14924/#post-485198

This First GM Service Tech Video gives a Bird's Eye View of what this VVT Apparatus does and looks like when it is "undressed":


This Second GM Service Tech Video relates to the setting up of the VVT Cam Phaser in Relation to the Marks on the Timing Chain and the requisite positions of the Two Upper Sprockets to the Lower Crankshaft Sprocket over the Chain Guides and the Timing Chain Tensioner. Only Pray to God that you Do Not have to do any of this though as it requires removing not only the Timing Chain Cover...but the Crankcase Oil Pan as Well. By being careful with keeping Tension on the Timing Chain at All Times during this repair...you will be able to avoid the problem. The TTY Procedures MUST be followed when installing the Camshaft Phaser Retention Bolt:


There are some good views in these videos that you can Download and then Stop, SLO-MO and Screen Print about how much of this work can be done… and since you are not having to Remove and Replace the Engine Head or the Timing Chain Tensioner… your job will be so much easier as long as you are vigilant about NOT DROPPING THE TIMING CHAIN OFF OF THE CRANKSHAFT COG. Watch both videos completely so you can see how serious problems can be avoided ...such as NOT RE-USING ANY TTY FASTENERS.

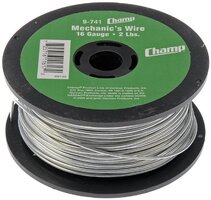
The Most Critical Issue of ALL: NOT ALLOWING THE RATCHETING TIMING CHAIN TENSIONER TO FULLY EXTEND AND LOCK IN PLACE ONCE THE CHAIN TENSION IS RELIEVED. Please remember that BOTH side of the Ascending and Descending Chain Segments MUST be under the control of either the Timing Chain Tensioner Tools on BOTH sides... or by means of using Safety Wire (Mechanics' Wire) to hold the same kind of equal and even restraint on BOTH sides of the chain. If you are thoughtful and cautious when planning your moves and introducing these tools and methods... you will succeed.

Part One.:

Part Two:

You can find all of the necessary Engine Parts, TTY Fastener Part Numbers and Tool Images here on my Photobucket…

http://s557.photobucket.com/user/60...NEREPAIR/TRAILBLAZERENGINEPARTS?sort=2&page=1

...and on Pages 1-17...but look towards the last pages from 12-17 for the most of the images and information:

http://s557.photobucket.com/user/60...NEREPAIR/TRAILBLAZEREPAIRTOOLS?sort=3&page=16

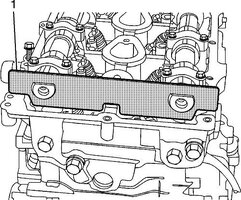
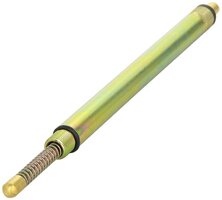
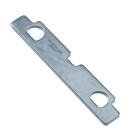
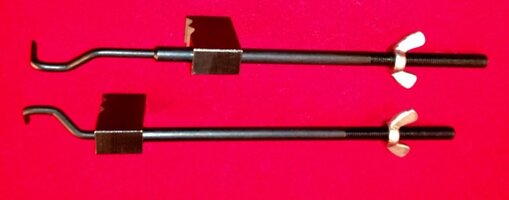
The Five Tools for this R&R Job that can make your life a bit easier look like this:

Innovation’s 14” TDC Tool:

https://www.amazon.com/Innovative-Products-America-7886-Indicator/dp/B000FMSU9Q/ref=sr_1_1?ie=UTF8&qid=1481797915&sr=8-1&keywords=TDC+TOOL+14"

GM Dual Camshaft Holding Tool:
https://www.amazon.com/dp/B00A3C4V3W/?tag=gmtnation-20

A PAIR of High Quality Large Crescent Wrenches:
There are Two Hexagonal sections on the Camshafts where these tools must be positioned and held in place using Safety or Mechanic’s Wire and then fixed in place with Safety Wire around the Wheel Fenders and maintain control of them while either removing or installing the Camshaft Phaser.

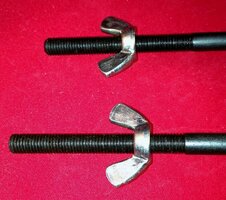
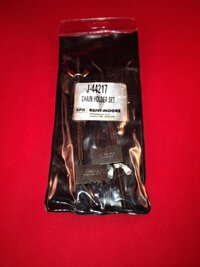
Timing Chain Holding Tools:
http://www.ebay.com/itm/KENT-MOORE-...:g:JmsAAOSwImRYMN8d&item=112232319601&vxp=mtr

An Alternative Method is to Use Mechanic’s Wire to Secure the Timing Chain: https://www.amazon.com/s?ie=UTF8&page=1&rh=i:aps,k:mechanics wire

If you are very careful to set things up before you remove the Exhaust Sprocket… You can use strong Mechanic’s Wire to weave into the Timing Chain and keep enough Tension NOT to have any slack in the chain cause it to fall off of the Lower Sprocket on the Crankshaft. If that occurs... This Job Becomes a Great Deal More Difficult. THIS Video is a Perfect Testimonial as to just How Bad This Job Can Get!


Attachments

  • properpositionfortool.jpg
    properpositionfortool.jpg
    72.3 KB · Views: 5
  • MECHANICSWIRE.jpeg
    MECHANICSWIRE.jpeg
    53.9 KB · Views: 3
  • largecrescentwrench.jpg
    largecrescentwrench.jpg
    13 KB · Views: 3
  • innovationtool_.jpg
    innovationtool_.jpg
    46.8 KB · Views: 3
  • GMCAMSHAFTHOLDINGTOOL.jpg
    GMCAMSHAFTHOLDINGTOOL.jpg
    2.6 KB · Views: 3
  • 44217oneandtwob.jpg
    44217oneandtwob.jpg
    34.7 KB · Views: 3
  • 44217oneandtwoa.jpg
    44217oneandtwoa.jpg
    201.6 KB · Views: 3
  • 44217KIT.jpg
    44217KIT.jpg
    95.2 KB · Views: 3
Last edited:
  • Like
Reactions: Bow_Tied

djthumper

Administrator
Nov 20, 2011
14,950
North Las Vegas
Keep this on topic, anything can lead up to bigger issues if not fixed early enough.
 
  • Like
Reactions: HARDTRAILZ

gmcman

Member
Dec 12, 2011
4,656
OP, what was your oil change interval and what oil did you use? Did you change your own oil or have a shop perform the service?
 

Mike7468

Original poster
Member
Dec 9, 2016
10
Akron
I him hawed on the oil change which most likely caused the original vvt to go bad. 5w30 Mostly done myself
 

mrrsm

Lifetime VIP Donor
Supporting Donor
Member
Oct 22, 2015
7,737
Tampa Bay Area
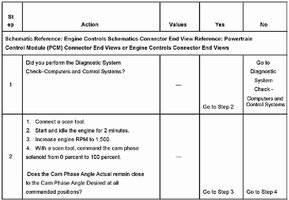
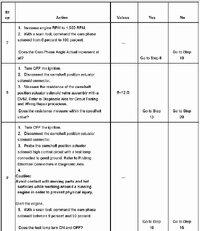
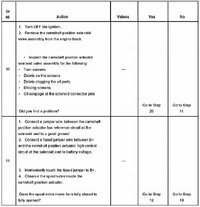
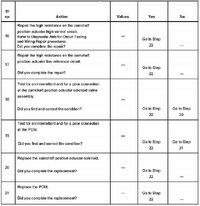
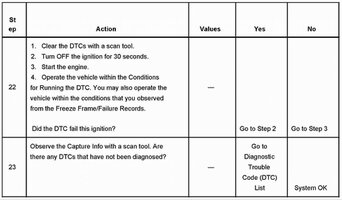
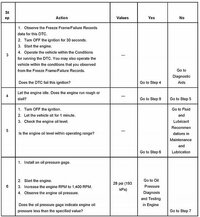
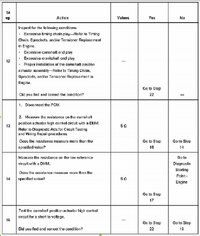
Following on with @djthumper 's suggestion to keep this OT... This link involves a very cool and detailed breakdown of the GM Dealership Tech-2 Diagnosis Procedures that we seldom if ever get to see and which are still quite useful in explaining just how involved chasing down that Damned P0014 problem can really get. (If you select and copy all of the inner Shop Manual Text and Column Boxes that fail to appear on screen at this link...and paste it in a Word Processor like LibreOffice... they will fully expand on screen) :

http://www.justanswer.com/chevy/5xk1x-chevrolet-trailblazer-lt-poo14-camtimeing-advance.html

EDIT:

I figured out that the reason the 23 Tech II Cam Phaser Diagnostic Steps would no resolve on screen was because of embedded HTML and TAB artifacts that were preventing them from being seen. I've stripped these 7 Plates down to their "image essence" and captured them here as SEVEN JPEGs and posted them on my Photobucket (also attempted as attachments here) that will serve the purpose. These 1-23 Steps are ordinarily meant to be used by either GM Techs or by anyone lucky enough to own a Tech II or similar Scanner. Nonetheless... in 4 out of the 23 Steps... a common Multi-Meter can be used to measure the Resistance variance in some of the related components working in the Cam Phaser Circuit. If nothing else... its lays bare all of the things that can go sideways with the Damned Thing:

http://s557.photobucket.com/user/60...GINEREPAIR/CAMPHASERDIAGNOSTICS?sort=4&page=1
 

Attachments

  • CAMPPHASERDIAGNOSTICS1.jpg
    CAMPPHASERDIAGNOSTICS1.jpg
    52.5 KB · Views: 3
  • CAMPPHASERDIAGNOSTICS3.jpg
    CAMPPHASERDIAGNOSTICS3.jpg
    75.2 KB · Views: 3
  • CAMPPHASERDIAGNOSTICS4.jpg
    CAMPPHASERDIAGNOSTICS4.jpg
    63.3 KB · Views: 4
  • CAMPPHASERDIAGNOSTICS6.jpg
    CAMPPHASERDIAGNOSTICS6.jpg
    70 KB · Views: 4
  • CAMPPHASERDIAGNOSTICS7.jpg
    CAMPPHASERDIAGNOSTICS7.jpg
    82.8 KB · Views: 4
  • CAMPPHASERDIAGNOSTICS2.jpg
    CAMPPHASERDIAGNOSTICS2.jpg
    44.6 KB · Views: 4
  • CAMPPHASERDIAGNOSTICS5.jpg
    CAMPPHASERDIAGNOSTICS5.jpg
    72.1 KB · Views: 3
Last edited:

Forum Statistics

Threads
23,332
Posts
638,005
Members
18,537
Latest member
moscoreli

Members Online

No members online now.