Need pics of trailing arm mounts

KEEBZ489

Original poster
Member
Jan 16, 2018
250
Howard Beach NY
So some may have seen my post a while back , I found prewelded mount brackets to replace the factory ones that are rotting away. Weather is better so I need to get it done.

Can someone post pics if GOOD / UN ROTTED mounts ? My concern is how much of my frame is gone possibly and if I need to repair it also.
 

Attachments

  • 73603356723__6205207A-A51F-4A5D-BF85-54DA10693311.jpeg
    73603356723__6205207A-A51F-4A5D-BF85-54DA10693311.jpeg
    498.7 KB · Views: 9
  • 73603357535__BE212C2A-58E0-4E34-826E-74A11284DBF2.jpeg
    73603357535__BE212C2A-58E0-4E34-826E-74A11284DBF2.jpeg
    407 KB · Views: 8
  • 73603358814__1AC091BA-D606-4537-B62E-500C09EC05FA.jpeg
    73603358814__1AC091BA-D606-4537-B62E-500C09EC05FA.jpeg
    551.7 KB · Views: 9
  • IMG_9616.jpeg
    IMG_9616.jpeg
    569.9 KB · Views: 9
  • Like
Reactions: coolride

budwich

Member
Jun 16, 2013
2,067
kanata
I think your gonna need a "bigger weld" (from Jaws). You are likely gonna need a large flat plate to find a good solid area to weld too. I think if you look at your original post, the "maker" of your replacement units posted some extra pictures of things. Here is one of mine... not sure you will find anyone who has "good ones" on their vehicle at this point but maybe.
 

Attachments

  • inside receiver rust.jpg
    inside receiver rust.jpg
    825.7 KB · Views: 8

mrrsm

Lifetime VIP Donor
Supporting Donor
Member
Oct 22, 2015
7,840
Tampa Bay Area
Visit eBay and scour some of the "Many Metal Vendors" and use the Search String Basic Expression of, "Mild Steel Practice Coupons" and then ...Find a nice stack of Pre-Cut Steel Plates in the Basic Thickness and Overall Dimensions of either Lengthy Rectangles, Large & Small Triangles for Buttresses or Large & Small Squares that will serve you well and truly for both Practice ...and for Practical Welding Repairs...
:ok:
 
Last edited:
  • Like
Reactions: Mooseman

mrrsm

Lifetime VIP Donor
Supporting Donor
Member
Oct 22, 2015
7,840
Tampa Bay Area
Look... Most Paint and Body Shops will NEVER Perform the necessary High Liability work on what looks like 
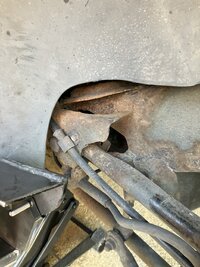
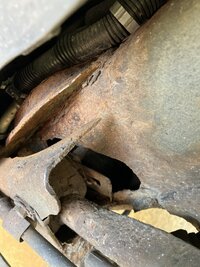
"A Crumb-Cake & Peanut Brittle - Accident Waiting To Happen" and Weld around 22 Years of Body Cancer caused by the collection of 22 Winters Worth of Brown, Salty Road Snow Slush doing such a Great Job at Dissolving Away at Everything structural under there.

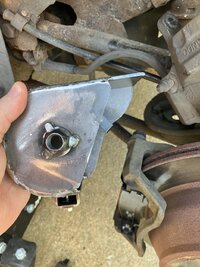
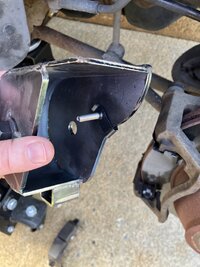
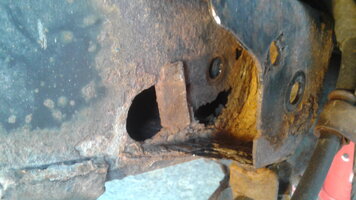
However... if it were *Mine To Keep* from the Salvage Yard Crusher... I would suggest that YOU place contact rulers along the Red Lines I super-imposed on your last Images... and Photo-Memorialize as many "On The Vehicle" Images with them of that "Metal Box" area as possible:

inside receiver rust.jpg

Then you'd very carefully have to use a Plasma Cutter and remove that Entire Rusty Box Section from under the SUV... Onto Your Bench ...and then From One End of it to the Other... You would need to Make a Stiff Paper or Thin Cardboard Model Copy Cut-Out of ALL of its Precise Dimensions and Landmark Relationships in all Three X, Y, Z Vectors.

But ...before doing anything else...

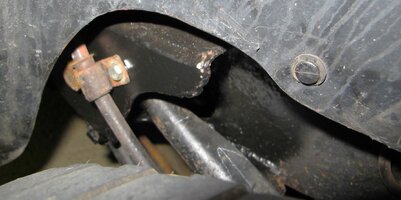
YOU SHOULD TAKE THE PAPER MODEL OF YOUR METAL TRAILING ARM BOX... BACK OUT TO THE SUV AND SEE WHETHER OR NOT IT ACTUALLY FITS IN PLACE INTO THE FRAME AND PROPERLY ALIGNS WITH ALL OF YOUR PREVIOUS FRAME MARKINGS...AND THEN SEE IF IT REALLY DOES FIT IN THERE...

Then it would be time to find the most appropriate Thickness and Dimensions of Each Piece of Mild Plate Steel necessary for your Pending Metal Cutting, Metal Shaping and Bench Welding Tasks.

You could either use that Plasma Cutter or a Gravity Band Saw to Shape them down to their exact sizes and Tack-Weld Each Segment into those identical Positions as compared with your Cardboard Model Segments... Making Dead Certain to ONLY CUT OUT THE HOLES with a minimum of Two Relational Segments, Tack Welded together that Match the Identical Two Paper or Cardboard Cut-Outs that Fit PERFECTLY Together once they are properly oriented with each other ...BEFORE You Tack-Weld the Metal Plates together. Using several Right Angle Boxing Magnets can Help You Here.

In other words... While Working Very Carefully... While Working Very Gradually...You Would:

"Build That Metal Box To Scale... ON THE BENCH."

And once you are certain of the Fitments... Only THEN would You Drill Out the Holes that support the Trailing Arm Thru- Bolts... Then... after Anodizing that "Thing" in an Electrolytic Coating... Take it BACK under the SUV...and Pre-Tack Weld it back under that Frame...Triple Checking each Prior Reference Point. Again the Boxing Magnets are your BFF for this part.

Then... *IF* EVERYTHING is Kosher... Stagger the Tack Welds about One Inch Apart, moving around the entire Box at opposite sides to avoid inducing any Warping or Shrinkage. Then... Let It all Cool Down...and Measure it "One Last Time...For Ol' Times Sake" BEFORE running the Final Staggered One Inch Long Welding Passes around the Perimeter of That Whole Damned *THING*..

AND..."Bob's Your Uncle!" :>)

...or you could just call around to your Local Welder's Supply and see if anyone they KNOW is looking for a Bench Top Welding Job like YOURS Requires... and be Ready to Pony Up That CASH! That Moolah! That *Elusive Spondulex*...You get the Idea... :>)
 
Last edited:
  • Like
Reactions: coolride

budwich

Member
Jun 16, 2013
2,067
kanata
not to side track this but my question: why does one need to do any cutting? Get some flat plate stock and create a piece that is long enough to "tack" to the areas just past red marks to areas in the posted picture which appear to be "reasonable" metal. Tack weld the piece in place... of course, already tack the mount to the flat plate just like one is planning. Then bolt your new arms on like "normal". That should be it.

Ensure that the replacement mount is correctly placed to the "existing "hole"... ie. pre-mark the positioning marks so this will happen.

Yes, the thickness of the plate may be an issue BUT based on my experience with rubber bushings, there is some "play" that should allow things to function. My thinking is that one is not some much worried about the "in / out" as opposed the "front / back" distance. Of course, it has to mount, but I am betting it will using maybe 3/16 plate. Heck, I don't even know what thinkness the beam is... 5/32?
 
  • Like
Reactions: coolride

coolride

Member
Aug 23, 2019
621
Adirondacks
I just drove my Trailblazer home from the welder yesterday. I handed over a fat stack of Benjamins. And very grateful for it.

But I had everything fixed. All along both frame rails. And both trailing arm mounts were re-built. It was a big project.
 
  • Like
Reactions: mrrsm

coolride

Member
Aug 23, 2019
621
Adirondacks
It doesn't look like a plate was added to the outside face of my frame. It was not completely gone in this area, but the mounts were very poor. I remember the welder saying that it's important to do one side at a time (don't disconnect both arms at the same time.)
 

Attachments

  • trailmount1.JPG
    trailmount1.JPG
    327.3 KB · Views: 8
  • Like
Reactions: budwich and mrrsm

budwich

Member
Jun 16, 2013
2,067
kanata
My "2 cents" experience based on the replacement of the arms themselves, is that both arms off is not likely to be a problem. In my case both were broken so it did cause a driveability issue but I don't think it changed the install process.

With respect to the install process of new mounts, depending on who is welding, I suggest you can readily do a "two stage process". The first stage is to get the flat plate (size and shape design / made). Then get the mount welded to the plate... this can be done on the bench. The "paper trace" as suggested in by mrssm's post is a good technique. Once that is done, dry position the plate / mount to check and mark alignment position. Next mark / drill a couple of well planned holes in the plate where you will find good metal in the underlying rail / frame. Then drill "pilot holes" in the frame aligned with those holes to receive some self tapping bolts. This will then allow you to attach the plate and mount to the frame... non-welded at this point. I think you then should be able to mount your new arm. At this point, you could do some tack welding therein to complete the attaching process. Depending on access space and "good metal", you might even get away with adding additional bolt locations. The question then would become is welding even needed in the "interim".
 

mrrsm

Lifetime VIP Donor
Supporting Donor
Member
Oct 22, 2015
7,840
Tampa Bay Area
In the Realm of "There's ALWAYS More Than One Way. To SKIN A Cat..." I very much prefer @budwich 's approach to solving this problem to my own. Especially the part about Drilling out the Flat Stock Steel on the Frame Side and the Box Side while using proper 10.9 Bolts to marry the two together. A Very Sound Idea... Indeed... An "Occam's Razor" Solution ...at its VERY BEST!
 
Last edited:

KEEBZ489

Original poster
Member
Jan 16, 2018
250
Howard Beach NY
It doesn't look like a plate was added to the outside face of my frame. It was not completely gone in this area, but the mounts were very poor. I remember the welder saying that it's important to do one side at a time (don't disconnect both arms at the same time.)
How much did they get you for if you don’t mind ?
 

KEEBZ489

Original poster
Member
Jan 16, 2018
250
Howard Beach NY
not to side track this but my question: why does one need to do any cutting? Get some flat plate stock and create a piece that is long enough to "tack" to the areas just past red marks to areas in the posted picture which appear to be "reasonable" metal. Tack weld the piece in place... of course, already tack the mount to the flat plate just like one is planning. Then bolt your new arms on like "normal". That should be it.

Ensure that the replacement mount is correctly placed to the "existing "hole"... ie. pre-mark the positioning marks so this will happen.

Yes, the thickness of the plate may be an issue BUT based on my experience with rubber bushings, there is some "play" that should allow things to function. My thinking is that one is not some much worried about the "in / out" as opposed the "front / back" distance. Of course, it has to mount, but I am betting it will using maybe 3/16 plate. Heck, I don't even know what thinkness the beam is... 5/32?
This is what my plan of thought was. Just a good , well done boo boo patch that will last a few years , not really expecting to cut and patch the frame itself like an old muscle car project that’s worth money and effort. My biggest concern is proper positioning of the new mount bracket. I honestly do not trust one mechanic or tradesman unfortunately. I’ve been around to many that just cut corners and will not care and treat things as their own when working on them.
 
  • Like
Reactions: mrrsm

KEEBZ489

Original poster
Member
Jan 16, 2018
250
Howard Beach NY
If a broken trailing on does not cause drivability issues should / could I remove the arm now I’m still drive to work with it so that it doesn’t break the mount completely off?
 

coolride

Member
Aug 23, 2019
621
Adirondacks
The welder is an old friend of mine. So I won't mention the exact number. But it was a decent amount.

Keep in mind that my ENTIRE frame was messed up (not just the rear trailing arm brackets.)

I looked at my vehicle and estimated what it might sell for, if it had a solid frame.

From that number I subtracted, it's scrap value.

That's about what I paid. Essentially, my project car had depreciated to zero and I decided to buy it again.
 
Last edited:
  • Like
Reactions: mrrsm

mrrsm

Lifetime VIP Donor
Supporting Donor
Member
Oct 22, 2015
7,840
Tampa Bay Area
An Intelligent and Thoughtful Approach. Serious Props to You @coolride for saving yet another GMT360 SUV from winding up in the "Back of a Bone Yard", Brother. :ok:
 
  • Like
Reactions: coolride

azswiss

Member
May 23, 2021
917
Tempe, AZ
If a broken trailing on does not cause drivability issues should / could I remove the arm now I’m still drive to work with it so that it doesn’t break the mount completely off?
I would not remove it unless it poses a hazard (like it is going to fall off and/or get caught on something). More likely than not even though it is damaged it is still providing some (minor) benefit. Completely removing it risks pushing things irreversibly over the edge.
 
  • Like
Reactions: mrrsm

Forum Statistics

Threads
23,387
Posts
638,683
Members
18,592
Latest member
Chadla11

Members Online

No members online now.