Advice on AC Actuators

Steevo

Original poster
Member
Oct 7, 2012
194
I have changed about all the AC Actuators in my 2003 Envoy XL.
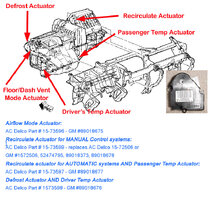
this helpful thread and illustration were very helpful.


Last summer my driver's side AC stopped blowing at all. No air. The passenger side worked normally.
I thought I would have to change an actuator.
Then it healed itself and the rest of summer I had cold AC on both sides.
So winter comes and it still blows cold all the time. No heat at all. Still, the passenger side works normally.

Is that the driver's side temp actuator?
I think that one was changed but not by me. A GM tech I found did it for me.

I want to say I always bought AC Delco actuators but they fail at the same rate as the dirt cheap Chinese replacements on ebay. The last one I needed was about $8 on there. Worked the same as the AC Delco one, still from China. It just goes to show that brand names have been deprecated by all the global manufacturing. You can't really say brand names matter at all. Not anymore.
 

Attachments

  • allactuators-orig.jpg
    allactuators-orig.jpg
    297.4 KB · Views: 4

TJBaker57

Member
Aug 16, 2015
2,900
Colorado
Last summer my driver's side AC stopped blowing at all. No air. The passenger side worked normally.

This issue seems very odd as there is no normal way for the system to do this!

As far as I can see the air is blown equally to both sides and only the temperature of each side is adjustable, without any change of air quantity.

I would think it would take a foreign object in the ducting system to block one side only. Very weird.


Is that the driver's side temp actuator?
I think that one was changed but not by me. A GM tech I found did it for me.


I would get in there myself and see if it was changed plus check the part number to be certain the correct actuator is in there.
 

Steevo

Original poster
Member
Oct 7, 2012
194
Both sides blow air now, warm or cold on passenger side, and only cold on drivers side.
I just need to fix that at this time. Is that the driver's temp actuator? No clicking this time.
 

Mooseman

Moderator
Dec 4, 2011
25,355
Ottawa, ON
Have you tried a reset? Just pull the HVAC-B fuse for a few seconds, put it back and turn the key to RUN. Let it do its thing until it stops moving the actuators.
 

Steevo

Original poster
Member
Oct 7, 2012
194
I have a broken actuator shaft in my rear air. I wonder if it's possible to change that door out without taking the box out of the car? 2003 Envoy XL. I haven't tried to fix it, because it didn't seem worth it. But if I could I would.
 

mrrsm

Lifetime VIP Donor
Supporting Donor
Member
Oct 22, 2015
7,747
Tampa Bay Area
It may help to view Two Blend Door Actuators... Side By Side... With the Damaged One... probably like the one in YOUR Vehicle ...being viewed on the LEFT ...vs. ... A New Replacement One depicted on the RIGHT.

Observe that the Damaged Main Plastic Gear Displays a SPLIT down through the location of One Tooth that propagates all the way to the center of the Axle... emphasized by the Two Red Arrows. Note that underneath the Idler Gear where the Blue Arrow points at the Axle (Axis of Drive Gear Rotation) is powerful enough to cause the Two Halves of the Gear to W-I-D-E-N as it rotates around, expanding the outer orbit of the Broken Gear.

Thus, the Broken Gear Segment will *SNAP* suddenly back to being ROUND and due to the sheer Weight of the Fresh Air Door Flap moving on the Sprocket of the Shaft-Axle slipping past and NOT being able to STAY OPEN, the Fresh Air Door will Drop and SLAM SHUT... Over and Over... as the Small DC Motor Powers the Worm Drive Gear. Unfortunately, the only remedy for this condition is to replace the Damaged Actuator:

BDACOMPARISON.jpg

Brian from "Briansmobile1" provides an EXCELLENT set of Blend Door Actuator Autopsies that better understanding the Best Blend Door Actuator Repair Practices:


Mooseman

Moderator
Dec 4, 2011
25,355
Ottawa, ON
More than likely your actuator is dying. Replace it, do an HVAC relearn and you should be good to go.
 

TJBaker57

Member
Aug 16, 2015
2,900
Colorado
Unfortunately, the only remedy for this condition is to replace the Damaged Actuator:

BDACOMPARISON.jpg


This picture also is a good comparison of differing door position sensing in actuators. See the blue gear in the actuator on the left? That is the potentiometer that reports the door position to the controller. It is the extents of the signal voltage from this potentiometer that gets learned by the controller. Now when the large cracked gear slips on the metal center hub the potentiometer moves with the gear but the center hub that moves the door does not. This results in the door position not being where the controller thinks it is. At this point a relearn fails because during the relearn the controller tries to drive the actuator to the full extents of the doors movement. But the gear just keeps slipping and the endpoints are not found due to the gear/hub slipping.

Plus... The potentiometer has to start out being correctly aligned/calibrated to the center hub/door position such that both are simultaneously at or near the midpoint of their rotation extents. The moment the cracked gear slips everything is out of whack.


Now look at the actuator on the right. No little blue gear (or small resistor) there where the other one is. This actuator has relocated the sensor somewhere else.

If memory serves I have used an aftermarket replacement actuator that had the sensor incorporated into the large gear and the whole gear/center hub was a single piece instead of a gear pressed onto a center hub. This eliminates the possibility of the the door position/sensor signal getting out of whack. Sure, gear teeth can still break but the learned position won't get corrupted with this design.
 
  • Like
Reactions: mrrsm

mrrsm

Lifetime VIP Donor
Supporting Donor
Member
Oct 22, 2015
7,747
Tampa Bay Area
And considering that the ACDelco "Innards" are usually the desired OEM Quality Parts... THIS inexpensive BDA Repair Gear Kit is worth having for those of us inclined to be "Adventurous" enough to Tear Down the Old BDA Units...and renew them using THIS Item:


BDAREPAIR2.jpgBDAREPAIR1.jpgs-l1600D.jpgs-l1600C.jpgs-l1600B.jpgs-l1600A.jpgs-l1600.jpg

...and THIS Video Shows the Step By Steps in preforming THIS Repair:


See THIS Related Thread for MORE BDA R&R Assistance with Front AND Rear BDA R&Rs:

 
Last edited:

Forum Statistics

Threads
23,336
Posts
638,054
Members
18,541
Latest member
33chevyrod

Members Online