Yes... Just think of the Downstream O2 Sensor ... as The Mother-in-Law who walks into the Living Room unannounced on Sunday Morning and finds everyone passed out on the couch in their underwear...with empty Beer Bottles and Potato Chips strewn about the floor... realizing that what ever happened on Saturday Night...happened...and there isn't a damned thing anybody can do about it... LOL
You are using an out of date browser. It may not display this or other websites correctly.
You should upgrade or use an alternative browser.
You should upgrade or use an alternative browser.
2004 TB - I6 4WD - Manifold Red Hot
- Thread starter webdawg
- Start date
Wooluf1952
Member
When I look up the part on any gm parts site they are giving me the part listed on rockauto called this:
ACDELCO 2131574 {#12578624, 2131143, 24577303} GM Original Equipment
It is listed as CENTER but it is cross referenced in the DELPHI ES20113 part listing too which specifically states Downstream.
This is the only "downstream" sensor on any of the official gm parts sites.
ACDELCO 2131574 {#12578624, 2131143, 24577303} GM Original Equipment
It is listed as CENTER but it is cross referenced in the DELPHI ES20113 part listing too which specifically states Downstream.
This is the only "downstream" sensor on any of the official gm parts sites.
gmcman
Member
- Dec 12, 2011
- 4,677
the only reason I rule it out is because I did the backpressure test, it never went above one.
How close to 1 did it go? Our exhaust systems, at least when I checked mine, was about 1/4 PSI.
The convertor looks plugged, I am still doing the job. I will take pictures when I get all this done and things calm down. Pieces of the manifold flaked off into it also. The heat destroyed that manifold and I am sure the converter. Also chunks of converter were falling out of itself. The new converter is in.
When I had to take the crossmember off to take the old converter out I decided to replace the tranmission mount. I am glad I did because both bolts that hold the mount on were stripped. It looks like someone cranked on them with an impact. At first I thought it was only one that was bad and tried to do a half ass job with a crappy bolt and nut. I ended up stripping the bolt and nut on that and had to drill the bolt head out to get it out. I went and bought better bolts and nuts. I then had to drill both mount holes and I was able to use two new bolts and two nuts.
I have the new manifold propped up with two bolts atm. Rockauto is late in shipping the upstream o2 sensor so I guess I am glad I accidentally ordered another from Amazon. Part of the new manifold was outside of the box rockauto shipped and the flange gasket was destroyed. They have the worst shipping of heavy items ever.
The o2 sensors did not come with covers over the threads (the little plastic piece) so there is anti-sieze all over inside the AC Delco box. Somehow I think the sensors are still clean.
I was securing the convertor flange to the manifold flange and the dorman bolts and nuts stripped that came with the new manifold. I was using what the manual said to use: Tighten the nuts to 50 N·m (37 lb ft). The stud stripped and the nut is destroyed. I do not know. I looked at the bolts from the old OEM flange and they look so much tougher. These look like the cheapest metal they could make bolts out of. I am so disappointed.
The only studs that the local auto places have are guess what, Dorman. The same crappy bolts that came with the kit. At this point I think I am going to reuse the bolts and nuts on the OEM manifold.
It does seem like 37 lb ft is alot for this application. The torque wrench that I have has never failed me, and it came calibrated. I may have them all calibrated after this. Can someone please chime in on this part and let me know what I should do? Have a different recommendation on torque to use? Back in the day I usually just tightened until it was good and did not leak, I may do that here.
I do not know if I am going to get it done this weekend. I may have to move to something else and finish it next. I will let you know.
It was at one.
When I had to take the crossmember off to take the old converter out I decided to replace the tranmission mount. I am glad I did because both bolts that hold the mount on were stripped. It looks like someone cranked on them with an impact. At first I thought it was only one that was bad and tried to do a half ass job with a crappy bolt and nut. I ended up stripping the bolt and nut on that and had to drill the bolt head out to get it out. I went and bought better bolts and nuts. I then had to drill both mount holes and I was able to use two new bolts and two nuts.
I have the new manifold propped up with two bolts atm. Rockauto is late in shipping the upstream o2 sensor so I guess I am glad I accidentally ordered another from Amazon. Part of the new manifold was outside of the box rockauto shipped and the flange gasket was destroyed. They have the worst shipping of heavy items ever.
The o2 sensors did not come with covers over the threads (the little plastic piece) so there is anti-sieze all over inside the AC Delco box. Somehow I think the sensors are still clean.
I was securing the convertor flange to the manifold flange and the dorman bolts and nuts stripped that came with the new manifold. I was using what the manual said to use: Tighten the nuts to 50 N·m (37 lb ft). The stud stripped and the nut is destroyed. I do not know. I looked at the bolts from the old OEM flange and they look so much tougher. These look like the cheapest metal they could make bolts out of. I am so disappointed.
The only studs that the local auto places have are guess what, Dorman. The same crappy bolts that came with the kit. At this point I think I am going to reuse the bolts and nuts on the OEM manifold.
It does seem like 37 lb ft is alot for this application. The torque wrench that I have has never failed me, and it came calibrated. I may have them all calibrated after this. Can someone please chime in on this part and let me know what I should do? Have a different recommendation on torque to use? Back in the day I usually just tightened until it was good and did not leak, I may do that here.
I do not know if I am going to get it done this weekend. I may have to move to something else and finish it next. I will let you know.
How close to 1 did it go? Our exhaust systems, at least when I checked mine, was about 1/4 PSI.
It was at one.
Last edited by a moderator:
Ordinarily, the OEM Studs and Nuts are of a Mild Steel Flavor... But the Dorman "HELP!" Exhaust Manifold Stud Kit has a fairly robust Stud/Nut Set... AND the Nuts are made of High Grade Hardened Steel (they are probably at LEAST an 8.8 rating on the scale) so if you are going to replace that set... these would be the ones to use that are specifically made for the GM 4.2L Engine for the Traiblazer & Saab series:
03133

SHARE:
Exhaust Stud Kit - M10-1.5 x 62mm
Application Summary: GENERAL MOTORS 2014-90, ISUZU 2008-03, NISSAN 2009-03, SAAB 2009-05
Application Notes:
Front; L6 256 4.2L; M10 x 1.5 Thread x 62 mm
As far as the Application of Proper Torque is concerned... Considering the fact that there should be a Graphite Donut getting squeezed for the seal... it might be better to just "Tighten" rather than Torque down the three High Grade Nuts to a decent "feel" and since it is NOT as critical to get perfect as would be on an Engine Head Gasket... You can always snug it back tighter if you hear, smell or see carbon tracing around the Bell Mouth of the piping at the Graphite Seal. This is a related "Link to a Link" here on GMT Nation that might give generic guidance of how much "twist" to reasonably apply to that set:
http://gmtnation.com/forums/threads/like-a-bolt-out-of-the-blue.14714/
If you insist upon using a Torque Wrench, perhaps this is a better range to work with:
30 Newton Meters to Foot-pounds Force = 22.1269
40 Newton Meters to Foot-pounds Force = 29.5025
It would be a better idea to buy and install these versus installing the Manifold...using Old Hardware... and having the Studs and Nuts stripping out. I would counsel you seriously against ever re-using fasteners that have been subjected to the overheating, stretching and dynamic wear those Old Studs and Nuts have had to endure under your present dilemma. This is definitely one of those times where the Old Adage "An Ounce of Prevention ... is Worth a Pound of Cure" is the Order of the Day...
One last thought...IIRC , the Nuts that hold the Front End of the Catalytic Converter on are also M10 X 1.5 as well... so if you obtained TWO of these Dorman Stud/Nut Kits... you would have enough HW to go around if the others look bad as well and your replacement CAT did NOT come with enough ...or any fasteners for this installation.


03133

SHARE:
Exhaust Stud Kit - M10-1.5 x 62mm
Application Summary: GENERAL MOTORS 2014-90, ISUZU 2008-03, NISSAN 2009-03, SAAB 2009-05
Application Notes:
Front; L6 256 4.2L; M10 x 1.5 Thread x 62 mm
As far as the Application of Proper Torque is concerned... Considering the fact that there should be a Graphite Donut getting squeezed for the seal... it might be better to just "Tighten" rather than Torque down the three High Grade Nuts to a decent "feel" and since it is NOT as critical to get perfect as would be on an Engine Head Gasket... You can always snug it back tighter if you hear, smell or see carbon tracing around the Bell Mouth of the piping at the Graphite Seal. This is a related "Link to a Link" here on GMT Nation that might give generic guidance of how much "twist" to reasonably apply to that set:
http://gmtnation.com/forums/threads/like-a-bolt-out-of-the-blue.14714/
If you insist upon using a Torque Wrench, perhaps this is a better range to work with:
30 Newton Meters to Foot-pounds Force = 22.1269
40 Newton Meters to Foot-pounds Force = 29.5025
It would be a better idea to buy and install these versus installing the Manifold...using Old Hardware... and having the Studs and Nuts stripping out. I would counsel you seriously against ever re-using fasteners that have been subjected to the overheating, stretching and dynamic wear those Old Studs and Nuts have had to endure under your present dilemma. This is definitely one of those times where the Old Adage "An Ounce of Prevention ... is Worth a Pound of Cure" is the Order of the Day...
One last thought...IIRC , the Nuts that hold the Front End of the Catalytic Converter on are also M10 X 1.5 as well... so if you obtained TWO of these Dorman Stud/Nut Kits... you would have enough HW to go around if the others look bad as well and your replacement CAT did NOT come with enough ...or any fasteners for this installation.


Last edited:
I ended up using the kit you mention. I wish that DORMAN kit would have came with the DORMAN manifold. The bolts and nuts were so much better.
Overall the vehicle runs a lot better. That cat had to be plugged. I drove it for about 30-40 mins at night and the glow is still there. I am going to take the heat-shield off next, torque the bolts one last time, and drive again and see where it is glowing (possibly heat from a single cylinder?) I am going to try and get pictures this time.
I plan to take off the intake manifold, examine it, and replace the intake manifold gasket. While I am doing this I am going to replace the injectors with some AUTOLINE 16971 remans. I guess I am hoping they are plugged or I find a leak in the intake because I just put all these new parts on this vehicle and I am still having this issue. I do not want to destroy the new parts that I just put on.
One more thing that may or may not be related: When I first got this vehicle a few years ago I blindly switched out sensors for new ones and I ended up replacing the Crankshaft Position Sensor (CKPS). I had issues after this (misfires) and ended up replacing all the coils. Anyways this was almost 2 years ago and nothing since. I did not know at the time anything about a CASE relearn then and I was going to pay to have it done.
I will still get pictures of the old CAT to you guys.
The service manual recommends replacing the fuel line retainer clips. Rock auto has a set cheap but there are two different sizes. Is this all I need?:
http://www.rockauto.com/catalog/moreinfo.php?pk=598317&cc=1424281&jnid=509&jpid=0
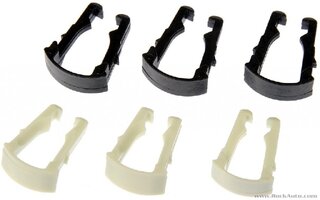
By two different sizes I mean the black and white ones are different sizes. The picture above is what comes in the kit. Do I need two of these kits?
---EDIT 2016.20.06---
I ended up purchasing these but I do not think they are for the I6...they may have been for the 8 or just something different because I did not use them anywhere. I have no idea what they are for.
http://www.rockauto.com/catalog/moreinfo.php?pk=598317&cc=1424281&jnid=509&jpid=0

By two different sizes I mean the black and white ones are different sizes. The picture above is what comes in the kit. Do I need two of these kits?
---EDIT 2016.20.06---
I ended up purchasing these but I do not think they are for the I6...they may have been for the 8 or just something different because I did not use them anywhere. I have no idea what they are for.
Last edited:
I figured out the fuel line retainer clip thing. They are not the ones that I posted. Instead they are the metal ones that are on the fuel injectors. New fuel injectors look like they come with them. These remans do not.
The manufacture that remans the injectors I purchased told me to reuse the clips. Just in case I ordered (http://www.amazon.com/gp/product/B000EQOZVA/?tag=gmtnation-20) ACDelco 12570620 GM Original Equipment Fuel Injector Retainer Kit which comes with 8 clips (I think it is for the v8 engine but they look the same as what is on the diagram on the I6) and I kept the fuel line clips on order in case I break one with this repair job.
Thanks to everyone that has helped so far, I really hope I can get this issue solved.
---EDIT 2016.02.06---
I did end up using the metal clips that I purchased. They are exactly the same as what was on the engine. I could have reused the old ones, I did not break them getting them off. I may have bent one a little getting it off but they would have been easy to reuse.
Last edited:
C-ya
Member
- Aug 24, 2012
- 1,098
And you don't need to replace the downstream o2 sensor. It does absolutely nothing on engine performance. All it does is report to the PCM that the cat is working correctly. It rarely fails.
I did not know that, is this true for all downstream o2 sensors.
While it may not actually affect engine performance, it will set a code. I had the rear sensor fail on another GM truck product. I don't remember any performance degradation, but I didn't like the light on all the time.
Mooseman
Moderator
Or if you need to pass an E-Test. Unless it's giving you issues, don't bother with it. I had to replace one on my Saab before an E-Test because it failed and throwing a code.
gmcman
Member
- Dec 12, 2011
- 4,677
It was at one.
Just for sake of discussion, when I installed the Walker Quiet flow exhaust, my backpressure went from about 1/4 PSI to 1/2 PSI and I lost 3 MPG. I can only imagine if it was 1 PSI. Also, the resonators have been known to get clogged with the sound deadening material and looks like long black hair-like fibers protruding from the tail pipe.
Here's a backpressure test I did with the OE exhaust and the Walker.
Needless to say I went back to stock.
I think I am going to take my bore scope put it in from the rear of the car into the exhaust and check that resonator. Will it be something easy to see? I know you said I would be able to see fibers coming out the end.
Thanks for that back pressure test video and your comments. It seems like my 1PSI was horrid and I still have to get pics of the inside of the CAT. They are coming!
Okay!
It looks like things are now good. After putting the new exhaust manifold on, taking it for a drive, and seeing some red again I replaced the intake manifold gasket and the fuel injectors. What a job! Not as bad as the exhaust manifold and CAT but so many electronics and everything is in the way.
The intake manifold gasket was completely flat (Level with the intake manifold itself). It was sucking dirt in and oil was everywhere:

I do not know if someone over torqued it, tightened it down at some point, or it was just old, but it was not doing anything at all. The center of the gasket was the worst.
Like I said while I was in there, I put in some AUTOLINE refurbished fuel injectors from rock auto. I should have primed it more because when I started the vehicle I thought I forgot to plug something in, it was missing pretty bad but smoothed out almost immediately. The line must not have filled on the first two key turns that you do just turn the pump on and check for leaks.
Man, the vehicle runs so smooth now. This has had to have been a problem since I purchased the vehicle. Everything I do to this car, it gets more and more smooth. (The biggest change was the motor mounts.)
The first thing I did was take it for a 30-40 min test drive to check the exhaust manifold heating issue. Something was STILL THERE :/
So, after thinking about it for a bit (If I remember correctly) the glow was very different after doing the exhaust manifold: it was less, and the glow looked different. Then after doing the intake manifold it was less also...it got me thinking about the heat shield.
I used the old heat shield when installing the new DORMAN manifold because the DORMAN heat shield packaged with the unit did not fit the new manifold well. The o2 sensor hole was skewed and the old heat shield fit so much better.
I needed to torque the exhaust manifold bolts one last time anyways so I took the old heat shield off the new manifold, torqued it, and drove it for about 30 mins with the heat shield off. No glow.
Coming back I inspected the old heat shield and now realized that it was largely bubbled very far out and there were scorch marks on it from when it was touching the manifold! (the fully overheated manifold must have destroyed it) I took the new manifold heat shield, dremeled out the o2 sensor hole, put some nuts as spacers on the new exhaust manifold and attached the new manifold heat shield on to it.
It does not glow at all anymore! This issue has been solved. We have went from a 100% cherry red exhaust manifold to a normally functioning one.
Thanks for all the help everyone. I may do another back pressure test when/if I purchase a back pressure tester and I think I will be using the bore scope to further examine the exhaust. I will have pictures of the manifold and the CAT up soon, just need the time to take them.
It looks like things are now good. After putting the new exhaust manifold on, taking it for a drive, and seeing some red again I replaced the intake manifold gasket and the fuel injectors. What a job! Not as bad as the exhaust manifold and CAT but so many electronics and everything is in the way.
The intake manifold gasket was completely flat (Level with the intake manifold itself). It was sucking dirt in and oil was everywhere:

I do not know if someone over torqued it, tightened it down at some point, or it was just old, but it was not doing anything at all. The center of the gasket was the worst.
Like I said while I was in there, I put in some AUTOLINE refurbished fuel injectors from rock auto. I should have primed it more because when I started the vehicle I thought I forgot to plug something in, it was missing pretty bad but smoothed out almost immediately. The line must not have filled on the first two key turns that you do just turn the pump on and check for leaks.
Man, the vehicle runs so smooth now. This has had to have been a problem since I purchased the vehicle. Everything I do to this car, it gets more and more smooth. (The biggest change was the motor mounts.)
The first thing I did was take it for a 30-40 min test drive to check the exhaust manifold heating issue. Something was STILL THERE :/
So, after thinking about it for a bit (If I remember correctly) the glow was very different after doing the exhaust manifold: it was less, and the glow looked different. Then after doing the intake manifold it was less also...it got me thinking about the heat shield.
I used the old heat shield when installing the new DORMAN manifold because the DORMAN heat shield packaged with the unit did not fit the new manifold well. The o2 sensor hole was skewed and the old heat shield fit so much better.
I needed to torque the exhaust manifold bolts one last time anyways so I took the old heat shield off the new manifold, torqued it, and drove it for about 30 mins with the heat shield off. No glow.
Coming back I inspected the old heat shield and now realized that it was largely bubbled very far out and there were scorch marks on it from when it was touching the manifold! (the fully overheated manifold must have destroyed it) I took the new manifold heat shield, dremeled out the o2 sensor hole, put some nuts as spacers on the new exhaust manifold and attached the new manifold heat shield on to it.
It does not glow at all anymore! This issue has been solved. We have went from a 100% cherry red exhaust manifold to a normally functioning one.
Thanks for all the help everyone. I may do another back pressure test when/if I purchase a back pressure tester and I think I will be using the bore scope to further examine the exhaust. I will have pictures of the manifold and the CAT up soon, just need the time to take them.
So I got to the pictures today! My borescope led lights burt out right when I was playing with it. I think I had the leds turned up way to much and they got hot. I will have to exchange at amazon. Anyways I am sure that these are great pictures of a clogged cat! This had the back pressure test at 1PSI.
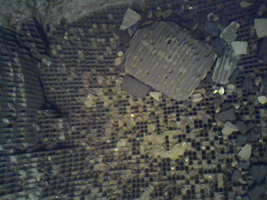
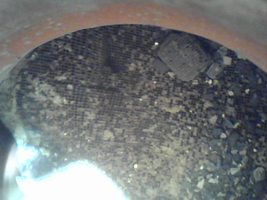
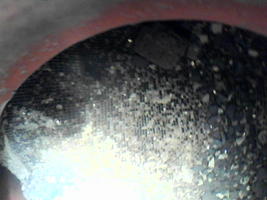
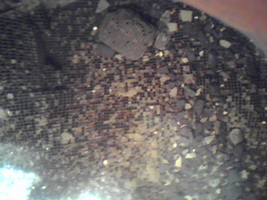
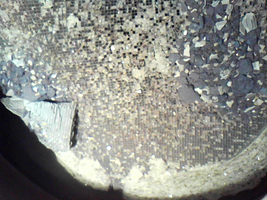
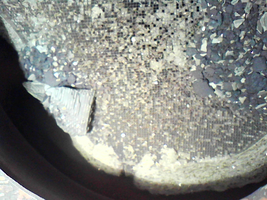
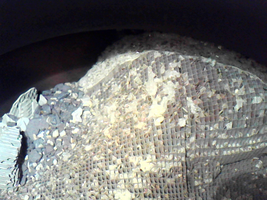
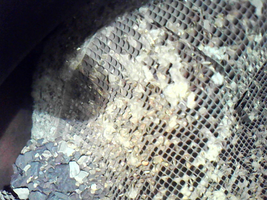
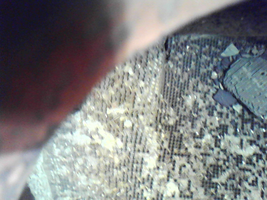
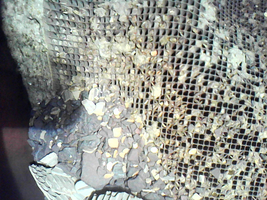
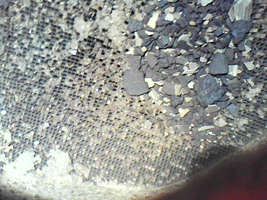
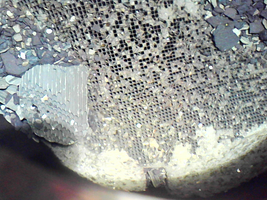
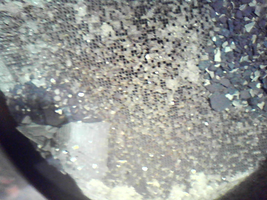
I think next time I suspect a clogged cat I am going to bore scope through the 02 sensor hole it almost first off to examine. Pieces of this thing are falling off heh and there is so much rubble in there.


I think next time I suspect a clogged cat I am going to bore scope through the 02 sensor hole it almost first off to examine. Pieces of this thing are falling off heh and there is so much rubble in there.
So here is the manifold and manifold shield. The shield was bubbled out before I pushed it back down when I was thinking about reusing it/fixing it instead of using the new one. The manifold has pieces of the first layer of metal missing from the inside and out:
http://imgur.com/a/P0Hjd
http://imgur.com/a/P0Hjd
Last edited:
@webdawg ...Thanks for posting the "AFTER"glow images of the CAT internals. When time permits... would you list the Make and Model and show some images of your Boroscope?... as your efficacious use of it here goes YARD to illustrate the cause and origin of the problem. Those photos also demonstrate the problem of what happens when the trapped condensed moisture in the exhaust seriously rusted into the interior of the E-manifold...and once re-heated...huge flakes of oxidized Cast Iron must have broken off and added to the blocking effect at the upstream side of the CAT Ceramic matrix... it looks like it might have shattered portions of the the material and caused parts to collapse in the direction of the exhaust stream.
I think I have finally seen an actual reason to switch to (...almost because of their prohibitively high costs) installing either the Kooks Header recently brought up in another thread...or one comparable to it. They would not only breath easier... but would also not break down into flakes that compound a CAT that is getting clogged up.
I think I have finally seen an actual reason to switch to (...almost because of their prohibitively high costs) installing either the Kooks Header recently brought up in another thread...or one comparable to it. They would not only breath easier... but would also not break down into flakes that compound a CAT that is getting clogged up.
Last edited:
Here is a link to the bore scope: http://www.amazon.com/gp/product/B00JERRES6/?tag=gmtnation-20
It should come with instructions not to turn the LED lights up all the way because they burnt out. I am going to purchase another after this return and just turn the all the way up when I take a pic or if I need to.
The end was hot with the LEDs turned up all the way. I think the problem was because I left them up all the way the entire time.
Here is a picture of exactly what I got:
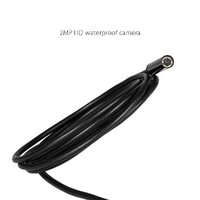
It just uses USB and you can use it simply with VLC (https://www.videolan.org/vlc/index.html) and open capture device. VLC does have a screenshot function. It should work with any standard camera software though.
If I ever get wild and start really modding this vehicle I may install some headers. I kind of wish I did now but at the time I was trying to solve a problem and did not want to add any additional variables into the equation.
It should come with instructions not to turn the LED lights up all the way because they burnt out. I am going to purchase another after this return and just turn the all the way up when I take a pic or if I need to.
The end was hot with the LEDs turned up all the way. I think the problem was because I left them up all the way the entire time.
Here is a picture of exactly what I got:

It just uses USB and you can use it simply with VLC (https://www.videolan.org/vlc/index.html) and open capture device. VLC does have a screenshot function. It should work with any standard camera software though.
If I ever get wild and start really modding this vehicle I may install some headers. I kind of wish I did now but at the time I was trying to solve a problem and did not want to add any additional variables into the equation.
What a Superb Diagnostic Device... Assuming the OD of the Camera End Barrel is small enough... here is what I have in mind for some of its potential uses:
(1) Accurately establishing Top Dead Center on the #1 Cylinder via a plastic slip-in tube support guide for insertion into the protected Spark Plug hole.
(2) Snaking it down inside the GM Atlas Engine Intake Manifold to search for oil and debris contamination.
(3) Snaking it down inside the GM Atlas Engine Front Timing Chain Cover to provide visual proof and confirmation of the Timing Chain to Crankshaft Sprocket mating points.
(4) Snaking it down inside the GM Atlas Engine Front Timing Chain Cover to provide a visual reference for re-setting the Timing Chain Tensioner Lever.
(5) Reading the condition of the interiors of cylinder walls and the tops of pistons.
(6) Possibly being able to examine the upper inside of the combustion chambers when the pistons are positioned at BDC.
(7 After removing a CAT from any vehicle... taping off one end of a clogged CAT for a liquid-tight seal and then bracing it to stand on its end.... and then filling it up from the other end with a mixture of Distilled Water and Purple Power for a few hours...and then running low velocity fresh water through the CAT from both ends to flush out the dissolved debris. If this Boroscope can prove a marked improvement in the removal of the offending building and that the ceramic cells appear clear... it might be possible to chemically clean out clogged CATS and make them ready for continued use again. Everything would depend upon what this device can show.
Chickenhawk
Member
- Dec 6, 2011
- 791
Actually, your photos, combined with this post, provides a LOT of good information, especially as these vehicles age. I have traditionally said that a backpressure test should read 0 at idle, and no more than 3 PSI at 2500 RPM. I need to revise this downward because those are generic numbers. Based on the efficiency of the factory exhaust, backpressure should be close to 0 at idle and at 2500 RPM. An aftermarket exhaust might go to .5 PSI, but anything 1 PSI or above should be considered a partially clogged cat.


