2004 TB - I6 4WD - Manifold Red Hot

webdawg

Original poster
Member
Jun 26, 2014
247
So I was towing a trailer a long distance (2500 Miles) and having transmission issues, this caused me to open up the hood and I thought the side of my engine was about to melt.

The manifold on this trailblazer gets red hot when I am towing a trailer at around 65-75. Besides that I do not have any issues. It seems that with normal driving I do not have issues.

I have already done a back pressure test and the exhaust came back good.
 

gmcman

Member
Dec 12, 2011
4,656
What size and type of trailer are you towing? Weight of trailer?

75 is kinda fast to tow a trailer, in some states it's illegal.

Need more info to help you out.
 

webdawg

Original poster
Member
Jun 26, 2014
247
5*8 hardly loaded. On the way back I had about 300 pounds of stuff in it. Still the same issue.

I think the aero dynamics of it all are the problem with load to be honest with you. But I get that the TB did not like it. I even ended up driving 60-65 in a 75 to 80 zone for hundreds of miles.

The point is, why after towing something like would it look like my manifold was going to melt off the side of the engine.
 

mrrsm

Lifetime VIP Donor
Supporting Donor
Member
Oct 22, 2015
7,714
Tampa Bay Area
FWIW... Get a Bright Flashlight and Inspect the Front and In-Between areas of the front of the Grill...The Radiator and The Air Conditioning Condenser and Transmission Fluid Cooling Coils... Check from the Top down and from the Bottom Up. On occasion... Plastic Convenience Store Bags, Newspapers and even Styro-Foam Objects can sometimes get pulled up inside those locations and then... no amount of effort by the Shrouded Electro-Viscous Fan will be able to pull the ambient air being stopped through the mass of the cooling fins and lower the temperature of the hot coolant and hot condensing freon.
 

webdawg

Original poster
Member
Jun 26, 2014
247
I can do that. I just had the radiator replaced but was having this problem before that.

Can you tell me where the AC condenser is?
 

mrrsm

Lifetime VIP Donor
Supporting Donor
Member
Oct 22, 2015
7,714
Tampa Bay Area
I can do that. I just had the radiator replaced but was having this problem before that.

Can you tell me where the AC condenser is?

You would be surprised at how often this happens because for all intents and purposes... the fronts of these vehicles can behave just like a vacuum cleaner. The Air Conditioning Condenser Coil matrices are generally sandwiched either in front of or behind the Radiators of most vehicles... I have not as yet had to remove mine from the TB ...but I'm sure there are some images on the Internet that will display how they are arranged.

EDIT:

There is another rare event that can happen when Mechanics stuffs Shop Rags into the ends of Radiator Hoses... and of course, if they forget to remove them... that causes an immediate slow down or complete stoppage of the coolant circulating correctly through the engine block and the radiator under pressure from the front mounted Water Pump. They often do this to prevent have anything dripping into their faces when down there doing maintenance and somtimes, removing the hoses becomes necessary to do some other repair job. Of course... it follows on that from time to time, we humans are prone to error... so this kind of this can happen as well.
 
Last edited:

webdawg

Original poster
Member
Jun 26, 2014
247
That is another thing too. The temp of the car never goes up. Stays right where it is supposed to be.
 

webdawg

Original poster
Member
Jun 26, 2014
247
Would I not see a rise in temp if something was wrong with the cooling system?
 

mrrsm

Lifetime VIP Donor
Supporting Donor
Member
Oct 22, 2015
7,714
Tampa Bay Area
Would I not see a rise in temp if something was wrong with the cooling system?

Not if the Cooling Sensor is Failing or if the Sensor is not directly in the path of any super-heated coolant. These sensors can give weird readings if the Thermostat is either stuck open or stopped functioning. And speaking of the Thermostat... when they replaced the Radiator...did they also change out the Thermostat? Why was the Radiator replaced?
 

webdawg

Original poster
Member
Jun 26, 2014
247
My transmission cooler broke inside the radiator and flooded the cooling system with transmission fluid. There was no coolant in the transmission so I think it was just a crack.

I had them replace the radiator, flush the coolant system 4 times, and do a transmission flush on the transmission.

I just replaced the thermostat when I purchased the car about 1.5 to two years ago because I did not want it to die in some of the hot weather I was living in at the time. I also replaced the temp sensor for the heck of it while doing the job.
 

Blckshdw

Moderator
Nov 20, 2011
10,681
Tampa Bay Area, FL

webdawg

Original poster
Member
Jun 26, 2014
247
Nevermind, had to re-read your first post, answered my question

You are curious about the tranny cooler right? The reason it was cracked is because I cracked it messing with it.

The tranny lines were leaking at the quick disconnect, something I realize now is a common issue. I did not understand how the clip/line disconnect works. I thought it was just a flared line with a nut to secure it.

I unscrewed the connector from the bottom of the radiator thinking I could replace some oring and when coolant started to pour out realized how it worked and what I had done. I know you can replace them (the oring) now, but not by unscrewing it. I had to tighten it until coolant stopped leaking.

What I did not realize at the time is that I had cracked the transmission cooler inside the radiator and over the next 4 hours of driving tranny fluid mixed with the coolant.
 

gmcman

Member
Dec 12, 2011
4,656
I'm assuming you were towing with a relatively high rpm, maybe 3K, were you in 3rd gear? Were you observing the red manifold at night or during the day? I would suspect a light glowing manifold at night directly after a long hard pull.

Is your manifold heat shield in place? How are you seeing glowing red? Just curious
 

webdawg

Original poster
Member
Jun 26, 2014
247
The vehicle was in 3rd gear most of the time, it would kick into the higher stuff when it could but I kept control of the throttle.

At night, but I could see it during the day. Shield is in place. The entire manifold was red. So you open the hood and the side of the engine is just glowing.
 

webdawg

Original poster
Member
Jun 26, 2014
247
I mean, is this supposed to happen running @ 3k for a long time or something?
 

mrrsm

Lifetime VIP Donor
Supporting Donor
Member
Oct 22, 2015
7,714
Tampa Bay Area
Terrain?
Engine... Stock as a Clock...No Turbocharger?

If your Catalytic Converter is particularly "Clogged & Bogged"... The runaway thermodynamics are this: If the engine is running continuously for extended time frames and the hot exhaust is delayed on its way out the exhaust pipe... The Heat Soak could be extreme enough to walk its way backwards from the ordinary and expected 900 Degree F inside the Cat... and gradually reach back up into the heavy Cast Iron to the source...and becoming hot enough to move from levels of Conduction Heat to Convection Heat and eventually to Radiant Heat... So what condition is your CAT in right now?
 
Last edited:

gmcman

Member
Dec 12, 2011
4,656
Most manifolds will glow slightly at least under load. If you pulled over then checked it and it was still bright cherry red like a stove burner then it sounds slightly abnormally hot but if it was a feint red glow, but noticeable then it's not out of the question for manifolds to glow.

My 8hp briggs muffler would glow at night under maybe a 30 to 40% load.

A pic would be good, but if your AFR is right then I wouldn't worry too much.

Just be darn sure you don't have that trans quick connect leaking, trans fluid on a hot manifold will burn your tb to the ground.
 

webdawg

Original poster
Member
Jun 26, 2014
247
Okay, so the car feels really bogged down now. Like it would be the cadalytic converter and the only reason I rule it out is because I did the backpressure test, it never went above one.

But I got a code today: P0410

I have been reading about the valve but I am wondering if this is malufunctioning can this be the cause of my problems? I checked the intake for vaccum issues...
 

mrrsm

Lifetime VIP Donor
Supporting Donor
Member
Oct 22, 2015
7,714
Tampa Bay Area
This issue seems separate from the Clogged CAT... THIS Item Solves THAT Problem:

http://www.autopartswarehouse.com/shop_years/chevrolet-trailblazer-catalytic-converter-2004.html

Bring your Old CAT and the Title/Registration to any Junk Yard... and they will give you a decent price for it...

And like all good scientific approaches to problem solving..."During any experiment...only change One Variable at a Time..." makes good sense in automotive repairs as well. Without knowing any of your "climate challenges" for sudden changes in ambient air temperature from the entire gamut of warm to well below freezing... since one major by-product of combustion is Water Vapor that will instantly condense on cold surfaces and freeze overnight...this is the salient information needed to answer your P0410 Question that comes excised from the attached link:

"The air injection reaction system (AIR) is on all 2004+ 4.2's. There is an electric blower under the truck, tucked inside the frame rail about under the drivers seat. The blower draws it's clean air from a hose tied into the air inlet tube between the air-filter box and throttle body, pressurizes it slightly and blows this clean air into a port in the cylinder head directly above the exhaust manifold, dead center. There is a can shaped check valve bolted to this port with the air hose clamped to it and an electrical connection. The most common failure point of this system is this check valve. Remove the hose, the electrical connection and 2 bolts and it's off. Very easy. Problem is, it's about a $125 dealer only item.:banghead: The check valve gets corroded/crudded up and doesn't seat. Let it go long enough and moisture from the exhaust can back flow into the system and destroy the $$$ electric air blower. I'd start by removing and checking the valve and check the hoses for water."

http://www.automotiveforums.com/t65...10_secondary_air_intake_malfunction_help.html
 
Last edited:

Chickenhawk

Member
Dec 6, 2011
781
Everything you write still points to the cat. A backpressure PSI reading of 1 is not normal. What kind of test was this, and did they use a proper exhaust backpressure tester? You can't use a standard vacuum/pressure gauge. It should be noted that normal is not much more than 0 PSI.

If you changed the thermostat, it might have been running too cool for a while. This will destroy a cat, and when they go bad, they go bad FAST. Regardless of that backpressure test, I would replace it anyway. Manifolds can glow almost red hot after running at high loads for a period of time, but that glow should only be visible in dim light.
 

webdawg

Original poster
Member
Jun 26, 2014
247
I am going to try and work on one issue at at time. I am going to replace the catalytic converter. The manifold got very hot. I was thinking about replacing the manifold at the same time. It got so hot that a layer of metal came off of it @ the 6 channel Y. I took the heat shield off yesterday and saw that. I am going to examine if it is cracked but it is a pita to look at this thing and I wonder if I be able to see the cracks anyways.

At least one of the manifold bolts is loose and have read the stories about snapping bolts and how easy it is. It is just at this point with how hot that manifold got and the fact that I really would like to examine it, I would really like to take it off.

I do not know, should I just check to see if it is cracked with mirrors and a visual inspection an go from there. Is there anyway that something is up with this manifold too? I mean I read posts about clogged cats causing the manifold to crack.

I have a brother that is a mechanic and he did the back pressure test but even now I am second guessing this at this point with all the issues that I am having. They have used the same tool before to successfully diagnose cars with the same issues. But I am thinking that if there are any leaks elsewhere this could be a false report?

I have read some guides and recommendations for removing manifold bolts...but it seems to remove them one really should apply some heat. I mean to remove red threadlocker it should be heated up to 550 degrees. (http://us.henkel-adhesives-blog.com/post/All-About-Threadlockers/How-to-Remove-Red-Threadlocker/).

It seems like there are a few recommendations to do the standard spray soak and forward and backward but why are people not focusing on the heat here? It is the only recommended way to do it correctly.

On top of these post that I am reading, I now see people talking about putting anti-seize on the threads instead of thread locker like OEM when putting back together. What the hell?
 

mrrsm

Lifetime VIP Donor
Supporting Donor
Member
Oct 22, 2015
7,714
Tampa Bay Area
Forgive me ... but you seem to keep plowing the same field, over and over... with some expectation that the the "seeds of the solution" will germinate into "easier plants" for you to harvest. If you have found "loose bolts" on the Exhaust Manifold Flange... you will have to act one way or another....if for no other reason than for the sake of guiding noxious exhaust down, into...and after proper chemical conversion therein...out of the exhaust pipe...and NOT dumping carbon monoxide in life-threatening amounts... inside the engine nacelle.

If you only change the exhaust manifold instead of an R&R of the catalytic converter... then all of these suggestions and recommendations will amount to nothing. You have a good chance of eliminating all four problems presented here at the same time... albeit with a need for a bit more planning and research on your part on how to do the work and naturally... with more expense for what should become a very long term fix:

(1) Possible Cracked or Warped Exhaust Manifold. (Examine the Old One? TOSS IT!)
(2) Clogged Catalytic Converter. (Get some $$$ Back @ The Junk Yard)
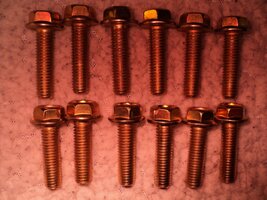
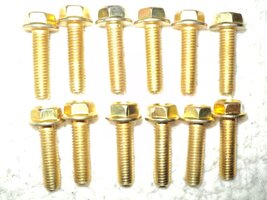
(3) Loose or Broken Exhaust Manifold Bolts. (TOSS THE OLD ONES)
(4) Ultimately... Solving the problem of "Thermal Runaway" for GOOD.

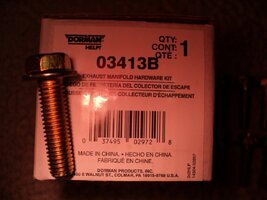
Any articles written that advocate using thread-locker should be looked upon with a jaundiced eye. If the bolts being used last happen to be made of Stainless Steel... they will eventually interact with the Aluminum Metal Head electrolytically... and form heavy electrolytic corrosion that offers no structural strength and either become looser...or seize in place...but not necessarily in concert with the bottom of the bolt face remaining in hard contact with the outer flange surfaces of each bolt hole in the exhaust manifold... in other words... be seized in the head...but NOT holding the manifold to the head correctly. The Dorman Bolts are the way to go... and ...DO NOT RE-USE THE MLS (Multi-Layered-Steel GASKET OR FASTENERS... Toss them!

If anyone made the mistake of using High Temp Thread Locker on the EM Bolts ... Don't automatically assume that they will not come out! Don't do ANYTHING extreme to remove them...and that include that you must abandon any idea of using or inducing "Heat" against the Exhaust Manifold and Bolts by means of any Propane, MAPP Gas or Ox-Acetelyne Torches... unless of course you want to compound your present problems... and burn your vehicle to the ground! What you need in this situation is NOT HEAT... but....FREEZING COLD to do the trick. That...and some good tools to allow you to work the bolts back and forth slowly and in micro-increments AFTER following the instructions listed next...

Again...If someone made the mistake of using any Thread Locker on the Exhaust Manifold Bolts... then your best ally in removing not only the Exhaust Manifold Bolts (on an Ice Cold Engine!) but for the Flange Bolts holding the upstream Catalytic Converter Three Bolt to Stud interface with the Exhaust Manifold as well...by obtaining a large can of CRC "FREEZE-OFF" to thermodynamically "shock" the fasteners loose by freezing them and breaking the rust loose. Save your money trying WD-40, PB-Blaster, Kroil or Liquid Wrench and ....Just follow the instructions shown in these videos:


And YES... Using a small amount of Anti-Seize Compound on the New Bolts is EXACTLY what is called for... NOT THREAD LOCKER !!! Just Don't Over Torque Steel Bolts into the Soft Aluminum Threaded Holes! Take your time and think and work carefully as you do all of this.
 
Last edited:
  • Like
Reactions: webdawg

webdawg

Original poster
Member
Jun 26, 2014
247
Thanks for the excellent reply. I will have to try the freeze-off if I ever need too.

3 days ago I sprayed Kroil on the manifold bolts. Yesterday I very carefully was able to remove them all without any problems. I was very surprised. I do not know, the bolts were in great condition (a little rust), and the back and fourth seems to work great.

The manifold was not cracked, but pieces are breaking off of it. It is scorched. I was able to get the catalytic converter off also.

This is what I have on order:

2x ACDELCO 2131698 o2 sensors to replace upstream and downstream

---EDIT 2016.02.06---
The downstream sensor is not the same as the upstream. I ended up ordering ACDELCO 2131574 to replace the downstream.
---/EDIT---

A WALKER 55476 Catalytic Converter
A DORMAN 674777 Exhaust Manifold (3 Studs, 3 Nuts; Gaskets: 1 Manifold, 1 Flange)
and DORMAN 674014 Exhaust Manifold Bolts

This is the info on the bolts: https://www.rockauto.com/catalog/moreinfo.php?pk=2954451&cc=1424281

I plan to replace all these parts. The OEM service manual calls for GM part number 12345493. Looking that up it looks like it is Permatex threadlocker red. (http://www.itwpf.com.au/permatex/pdfs/approvals/7.pdf)

I guess reading this that the red stuff that permatex makes and locktite makes is very different (http://www.corvetteforum.com/forums/c5-tech/3154675-thread-locker-or-anti-seize-on-headers.html)

So here is what I have been wondering. If GM used this thread locker on the manifold why were the bolts so easy to remove? Would not the manifold head the thread locker past 500-550 degress anyways making it useless?

Were these supposed to be thread locked in from the factory?

I don't know. I will be installing I think this weekend, we will see. It looks like I am going to work with the copper anti sieze at this point.
 
Last edited:
  • Like
Reactions: mrrsm

webdawg

Original poster
Member
Jun 26, 2014
247
FYI, I did read all you had to say. But why does the service manual call for it when everyone does not use it?
 

mrrsm

Lifetime VIP Donor
Supporting Donor
Member
Oct 22, 2015
7,714
Tampa Bay Area
The "Answer In A Word" is this: Aluminum. If the cylinder head on the Atlas I-6 were Sand-Molded Cast Iron... you could throw everything at the sides of the mate-up between the Exhaust Manifold, the MLS Gasket...and a Exhaust Ports made with the incredibly forgiving nature of this Basic Ferrous Metal because of its durability . But since this is NOT true... your first concern needs to be with being "Nice to the Metal" in the manner of not scoring, dinging, cracking or most importantly, cross-threading and/or stripping out the threaded holes.

Installing Steel Spring Helicoils after having to drill out stripped bolt holes in an Aluminum Cylinder Head... or an Aluminum Engine Block...would be challenging enough with the advantage of having either a Bench Mounted Cylinder Head or Engine Stand Mounting the work area conveniently while working on the problem vertically. But doing this job at a Near Right Angle, while bent sideways over the fender well would make you lose your mind.

Consequently... treating the Aluminum Head as though you are Installing Fasteners into a Twinky... is the order of the day. And.... better that you should have to snug up the Exhaust Manifold Bolts once every few months...and be able to completely remove them... then have their bolt heads sheer off because the engine moves one way and the upstream to downstream exhaust assembly pulls the opposite way... and occasionally snaps off the heads of the bolt... leaving you to face the starting scenario...with the broken shanks held firmly in place with Red Loctite.

I would like to suggest that you research via Google... the various ways that the Hot-Rodding Community solve these problems on Performance Headers with the use of ARP or BBK or Hooker, etc... Special Alternative Fasteners as well as looking at the Rubber-Metal Hanger supporting the back of the bolt-on section of the Catalytic Converter to determine if it has become too loose to grip the back end of the CAT and see if installing a New One would reduce the motions of the CAT that constantly are pulling and tugging where it attaches to the Triple Stud Flange of the Exhaust Manifold... Stressing each fastener....Starting with the two holding at the closest attachment position that is notorious for breaking off bolts: The #6 Cylinder.

Here is a How-To Video that demonstrates an abbreviated, but still useful amount of information on how to approach the R&R of the Exhaust Manifold AND here is also an actual use of CRC-FREEZEOFF SPRAY in action:


As for the information on the type of Dorman Exhaust Manifold Fasteners... I like the idea of having the washers under the Bolt Faces... I will include an alternative choice here:
 

Attachments

  • DSC04827_copy.jpg
    DSC04827_copy.jpg
    150.8 KB · Views: 4
  • DSC04825_copy.jpg
    DSC04825_copy.jpg
    96.6 KB · Views: 3
  • DSC04826_copy.jpg
    DSC04826_copy.jpg
    106.9 KB · Views: 4
Last edited:
  • Like
Reactions: webdawg

webdawg

Original poster
Member
Jun 26, 2014
247
Thanks for all the information. You are a lot of help, thanks!

I am going to clean the head surface, what and how do you recommend to clean it?

Should I do anything to the exhaust ports? Clean anything out of them?

It looks like the bolts are M8-1.25 right? I was looking here: http://www.stage8.com/gm.html

I may not buy these right now, but I think I might in the future.
 

mrrsm

Lifetime VIP Donor
Supporting Donor
Member
Oct 22, 2015
7,714
Tampa Bay Area
Everybody at GMT Nation is always Glad to be of Service! The important thing now is to examine and make an accurate "Blind Hole" Depth Check and compare that to the combined thickness of the average of all 10 Holes in the Exhaust Manifold AND the thickness of the MLS Gasket vs. the Length of the Bolts...to make certain that the Bolts you choose do NOT bottom out inside of the head before the "Squeeze Play" between the Aluminum Head Exhaust Ports, the MLS Gasket and the Exhaust Manifold Flange can be tightly established.

Don't bother trying to make the Exhaust Ports clean...as within just a few minutes after firing up the engine...the exiting exhaust components of Carbon and unburned hydro-carbon, H2O, etc... will just "dirty it all up inside" all over again. As long as the port faces are cleaned with a clean wipe down rag and show no signs of damage... the MLS gasket will sort of "fill in the blanks" of any tiny imperfections on both sides of the gasket and seal tightly with minimal torque.... CHECK that you are certain on the accuracy of what the required torque is for this.

For example ...Do NOT confuse 85 Inch Lbs with 85 Foot Lbs... or the bolts will NOT survive... Check the Service Manual Torque Table for the right amount to apply....and STOP. Apply a very thin coat of the Permatex Copper Anti-seize on the threads about 1/8" from the bottom to avoid Hydro-Locking the bolt in the bottom of the bolt hole if you try squeezing the stuff directly into the holes in the Aluminum Engine Head as this can stop the bolt from threading all the way in. Be consistent in how you do everything for each and every bolt and be systematic when torquing down the Exhaust Manifold. Begin at the center with 1/2 the total required torque and work your way from the center outwards...gradually drawing the manifold inwards until it is flat and even across its entire length. Likewise...perform the final torque sequence in this identical manner.

When you are ready... start the engine and allow the motor to warm up while you make some visual and audible checks on the Exhaust Side of the engine. After 10-15 minutes... shut the engine down and allow the motor to completely cool before you re-torque all the bolts as described above. Doing this re-torque sequence check once a month will ensure that no exhaust leaks can occur. This is very important to remember... There are only two kinds of Exhaust Manifolds... Those that are LEAKING...and those that are GOING TO LEAK.

Do NOT Use Brake Cleaner on ANY Burning, Incandescently Hot or Glowing Components or around any open flames or electric arcs...as this Brake Cleaner will decompose into Highly Toxic Phosgene Gas! One whiff of this stuff ... and all your problems will be over!
 
Last edited:
  • Like
Reactions: webdawg

Wooluf1952

Member
Nov 20, 2011
2,663
Milwaukee, Wisconsin
This is what I have on order:
2x ACDELCO 2131698 o2 sensors to replace upstream and downstream


The upstream and downstream O2 sensors are different parts.
You have two upstream sensors ordered.
 

webdawg

Original poster
Member
Jun 26, 2014
247
Nice catch! I see on rock auto they have downstream and center....the only oem one they have is center, downstream is professional. Do you know the part number?

http://www.amazon.com/gp/product/B000C9GNLE/?tag=gmtnation-20

It looks like this is the correct part for the downstream/center. I guess they call it center if the vehicle had two o2 sensors in the front.

It is GM part number: 12578624.
 
Last edited by a moderator:

Mooseman

Moderator
Dec 4, 2011
25,332
Ottawa, ON
And you don't need to replace the downstream o2 sensor. It does absolutely nothing on engine performance. All it does is report to the PCM that the cat is working correctly. It rarely fails.
 
  • Like
Reactions: Redbeard and mrrsm

Chickenhawk

Member
Dec 6, 2011
781
Since you got your cat off, can you shine a strong light down there and see what it looks like? If not, can you cut it up with a cutting wheel and show us the screens? I want to know if we were correct about the cat or not. I have always said that backpressure should be 0 at idle and no more than 2 to 4 at 2500 RPM. I have since learned that it should be near 0 at 2500 as well. (Which is why I suspected it when you said your reading was 1 PSI.)
 

mrrsm

Lifetime VIP Donor
Supporting Donor
Member
Oct 22, 2015
7,714
Tampa Bay Area
If you use a cutting tool to open that CAT... Make Damned sure that you are wearing a 3M Filter Face Mask and Eye Protection... The light Tan. (Tope) Colored Ceramic Matrix (Honeycomb) Material nested inside that Stainless Steel Container has Micronized Heavy Metal Particles of Platinum, Vanadium and other embedded exotic Powerful Catalyzing Metals that are extremely carcinogenic if inhaled... and the dust that you might create while tearing the CAT apart... will not come out of your lungs if breathed in.
 
Last edited:

Chickenhawk

Member
Dec 6, 2011
781
Good point! I should have mentioned to just cut the thin part of the top away to expose the plates, but this would be hard to do without inadvertently cutting into a plate. Heed the advice above!!
 

webdawg

Original poster
Member
Jun 26, 2014
247
If anyone could confirm that part number for that rear o2 sensor that would be great!

I have a usb borescope and I can start with that once I get it back together.

And you don't need to replace the downstream o2 sensor. It does absolutely nothing on engine performance. All it does is report to the PCM that the cat is working correctly. It rarely fails.

I did not know that, is this true for all downstream o2 sensors.
 
Last edited by a moderator:

Forum Statistics

Threads
23,319
Posts
637,895
Members
18,519
Latest member
chirobo1

Members Online