Valve cover gaskets...need some input. (2003 GMC Envoy XL 4.2L)

Alec Venable

Original poster
Member
Oct 23, 2016
30
Indiana, US
2003 GMC Envoy XL 4.2L I6 278,000 miles

Greetings all! I have been long awaiting the opportunity to replace my leaking valve cover gaskets, and yesterday presented such an opportunity. Continuing the job today, I finally removed the valve cover. However, when removing the intake manifold to access the valve cover bolts, I saw my intake ports coated with the ever so popular black "mung". This should have been a clue.

I did anticipate this to an extent, as the vehicle went many years (8 years, it's been in my possession for 9 years) without proper maintenance of the CV system. That being said, it did always receive oil changes every 3,000 - 5,000 miles with synthetic blend oil for the first 5 years I owned it, then for the past 4 years full synthetic. Recently, after reading the post from Raviolli surfer about how to service the CV system, I sprayed B12 Chemtool in the orifice on the intake manifold that connects to the cylinder head, and I have been able to verify vacuum from the nipple on the valve cover that connects to the resonator box on top of the motor, while it idles. This was done many months ago, and was overdue to perform again.

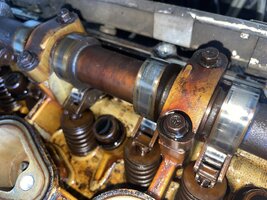
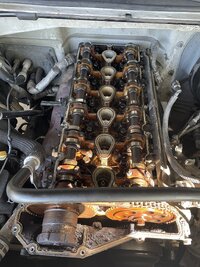
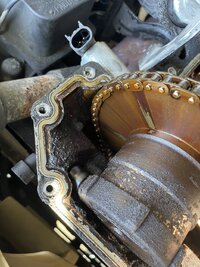
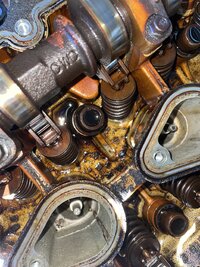
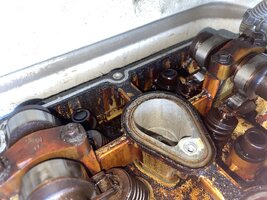
All this being said, fast forward to now, the valve cover removed, and man. I am...concerned about the amount of disgusting black coffee grounds and...dark colored...everything? Take a look:
IMG_0370.jpegIMG_0371.jpegIMG_0372.jpegIMG_0377.jpegIMG_0378.jpeg


To be honest I'm not sure what I was expecting...I should've guessed this was lurking underneath there. 278,000 miles and 21 years.

So with all this in mind, my question is. Do I go about trying to even clean any of this? I feel like a thorough clean would require complete disassembly and removal of the head, then taking it to a machine shop. Not really interested in doing that at this point if I don't have to. Will I be alright to simply, clean my intake ports, clean gasket sealing surfaces, replace gaskets, do a couple oil changes, and be on my way?
 
Dec 5, 2011
595
Central Pennsylvania
2003 GMC Envoy XL 4.2L I6 278,000 miles

Greetings all! I have been long awaiting the opportunity to replace my leaking valve cover gaskets, and yesterday presented such an opportunity. Continuing the job today, I finally removed the valve cover. However, when removing the intake manifold to access the valve cover bolts, I saw my intake ports coated with the ever so popular black "mung". This should have been a clue.

I did anticipate this to an extent, as the vehicle went many years (8 years, it's been in my possession for 9 years) without proper maintenance of the CV system. That being said, it did always receive oil changes every 3,000 - 5,000 miles with synthetic blend oil for the first 5 years I owned it, then for the past 4 years full synthetic. Recently, after reading the post from Raviolli surfer about how to service the CV system, I sprayed B12 Chemtool in the orifice on the intake manifold that connects to the cylinder head, and I have been able to verify vacuum from the nipple on the valve cover that connects to the resonator box on top of the motor, while it idles. This was done many months ago, and was overdue to perform again.

All this being said, fast forward to now, the valve cover removed, and man. I am...concerned about the amount of disgusting black coffee grounds and...dark colored...everything? Take a look:

View attachment 114649View attachment 114650View attachment 114651View attachment 114652View attachment 114653


To be honest I'm not sure what I was expecting...I should've guessed this was lurking underneath there. 278,000 miles and 21 years.

So with all this in mind, my question is. Do I go about trying to even clean any of this? I feel like a thorough clean would require complete disassembly and removal of the head, then taking it to a machine shop. Not really interested in doing that at this point if I don't have to. Will I be alright to simply, clean my intake ports, clean gasket sealing surfaces, replace gaskets, do a couple oil changes, and be on my way?
I wouldn't stress too much. That looks pretty much like mine did when I did mine.

I took a quick look at the situation and decided I needed to figure out how much more I expected out of my engine. 1 year? 5 years? 10? I've had 4 good years since I did this and have no complaints.

The effort required to clean that head up would be significant.
Removing the head is sometimes a deathstroke as the head bolts often break and are not reusable if they don't. Removing the head often starts a series of "well, I've gone this far..." and before you know it, you're pricing an engine replacement.

Personally, I'd clean up the gasket surfaces, clean the valve cover and throttlebody, and de-mung the intake ports as best you can. There's a port in the intake side of the engine that is crucial to the PCV system and it's easy to miss. There's a hose on the intake that connects from the intake to a spot between intake ports, that's where the port I'm talking about is. Clean that port well. Also clean the inside of the hose and the port on the intake itself. You'll get maximum flow through the PCV when you do. If you can, replace that hose. Replace the intake gaskets, valve cover gaskets, coil well gaskets, etc...

The truth is that the PCV circuit on this engine is horrendous. There's no PCV valve and there's tons of blowby. It's filthy and makes a mess of things. But the engine is very tolerant of it.

Replace your gaskets, torque stuff to spec, change the oil (for good measure), and get your money's worth out of driving it.
 
  • Like
Reactions: azswiss

mrrsm

Lifetime VIP Donor
Supporting Donor
Member
Oct 22, 2015
8,181
Tampa Bay Area
Dislodging what has already accumulated ..not just along the Upper Head under the Valve Cover...but also "near the water line" inside the Boxy Casement below...might wind up....Doing More Harm...Than Good. The Oil Pick Up Tube might become COMPLETELY Blocked Off if that loosened crap gets sucked into the opening and screen.

Your engine is STILL in very respectable condition because it bears the ear marks of having been well treated with the Proper FULL Synthetic Oil and Oil Filter Changes over such a LONG duration

The presence of all that Black Mung was NOT caused by infrequent Oil Changes...but rather the culprit is Gas Blow-By from having Worn or Trapped Upper Compression Rings. This phenomena is accentuated in the Modern High Mileage LL8 4.2L Engines because the Upper Compression Rings are THIN and work under VERY LOW TENSION.

This allows the results of incomplete combustion to penetrate around the Lands & Grooves over time...and literally GLUE the Two Upper Compression Rings TIGHTLY inside of those channels at the upper portions of the Pistons. The net effect is to have both un-burned Fuel getting past the Rings and contaminating the Oil in the Crankcase...ruining its Lubricity and allowing Carbon Laden, partially Burned Fuel to literally Gas-Gum Up The Works.

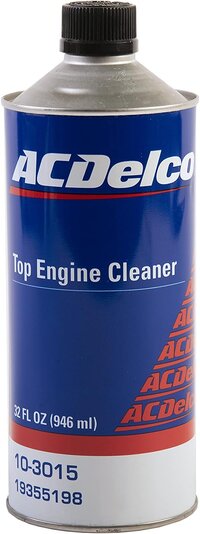
A Vehicle with an LL8 Engine lasting 240,000 Miles will burn just under 12,000 Gallons of Mid-Grade Gasoline and inhale around 175,000 Gallons of Ambient Air along the way. THIS Fuel Air Combo gradually gets consumed with less and less efficiency over time and without regular treatments of ACDelco TEC (Top Engine Cleaner) to Dissolve Away the Gas-Gum around the Rings and Grooves and loosen the Carbon Build Up on the Pistons Tops and around the Valve Seats...

The Engine Compartment becomes over pressurized from Blow-By and can gradually force the Engine Oil up into the top underside of the Valve Cover through that small Rubber Elbow Tube and thence on through the Air Plenum, into the Throttle Body and back down into the Intake Manifold Runners ...right back into the Cylinders:

61Aj3Se7f6S._AC_SL1500_.jpg

When that Oil Burns...the Extra Carbon Thick Mung adds to the Gas Gum to gradually trap the rings as described above...Coating EVERY Surface not rotating or moving enough to resist its presence with High Heat and Fuel-Air consumption as its source. THIS is the explanation and the answer to the Question of "Where does all my OIL keep going?" on High Mileage Motors.

Check Out the various Threads explaining the Procedures for performing the Top Engine Cleaning with the ACDelco TEC Solvent after you replace your Gasket Set on the undersides of the Valve Cover. You won't be disappointment with the modest performance and mileage improvement.


PS: Don't forget to Drain The Oil collected inside of the Air Plenum, and wash it all out with Purple Power and Hot Water...allow it to completely dry out prior to re-installing it on the Intake and Throttle Body.
 
Last edited:
  • Like
Reactions: Alec Venable

Mooseman

Moderator
Dec 4, 2011
25,972
Ottawa, ON
There are cons to trying to clean it. Eric the Car Guy on YT has had personal experience trying to run a flush to try to clean it. Wound up destroying an engine as stuff got dislodged and plugged the oil pickup.

My old 02 TB, the used replacement engine was about the same as yours. It did live a long life however I had to replace the cam phaser twice and the timing chain tensioner once. I did try running flushes at the time. Maybe it would have been fine if I left it alone.

I'd try to use a shop vac to suck out any loose stuff and that's it. Otherwise, I wouldn't touch it. Only thing I might try is use a quart of transmission fluid in place of one of the 7 quarts of oil it normally takes. That would slowly dissolve some of this stuff but not so aggressively like a solvent flush would.
 
  • Like
Reactions: Alec Venable

Mooseman

Moderator
Dec 4, 2011
25,972
Ottawa, ON
And this video popped up on my YT feed. Definitely not worth it for sludge:


And this is the one from ETCG on the blown up engine:

 
  • Love
Reactions: mrrsm

Alec Venable

Original poster
Member
Oct 23, 2016
30
Indiana, US
Thank you for the helpful responses! Since making that post, I have, to the best of my ability:

- Cleaned all gasket sealing surfaces,
- Cleaned the inside of the valve cover itself
- Cleaned the intake ports
- Cleaned the small crankcase ventilation port on the cylinder head (this was accomplished by shooting Berryman B12 Chemtool straight into the port 2 or 3 times)
- Performed a piston soak using Berryman B12 Chemtool in non-aerosol form (this was done before mrrsm's post suggesting the use of ACDELCO TEC, which looks to be more superior for that purpose)
- Replaced intake manifold and valve cover gaskets
- Installed intake manifold and valve cover, ensuring everything was properly torqued down
- Drained and changed engine oil and oil filter (I am now using Valvoline Restore and Protect, more on this to follow.)


After having done all this, the envoy runs well. It was interesting getting it to start. Since the fuel line was was disconnected from the rail to remove the intake manifold, it had no pressure upon reassembly. The first start resulted in what seemed to be a 6 cyl engine running on one cylinder for 15 seconds or so...didnt sound happy. Once adequate fuel pressure was established however, it roared to life and runs like a charm.

With all this in mind, I am now experiencing something interesting.

For the first test drive, not even 5 miles down the road, my oil pressure gauge drops to 0. I am familiar with the nature of the gauge on this thing, it not being an actual pressure reading, and assumed it was my CPAS clogged with some grit. I had experienced this sort of thing before, replacing the CPAS solved it. When I experienced these issues in the past, I installed an analog oil pressure gauge and did confirm I had oil pressure. Back to now, sure enough, the screens on my CPAS contained this black, coffee ground looking gunk. I cleaned it off, reinstalled and was on my way. The next day, driving to and from work, I pull in my driveway, and the same thing. Oil pressure gauge dropping to 0. Pulled my CPAS and the screens were gummed up again.

Fast forward...3 days? And now I am driving about an hours worth, and as a precaution, pulling my CPAS to clean it before I get the 0 oil pressure reading. It seems to be clogged slightly less each time...but I have to wonder. Either I've freed something up that has to work its way through, the crankcase now experiencing proper vacuum for the first time in...a while? is loosening up junk, or Valvoline Restore and Protect is doing too well...Anybody else experienced this after a valve cover gasket job? I am intrigued to say the least. Slightly concerned as well.
 

Mooseman

Moderator
Dec 4, 2011
25,972
Ottawa, ON
It is possible that coked up oil is getting freed up and clogging the CPAS however, this shouldn't affect the oil pressure switch or pressure. Only CPAS/VVT cam phaser actuation would be affected.

It could just be coincidental that the oil pressure switch is either defective (common) or got plugged with gunk. Just removing the valve cover could have loosened and dropped some loose gunk. and it's making its way around the engine. I would check the oil pressure, replace the pressure switch and do another oil change just to remove as much loose junk as possible from the oil.
 

mrrsm

Lifetime VIP Donor
Supporting Donor
Member
Oct 22, 2015
8,181
Tampa Bay Area
There is one additional consideration which I failed to mention regarding using the Top Piston Cylinder Soak (whether using the Berrymans Chem-Tool or the ACDelco TEC Solvent) in that if a sufficient quantity of this material leaks past the Piston Rings and migrates into the Oil Pan... The Extra Chemical Bath ...can seriously reduce Oil Lubricity. So ...Changing to a Fresh 7 Quart Dose of Mobil1 5W-30 FULL Synthetic and a Brand New Mobil1 or K&N Oil Filter should be part and parcel to this process.

The other possibility is that if any of that Carbon "MUNG" loosened up enough as a result of the Berryman's migrating around inside of the Crankcase - Oil-Pan...any of those free-floating Carbon Chunks can quite easily get vectored along the Oil Stream and sucked up by the vacuum created by the Gerotor Oil Pump.

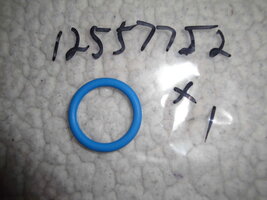
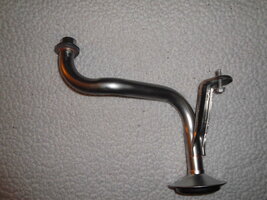
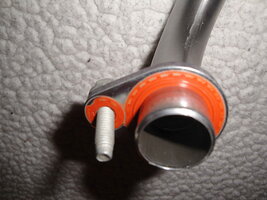
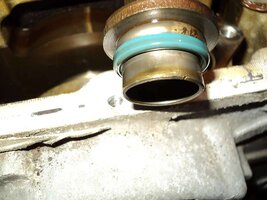
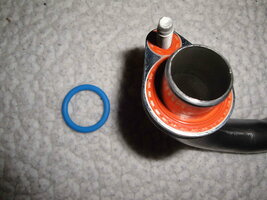
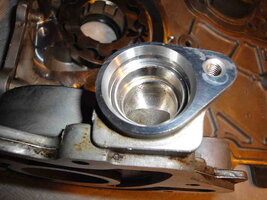
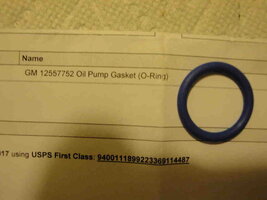
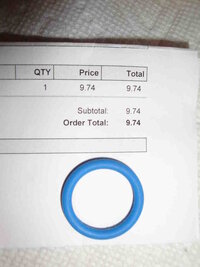
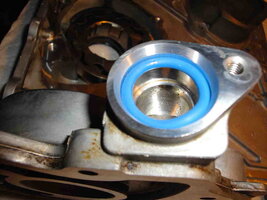
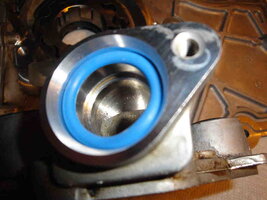
It is worth mentioning that when running at close to 3,000 RPM, the Gerotor Oil Pump moves nearly 11 Gallons of Motor Oil Through the system Per Minute at around 65 PSI. Consequently, having a Strong Vacuum is naturally requisite here... and if the Oil Pick Up Tube were to be suddenly occluded and compromised by Greasy Carbon Junk blocking that opening... enough of a Strong Vacuum could develop in between to Defeat the OEM "Blue" Viton Seal between the Base where the Pick Up Tube Bolts into the front of the Engine Block... and the hollow, VERY Shallow, Beveled Cavity leading into the Gerotor Oil Pump Pick Up Tube Manifold. If AIR CAVITATION occurs at that location, the Engine Oil Pressure can suddenly Drop To ZERO.

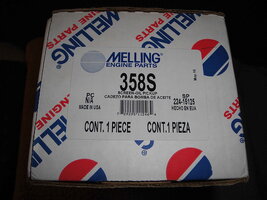
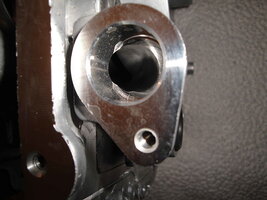
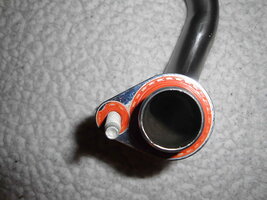
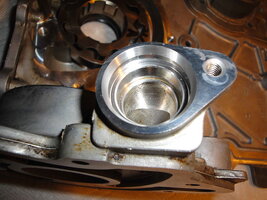
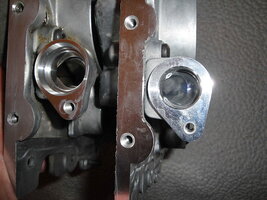
This issue was later addressed with the manufacture of an updated Gerotor Oil Pump, a modified Oil Pick Up Tube and an Orange Silicone Impregnated Wide Washer to replace the Old "Blue" O-Ring version previously subject to catastrophic failure. These components are NOT interchangeable in between the Old Style and the New Style Gerotor Oil Pumps. That New Orange Silicone Design... Keeps Air...OUT ...and ensures a Good Suction Draw for the Motor Oil nested in the Oil Pan to clear the Inlet Screen and get suctioned in from below.

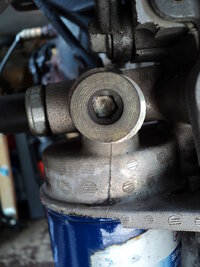
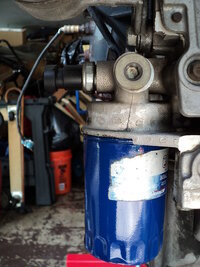
For any other Folks visiting this thread... before you get too concerned, by using an M16 X 1.50 to 1/4" NPT Adapter threaded in where the front (H-8) Hex Plug Location gets removed at the lower Right Passenger side of the Oil Filter Manifold... This will allow for using an Analog Oil Pressure Gauge fitted via an extra long Oil Line that will allow the Gauge to be routed up, over and across the top of the engine, then under the hood and rest near the windshield for a clear view of the ACTUAL Oil Pressure showing on that Gauge being developed ...at Idle :

29564782028_bb0d97337e_c.jpg29564785708_8b99044eb0_c.jpg

@MAY03LT shows this process in Part 2 of his Classic, Epic explanation on Video of How to set this all up:


If it rises above 12 PSI @ 600 RPM...Gradually increase the RPM and observe whether the pressure increases from there on or NOT... if it registers "0"... Then Shut Down The Motor ---IMMEDIATELY--- and you can be certain that the aforementioned conditions might have developed and more work to remove the Oil Pan and Timing Cover will be seen as necessary in your future.

It it helps... Please visit my "Flickr-Bucket" linked below that provides all manner of related GMT360 Engine and other component and New Parts images, etc.:


49576287002_21d17a86fe_c.jpg49576058076_a537f60d70_c.jpg49576286922_f8199703df_c.jpg49576291827_0c3691c2f3_c.jpg49575555988_4398ec2c8c_c.jpg49576291702_6f539cfe43_c.jpg49576291697_b5837ac7fb_c.jpg49575555913_e474ec601e_c.jpg49576291647_d591778c33_c.jpg49576063001_a9db397f35_c.jpg49576291607_9d850c51af_c.jpg49576062871_d6eb44f377_w.jpg49576291552_6023ea9bf7_c.jpg50109253138_56e5266194_c.jpg50109253168_20825e487c_c.jpg50109253133_c1269884db_c.jpg50109823981_3f8445dcb5_c.jpg50109253108_898232f3c6_c.jpg
 
Last edited:
  • Like
Reactions: Mooseman

Alec Venable

Original poster
Member
Oct 23, 2016
30
Indiana, US
Interesting. Well it looks like I'll be connecting an analog gauge again to be on the safe side. Man I would certainly hope dropping my oil pan isnt necessary yet. What a task. For reference, last time I connected an analog gauge, I got 11 PSI at 625rpm and 25PSI at 1,200rpm. These readings were taken with the engine at full operating temperature, about two years ago.

One thing I am still puzzled about however, is why a dirty CPAS screen on the inlet portion of the solenoid housing results in this "0 oil pressure" gauge reading, and then how keeping this screen clean results in no sort of low oil pressure reading at all. Would over advanced exhaust cam timing resulting from a lack of oil pressure in the CPAS due to a clogged screen lead the PCM to assume a low oil pressure scenario existing throughout the entirety of the engine, even though this scenario may only exist inside the CPAS?
 

mrrsm

Lifetime VIP Donor
Supporting Donor
Member
Oct 22, 2015
8,181
Tampa Bay Area
Not Likely... The range of response here runs from 0-25 Degrees on a 360 Degree Radial and all that the CPAS Solenoid does to perform its Job is to shunt the Oil in and out through the Screened Ports portions to put pressure upon the Helical Gear Innards of the Cam Phaser, making it possible to have an infinitely variable response in a way that ordinarily allows for Exhaust Valve Train responses that can make for a LOT of Power and Performance over a wide range of RPM.

Due to Newton's Third Law of Motion, as the Solenoid Inner PIN repeatedly electrically activates... The Body of the CPAS will try to move in and out of that narrow cylindrical port in the Opposite Directions while being retained by a loose metal tab and fastener... moving just enough to eventually wear out the Sealing "O" Ring around its casement.

Over time, ... Oil can leak out and around that position as the "O" Ring Flattens Out and the Dirty Fluid can contaminate the inside of the Electrical Harness Connector and-or leave a Long Oil Stain Trailing down the Passenger side of the Engine Block.

In some cases, this action is robust enough to allow the CPAS Body Casement to pound away at the unfinished hole, just inside of the head... and break through the residual soft aluminum left behind from an incomplete drill-out job done at the GM Factory.

Other than that, the only other remarkable aspect worth mentioning is its proximity in the Oil Galleries in relation to the Oil Filtration System just below as being one of the first "stops" for the Oil Under Pressure coming from the Gerotor Oil Pump output stream.

The reason the Extra Stainless Steel Screens are wrapped around the CPAS *piston and chamber* is because the Cam Phaser is essentially located at a "Dead End" of the Oil Delivery System Gallery, making it necessary to keep as much of that "Black Mung" as possible from contaminating the insides of the Cam Phaser.

The CPAS shunts the excess Motor Oil right back out and across the inside of the Upper Engine Head under the Valve Cover to drain back down into the Crankcase through a partially drilled out section of the "Lost Foam" Cast Aluminum Engine Head.

There IS one other issue that might raise its Ugly Head and that is having the Oil Pressure Relief Valve getting *STUCK* in the By-Pass position from getting sand and junk jammed between the Hex (H-6) retaining a Steel Cup (Piston-like) device fitted over the end of the strong spring nested inside the Pump. Dusty or Desert Driving Conditions might invite such an unusual event to occur if your Donor Motor hailed from any of the States having such a Harsh, Dry and "Gritty" environment.

Being thusly arranged... once the Oil Pressure within the Gerotor Pump compresses the Cup & Spring enough to allow it to open up that port, all of the output from the Gerotor Lobed Gears simply by-passes the normal Gallery Channels and then Dumps the Fluid right back into the Crankcase - Oil-Pan.

It's purpose is to do that sort of thing against the advent of a completely blocked Oil Filter... since All Liquids are In-compressible... it would avoid damaging the rotating assembly by dislodging any Main Cap Bearings from excessive or Extremes in Oil Pressure. There is also another Oil By-Pass Relief Valve adjacent the Oil Filter fitted therein for the very same reasons to prevent the Typical Mild Steel Oil Filter Canister from Bursting Open,
 
Last edited:
  • Like
Reactions: Mooseman

Mooseman

Moderator
Dec 4, 2011
25,972
Ottawa, ON
The CPAS is part of the oil flow path but it shouldn't restrict it. It's up in the head so I don't think it would restrict oil flow to major components. The oil pressure switch is directly above the filter and the oil is coming directly from the pump so I doubt very much the CPAS would lower the pressure there. I would be more inclined to suspect the oil pressure switch is bad, especially if it's an aftermarket, or a restriction in the oil filter.

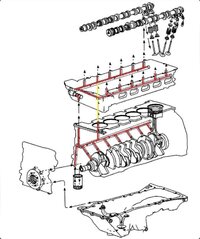
I remember seeing an oil flow path diagram for this engine but I'm not able to locate it.
 
  • Like
Reactions: mrrsm

Alec Venable

Original poster
Member
Oct 23, 2016
30
Indiana, US
IMG_0403.jpeg

I managed to find this image. Very informative as far as the oil flow path. Leads me to wonder where the heck all this crud is coming from that winds up in my CPAS screen.

Well with all this in mind, I’ll be connecting the analog gauge and honestly, I may just leave it connected indefinitely. GM’s choice to fit a fake pressure gauge on the 4.2L is really getting on my nerves. With that being said, I can see how the engine having such low pressure readings as being normal may cause many to worry. I digress though.

I am seriously beginning to see how much I lack understanding of the nature of the oil system inside my motor. Even just the CPAS itself. There are 3 ports on this thing, each port having its own screen, and I’m only noticing the crud on the screen that is located in between the 2 others. I am seriously questioning any understanding I thought I had of the flow of oil through the CPAS, and the entire engine as a whole. Looks like I have more reading to do.
 

mrrsm

Lifetime VIP Donor
Supporting Donor
Member
Oct 22, 2015
8,181
Tampa Bay Area
Yes... when I color-modified that particular OEM Drawing...I marked the Oil Path leading up to the Valve Train in YELLOW to distinguish it from the feed gallery leading to the sub-lines lubricating the Main Bearings.

The Valve Train components Turn at One Half of the Crankshaft's rotational speed and thus... the Camshaft Bearing Caps are made of soft aluminum and have no internal "Clam Shell " inserts. Even so, they will show very little wear over time, even on very high mileage engines.

Damage to the Camshaft Lobes can occur with having Persistent Oil Starvation from having a Low Oil Volume in the Crankcase and will be in evidence by signs of Lobe Galling during their inspection .. post-removal of the Valve Cover.

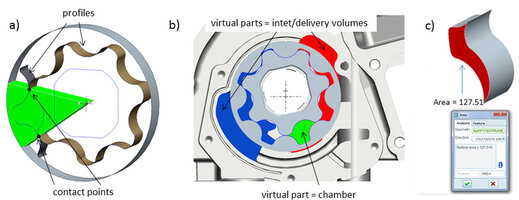
I have a Gerotor Oil Pump Autopsy "White Paper" written and posted somewhere on GMT Nation in the FAQ if you desire more information. It includes extensive comparative imagery showing the differences in between the Old and the New Gerotor Oil Pumps:

Some-steps-of-a-CAD-procedure-applied-to-a-gerotor-pump-a-generation-of-the-chamber.jpeg

This Image above and the Video linked below does an excellent job explaining --WHY-- Gerotor Oil Pumps manage to develop such a --Strong Suction -Vacuum-- and coupled with a Blocked Off Oil Pick Up Tube Screen... this condition can ruin the Old Style "Blue" Viton "O" Ring and collapse Engine Oil Pressure:


Forum Statistics

Threads
23,654
Posts
641,615
Members
19,069
Latest member
acsr526

Members Online