In a recent Video from Super Mario Diagnostics… his unnamed Guest showed something interesting and useful for ALL of us to know whenever performing General Automotive Diagnostics with LED Test Lights. The focus of the topic was that if we rely entirely upon the results coming from an LED Test Light when Testing Fuses… We just MIGHT be getting Fooled. Consider these Two Contrasting Test Procedures:
First, by using a Typical LED Test Light applied upon on One Particular Fuse:

First on One Test Leg … (And It Lights Up Nicely)

And then on the Other Test Leg… (Again, it Lights Up Nicely)

So Far … So Good, ... Good Fuse... Right? Hmmmm… Well, it SURE Looks Like It...
But Just In Case... Next we should use a Typical Digital Multi-Meter to perform a Voltage Test on the Same Fuse NOT A CONTINUITY TEST:

First, by taking a Voltage Reading on One Test Leg….

And then using the DMM touching upon the Other Test Leg…

Uh Oh… Ooooooooohhh... Say... What Just happened here?
Hmmm… We better pull out that particular Fuse from an abundance of caution and curiosity and give it a gander with a Graduated Eye-Ball ...and Lo and Behold... we see ...THIS:

A Blown Fuse…?
So how can this possibly be? And how can we have Differential Voltage Readings on the Two Test Legs of the SAME Fuse… and .... showing at a MUCH HIGHER VOLTAGE on that One Leg than either Normal Battery Voltage or the system’s Maximum Charging Voltage?
Well, check out this Fellow’s excellent explanation below on this phenomena and it will make perfect sense to prefer using the LED Test Light ***AND*** the DMM whenever Testing Fuses after throwing Unusual Codes:

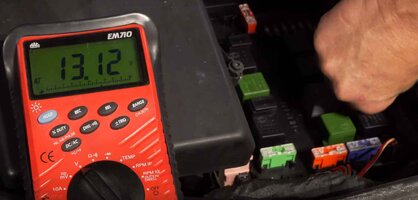
So after Replacing the Old Fuse with a New One...we Re-Test using the Typical DMM to compare the Voltage Readings on the Two Legs... and we get THESE Results:
First on One Test Leg:
Then on the Other Test Leg:

...and the Battery Voltage Readings Finally Reconcile.
First, by using a Typical LED Test Light applied upon on One Particular Fuse:
First on One Test Leg … (And It Lights Up Nicely)
And then on the Other Test Leg… (Again, it Lights Up Nicely)
So Far … So Good, ... Good Fuse... Right? Hmmmm… Well, it SURE Looks Like It...
But Just In Case... Next we should use a Typical Digital Multi-Meter to perform a Voltage Test on the Same Fuse NOT A CONTINUITY TEST:
First, by taking a Voltage Reading on One Test Leg….
And then using the DMM touching upon the Other Test Leg…
Uh Oh… Ooooooooohhh... Say... What Just happened here?
Hmmm… We better pull out that particular Fuse from an abundance of caution and curiosity and give it a gander with a Graduated Eye-Ball ...and Lo and Behold... we see ...THIS:
A Blown Fuse…?
So how can this possibly be? And how can we have Differential Voltage Readings on the Two Test Legs of the SAME Fuse… and .... showing at a MUCH HIGHER VOLTAGE on that One Leg than either Normal Battery Voltage or the system’s Maximum Charging Voltage?
Well, check out this Fellow’s excellent explanation below on this phenomena and it will make perfect sense to prefer using the LED Test Light ***AND*** the DMM whenever Testing Fuses after throwing Unusual Codes:
So after Replacing the Old Fuse with a New One...we Re-Test using the Typical DMM to compare the Voltage Readings on the Two Legs... and we get THESE Results:
First on One Test Leg:
Then on the Other Test Leg:
...and the Battery Voltage Readings Finally Reconcile.
Attachments
Last edited:
