Possible Control Module Problem - Blower Motor Wont Turn Off

shaun4282

Member
Jul 5, 2012
8
First time poster on the new site, have to say that it is alot more user friendly than TV! I am having the same issue as mentioned above with my blower motor running after truck was shut off. I'm not too confident with wiring and am nervous that I will do it wrong and short something else out. Form what I am understanding is that the new resistor has to be spliced with the old wiring system. Does anyone have a pic of what the wiring will look like with the new blower motor resistor?

Many thank in advance! This site (and as much as I hate to admit TV :hissyfit: ) have saved me TONS!!!!
 

Mark20

Member
Dec 6, 2011
1,630
Welcome to the Nation. The old site (OS in our lingo) is a useful source of information. Unfortunately the owner is only an enthusiast for making money. If you introduce yourself in the new member thread you'll get a link to the story.
 

The_Roadie

Lifetime VIP Donor
Member
Nov 19, 2011
9,957
Portland, OR
New ones at the parts store come with instructions how to splice them in. Repairing components inside the module is best left to folks with experience, I agree. So the repair will cost $50-75 instead of $5. At least it's not $300 at the dealer.
 

shaun4282

Member
Jul 5, 2012
8
Thanks guys for the quick replies! I was doing research on the OS and it looks like I need either

ACDelco
1580186 (older design)
1580567 (2004+ design)

I was also looking at the part number from the one I tool off my truck #52495874 and I found a comparison part at Autozone:
Duralast/A/C Heater Blower Motor Resistor (JA1639) | AutoZone.com

Am I correct in thinking that the old (current) blower motor that I have might need to be replaced as well?

Thanks again!!
 

The_Roadie

Lifetime VIP Donor
Member
Nov 19, 2011
9,957
Portland, OR
shaun4282 said:
I was also looking at the part number from the one I tool off my truck #52495874 and I found a comparison part at Autozone:
Duralast/A/C Heater Blower Motor Resistor (JA1639) | AutoZone.com
I get a price of that as $173! Insane. It should be $50-60 max.

The blower motor is sometimes, but not always, the root cause of resistor pack and blower speed module failures, if the current drawn by the motor goes above the design spec. Such as when bearings get old. Unless you can measure the current, people who have repeated failures are advised to swap the motor, too. But probably not on the first such failure. The module's more often at fault because of their substandard heat sink design.
 

shaun4282

Member
Jul 5, 2012
8
So it took alot longer that I thought it would to find the right replacement part, went to a local parts plus store and I don't think the kid knew what he was doing. Long story short, got a ACDelco replacement part for 60.00 and was very easy to install! Thanks Bill for your insight and quick response, very easy to wire together (and no did not use those useless 'butt' connectors :wink: ).
 

billzie

Member
Aug 20, 2012
86
Athens, OH
The_Roadie said:
Perceptive. :thumbsup: Parts store clerks think they're mechanics, and in reality, if they were competent, they'd ALREADY be working as mechanics. Or diagnosticians. :yes:

Hey now, I used to be what I considered myself to be an excellent counterman, it's been a while since I last worked as one 10+ years ago, and was at regional/national chains but was just when computer lookup began and we still had every parts manual and had a mini shop where we still did things like turn rotors drums flywheels and other shop type stuff. I admit many/most other guys I worked with over the 10 years I did it weren't the best at their job. IE, when I interviewed for the last place, I was the ONLY non-graduate of a auto mechanics school in the group of candidates for the job and I was the only one to pass any of the 4 tests they gave us (I passed all 4 with only 1 missed question). I consider myself to be a good R&R "alley mechanic" and used to do simple jobs in my garage every weekend for side money (back then) for neighbors and co-workers, however, I don't consider myself a good diagnostician (I have high standards) but I don't consider most of the shop mechanics in my town good diagnosticians either. That's why I frequent sites like this one to help me out, thank you all. :smile:
Now if I were only proficient at bread board work and was better familiar with electronic lingo, I think I could do the mosFET swap, just wish I had more time, better place to work on it, the discretionary funds, and a younger body to get it done LOL.
BTW, the guy at my local Radio Shack a self professed electronics geek didn't know what desolder wick was. When I have the funds I'm going to order from mcmaster carr as was mentioned earlier in this thread.
Bill.
 

The_Roadie

Lifetime VIP Donor
Member
Nov 19, 2011
9,957
Portland, OR
billzie said:
...I used to be what I considered myself to be an excellent counterman, it's been a while since I last worked as one 10+ years ago, and was at regional/national chains but was just when computer lookup began and we still had every parts manual and had a mini shop where we still did things like turn rotors drums flywheels and other shop type stuff.
Of course - YOU'RE not that guy I'm knocking nowadays. :wootwoot:You're a member here, after all. Those goofball modern parts jockeys are all over at Trailvoy.
BTW, the guy at my local Radio Shack a self professed electronics geek didn't know what desolder wick was.
:crazy: Solder suckers were all the rage, but the mechanical shock was starting to damage a lot of parts, even if you had the ESD-safe conductive barrel units. Desolder wick is an absolutely critical tool for surface mount parts. Solder suckers are still good for through hole items like stepper motors.

McMaster Carr can be a stickler for wholesale only, although I think they're not as adamant about it as Grainger. I have to have my wife's business keep a Grainger account open for me at home if I can't pass through a PO at work. Plenty of Ebay vendors and Amazon for wick, though.
 

Ghoster

Lifetime VIP Donor
Member
Nov 18, 2011
1,444
The_Roadie said:
Of course - YOU'RE not that guy I'm knocking nowadays. :wootwoot:You're a member here, after all. Those goofball modern parts jockeys are all over at Trailvoy. :crazy: Solder suckers were all the rage, but the mechanical shock was starting to damage a lot of parts, even if you had the ESD-safe conductive barrel units. Desolder wick is an absolutely critical tool for surface mount parts. Solder suckers are still good for through hole items like stepper motors.
McMaster Carr can be a stickler for wholesale only, although I think they're not as adamant about it as Grainger. I have to have my wife's business keep a Grainger account open for me at home if I can't pass through a PO at work. Plenty of Ebay vendors and Amazon for wick, though.

SOLDER SUCKERS!!!! :wootwoot::wootwoot::wootwoot:

I still have a couple in the old.... old tool box. My wife also has a Grainger account.:biggrin:
 

BRomanJr

Member
Dec 9, 2011
371
The_Roadie said:
Man, I gotta post a picture. My old, old electronics toolbox has WIRE-WRAP tools in it. Nobody knows about wire wrap anymore.

I do, did some repairs years ago on an old Hughes NC Control, I wonder if we could get ten people to own up to knowing what it is?
 

Mark20

Member
Dec 6, 2011
1,630
Wire wrap forever!!!!!!
 

Rich-MarionOH

Member
Jun 20, 2014
8
Marion, OH
I have an '08 TrailBlazer LT with dual auto climate control. The fan won't shut off at all. Had to pull fuse #35 (underhood) to prevent drawing the battery down.

First of all, where is the Blower Motor Control Module physically located?

Second, I read on the OS (other site) that my problem might be a blower resistor but the same site also is unclear whether units with the auto climate even have this resistor.

So what may the cause of my problem?

Help, PLEASE!! :crazy:
 

The_Roadie

Lifetime VIP Donor
Member
Nov 19, 2011
9,957
Portland, OR
Welcome! Read all the posts in this thread you're in PLUS http://gmtnation.com/forums/topic/2961-how-to-replace-blower-motor-resistor-pack-and-connector-pigtail/

The auto system has a module, the manual systems have a resistor pack. Located at the same location next to the blower motor. Different numbers of wires on the harness, but they tend to burn up for the same reason - poor design.

ADDED: Plus this: http://gmtnation.com/forums/topic/6062-updated-part-s-for-auto-blower-motor-speed-module/
 

Paul Bell

Member
Aug 16, 2014
460
Thread from the dead!

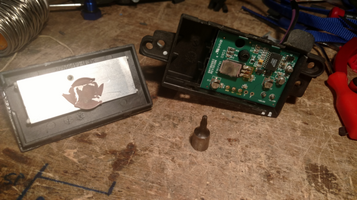
I had this problem of the blower being stuck on and this thread showed me what was wrong and how to fix it so I thought I'd add to it.

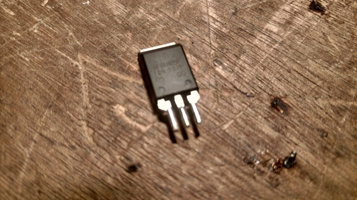
I ordered the transistor from Digikey along with some heat sink compound.

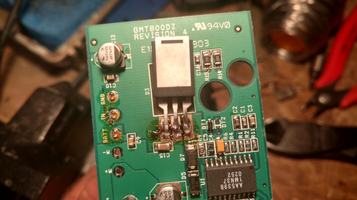
To remove the old transistor, snip two of the three leads soldered to the board. Then heat the one left and tug the transistor until it releases. Then do the remaining leads. Be careful not to allow solder to bridge between the three pads on the board.

The leads on the new transistor are too long, snip them to the right length.

Lay the new transistor so the heat sink plate faces down and apply a little solder to all three leads.

Hold the transistor in place on the board and just heat the leads until the solder on the other side melts into the pads on the board.

Clean the heatsink, apply the new heat sink compound and you're done!
 

Attachments

  • blower 1.png
    blower 1.png
    837.3 KB · Views: 19
  • blower 2.png
    blower 2.png
    759.7 KB · Views: 19
  • blower 3.png
    blower 3.png
    791.5 KB · Views: 20
  • blower 4.png
    blower 4.png
    765.3 KB · Views: 20
  • Like
Reactions: Mooseman

Realism

Member
Nov 25, 2015
213
Idaho
Thread from the dead!

I had this problem of the blower being stuck on and this thread showed me what was wrong and how to fix it so I thought I'd add to it.

I ordered the transistor from Digikey along with some heat sink compound.

To remove the old transistor, snip two of the three leads soldered to the board. Then heat the one left and tug the transistor until it releases. Then do the remaining leads. Be careful not to allow solder to bridge between the three pads on the board.

The leads on the new transistor are too long, snip them to the right length.

Lay the new transistor so the heat sink plate faces down and apply a little solder to all three leads.

Hold the transistor in place on the board and just heat the leads until the solder on the other side melts into the pads on the board.

Clean the heatsink, apply the new heat sink compound and you're done!

When I was having my issue with my controller a while back I ended up coming on a post on different site where the guy did just this. He replaced the FET in his and saved a lot of money by doing it. I had already purchased the part so I installed it anyways, but if I end up with the same issue in the future, I am so going to try this out. The one I got caused me wiring issues because it was poorly thought out then sent with wiring schematics or instruction. and all wires were one color.
 

Forum Statistics

Threads
23,681
Posts
641,972
Members
19,138
Latest member
wentzben

Members Online