Lower control arm brackets

MichEnvoyGuy

Original poster
Member
Dec 3, 2011
522
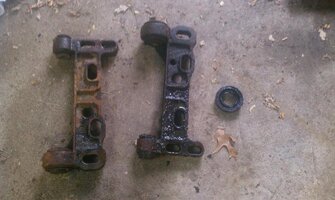
I "finally" am getting around to replacing my LCA brackets on my 2002 Envoy :lipsrsealed: They used to creak, oh about 50,000 miles ago.... lol... now they give a nice metallic clunk when I stop and the front end is so loose its frightening! :frown: The last time I had it aligned in 2009, they couldnt do it because the LCA brackets were loose then.

Looking at it the other night, is there anything I should know besides taking off the 3 bolts that connect it to the frame and the 2 nut/bolts that connect the bracket to the LCA itself? How hard is it to get it out of the frame - and do I have to disconnect the front shocks? Any good techniques to get the new bracket in aligned close to the old one so I drive to the alignment shop without chewing the heck out of my tires?
 

fishsticks

Member
Nov 21, 2011
433
  1. Unclip brake lines and ABS wires from ALL clips. You will need the length.
  2. Remove brake calipers and hang out of way.
  3. Remove swaybar links from LCAs.
  4. Unbolt outer tie rods from steering knuckle.
  5. Unbolt upper ball joint pinch joint. Tap ball joint free and let knuckle hang against CV axle.
  6. Use large hammer and drift (or pickle fork) to pop CV axles out of diff/splined disconnect.
  7. Unbolt lower ball joint from steering knuckle.
  8. Lift steering knuckle/axle and set out of way on large bucket or other raised surface.
  9. Remove lower shock mounts from LCAs. (Use a pickle fork and large hammer)
  10. Remove 3 alignment bolts from each side of IFS subframe.
  11. Pull/pry/wiggle LCAs and alignment brackets free.
Installation is the reverse. Alignment bolt torque is 175 ft/lbs.

I set my brackets with the fronts all the way in and the rears all the way out. That is max caster and almost 0 camber for me on my lift.
 

Sparky

Member
Dec 4, 2011
12,927
fishsticks said:
Remove lower shock mounts from LCAs. (Use a pickle fork and large hammer)

Good luck with that :crazy: I couldn't get mine off that way when I did my shocks. The rubber was too springy and absorbed all the impact. I just pulled the shock from the lower mount and left the mount on the LCA lol.
 

fishsticks

Member
Nov 21, 2011
433
Sparky said:
Good luck with that :crazy: I couldn't get mine off that way when I did my shocks. The rubber was too springy and absorbed all the impact. I just pulled the shock from the lower mount and left the mount on the LCA lol.


I do mine with a 2lb sledge.

I take the nut all the way off. Then I pound the pickle fork in between the LCA and the shock mount until it won't budge. After that I put the nut back on the LCA so that about half the threads are on the stud.

I give it a few good two-handed whacks on the nut and it pops... usually on the 3rd whack or so.
 

Sparky

Member
Dec 4, 2011
12,927
Huh. I guess my truck hates me then. I did that for a good 30 minutes and it didn't budge in the slightest. Just got my arm sore from swinging that hammer. Maybe mine has more rust build up or something than yours does. I think Roadie uses a pitman arm puller on his, I didn't have one to try however.
 

fishsticks

Member
Nov 21, 2011
433
Sparky said:
Huh. I guess my truck hates me then. I did that for a good 30 minutes and it didn't budge in the slightest. Just got my arm sore from swinging that hammer. Maybe mine has more rust build up or something than yours does. I think Roadie uses a pitman arm puller on his, I didn't have one to try however.


Roadie is old and can't swing a hammer anymore. :biggrin:
 

markarock

Member
Dec 12, 2011
9
I prefer the pickle fork as well. Much faster. Much easier. If you use a 3 lb. sledge, it only takes two solid whaps! You'll be there all day with a sissy sledge, unless you've got Popeye arms.

Mark
 

Sparky

Member
Dec 4, 2011
12,927
I guess I'm a sissy :redface:

Hey, I'm a PC geek first, that doesn't require a whole lot of strength so give me a break :rotfl:
 

Regulator

Member
Nov 20, 2011
2,496
fishsticks said:
I do mine with a 2lb sledge.

I take the nut all the way off. Then I pound the pickle fork in between the LCA and the shock mount until it won't budge. After that I put the nut back on the LCA so that about half the threads are on the stud.

I give it a few good two-handed whacks on the nut and it pops... usually on the 3rd whack or so.

:iagree: exact same way I go after mine! I did learn the hard way to put the nut back on before swinging away! :duh:
 

ScarabEpic22

Member
Nov 20, 2011
728
I used to be able to get the lower shock yoke bolt off that way with either a puller or a pickle fork, the last 2 times not so much. I hit it with a 3lb sledge, the first time probably 30ish times. Its not coming off. Did what Regulator did and just pulled the shock out of the mount and put it back in. Was easy at stock height, not so much with the 3" lift haha.

Hopefully the SS is easy to pop, going to put some coilovers on it sometime soon I hope.
 

MichEnvoyGuy

Original poster
Member
Dec 3, 2011
522
fishsticks said:
  1. Unclip brake lines and ABS wires from ALL clips. You will need the length.
  2. Remove brake calipers and hang out of way.
  3. Remove swaybar links from LCAs.
  4. Unbolt outer tie rods from steering knuckle.
  5. Unbolt upper ball joint pinch joint. Tap ball joint free and let knuckle hang against CV axle.
  6. Use large hammer and drift (or pickle fork) to pop CV axles out of diff/splined disconnect.
  7. Unbolt lower ball joint from steering knuckle.
  8. Lift steering knuckle/axle and set out of way on large bucket or other raised surface.
  9. Remove lower shock mounts from LCAs. (Use a pickle fork and large hammer)
  10. Remove 3 alignment bolts from each side of IFS subframe.
  11. Pull/pry/wiggle LCAs and alignment brackets free.
Installation is the reverse. Alignment bolt torque is 175 ft/lbs.

Really?

When I was replacing my motor mounts I was looking at the brackets and it didnt look like I'd have to disassemble everything! I guess I was wrong.

Taking the steering knuckle out completely is no big deal to me; done it a dozen times. But removing the shock bracket & the end link is a PITA and Im NOT looking forward to that....

Thanks for posting that for me. It lead me in the right direction....
 

fishsticks

Member
Nov 21, 2011
433
MichEnvoyGuy said:
Really?

When I was replacing my motor mounts I was looking at the brackets and it didnt look like I'd have to disassemble everything! I guess I was wrong.

Taking the steering knuckle out completely is no big deal to me; done it a dozen times. But removing the shock bracket & the end link is a PITA and Im NOT looking forward to that....

Thanks for posting that for me. It lead me in the right direction....

I'm assuming you'll be replacing the bracket and LCA as a unit. They come that way from Mevotech for less than $150 a side and have new lower ball joints in them already.

If you're only going to replace the bracket, you could skip some of those steps.
 

MichEnvoyGuy

Original poster
Member
Dec 3, 2011
522
fishsticks said:
I'm assuming you'll be replacing the bracket and LCA as a unit. They come that way from Mevotech for less than $150 a side and have new lower ball joints in them already.

If you're only going to replace the bracket, you could skip some of those steps.

Ive already replaced my ball joints in 2010 so in my case, I dont have to replace the whole LCA's.... although last year when I was doing my ball joints I did see 'after the fact' that I could buy the mevotech's :bonk:

So seeing that I only have to replace the brackets, can I skip removing the shock from the control arm, the tie rod end, and the end link? (those are the 3 things I despise removing ... lol)
 

fishsticks

Member
Nov 21, 2011
433
MichEnvoyGuy said:
Ive already replaced my ball joints in 2010 so in my case, I dont have to replace the whole LCA's.... although last year when I was doing my ball joints I did see 'after the fact' that I could buy the mevotech's :bonk:

So seeing that I only have to replace the brackets, can I skip removing the shock from the control arm, the tie rod end, and the end link? (those are the 3 things I despise removing ... lol)

It'll be tight, but yes. Personally I found that having the LCA to use as a lever was helpful, but you can probably get the brackets out with creative use of a prybar.
 

MichEnvoyGuy

Original poster
Member
Dec 3, 2011
522
So who has replaced just their brackets before? What peripherals did you remove to get at them?
 

jimmyjam

Member
Nov 18, 2011
1,634
i pretty much removed everything; its just easier to maneuver. you could potentially just remove the shock, sit the lower ball joint on a jack to support it, and pull the lower control arm out a little

take a lot of pics and measurements of the depth of the bracket in relation to the frame so you can eyeball it when you put the new one back in. hopefully you have an alignment place nearby.
 

MichEnvoyGuy

Original poster
Member
Dec 3, 2011
522
Ok started working on the 'Voy at 10am, by 1pm I had the drivers side axle seal & the drivers LCA bracket done and everything back together (Man, that seal puller tool is a ROCKSTAR!!!) lol. The last time I replaced the seal, about 4-5 years ago, I used screwdrivers to pry it out and it took me hours. If I spent 3 minutes on it this time, I'd be shocked.

Anyways, the lower control arm on the drivers side came right out; after all, it had been 'lubed' by the leaking axle for 2 or 3 years now...heh. I took off the tie rod, the upper ball joint pinch, the wheel bearing, got the half shaft completely out of the way, took off the 1 end of the sway bar link - Thank GOD I put never-seize on the end link threads the last time I replaced them (2008?), loosened the LCA bracket bolts - btw, mine werent guerilla tight by any means. I got my 14" or so 1/2"breaker bar, put a pipe on the end for torque and it came loose right away. The rest of the way I used a ratchet.

So after I got the bolts out, the old LCA bracket slid right out like buttah. The new one going in was a little tricky; I had to take my crow bar and pry apart the opening a bit. I also took engine degreaser and totally cleaned the area with a hard bristled brush because the cartridge area where the LCA bracket goes was full of crap. When I took the bracket off, a ton of gear lube dripped out. And it wasnt from removing the 1/2 shaft - I had such a bad leak I was topping my front axle off every 2 weeks until I could get to it. When I took the 1/2 shaft out, no fluid dribbled :eek:

I took a lunch break, and now Im going to do the passenger side. Im NOT looking forward to removing the half shaft on that side, Ive heard it to be a PITA and I havent removed it myself in about 6 years...lol. Happy thoughts, Chris...happy thoughts :lipsrsealed:
 

jimmyjam

Member
Nov 18, 2011
1,634
hope you lubed it when you put it in :crazy:
 

MichEnvoyGuy

Original poster
Member
Dec 3, 2011
522
jimmyjam said:
hope you lubed it when you put it in :crazy:

Lubed what? :confused:

Ok so the passenger side was easier than the drivers side, either that or I knew what I was doing and it went a lot easier...lol.

On the passenger side, I took off the knuckle from the upper ball joint, disconnected the half shaft at the wheel bearing, and removed the tie rod. Then, I just pushed the lower control arm out of the way and wedged it against the frame so I could get at the bracket. I didnt have to remove the half shaft from the axle on the pass. side.

The passenger bracket took me about 10 more minutes than the driver side to get out - it was rusty and wasnt well 'lubed' with gear oil like my drivers side was...lol. Getting the bracket back in was a treat and took a lot of beating with my BFH and a crow bar.

Just got home from the alignment- get this! I almost didnt need an alignment. The guy wanted to know how I did that. lol. I got the alignment anyway and it drives nicer now. I dont get that "THUNK" out of the front end now every time I stop. Also, the steering wheel itself is tighter. The steering had got very sloppy and slow to respond to me. Now it seems much tighter and responsive :thumbsup:
 

MichEnvoyGuy

Original poster
Member
Dec 3, 2011
522
And sorry...how rude of me!

View attachment 17364

I will take some more pictures later/tomorrow/another date to display the actual bushings. The drivers side was disintegrated and I suspect it had something to do with the gear oil bath it was receiving over the years...lol. The passenger side was still intact but very badly dog-eared (read: the bushing was no longer round, it was oval). Strangely, I still get a creeeeeaaaaakkk when the front end dips from the passenger side only, even after replacing the upper control arms in 2010 and the lowers now. :confused:
 

Attachments

  • LCA Brackets 12-2011.jpg
    LCA Brackets 12-2011.jpg
    82.9 KB · Views: 15

Sparky

Member
Dec 4, 2011
12,927
How old are the upper shock mounts? They might be creaking a bit. Also, when you tightened down the bolts connecting the arms to the bushings, did you do it with the suspension loaded or up in the air? They really should be fully tightened down with the suspension loaded so that the bushings are in a neutral position at rest instead of slightly twisted.
 

MichEnvoyGuy

Original poster
Member
Dec 3, 2011
522
Sparky said:
How old are the upper shock mounts? They might be creaking a bit. Also, when you tightened down the bolts connecting the arms to the bushings, did you do it with the suspension loaded or up in the air? They really should be fully tightened down with the suspension loaded so that the bushings are in a neutral position at rest instead of slightly twisted.

Ok the shock mounts are original. I replaced the front shocks a few years back and just compressed the springs, put the new shocks in and that was it.

Also, I tightened it on jack stands. The new bushings are urethane (at least from what I saw), does that make any difference?
 

Sparky

Member
Dec 4, 2011
12,927
Could be the upper mounts then if they are original. How do they look? When I replaced my shocks and mounts my uppers were pretty worn looking.

Urethane bushings are a little different than rubber, but I would think similar would apply to them (not positive on this). When I replaced my rear axle I used a second, smaller jack to load the suspension on each side close to the normal resting position before cranking down the bolts. Before pulling the shock mounts it might be worth just taking the wheel off, loosening the bushing bolts, and using a jack to load the suspension before tightening the bolts back down.

I think urethane bushings need greased as well, don't they? Are there zerk fittings on them?
 

MichEnvoyGuy

Original poster
Member
Dec 3, 2011
522
Sparky said:
Could be the upper mounts then if they are original. How do they look? When I replaced my shocks and mounts my uppers were pretty worn looking.

Urethane bushings are a little different than rubber, but I would think similar would apply to them (not positive on this). When I replaced my rear axle I used a second, smaller jack to load the suspension on each side close to the normal resting position before cranking down the bolts. Before pulling the shock mounts it might be worth just taking the wheel off, loosening the bushing bolts, and using a jack to load the suspension before tightening the bolts back down.

I think urethane bushings need greased as well, don't they? Are there zerk fittings on them?

Ill remember that for when I do the shock mounts. When I replaced the shocks, I remembered the mounts looking ok, but that was probably 2006-2007 we are talking about...lol.

There are no zerk fittings, they are the Dorman brackets. Theres definitely some rubber looking parts in there but also combined with a hard white plastic looking bushing too.

Best part - they have a lifetime warranty :biggrin:
 

ieatglue

Member
Nov 20, 2011
152
Does the dealer sell the lower control arm bracket bolts separately? Mine are so corroded that 1/2 the thread is missing! I'd tighten them to 175lb/in but I'm afraid they might snap!
 

neelskit

Member
Dec 7, 2011
69
MichEnvoyGuy said:
So who has replaced just their brackets before? What peripherals did you remove to get at them?

I know you've already tackled this job, but for future reference, I just replaced mine and all I had to remove was the end link to stabilizer bar nut and push the end link up and out of the way. I did have to pry the old bracket out with a pry bar and tap the new one in with a hammer, but much easier than removing the LCA altogether. :thumbsup:
 

ieatglue

Member
Nov 20, 2011
152
When I bolted up my control arm bracket, I pushed it in all the way. What's a decent way to orient the bracket to get the truck to drive well enough to get to an alignment shop?
 

neelskit

Member
Dec 7, 2011
69
I did the same. Fortunately, I have an alignment shop right across the street. If it's not too far a drive for you, it shouldn't be a problem. Just take it slow.
 

jimmyjam

Member
Nov 18, 2011
1,634
ieatglue said:
When I bolted up my control arm bracket, I pushed it in all the way. What's a decent way to orient the bracket to get the truck to drive well enough to get to an alignment shop?

as long as your toe is close, theres not much to worry about

i once drove to the alignment shop with one wheel toed in so bad it was chirping as it shimmied down the road :lipsrsealed: (they were old tires)
you can eyeball it and adjust your tie rods if its way off
 

ieatglue

Member
Nov 20, 2011
152
That's what I did for the driver side. I just started doing the passenger side today. I got the upper bushings in within about 40 minutes. The LCA bracket came out in about 5 minutes and I pressed in the bushings in about 45 minutes. Upper ball joint took me about 5 minutes. I love this loan-a-tool thing!!

Here's the passenger side bushing!

bcaf7a96.jpg


0b6f7d05.jpg


5f65499c.jpg


I also noticed some grease splashed around the CV axle. The boot has no tears though. What else could it be? Looks new

fa6fe358.jpg
 

The_Roadie

Lifetime VIP Donor
Member
Nov 19, 2011
9,957
Portland, OR
ieatglue said:
I also noticed some grease splashed around the CV axle. The boot has no tears though. What else could it be?
Classic leakage out of the inner part of the boot towards the centerline. The bands start to loosen over time or especially after a lift. Remove the band and replace it with a big-ass hose clamp. The off-center screw drive will not give you any noticeable vibration, but if you're anal, you might glue on a counterweight, or use TWO hose clamps spliced together to make a longer one, and cut off the excess worm drive banding.
 

ieatglue

Member
Nov 20, 2011
152
the roadie said:
Classic leakage out of the inner part of the boot towards the centerline. The bands start to loosen over time or especially after a lift. Remove the band and replace it with a big-ass hose clamp. The off-center screw drive will not give you any noticeable vibration, but if you're anal, you might glue on a counterweight, or use TWO hose clamps spliced together to make a longer one, and cut off the excess worm drive banding.

Aww man! I just finished overhauling the front end about 30 minutes ago! I'll do that when I flush the brakes next weekend. Thanks!
 

Forum Statistics

Threads
23,273
Posts
637,499
Members
18,472
Latest member
MissCrutcher

Members Online