How to: Replace the Roof Mount “Shark Fin” Antenna: 2006 Envoy SWB Denali
A couple years ago I busted the plastic housing of the roof mounted antenna, aka shark fin, on our Envoy with my snow brush. The cold combined with enough snow to have buried the antenna from my sight, and likely a few years of UV damage, allowed the plastic cover to shear off just above its base. I two-part epoxied it which lasted for a couple years until I, ahem, repeated the exercise. In the meantime I had purchased a new antenna so I got right to work replacing it the same day it broke this second time.
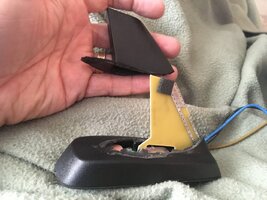
Here are the replacement steps I did, YMMV.
Tools:
Small flat blade for popping a cover or harness connector apart
#2 Philips screwdriver
T20 torx screw driver
10mm x ¼” drive socket/ratchet (better would be a 10mm ratcheting wrench)
1. On the driver’s A pillar, pop the round cover open that is near the top. This will reveal a Philips screw. The cover is captive to the screw. Remove the screw.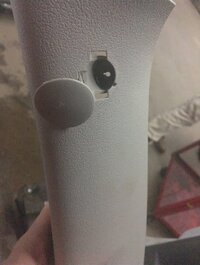 9571
9571
2. Pull the top of the cover away from the pillar. The rubber trim along the outside will resist you a bit. Once pulled away you work it back and forth a bit more. There is spring clip furtherdown the cover that fits into a square hole in the pillar. Once that is free you work the cover out from the dash.
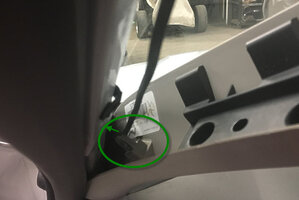 9575
9575 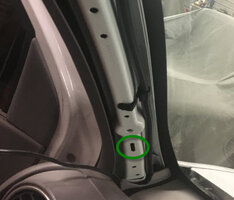 9574
9574
3. Unclip the sun visor from the inboard retainer. Remove the torx screw and the retainer.
4. Remove the 3 torx screws that hold the sun visor in place. Carefully lower the sun visor and note that is tethered yet by its wiring harness. It would be improper to let the weight of the sun visor hang and stress its wire harness. I did exactly that anyway and was lucky to have no ill effects.
5. The headliner corner can be lowered now but will be resisted by the same rubbertrim that resisted the A pillar cover. Be careful to not stress the headliner and kink it. At this point you can lower it just enough to slide a hand in, but not much more.
6. Reach in and unlock this red-wire connector to release the sun visor. Hear the harness breathe a sigh of relief as the weight of sun visor is removed.
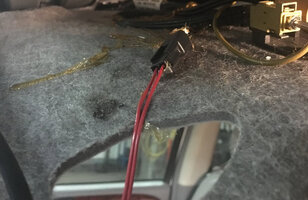 9569
9569
7. These connectors here (next few pics), a single tan/yellow wire and a blue and black wire pair (black is hard to see in this pic), lead to the antenna. Disconnect these. It would be more obvious as to how these connectors release if you could see them better. There is a tab on the underside of each connector that detaches them from the headliner to see easier, bend the tab down and slide it toward you.
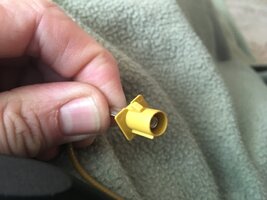
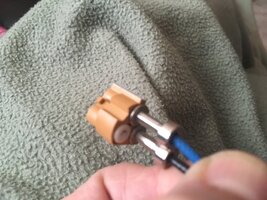
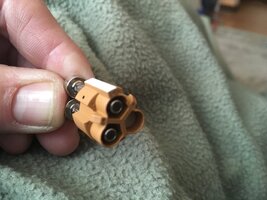
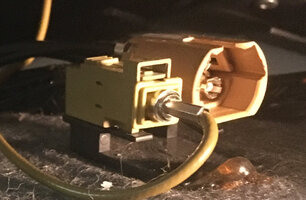
The following pic can be referenced for the next few steps"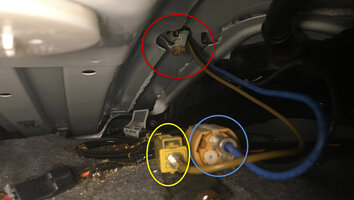 9568
9568
8. Once the connectors are apart, use the 10mm to loosen this bolt (red circle). It may be a little difficult to start as there is some thread locker on the threads and likely some corrosion. With the bolt out remove the 3 finger ‘washer’ that the bolt retained against the roof.
9. The base of the antenna has a plastic post that goes through its own hole in the roof (red circle, right side of pic). The post has a pair of tabs/barbs that need to be squeezed together to allow the base of the antenna to pass through the roof. Squeeze these tabs while working the antenna around to release this post, as well as the threaded post the bolt was removed from in previous step, up and through the roof. The plastic post on mine was brittle and broke off in the process. Guide the antenna harnesses out through the roof hole.
10. Use a soft cloth dampened with soapy water and clean the years of grime off the roof around the antenna’s gasket. Avoid getting water through the holes. Wipe dry.
11. Installation is the reverse of removal and should be fairly straight forward. The new antenna should have come with a new 3 finger washer. This washer gets deformed against the roof so you will be tightening the bolt for a bit to compress it and the bolt won’t free spin as it has a thread locker pre- applied, so expect some wrenching time. Recall the rubber trim that fought the dropping of the headliner and removal of the A pillar cover as it will do so for install too. If you're not careful, this edging will be curled up. Also take note of the A pillar cover’s spring clip needing to be properly aligned to its slot during cover installation. Before buttoning things up, test the mirror light, your XM radio, and OnStar if so subscribed.
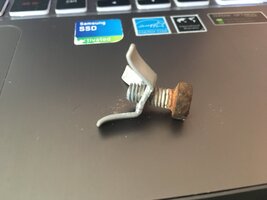
Notes:
I did an extensive 3.5 minute search on my phone for how to lower the headliner and didn’t find instructions other than how to disassemble the entire vehicle in order to completely remove the headliner. So I just winged it. Perhaps a little more investigation/patience/competence might have yielded more working space above the headliner. The way I did that was likely not ideal.
If during the work the plastic adapter for the sun visor mounting falls out, it’s installed in this orientation. 9570
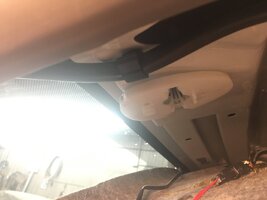
I found the antenna harness connectors a pain to work with, but some patience will get you there. I think the large connector had squeeze points and the small one a locking tab. The bigger one was the hardest for me, fought me a lot. A buddy reached in and did it in 3 seconds so likely my incompetence in action, I dunno.
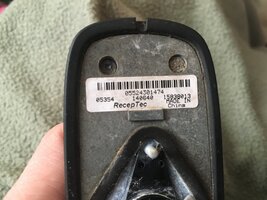
What I believe was the OEM shark fin antenna markings:
Special Note on the Replacement Part
My replacement antenna I bought was NOT the same as the OEM one – mine only had the tan/yellow wire, otherwise identical. My fault for not researching it well enough I guess, it was a fleaBay purchase, I think it was $35ish? With a broken antenna to deal with, to avoid snow/ice/water intrusion I elected to install it anyway and deal with it later. Interestingly, XM worked! We don’t subscribe to XM but there is the free channel and it was coming in loud and clear. It is my assumption that the two wires I didn’t have are part of the OnStar system which I also do not subscribe too,and so did not test. This assumption remains not verified – I invite feedback on that point.
I hope this may help someone else. Cheers.
A couple years ago I busted the plastic housing of the roof mounted antenna, aka shark fin, on our Envoy with my snow brush. The cold combined with enough snow to have buried the antenna from my sight, and likely a few years of UV damage, allowed the plastic cover to shear off just above its base. I two-part epoxied it which lasted for a couple years until I, ahem, repeated the exercise. In the meantime I had purchased a new antenna so I got right to work replacing it the same day it broke this second time.

Here are the replacement steps I did, YMMV.
Tools:
Small flat blade for popping a cover or harness connector apart
#2 Philips screwdriver
T20 torx screw driver
10mm x ¼” drive socket/ratchet (better would be a 10mm ratcheting wrench)
1. On the driver’s A pillar, pop the round cover open that is near the top. This will reveal a Philips screw. The cover is captive to the screw. Remove the screw.
 9571
95712. Pull the top of the cover away from the pillar. The rubber trim along the outside will resist you a bit. Once pulled away you work it back and forth a bit more. There is spring clip furtherdown the cover that fits into a square hole in the pillar. Once that is free you work the cover out from the dash.
 9575
9575  9574
95743. Unclip the sun visor from the inboard retainer. Remove the torx screw and the retainer.
4. Remove the 3 torx screws that hold the sun visor in place. Carefully lower the sun visor and note that is tethered yet by its wiring harness. It would be improper to let the weight of the sun visor hang and stress its wire harness. I did exactly that anyway and was lucky to have no ill effects.
5. The headliner corner can be lowered now but will be resisted by the same rubbertrim that resisted the A pillar cover. Be careful to not stress the headliner and kink it. At this point you can lower it just enough to slide a hand in, but not much more.
6. Reach in and unlock this red-wire connector to release the sun visor. Hear the harness breathe a sigh of relief as the weight of sun visor is removed.
 9569
95697. These connectors here (next few pics), a single tan/yellow wire and a blue and black wire pair (black is hard to see in this pic), lead to the antenna. Disconnect these. It would be more obvious as to how these connectors release if you could see them better. There is a tab on the underside of each connector that detaches them from the headliner to see easier, bend the tab down and slide it toward you.


The following pic can be referenced for the next few steps"
 9568
95688. Once the connectors are apart, use the 10mm to loosen this bolt (red circle). It may be a little difficult to start as there is some thread locker on the threads and likely some corrosion. With the bolt out remove the 3 finger ‘washer’ that the bolt retained against the roof.
9. The base of the antenna has a plastic post that goes through its own hole in the roof (red circle, right side of pic). The post has a pair of tabs/barbs that need to be squeezed together to allow the base of the antenna to pass through the roof. Squeeze these tabs while working the antenna around to release this post, as well as the threaded post the bolt was removed from in previous step, up and through the roof. The plastic post on mine was brittle and broke off in the process. Guide the antenna harnesses out through the roof hole.
10. Use a soft cloth dampened with soapy water and clean the years of grime off the roof around the antenna’s gasket. Avoid getting water through the holes. Wipe dry.
11. Installation is the reverse of removal and should be fairly straight forward. The new antenna should have come with a new 3 finger washer. This washer gets deformed against the roof so you will be tightening the bolt for a bit to compress it and the bolt won’t free spin as it has a thread locker pre- applied, so expect some wrenching time. Recall the rubber trim that fought the dropping of the headliner and removal of the A pillar cover as it will do so for install too. If you're not careful, this edging will be curled up. Also take note of the A pillar cover’s spring clip needing to be properly aligned to its slot during cover installation. Before buttoning things up, test the mirror light, your XM radio, and OnStar if so subscribed.

Notes:
I did an extensive 3.5 minute search on my phone for how to lower the headliner and didn’t find instructions other than how to disassemble the entire vehicle in order to completely remove the headliner. So I just winged it. Perhaps a little more investigation/patience/competence might have yielded more working space above the headliner. The way I did that was likely not ideal.
If during the work the plastic adapter for the sun visor mounting falls out, it’s installed in this orientation. 9570

I found the antenna harness connectors a pain to work with, but some patience will get you there. I think the large connector had squeeze points and the small one a locking tab. The bigger one was the hardest for me, fought me a lot. A buddy reached in and did it in 3 seconds so likely my incompetence in action, I dunno.
What I believe was the OEM shark fin antenna markings:

Special Note on the Replacement Part
My replacement antenna I bought was NOT the same as the OEM one – mine only had the tan/yellow wire, otherwise identical. My fault for not researching it well enough I guess, it was a fleaBay purchase, I think it was $35ish? With a broken antenna to deal with, to avoid snow/ice/water intrusion I elected to install it anyway and deal with it later. Interestingly, XM worked! We don’t subscribe to XM but there is the free channel and it was coming in loud and clear. It is my assumption that the two wires I didn’t have are part of the OnStar system which I also do not subscribe too,and so did not test. This assumption remains not verified – I invite feedback on that point.
I hope this may help someone else. Cheers.
Last edited:
