Tools needed:
8, 10, 13 mm sockets and ratchet
Good set of picks
¼” torque wrench (needs to have a range between 40 and 96 inch-lbs
Any transmission parts you plan on replacing (accumulator pistons, separator plate, separator plate gaskets, shift kit, etc.) I listed the parts that I used over at http://gmtnation.com/f24/built-4l60e-replacement-4894/
Gloves
Lots of rags
Patience
First remove the transmission pan. Have a large bucket ready to catch the fluid that will inevitably drip all over you. I like to remove all the bolts except for those in the corners and then select one corner to drop lower than the others. That way it’ll more or less funnel it into the bucket. Then remove the filter and leave it in the bucket of fluid. Let it drip for 10 or 15 minutes unless you love getting ATF in your eyes/hair/beard.
Pic 1View attachment 22836
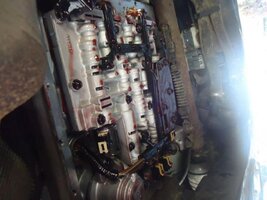
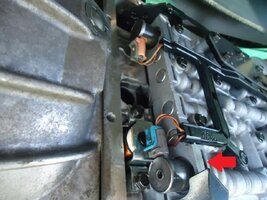
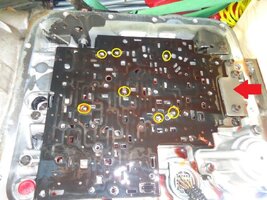
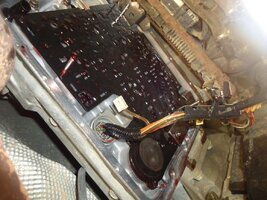
You’re probably now pretty anxious while looking at all the wires, solenoids, and whatnot. It’s ok, take it step by step and you’ll be fine. Take notes or pictures of the coloring of the wires going to the shift solenoids (arrows in pic). I believe these are the only two plugs that interchange and in the case that the wiring gets bent up you want to be able to tell them apart. I didn’t have to worry about it because I took the wiring harness down carefully and put it back up the same way to the connector that lied closest to each solenoid was plugged in.
Pic 2View attachment 22837
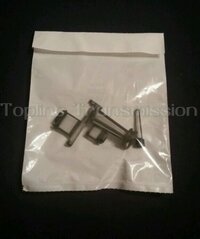
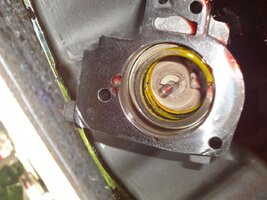
Now you can remove one of the accumulators (arrow in pic). This will house one of the plastic pistons that should be replaced. It will have three bolts and one will be longer than the other two. Keep these aside (I like to put stuff in plastic sandwich baggies as I’m taking it apart).
Pic 3View attachment 22838
Here is what mine looked like. You can see it’s literally crumbling around the base and there are at least a couple chunks of plastic floating around in there. I’m glad I caught this now instead of when it finally completely fell apart.
Pic 4View attachment 22839
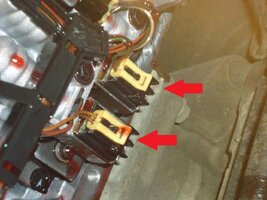
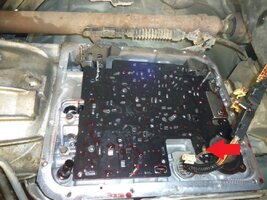
Now you’re ready to remove the wiring harness. Beginning from the plug leading to the top of the transmission, unplug the force motor, both shift solenoids, the pressure manifold switch, the 3-2 solenoid, and the torque converter clutch PWM solenoid. Use a pick to pull out the clip holding the TCC PWM solenoid in place then remove the solenoid from its bore (arrow in pic). Set it aside for now.
Pic 5View attachment 22840
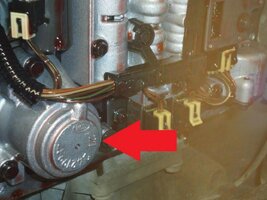
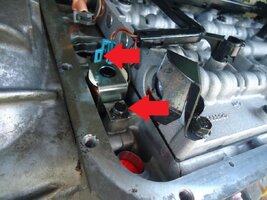
The torque converter clutch solenoid (NOT the PWM solenoid- funny how they give them such close names) is a physical part of the wiring harness and must be removed. I repeat, it should remain attached to the wiring harness. Two bolts (arrows in pic) hold it in and it can be pulled from its bore.
Pic 6View attachment 22841
You can now bring the wiring harness down. The TCC solenoid might reach the ground depending on how high you have it jacked up, so put something under it to keep it clean. Now you’re ready to start removing bolts. There are several of them and they are different lengths. I made myself a piece of thin foam that I could push the bolts into to keep them in order.
I repeat, do not mess up which bolts go where. You will lock up the transmission if you put a long bolt in a short bolt position. If you are in doubt of where the correct length bolts go, look it up. My shift kit came with a detailed view of exactly where the bolts go so I double checked to make sure I kept them in the same spots (better safe than sorry).
You can take off the pressure manifold switch like I did or leave it. It doesn’t matter as it’s coming down with the valve body anyway. If you’re doing this with the transmission in the vehicle, I usually leave the middle bolt for the very end. That way you can take out all the others and be holding it while it drops. Some of these pics are from one I did while it was out of the vehicle, so it’s a little easier. As you’re dropping the valve body you need to disconnect the manual valve (red arrow in pic). You can either slide the valve from its bore or unlink it at its connector. If you’re careful you can drop it with all seven checkballs in place. I was able to on my first shot. On transmissions that are out I’ve also been able to leave all checkballs in the correct place on the separator plate.
Pic 7View attachment 22842
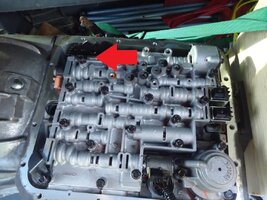
Now you’re staring at the separator plate and its gaskets. You’ll need to remove the hold down plate in order to remove the separator plate (red arrow). It’s held in with three bolts. I’ve also circled the positions of all the checkballs in yellow and the one that failed me- went through the separator plate- in orange.
Pic 8View attachment 22843
When you pull off the separator plate and gaskets the case checkball will come down on top. I didn’t get a picture of where it is in the case, but the red arrow here is where it is on the separator plate. It’s a spot close to accumulator housing you previously took off and it’s pretty obvious where it goes there is a little cage-like spot for it.
Pic 9View attachment 22844
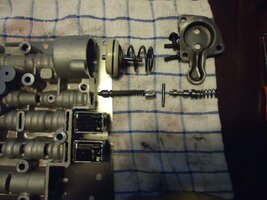
This picture shows the other plastic accumulator piston you should replace. Mine was cracked in two places and getting ready to self-destruct. It’s in the valve body and the plate that it’s underneath is under light spring tension. Just slowly remove the three bolts holding the plate on, and the piston will pull from its bore.
Pic 10View attachment 22845
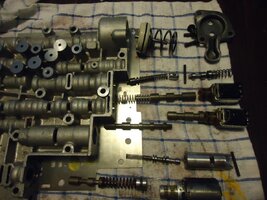
I decided to pull out all the valves and clean up the valve body but you don’t need to. At this point I need to stress that whichever shift kit (if you got a shift kit) you bought should have come with directions and you need to follow them to the letter. Really, read the directions a couple times before even starting. When I put in my Transgo shift kit, I still messed up. I was replacing springs and realized that there are TWO white springs that were about the same size. They were in different baggies and were meant for different valves. So, look through all the parts before you start and make sure you know where everything goes. These pictures are for anyone that might need them.
Pic 11View attachment 22846
Pic 12View attachment 22847
Assembly is the reverse of disassembly. Here are a few pointers though:
I used alignment pins that I made out of some old bolts by cutting the heads off. They were long enough to go through the valve body and they keep the separator plate and gaskets aligned. Then the hold down plate can be put on and torqued to 96 inch lbs.
Pic 14View attachment 22848
Use Vaseline or transgel to hold all the checkballs in place. I didn’t have any problem doing so. The transmission won’t quite shift right until the Vaseline melts, but that’s nothing a short 5-10 minute drive won’t accomplish.
Take it slow and make sure everything looks correct. You have to tip the valve body to the side just a little bit to make it fit slide up under Make sure you remember to reattach the manual valve linkage.
You’ll need to torque the valve body bolts in three steps. First, 40 inch pounds, then 65 inch pounds, then 96 inch pounds. Torque the bolts in a circular pattern starting from the center. Don’t forget to reinstall the dipstick guard.
Pic 13View attachment 22849
It took six quarts of Dex VI to get my transmission back up the hatched area after this. I think the extra quart is probably from dropping the valve body and losing a little more fluid.
If you have questions, either PM me or look around on the internet. BoxWrench has some great youtube videos that explain exactly how to remove, tear down, and reassemble the valve body.
Have fun with your fixed transmission.
8, 10, 13 mm sockets and ratchet
Good set of picks
¼” torque wrench (needs to have a range between 40 and 96 inch-lbs
Any transmission parts you plan on replacing (accumulator pistons, separator plate, separator plate gaskets, shift kit, etc.) I listed the parts that I used over at http://gmtnation.com/f24/built-4l60e-replacement-4894/
Gloves
Lots of rags
Patience
First remove the transmission pan. Have a large bucket ready to catch the fluid that will inevitably drip all over you. I like to remove all the bolts except for those in the corners and then select one corner to drop lower than the others. That way it’ll more or less funnel it into the bucket. Then remove the filter and leave it in the bucket of fluid. Let it drip for 10 or 15 minutes unless you love getting ATF in your eyes/hair/beard.
Pic 1View attachment 22836
You’re probably now pretty anxious while looking at all the wires, solenoids, and whatnot.
It’s ok, take it step by step and you’ll be fine. Take notes or pictures of the coloring of the wires going to the shift solenoids (arrows in pic). I believe these are the only two plugs that interchange and in the case that the wiring gets bent up you want to be able to tell them apart. I didn’t have to worry about it because I took the wiring harness down carefully and put it back up the same way to the connector that lied closest to each solenoid was plugged in.Pic 2View attachment 22837
Now you can remove one of the accumulators (arrow in pic). This will house one of the plastic pistons that should be replaced. It will have three bolts and one will be longer than the other two. Keep these aside (I like to put stuff in plastic sandwich baggies as I’m taking it apart).
Pic 3View attachment 22838
Here is what mine looked like. You can see it’s literally crumbling around the base and there are at least a couple chunks of plastic floating around in there. I’m glad I caught this now instead of when it finally completely fell apart.
Pic 4View attachment 22839
Now you’re ready to remove the wiring harness. Beginning from the plug leading to the top of the transmission, unplug the force motor, both shift solenoids, the pressure manifold switch, the 3-2 solenoid, and the torque converter clutch PWM solenoid. Use a pick to pull out the clip holding the TCC PWM solenoid in place then remove the solenoid from its bore (arrow in pic). Set it aside for now.
Pic 5View attachment 22840
The torque converter clutch solenoid (NOT the PWM solenoid- funny how they give them such close names) is a physical part of the wiring harness and must be removed. I repeat, it should remain attached to the wiring harness. Two bolts (arrows in pic) hold it in and it can be pulled from its bore.
Pic 6View attachment 22841
You can now bring the wiring harness down. The TCC solenoid might reach the ground depending on how high you have it jacked up, so put something under it to keep it clean. Now you’re ready to start removing bolts. There are several of them and they are different lengths. I made myself a piece of thin foam that I could push the bolts into to keep them in order.
I repeat, do not mess up which bolts go where. You will lock up the transmission if you put a long bolt in a short bolt position. If you are in doubt of where the correct length bolts go, look it up. My shift kit came with a detailed view of exactly where the bolts go so I double checked to make sure I kept them in the same spots (better safe than sorry).
You can take off the pressure manifold switch like I did or leave it. It doesn’t matter as it’s coming down with the valve body anyway. If you’re doing this with the transmission in the vehicle, I usually leave the middle bolt for the very end. That way you can take out all the others and be holding it while it drops. Some of these pics are from one I did while it was out of the vehicle, so it’s a little easier. As you’re dropping the valve body you need to disconnect the manual valve (red arrow in pic). You can either slide the valve from its bore or unlink it at its connector. If you’re careful you can drop it with all seven checkballs in place. I was able to on my first shot. On transmissions that are out I’ve also been able to leave all checkballs in the correct place on the separator plate.
Pic 7View attachment 22842
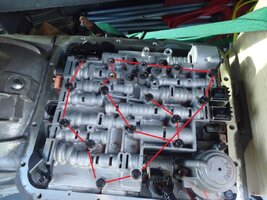
Now you’re staring at the separator plate and its gaskets. You’ll need to remove the hold down plate in order to remove the separator plate (red arrow). It’s held in with three bolts. I’ve also circled the positions of all the checkballs in yellow and the one that failed me- went through the separator plate- in orange.
Pic 8View attachment 22843
When you pull off the separator plate and gaskets the case checkball will come down on top. I didn’t get a picture of where it is in the case, but the red arrow here is where it is on the separator plate. It’s a spot close to accumulator housing you previously took off and it’s pretty obvious where it goes there is a little cage-like spot for it.
Pic 9View attachment 22844
This picture shows the other plastic accumulator piston you should replace. Mine was cracked in two places and getting ready to self-destruct. It’s in the valve body and the plate that it’s underneath is under light spring tension. Just slowly remove the three bolts holding the plate on, and the piston will pull from its bore.
Pic 10View attachment 22845
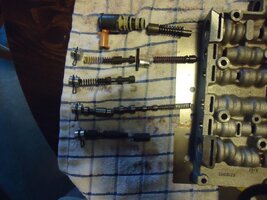
I decided to pull out all the valves and clean up the valve body but you don’t need to. At this point I need to stress that whichever shift kit (if you got a shift kit) you bought should have come with directions and you need to follow them to the letter. Really, read the directions a couple times before even starting. When I put in my Transgo shift kit, I still messed up. I was replacing springs and realized that there are TWO white springs that were about the same size. They were in different baggies and were meant for different valves. So, look through all the parts before you start and make sure you know where everything goes. These pictures are for anyone that might need them.
Pic 11View attachment 22846
Pic 12View attachment 22847
Assembly is the reverse of disassembly. Here are a few pointers though:
I used alignment pins that I made out of some old bolts by cutting the heads off. They were long enough to go through the valve body and they keep the separator plate and gaskets aligned. Then the hold down plate can be put on and torqued to 96 inch lbs.
Pic 14View attachment 22848
Use Vaseline or transgel to hold all the checkballs in place. I didn’t have any problem doing so. The transmission won’t quite shift right until the Vaseline melts, but that’s nothing a short 5-10 minute drive won’t accomplish.
Take it slow and make sure everything looks correct. You have to tip the valve body to the side just a little bit to make it fit slide up under Make sure you remember to reattach the manual valve linkage.
You’ll need to torque the valve body bolts in three steps. First, 40 inch pounds, then 65 inch pounds, then 96 inch pounds. Torque the bolts in a circular pattern starting from the center. Don’t forget to reinstall the dipstick guard.
Pic 13View attachment 22849
It took six quarts of Dex VI to get my transmission back up the hatched area after this. I think the extra quart is probably from dropping the valve body and losing a little more fluid.
If you have questions, either PM me or look around on the internet. BoxWrench has some great youtube videos that explain exactly how to remove, tear down, and reassemble the valve body.
Have fun with your fixed transmission.
Attachments
-
 1.jpg83.2 KB · Views: 428
 -
 2.jpg78.3 KB · Views: 401
 -
 3.jpg85.8 KB · Views: 401
 -
 4.jpg90.9 KB · Views: 414
 -
 5.jpg91.1 KB · Views: 408
 -
 6.jpg92.8 KB · Views: 404
 -
 7.jpg94.7 KB · Views: 410
 -
 8.jpg92.8 KB · Views: 418
 -
 9.jpg93.9 KB · Views: 403
 -
 10.jpg93.2 KB · Views: 391
 -
 11.jpg93.5 KB · Views: 357
 -
 12.jpg93.5 KB · Views: 346
 -
 14.jpg94 KB · Views: 363
 -
 13.jpg94.9 KB · Views: 331