- Mar 26, 2012
- 2,631
Summary: A "how to" for installing LED arrow turn signals in you mirrors
Difficulty: Moderate
Estimated Time: 2½ to 3½ hours
Part Numbers: LED Mirror Turn Signals
Cost: $15 - $30 for both mirrors depending on the style of indicator you choose.
The LED panels that I purchased were sequential arrows and can be found on ebay for $20, similar ones that flash only can be had for about 10 bucks with shipping
You will also need 3M double sided tape, make sure you purchase the kind meant to be used for automotive moldings as this works well in different weather conditions. Don't go cheap here.
Disclaimer: The glass you will be handling has un-beveled edges. It was never meant to be handled after it was assembled. As a result, it is EXTREMELY sharp. I have around 10 cuts on my hands to prove it. Be careful doing this mod, or don't do it at all. Also, I am not responsible for any damage or warranty issues as a result of this mod, if you follow these directions, you are doing so at your own risk.
Step 1: Remove mirror glass from the mirror housing by moving your mirror all the way down and releasing the two clips at the top of the mirror. Once these are free, you should be able to tilt the glass forward and the bottom clips will release.
View attachment 28223
Step 2: Soak the mirror glass with plastic backing in extremely hot soapy water for at least 20 minutes. This will make the plastic housing softer and also soften the adhesive on the factory two sided tape. (no pictures of this, it's a bucket of soapy water with a mirror in it, what more do you want from me?)
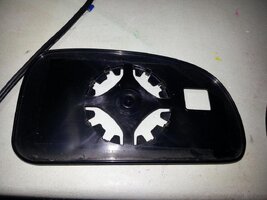
Step 3: SLOWLY AND GENTLY use a plastic pry tool to separate the glass from the plastic backing. Be careful and don't force it too much, you don't want to chip or crack the glass. If it doesn't feel like it's coming loose, try to soak it longer. DO NOT USE YOUR FINGERS YOU MORON! (sorry, trying to see if Don from 2 days ago will read this and listen)
View attachment 28224
View attachment 28225
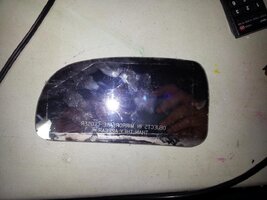
Step 4: If you can easily remove the double sided tape, then do it, if not, more soaking! Soak it for another 10-20 minutes. I tried removing the tape without soaking it first, didnt go well, after i soaked it, i was able to get most of it off in one piece. Don't scrape it too much, you don't want to scratch the shiny off! You should end up with something like this.
View attachment 28226
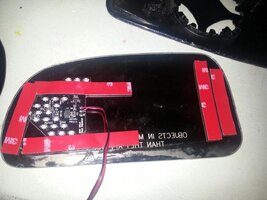
Step 5. Carefully line up where you want your led panel to be and tape it down using the double sided tape as if it were normal tape (IE: don't put the tape between the glass and the panel and leave the other side of the double sided tape with it's backing for now). Then line the edges of the glass with double sided tape. Make sure you get as much of the edges covered as possible, i actually had to redo the one below because i didnt have enough tape on the edges and the glass wouldnt seat correctly. I know it looks like the LED's are facing up in this picture, but i assure you, they are not. The LED's should be facing the glass.
View attachment 28227
Step 6: Route the wires through one of the holes in the plastic backing, remove the covering from the other side of the tape, and reassemble your mirror. IF you used enough tape, you shouldn't have any gaps.
View attachment 28229
Step 7: Follow this tutorial for connecting the LED indicators. The process is exactly the same. (other than the part about connect the bulb to the wires and changing out the lens, but I'm sure you would have figured that out on your own you sly dog)
GMTNation - Installing Mirror Turn Signals
Step 8: Replace the mirror in the mirror housing by clipping everything back together the opposite way of how it came out. I personally did this after step 6 in the tutorial mentioned above.
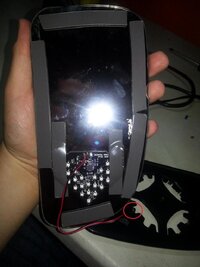
If everything went as planned, you should have fully functioning LED Mirror turn signals.
[video=youtube_share;lhtcn_NZNzk]http://youtu.be/lhtcn_NZNzk[/video]
Note: If you purchased the sequential signals, they need full power to work properly, mine didn't look right until i started my truck. See the video below to see what i mean.
[video=youtube_share;lQdMoEbQ8nk]http://youtu.be/lQdMoEbQ8nk[/video]
Difficulty: Moderate
Estimated Time: 2½ to 3½ hours
Part Numbers: LED Mirror Turn Signals
Cost: $15 - $30 for both mirrors depending on the style of indicator you choose.
The LED panels that I purchased were sequential arrows and can be found on ebay for $20, similar ones that flash only can be had for about 10 bucks with shipping
You will also need 3M double sided tape, make sure you purchase the kind meant to be used for automotive moldings as this works well in different weather conditions. Don't go cheap here.
Disclaimer: The glass you will be handling has un-beveled edges. It was never meant to be handled after it was assembled. As a result, it is EXTREMELY sharp. I have around 10 cuts on my hands to prove it. Be careful doing this mod, or don't do it at all. Also, I am not responsible for any damage or warranty issues as a result of this mod, if you follow these directions, you are doing so at your own risk.
Step 1: Remove mirror glass from the mirror housing by moving your mirror all the way down and releasing the two clips at the top of the mirror. Once these are free, you should be able to tilt the glass forward and the bottom clips will release.
View attachment 28223
Step 2: Soak the mirror glass with plastic backing in extremely hot soapy water for at least 20 minutes. This will make the plastic housing softer and also soften the adhesive on the factory two sided tape. (no pictures of this, it's a bucket of soapy water with a mirror in it, what more do you want from me?)
Step 3: SLOWLY AND GENTLY use a plastic pry tool to separate the glass from the plastic backing. Be careful and don't force it too much, you don't want to chip or crack the glass. If it doesn't feel like it's coming loose, try to soak it longer. DO NOT USE YOUR FINGERS YOU MORON! (sorry, trying to see if Don from 2 days ago will read this and listen)
View attachment 28224
View attachment 28225
Step 4: If you can easily remove the double sided tape, then do it, if not, more soaking! Soak it for another 10-20 minutes. I tried removing the tape without soaking it first, didnt go well, after i soaked it, i was able to get most of it off in one piece. Don't scrape it too much, you don't want to scratch the shiny off! You should end up with something like this.
View attachment 28226
Step 5. Carefully line up where you want your led panel to be and tape it down using the double sided tape as if it were normal tape (IE: don't put the tape between the glass and the panel and leave the other side of the double sided tape with it's backing for now). Then line the edges of the glass with double sided tape. Make sure you get as much of the edges covered as possible, i actually had to redo the one below because i didnt have enough tape on the edges and the glass wouldnt seat correctly. I know it looks like the LED's are facing up in this picture, but i assure you, they are not. The LED's should be facing the glass.
View attachment 28227
Step 6: Route the wires through one of the holes in the plastic backing, remove the covering from the other side of the tape, and reassemble your mirror. IF you used enough tape, you shouldn't have any gaps.
View attachment 28229
Step 7: Follow this tutorial for connecting the LED indicators. The process is exactly the same. (other than the part about connect the bulb to the wires and changing out the lens, but I'm sure you would have figured that out on your own you sly dog)
GMTNation - Installing Mirror Turn Signals
Step 8: Replace the mirror in the mirror housing by clipping everything back together the opposite way of how it came out. I personally did this after step 6 in the tutorial mentioned above.
If everything went as planned, you should have fully functioning LED Mirror turn signals.
[video=youtube_share;lhtcn_NZNzk]http://youtu.be/lhtcn_NZNzk[/video]
Note: If you purchased the sequential signals, they need full power to work properly, mine didn't look right until i started my truck. See the video below to see what i mean.
[video=youtube_share;lQdMoEbQ8nk]http://youtu.be/lQdMoEbQ8nk[/video]


 :wootwoot:
