- Jan 25, 2012
- 30
Thanks to all the great help this site has been I decided I needed to give back. Anyway since I needed to change out my encoder motor on my 2002 Bravada I figured I might as well document the process.
Tools needed
Flat bladed screwdriver
Socket set, mainly 13 mm socket and 6 inch extension
Torque wrench
Vice grips
Step 1:
Raise and support your vehicle. I just used ramps placed on both the driver side wheels. This gave me enough room to get under and access everything. A lift would be ideal for doing this job but ramps or a jack will get it done. Edited to add in if you have a Trailblazer or Envoy make sure your selector switch is in 2 Hi before starting.

Step 2:
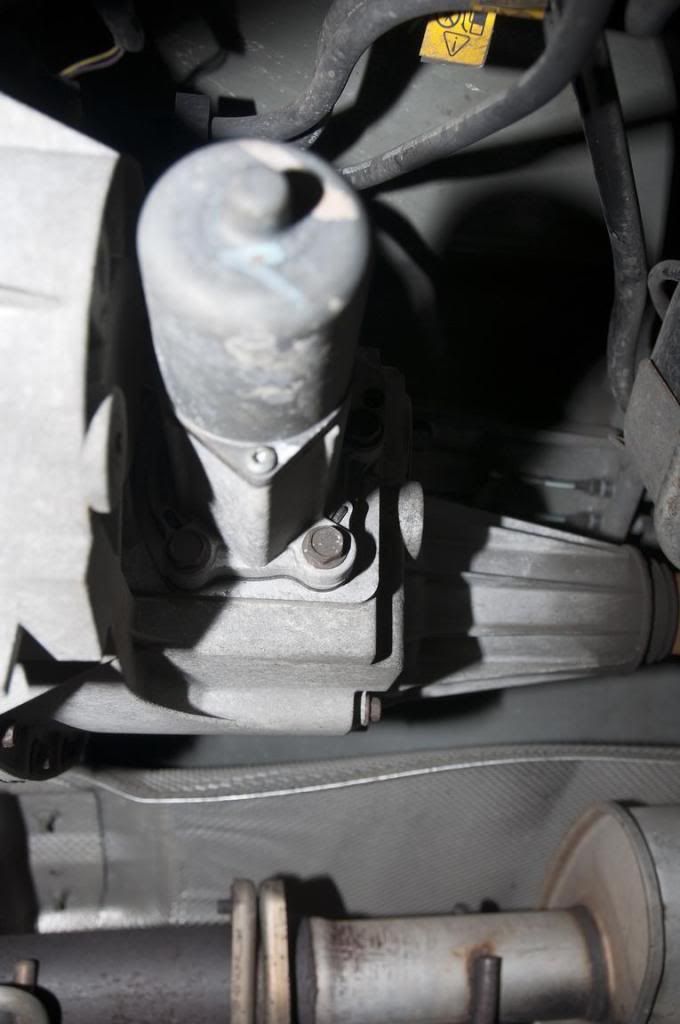
Locate your encoder motor. It is located on the side of the transfer case which is located about under the drivers seat. Once you locate the motor look for the wire coming off of it. Follow this wire up to the top of the transfer case. There you will find where it plugs in at. Undo this connection. I found the easiest way to do this was to lay under the vehicle with your feet going towards the engine and your chest and arms under the transfer case. From there reach your left arm up one side of the transfer case and your right arm up the other side. In order to make disconnecting the harness easier I used a flat bladed screwdriver to release the catch. You will have to do this by feel because you really can't see the connection. Once this is done you can pull the wire down and out of the way.
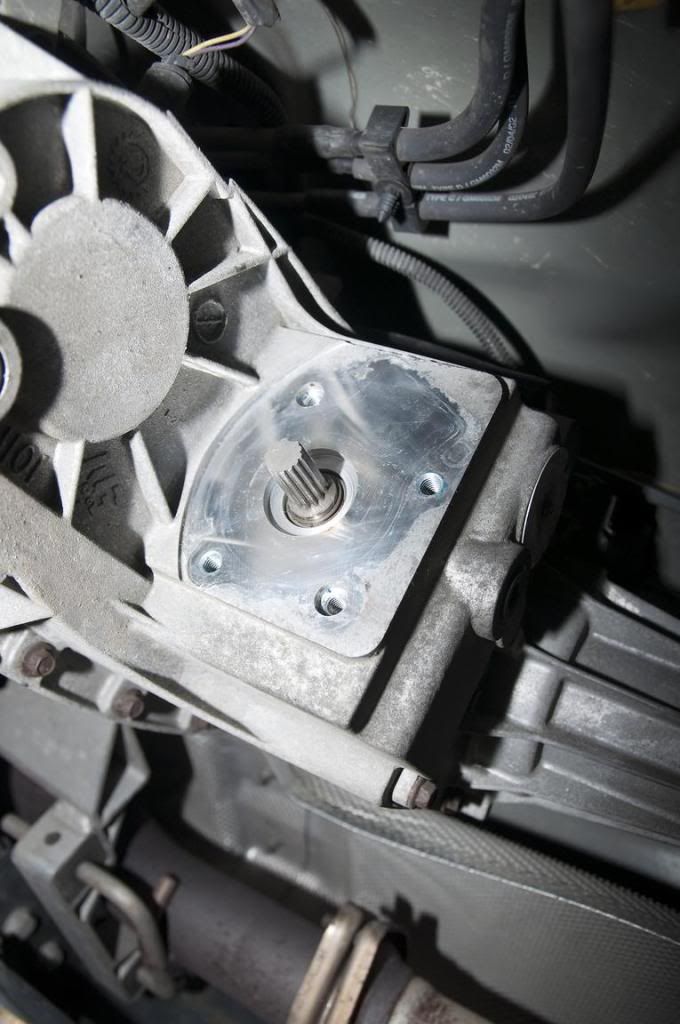
Now you are ready to remove the encoder motor bolts. To do this I used a socket wrench with a six inch extension and a 13mm socket. I started off with the top most inaccessible bolt. When removing the bolts I placed them on the ground in a way so that the same bolt would go back into the same hole. Once you have all four bolts out you can remove the encoder motor. You may have to give it a wack with your hand to free it up but from there it pulls straight off. Here is a view of the encoder motor on the transfer case and removed.
Step 4:
Here is a view of the old and new encoder motor. Notice that the old motor on the left has sleeves in the 10 o'clock and 4 o'clock bolt holes. These locating sleeves need to be removed and installed in the new motor. I did this by using a set of vice grips to gently squeeze the sleeves and then pull them out. From there you can install them into the new motor. Once this is done clean the mating surfaces on the transfer case and encoder motor and install the new motor. Fitting the new motor onto the shaft coming out of the case is the hardest part. It is pretty much a matter of trial and error but once everything lines up it will slide onto the shaft. Once the motor is installed onto the shaft reinstall the four bolts and torque them down to 12 ft lbs. The final step is to reconnect the wire harness from the motor to the vehicle. Before doing this I used some electrical contact cleaner on the vehicle side of the harness and then applied dielectric grease to the connectors.

There you have it. Time to do this job took me about an hour including set-up and clean up. Note I did this job on an Oldsmobile Bravada. It uses a different transfer case than the Envoy and Trailblazer and a different wiring connector, 5 pins vs 7 pins. Other than that the job should be pretty similar.
Jerry
Tools needed
Flat bladed screwdriver
Socket set, mainly 13 mm socket and 6 inch extension
Torque wrench
Vice grips
Step 1:
Raise and support your vehicle. I just used ramps placed on both the driver side wheels. This gave me enough room to get under and access everything. A lift would be ideal for doing this job but ramps or a jack will get it done. Edited to add in if you have a Trailblazer or Envoy make sure your selector switch is in 2 Hi before starting.
Step 2:
Locate your encoder motor. It is located on the side of the transfer case which is located about under the drivers seat. Once you locate the motor look for the wire coming off of it. Follow this wire up to the top of the transfer case. There you will find where it plugs in at. Undo this connection. I found the easiest way to do this was to lay under the vehicle with your feet going towards the engine and your chest and arms under the transfer case. From there reach your left arm up one side of the transfer case and your right arm up the other side. In order to make disconnecting the harness easier I used a flat bladed screwdriver to release the catch. You will have to do this by feel because you really can't see the connection. Once this is done you can pull the wire down and out of the way.
Now you are ready to remove the encoder motor bolts. To do this I used a socket wrench with a six inch extension and a 13mm socket. I started off with the top most inaccessible bolt. When removing the bolts I placed them on the ground in a way so that the same bolt would go back into the same hole. Once you have all four bolts out you can remove the encoder motor. You may have to give it a wack with your hand to free it up but from there it pulls straight off. Here is a view of the encoder motor on the transfer case and removed.
Step 4:
Here is a view of the old and new encoder motor. Notice that the old motor on the left has sleeves in the 10 o'clock and 4 o'clock bolt holes. These locating sleeves need to be removed and installed in the new motor. I did this by using a set of vice grips to gently squeeze the sleeves and then pull them out. From there you can install them into the new motor. Once this is done clean the mating surfaces on the transfer case and encoder motor and install the new motor. Fitting the new motor onto the shaft coming out of the case is the hardest part. It is pretty much a matter of trial and error but once everything lines up it will slide onto the shaft. Once the motor is installed onto the shaft reinstall the four bolts and torque them down to 12 ft lbs. The final step is to reconnect the wire harness from the motor to the vehicle. Before doing this I used some electrical contact cleaner on the vehicle side of the harness and then applied dielectric grease to the connectors.
There you have it. Time to do this job took me about an hour including set-up and clean up. Note I did this job on an Oldsmobile Bravada. It uses a different transfer case than the Envoy and Trailblazer and a different wiring connector, 5 pins vs 7 pins. Other than that the job should be pretty similar.
Jerry

