- Nov 25, 2011
- 113
Summary: Removing DRL and adding Quadlights
Difficulty: Easy to Moderate
Estimated Time: 30-45 min
Part Numbers: Dorman relay 84601
Cost: ~$10
The author assumes no responsibility if you wreck something during installation! If you are not comfortable working with electrictiy, get help! As with all electrical work, disconnect your battery before beginning work!
Required tools:
Wire stripper
Crimper
Ratchet with 6" extension
10mm socket
13mm socket
View attachment 17684.jpg]
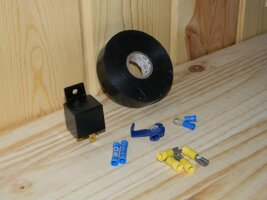
Required parts:
1- Dorman automotive relay Part#84601 or equivalent
2- Butt splice wire connectors
4- 1/4" Female spade connectors (Only one displayed in pic.)
1- 5/16" Ring lug connector
1- 1/4" Ring lug connector
Crimp-on wire tap
Electrical Tape
View attachment 17685
The installation of this relay will kill your daytime running lights while enabling quad high-beam headlights, this is the most noticeable benefit of this modification. You will also see longer life from the headlight bulbs.
This modification will prevent your headlights from flashing when you lock/unlock your vehicle with the remote, only the parking lights will flash. Also, your automatic headlights will no longer function, only the parking lights will come on in the evening hours.
Locate the fuse block under the second row seat, it is on the driver's side. Take the cover off by pulling forward and up on the front of it. This is what you should see. The 2 connectors you will be working with are circled in the pic. One of the connectors is tan, the other is gray.
View attachment 17686.jpg]
Pin 85: This pin will be connected to the white wire on the tan harness. Do not cut the white wire! Tap into it and connect it to Pin 85 on your new relay. Although difficult to read, the harness is labeled F9 where the white wire goes into it.
View attachment 17687.jpg]
Pin 87: Locate the pink/white wire on the gray harness. Cut the pink/white wire. Be sure your cut is in a location that will allow you to crimp a butt splice connector onto the wire on both sides of your cut. To prevent accidental short circuits, insulate the butt splice connector that goes into the gray harness with some electrical tape. Connect Pin 87 to the other end of the wire.
View attachment 17688.JPG]
Pin 86: This pin will be connected to the positive power on the fuse block using the 5/16" ring lug connector. This is the large red wire supplying the main power to the fuse block.
Pin 30: This pin will be connected to ground. I used the stud beneath the main power connection located in the last step.
View attachment 17689.jpg]
Difficulty: Easy to Moderate
Estimated Time: 30-45 min
Part Numbers: Dorman relay 84601
Cost: ~$10
The author assumes no responsibility if you wreck something during installation! If you are not comfortable working with electrictiy, get help! As with all electrical work, disconnect your battery before beginning work!
Required tools:
Wire stripper
Crimper
Ratchet with 6" extension
10mm socket
13mm socket
View attachment 17684.jpg]
Required parts:
1- Dorman automotive relay Part#84601 or equivalent
2- Butt splice wire connectors
4- 1/4" Female spade connectors (Only one displayed in pic.)
1- 5/16" Ring lug connector
1- 1/4" Ring lug connector
Crimp-on wire tap
Electrical Tape
View attachment 17685
The installation of this relay will kill your daytime running lights while enabling quad high-beam headlights, this is the most noticeable benefit of this modification. You will also see longer life from the headlight bulbs.
This modification will prevent your headlights from flashing when you lock/unlock your vehicle with the remote, only the parking lights will flash. Also, your automatic headlights will no longer function, only the parking lights will come on in the evening hours.
Locate the fuse block under the second row seat, it is on the driver's side. Take the cover off by pulling forward and up on the front of it. This is what you should see. The 2 connectors you will be working with are circled in the pic. One of the connectors is tan, the other is gray.
View attachment 17686.jpg]
Pin 85: This pin will be connected to the white wire on the tan harness. Do not cut the white wire! Tap into it and connect it to Pin 85 on your new relay. Although difficult to read, the harness is labeled F9 where the white wire goes into it.
View attachment 17687.jpg]
Pin 87: Locate the pink/white wire on the gray harness. Cut the pink/white wire. Be sure your cut is in a location that will allow you to crimp a butt splice connector onto the wire on both sides of your cut. To prevent accidental short circuits, insulate the butt splice connector that goes into the gray harness with some electrical tape. Connect Pin 87 to the other end of the wire.
View attachment 17688.JPG]
Pin 86: This pin will be connected to the positive power on the fuse block using the 5/16" ring lug connector. This is the large red wire supplying the main power to the fuse block.
Pin 30: This pin will be connected to ground. I used the stud beneath the main power connection located in the last step.
View attachment 17689.jpg]
![DSCN1011 [Desktop Resolution].jpg](/forums/data/attachments/103/103326-c501ca90e97e29a57f8c074b52d42500.jpg)
![DSCN1016 [Desktop Resolution].jpg](/forums/data/attachments/103/103328-f6d11126f6ee022c71eec0ad396c3244.jpg)
![DSCN1019 [Desktop Resolution].jpg](/forums/data/attachments/103/103329-bb6ddcb5e3a0b23a294ae7a23212d317.jpg)
![DSCN0999 [Desktop Resolution].JPG](/forums/data/attachments/103/103330-2ab60dac8bfdd6614d3f01acf727a605.jpg)
![DSCN0987 [Desktop Resolution].jpg](/forums/data/attachments/103/103331-069dd55ff07652bf2dc520fbb96bdcb1.jpg)


 The quad beam part is optional, but useful if you use your high beams at all.