For most, just yank the module out and for $40-50 replace it. Done.
I just can't leave well enough alone though, and need to see WHY something failed! So, when the blower locked on full blast even with the key off (pull the J fuse it shuts off), out the module came.
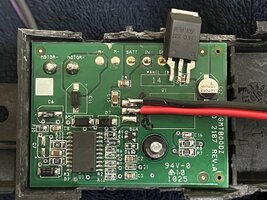
Took it apart, and figured out it's a MOSFET in it that gets shorted out. You can still get them off AliExpress but the actual part was discontinued. It's an IRFBA1405P. Super TO220 case (looks like a typical TO220, just thicker). I think it was about $1.50 each in 10's. Pretty easy to change out.
Just poke through the sticker on the module and remove the Torx screw. Then you can pull off the heat sink. Pull back the outer edge of the foam seal. 2 or 3 thin flat blades through the now exposed gap, and work the 5 lock tabs until the cover starts to lift. the 3 tabs of the one connector, and the 2 large motor wires need to be wiggled through it. Don't mangle the 3 tabs of the connector.
The TO220 is now right there, and is a simple job to swap out. It's even surface mount pads, so no through hole mucking about. Reassemble is reverse, making sure to replace the now destroyed heat pad with your fav' heat sink compound.
Theory of operation is pretty simple. Power goes in through the 3 wire. Gets tapped to run the internal stuff, and passes right back out to the motor. The control circuit inside (normally under control of the BCM - until the FET shorts!) diddles the 1405P to pulse the ground which also comes in through the 3 pin, and out the other motor wire. The 3rd pin of the 3 pin is what connects the module to the BCM.
In the attached pic, you can see the old MOSFET just sitting there, and the two wires I attached that go to a switch so I can at least turn the fan on/off until the new module arrives in 4 days (it's getting major cold out and I need heat! Can't wait 4-6 weeks for the components to arrive). Note at the edge of the board it says "GMT800" - clearly the same module {board wise at least} used in the earlier big trucks.
Hope someone finds this useful.

