Oxygen Sensor Threads Stripped

Kurb

Original poster
Member
May 3, 2014
89
I learned the hard way. It is a bad idea to wait for the CEL to come on at 160,000 miles to replace the upstream O2 sensor. Not only is this bad for gas mileage, the sensor will likely seize up. Although the O2 sensor is easy to access and should be a simple job, this is how the Trailblazer O2 sensor replacement went for me:
1. After spraying a lot of PB Blaster on the sensor, I ran the engine for ~5 minutes to heat it up, and then I broke my tried and true crows foot O2 sensor removal tool on my first try. This worked for me in the past - not on the Trailblazer, of course. I figured that I probably did not let the truck get hot enough.
2. Trying to keep this cheap, I then rented a set of three O2 sensor removal tools from Advance Auto. Using the crows foot tool from this set, I felt the sensor starting to round off, so I decided to buy a half-inch drive 22 mm deep well socket. I should have tried the deep well socket first - lesson learned for all future O2 sensor replacements.
3. I cut the wires off the sensor and tried the 22 mm deep well socket. My 1/2 drive ratchet would not fit between the frame and and the socket. Should have measured...
4. I then tried using a pipe wrench on the deep well socket. This rounded the sensor even more.
5. I removed the heat shield and used vice grips on the sensor, and then a pipe wrench with a pipe extension. This just managed to completely round off the sensor. It would not budge.
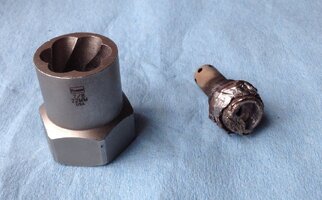
6. I was desperate at this point, so I spent ~$75 on an Irwin (P/N 54125) lug nut extraction tool from Amazon:
http://www.amazon.com/dp/B001ACPRFU/?tag=gmtnation-20
I had smaller (and much cheaper) versions that worked great on other bolts, but this was the only set I could find with a 22 mm fluted socket.
7. To make this socket work, I had to break off the end of the sensor with a hammer and long screw driver.
8. I let the Trailblazer idle for 25 minutes to get it good and hot. I used the 22 mm fluted socket, and it worked great! What was left of the sensor came right out! I attached an image of the sensor and the socket I used to remove it.
9. Needless to say, the threads weren't in the greatest of shape, so I bought an O2 sensor thread chaser from Advance Auto.
10. The thread chaser turned really hard as soon as it started, so I decided to use an 18 mm-1.5 mm tap. I looked at every auto part store and hardware store nearby, but the only place I could find this tap locally was at Harbor Freight, in an $85 set. Ouch! I did not want to wait, and it would have cost me at least $30 to order it anyway, just for one tap.
11. I very carefully ran the tap into the hole using motor oil and penetrating fluid to lubricate it. I stopped when I started to feel a lot of resistance on the tap. I thought it was deeper than the thread length on the O2 sensor at that point, so I figured all was well.
12. I ran the chase in the hole. It turned much easier.
13. I turned the sensor in by hand to make sure that it would fully seat. It went it pretty smooth, so that was good.
14. I snugged the sensor with a 3/8" ratchet and one of the rental O2 sensor sockets.
15. I decided I would try to torque the sensor. Concerned about the threads, I set the torque wrench at 15 ft-lb to see how it felt. The sensor is supposed to be torqued to 30 ft-lb, so this was only half of the specified torque. As soon as I turned the torque wrench, the threads rounded out.
16. I ran the chaser back into the hole. While not as good as earlier, it seemed to go okay.
17. I snugged the sensor by hand, but when I tried a quarter turn with the ratchet, the sensor just spun freely.

The sensor is now only hand tight. The truck runs okay and the sensor does not appear to be leaking, but I am sure that this will not last very long. The local auto parts stores, hardware stores, and the nearest Tractor Supply store do not carry a helicoil for 18 mm threads, and my drill will not fit with the manifold on the vehicle. Since I have already expended too much effort on this "simple" job, I am not interested in removing the manifold. I need the Trailblazer on Monday morning, so it can't go to the shop unless I take a day off work, which I can do if necessary, but I would prefer to save my vacation days for something better.

A friend of mine told me to just wrap mechanics wire around the sensor threads and tighten the sensor into the hole as-is. I am a little nervous about doing this, but he did it on a different vehicle with success. Has anyone had success with doing this?
If not, are there any other ideas? Thanks.
 

Attachments

  • IMG_4684.JPG
    IMG_4684.JPG
    130.1 KB · Views: 30

AWD V8

Member
Jan 12, 2015
463
Sometimes no matter what you try those things will not come out without tearing out the threads. Usually you do not have enough threads to work with to try to restore them with a tap. The tap is best when you just want to clean up the threads for the new sensor.

At this point have a muffler shop weld an O2 bung in place.
 
  • Like
Reactions: northcreek and Kurb

Mooseman

Moderator
Dec 4, 2011
25,351
Ottawa, ON
If it's not leaking, I'd just have the muffler shop put a couple of tack welds on the sensor to the manifold to hold it in place.
 
  • Like
Reactions: Kurb

Kurb

Original poster
Member
May 3, 2014
89
Thanks. It sounds like it's going to the muffler shop tomorrow either way. As far as it not leaking, it isn't now, but I can't imagine that it will hold much longer. It is only hand-tight, and I have not even road tested it. I just revved it up in the driveway. I may take the sensor out before I drive it to make sure that it doesn't get ejected and damaged.
 

Kurb

Original poster
Member
May 3, 2014
89
I spoke with a couple muffler shops today. They said they can't weld the manifold since it is cast iron. They said the only option is to replace the manifold.

I drove with the sensor installed hand-tight, and the sensor started leaking within 5 minutes. Luckily, I immediately stopped and the sensor was still resting in the bore, so it did not get damaged. I removed it.
 

northcreek

Member
Jan 15, 2012
3,322
WNY
The bung could be brazed into the manifold and would be a suitable fix...Mike.
 
  • Like
Reactions: Kurb

Mooseman

Moderator
Dec 4, 2011
25,351
Ottawa, ON
They could weld a couple of tack welds if they wanted to, they just want the work. I would understand doing a full weld, like to fill a crack, wouldn't work on cast iron but just 2 or 3 tacks, that would hold.
 
  • Like
Reactions: Kurb

Kurb

Original poster
Member
May 3, 2014
89
i spoke with six different shops, and none of them would try to weld or braze on the cast iron manifold. I am sure I just gave up too easy, but I just wanted to get it fixed, so I took it to a shop for a new manifold.

At the end of the second day (special order part), the shop called and said that three bolts were already broken before they started and the manifold was cracked. They also decided it would be too difficult for them to remove the broken boots from the head, so they took it to a muffler shop who will take a look at it on Monday to see if they can do anything with it. I wish I had looked closer at the manifold before I went through the effort of removing the sensor. I did look at it when the heat shield was off, but apparently not close enough.

Why would the bolts break off when the manifold was never taken off? Design flaw, or is this normal for older cars? I have never seen this before. Maybe it was the insane amount of torque that it took to remove the O2 sensor, but I think that would be a stretch.
 

Sparky

Member
Dec 4, 2011
12,927
I think the primary cause is the dissimilar metals between the manifold (cast iron) and the head (aluminum). Heat causes expansion and contraction at different rates, and combine that with it being a long manifold - and therefore more of a total change from one end to the other - and you have a lot of lateral stress on those bolts. Throw age, hundreds of heating/cooling cycles, and rust weakening, and POP a bolt shears off.

Side note - this dissimilar expansion/contraction across a long manifold made from a material that does not stretch well (cast iron) is also a theorized leading cause of the cracked manifolds.

When I had my manifold replaced (along with literally every other piece of my exhaust) a couple bolts were broken already and several more broke off in the process. IIRC they said they had to extract something nuts like 9 of the bolts from the head. Good thing it was a very good shop and knew what they were doing, they didn't have to pull the head.
 
  • Like
Reactions: Kurb

Mooseman

Moderator
Dec 4, 2011
25,351
Ottawa, ON
When I replaced my engine, both the replacement used engine's and my old one had cracked exhaust manifolds. A couple of the bolts were already broken and a couple more broke when I removed the remaining ones. Because the engine was out, it was easy for me to heat the stubs and turn them out. They use toque to yield bolts and I suspect that the heat and corrosion plays a part in breaking them. Others have had pre-broken bolts. I found some regular high grade bolts instead as replacements.
 
  • Like
Reactions: Kurb

Kurb

Original poster
Member
May 3, 2014
89
Great explanations, guys! That makes sense, but I think it points to a bad design, since the engineers should have been able to factor in corrosion, thermal stress range, and expected number of cycles to get more life. Of course, maybe my expectations are too high since I did get 160K miles out of it before I found the problem, and even with the broken bolts/cracked manifold, the engine was pretty quiet, such that I would have probably gone a lot more miles without noticing if the O2 sensor hadn't died.

Luckily, the muffler shop had success getting the bolts out. They said 6 were broken when they received it (3 more than the first shop mentioned), and they broke 2 more taking them out, so they had to extract 8 bolts. They welded nuts on the bolt remnants when there was enough sticking out of the head to do so. For those that were recessed, they filled the holes with weld metal and then welded nuts to the weld metal. The filler metal they used does not adhere to aluminum, but I imagine it still takes a lot of skill to prevent distorting the threads from the heat. The total cost for the new manifold installation was $428, which was much less than I expected, although the first shop gave me a discounted price on the manifold ($107) and didn't charge any labor since they could not fix it.

The muffler shop even installed a new heat shield, although for some reason, they didn't use the original mounting locations, and I am not sure I like how they mounted it. I didn't look close enough yet to tell if I can fix that.

Still, this was one expensive O2 sensor replacement since I ended up having to rent a minivan for a weekend trip. With the car rental included, I ended up spending $930 total. Ouch! At least I got some new tools out of it.:2thumbsup:
 

gmcman

Member
Dec 12, 2011
4,656
When I remove my O2 sensors, I start the engine and let it run for about 30 seconds to a minute so the manifold can heat enough to expand the hole for the O2 sensor. This may or may not release tension on the sensor but if it's going to it will be after a brief warm up...before the sensor tries to expand.

5 min is a long time and can expand the sensor also
Not a factual procedure but in theory it seems plausible and has worked for me.
 
  • Like
Reactions: Kurb and Trkdrvremt

Sparky

Member
Dec 4, 2011
12,927
Great explanations, guys! That makes sense, but I think it points to a bad design, since the engineers should have been able to factor in corrosion, thermal stress range, and expected number of cycles to get more life.

Pretty much!
 
  • Like
Reactions: Kurb

Bow_Tied

Member
Dec 21, 2014
453
London, ON
Great explanations, guys! That makes sense, but I think it points to a bad design, since the engineers should have been able to factor in corrosion, thermal stress range, and expected number of cycles to get more life.

The engineers likely did account for all of that but were over-ruled as the proper design would be more expensive and the failure mode would be unlikely to happen within the warranty period. We are too quick to blame the design team sometimes - sure they make mistakes, but overall have no doubt, the bean counters run the show.

I am glad to hear you got your fix in place and can relate to similar struggles. I have only ever done an O2 twice but had the good fortune of access to a hoist and set of acetylene torches to heat up the bung. The sensors turned out almost like they were new. But I too have spent hundreds on a 'cheap fix' before. In the end your new manifold is a definite improvement I'd say. Did you notice it any quieter?
 
  • Like
Reactions: Kurb

mrrsm

Lifetime VIP Donor
Supporting Donor
Member
Oct 22, 2015
7,738
Tampa Bay Area
I was almost poking a little fun during a recent post concerning the question as to whether it was worth it to switch from a Cast Iron OEM or Dorman Exhaust Manifold over to a $700.00 set of beautiful Kook's Steel Headers for the GM 4.2L Engine. At least that was what I thought... until I saw @webdawg's images of the result of huge, lava hot flakes of rusted Cast Iron that had all but completely clogged his CAT just below the manifold flange... and so I owe that guy who wanted those Kooks "Vanity Pipes" a serious apology.

Incidentally... The problem with welding Cast Iron is that in order for the weld to "take"... the Cast Iron has to be pre-heated cherry-red and then almost white hot for a very long time and then a nickel-iron welding rod must be used... and it seldom turns out well as the necessary gradual cool down afterwards must be done over a period of a whole day or two or risk adjacent cracking and weld failure. Usually... the repaired parts are kept either heated in an oven afterwards or buried in a large container filled with special sand that insulates and keeps the heat inside the component for days on end until it finally cools down slowly...without cracking.
 
Last edited:
  • Like
Reactions: Kurb and Bow_Tied

Bow_Tied

Member
Dec 21, 2014
453
London, ON
Incidentally... The problem with welding Cast Iron is that in order for the weld to "take"... the Cast Iron has to be pre-heated cherry-red and then almost white for a very long time and then a nickel-iron welding rod must be used... and it seldom turns out well as the necessary gradual cool down must be done over a period of a whole day or two or risk adjacent cracking and weld failure. Usually... the repaired parts are kept either heated in an oven afterwards or buried in a large container filled with special sand that insulates and keeps the heat inside the component for days on end until it finally cools down slowly...without cracking.

Agreed - for a full penetration weld I have had cast pre-heated (a lot) immediately followed by arc welding followed by more heating afterward and slowly reducing the heat over a period of time. Had an entire machine flange red-hot before, during and after. But it held.
 
  • Like
Reactions: Kurb and mrrsm

Kurb

Original poster
Member
May 3, 2014
89
When I remove my O2 sensors, I start the engine and let it run for about 30 seconds to a minute so the manifold can heat enough to expand the hole for the O2 sensor. This may or may not release tension on the sensor but if it's going to it will be after a brief warm up...before the sensor tries to expand.

5 min is a long time and can expand the sensor also
Not a factual procedure but in theory it seems plausible and has worked for me.

Interesting. Before I bought the fluted sockets, I did try to remove the sensor hot a few times and many more times as it cooled off over a couple of hours. Although, I probably hit the entire temperature range, that probably did not give the same results as what you mentioned. Normally, more heat is better, but if the oxygen sensor case is stainless steel (I think it is), then it will expand a little more than the cast iron manifold, and stainless should heat up slower, depending on the geometry and assuming that the sensor heater is well insulated from the case as it should be. However, with it really hot, considering that the hole in the manifold will get bigger, I wouldn't expect the small difference in expansion to be enough to fully eliminate the original thread clearance, so only the pressure on the corrosion might increase.

I have removed oxygen sensors in the past by getting the car up to normal operating temperature, and the sensors always came out with ease.

I also watched a MAY03LT youtube video, and he mentioned that the GM service information said the sensor should be at least 120 degrees. I wish I could have gotten angry over an easy to remove sensor.:wink:

That being said, I might try what you mentioned in the future since heating the manifold more than the sensor is a good thing and I would not have to wait as long. I have a grand prix with 90K miles and I plan to replace the O2 senor on it some time this year.
 

Kurb

Original poster
Member
May 3, 2014
89
The engineers likely did account for all of that but were over-ruled as the proper design would be more expensive and the failure mode would be unlikely to happen within the warranty period. We are too quick to blame the design team sometimes - sure they make mistakes, but overall have no doubt, the bean counters run the show.

Good point! The bean counters do tend to mess things up.

I am glad to hear you got your fix in place and can relate to similar struggles. I have only ever done an O2 twice but had the good fortune of access to a hoist and set of acetylene torches to heat up the bung. The sensors turned out almost like they were new. But I too have spent hundreds on a 'cheap fix' before. In the end your new manifold is a definite improvement I'd say. Did you notice it any quieter?

I did not really notice it to be much quieter, maybe a little. I was really surprised by the broken bolts and cracked manifold since the TB did not sound like it had an exhaust leak.
 
  • Like
Reactions: Bow_Tied

Forum Statistics

Threads
23,333
Posts
638,015
Members
18,538
Latest member
Mynamesjeff

Members Online