You are using an out of date browser. It may not display this or other websites correctly.
You should upgrade or use an alternative browser.
You should upgrade or use an alternative browser.
motor mounts
- Thread starter cmatb08
- Start date
SBUBandit
Member
- Dec 5, 2011
- 597
Sparky said:When I pulled my fan clutch to get to the AC pulley I borrowed a tool set from a friend that fit perfectly. It surprisingly didn't take much effort to break loose at all. having the proper tools helps a ton.
I borrowed the set from O'Reilly, and not one of the wrenches in the set fit, so I ended up using two big adjustable wrenches. Tight squeeze, but it worked
Dillyo82
Member
- Aug 17, 2012
- 80
SBUBandit said:I borrowed the set from O'Reilly, and not one of the wrenches in the set fit, so I ended up using two big adjustable wrenches. Tight squeeze, but it worked
The Big Adjustable Wrench I used wasn't long enough to cover the 4 pulley bolts and was too thick and covered the center Fan bolt...maybe making a 4 hole drilled flat piece of metal will work.
Mooseman
Moderator
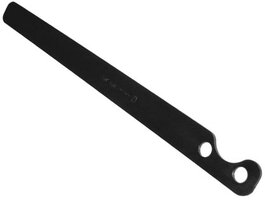
I've got a tool like this one and it works well.
View attachment 23813
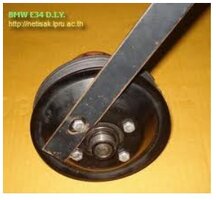
Here's a pic of a homemade one I found on a Google search:
View attachment 23814
If still having difficulty, remove two bolts and bolt the holding tool onto the pulley for a better hold. Had to do that on my old Jimmy. Used a big adjustable wrench on the clutch with a BFH.
View attachment 23813
Here's a pic of a homemade one I found on a Google search:
View attachment 23814
If still having difficulty, remove two bolts and bolt the holding tool onto the pulley for a better hold. Had to do that on my old Jimmy. Used a big adjustable wrench on the clutch with a BFH.
Attachments
Dillyo82
Member
- Aug 17, 2012
- 80

Dillyo82 said:Thanks. I made the one from Discount Auto work in conjunction with the chain method to hold the tool. I'll post pics later. It was NOT a 4 hour job!
So what was your final method? Did you remove the mount with the lower bracket still connected to it? What components did you remove to get the engine lifted enough and what did you have to remove to reach the bolts?
Dillyo82
Member
- Aug 17, 2012
- 80
My Method was that I removed the Passenger Mount with Top and Bottom Brackets still in and tight. I did have to cut the tip off of the top stud before removing and about an 1/8th inch into the threads to get the new one in. Do not cut so much off to where you won't have enough for the nut to grab onto all of it's threads. I did notice after sitting over night and having to remove the New Passenger mount because I forgot the heat shield, that it was a little easier to remove and put back in. I only pushed the engine over with both Pass and Driver mounts loose and popped the top out to put the shield back on. Maybe it settled a bit, but it was easier the second time.
As for the Driver's Side, I loosened the Bottom Brackets until the were touching the suspension coil as it was just enough to wiggle the bracket counter clockwise off of the ledge that it sits in on the frame. Both bottom and top nuts on the mount studs were removed before doing this. I did not have to cut any studs on the Driver's Side. It just took a lot of patience and sitting up and down and getting at it from top and bottom to make it work. I'm just glad I didn't have to remove the Suspension components (CV Shaft, Hub, Links etc). Be careful if it's a 4x4 as the Tripot housing on the CV Shaft will hit the frame. That's as far as you can go. I'll still upload pics when I get a chance.
As for the Driver's Side, I loosened the Bottom Brackets until the were touching the suspension coil as it was just enough to wiggle the bracket counter clockwise off of the ledge that it sits in on the frame. Both bottom and top nuts on the mount studs were removed before doing this. I did not have to cut any studs on the Driver's Side. It just took a lot of patience and sitting up and down and getting at it from top and bottom to make it work. I'm just glad I didn't have to remove the Suspension components (CV Shaft, Hub, Links etc). Be careful if it's a 4x4 as the Tripot housing on the CV Shaft will hit the frame. That's as far as you can go. I'll still upload pics when I get a chance.
jeffro312
Member
hi a motor mount question i didnt feel was worth a new thread so ill post it here.
my dealer wants 98 dollars per motor mount.
i know we must use oe parts from dealer
question is will the part with same part number #15062381 found at gm parts direct GM Parts Direct: 15062381 - ENGINE MOUNT be the same as if i went to the dealer except its about 30 dollars cheaper?
i have never purchased from this site.. are they genuie oe dealer parts?
irwinmb5
Member
- Dec 8, 2011
- 20
I have bought parts from them before and they are oem parts. The prices are good, but they get you with their high shipping. For 2 motor mounts you can get them shipped for about 145, which is still better than the stealership price. I had no issues when i bought from them before.
Here's my collection of sources for GM parts (please feel free to add more experiences if they differ from mine)
1) gmpartsdirect.com lists wholesale prices for the parts and abuses you with high shipping costs.
2) parts4chevys.com (same as gmpartsshop.com) has a fair price for parts between wholesale and retail, a fair price for shipping, and I mostly patronize them because I like a more honest business model.
3) rockauto.com has the most excellent prices and customer service, and many OEM parts vendors sell through them as well, so you have to at least look at rockauto when you're searching
4) gmpartsgiant.com is another on-line discount source, but I have no personal experience with them
5) oehq.com looks legitimate, until you see that they lie about the list price to make their close-to-real-list-price sale price look like less of a ripoff. I object to being lied to.
6) parts.nalleygmc.com is a resource we refer to a lot because they're one of the few places that offer exploded parts diagrams WITH part numbers, but by selling close to list price, they guarantee no bargain-hunter will buy from them. At least they're an authorized GM dealer.
7) [DEFUNCT]: compnine.com - a FANTASTIC resource we all used to use, put up as a labor of love by a GM enthusiast who posted the ENTIRE data base of exploded parts views in an easy to search web site, and all the part numbers, and allowed you to order. But he wasn't a dealer himself and had to order parts for drop shipping, and his order process was poor and customer support poor and prices were near or at list, so his business model failed and he's off the air except as a VIN decoder service. Included here just in case anybody sees reference to that name in a search back on the OS.
I used Chevrolet OEM Parts at Wholesale Prices for the first time for my mounts. Good price and fast delivery from Corpus to Dallas for me.
Dillyo82
Member
- Aug 17, 2012
- 80
Dillyo82 said:Bought the Mounts from GMTNation.com.
Also got the GM Cleaner. Is it any good?
Is there a link to get these replaced?
I'm thinking of going with removing the top nut and then lifting engine and removing Lower Bracket with Mount.
Would like the easiest way though.
I have minimal tools as well.
Sorry, I posted that I got the Mounts from GMTNation...Did someone change that? I meant to say gmpartsdirect.com.
The Mounts were OEM and have been smoother than when I bought it with 53,000mi on it (Like New) for a couple thousand miles now.
Be sure to use Blue Thread Locker on them! And don't forget the Heat shield on the Pass mount like I did!
Most important other than safety...DO NOT JACK UP THE ENGINE TOO FAR! Watch the Tripot Housings (Inner CV Shaft Housing) and stop when it/they hit the frame.
I also got the GM Cleaner. I would say not to buy the cleaner, as I have not felt any difference or increased MPG. Other Cleaners/Treatments for a third of the cost surely do the same thing.
rgoldberg
Member
- Dec 13, 2011
- 35
My $0.02 on changing the Motor Mounts on my 04 4WD EXT
First, this forum is priceless, thanks to everyone for sharing their knowledge.
Second, the vibration was so bad that I would shift in to Neutral when coming to a stop to avoid the shakes.
Locally mounts were $109 or $136 each depending on the dealer plus tax. I ordered from GM Parts Direct for $65 each and $37 FedEx next day (ordered Thursday AM got em Friday AM). $167 even versus $218 + tax plus and a 90min round trip drive…
This took 4 hours from the time I turned the stereo on to the time I turned it off.
1) Block the rears, Jack up the front end, & remove the front tires.
2) Disconnect battery
3) Remove the air filter and intake plumbing
4) Remove the ECU (Driver’s side)
5) Remove Fan Shroud Bolts
6) Remove the oil pan skid plate
7) Loosen the top and bottom nuts on the driver’s side Motor Mount (for this I used a ½” drive 18mm socket with a knuckle, a long wobble extension, and a short standard extension)
8) Remove the top and bottom nuts from the passenger side motor mount
9) Using a section of 4x4 and my floor jack I raised the engine until the front half axel CV joint touched the frame
10) Loosened the Motor Mount Bracket for extra wiggle room. You’ll need a 13/16” combo wrench as the bolt are behind or very close to being behind the strut spring
11) Passenger side mount came right out.
12) Removed (dremel with cutting wheel) the top portion of the top stud on the new mount which gives an extra ¼” of play
13) Passenger side mount went in bottom first, then I used a pry bar and a rubber mallet to persuade the top stud it in the rest of the way, however, the method I sued on the driver’s side mount would have been just as easy if not easier.
14) Install top and bottom nuts and tighten up the bracket
15) Lower engine and tighten bracket all the way
16) Remove top and bottom nuts on driver side
17) Jack up engine
18) Loosen the motor mount bracket
19) Bust you knuckles trying to remove it, swear a lot. This side sucks so much worse than the passenger side.
20) I finally decided to use a bottle jack, a 4x4, and my pry bar placed against the bottom on the old motor mount to force it up and out of the bottom bracket. This worked amazing well!!!
21) Cut the top stud on the new mount.
22) Install the top stud first and placed the nut on loosely to make sure the mount doesn’t fall out.
23) Back to the bottle jack, 4x4, and pry bar. Place the pry bar against the metal bottom of the new mount and use the jack to compress it until the bottom stud slides on to the bracket. I use the 4x4 between the jack and pry bar.
24) I then threaded a rope through the frame and around the bottom stud of the mount so I could gently pull it in to place, and it fell right in to the mounting hole.
25) Add bottom nut
26) Tighten up the Bracket.
27) I then when back to all 4 motor mount nuts and removed them and added blue lock tight, then replaced them and torque them down.
28) Reassemble everything and OMG this thing runs like a DREAM!!! Smooth as Silk!
I finally had an afternoon to tackle this. My steps are based on Goldberg's notes (THANKS!). I also spent just short of 4 hours.
1) Block the rears, Jack up the front end, & remove the front tires.
2) Disconnect battery - I didn't but probably should have.
3) Unbolt the ECU and wiring clips just below it (Driver’s side) and move it towards front of vehicle with wiring still intact.
4) Remove Fan Shroud Bolts.
5) Remove the oil pan skid plate.
6) Loosen the top and bottom nuts on drivers side mount. Remove the top and bottom nuts completely from the passenger side motor mount. I used a 3/8 drive 18mm deep socket with a knuckle and a 6-inch extension and sometimes another 3-inch extension, I probably could have used more/different extensions but that's what I've got. Get the top bolts by going through the top. On the passenger side you with need to work carefully around the oil dipstick. On the drivers side you will need to work carefully around the ECU mounting bracket. Get the bottom bolts by going through the space between the front-end of the wheel well and the strut.
7) Using a section of wood and my floor jack I raised the engine until the front half axel CV joint touched the frame. I placed the jack towards the passengers side of the engine.
8) Passenger side mount came right out because it was so compressed. I pulled it out from the top through the space between the coolant tank and the exhaust manifold near the windshield.
9) I used a hacksaw and cut the top studs of the new mounts three threads down from the top. (More on this below)
10) Passenger side mount went in bottom stud first, I did not need to persuade it to go in because I cut the stud three threads down. Remember to pull the heat shield off the old mount and put it on the new mount for the passenger side.
11) Lower the jack until you can install top and bottom nuts loosely.
12) Remove top and bottom nuts on driver side
13) Lower jack and move it slightly towards the drivers side of the engine and jack it back up
14) Pull out the drivers side mount from the top using the space between the engine and brake fluid tank near the windshield. This is a tighter space but again if the mount is worn out and compressed enough it will come out easily.
15) Install new mount bottom first then lower jack until you can get the nut on the top stud.
16) Lower engine and go through all four bolts and tighten them up. Grab a 21MM wrench and tighten up the bracket bolts and suspension parts while you are there.
17) Drive for a day then go back and tighten bolts again just in case anything settled.
Okay, so two major differences.
1 - I did not need to loosen the frame-to-mount brackets. The bolts conflict with the strut spring making this difficult. Even after loosening the bolts I could not get the bracket loose to give me extra room anyway so I tightened them back up and proceeded without this step.
2 - Because I cut the top studs shorter (three threads deep instead of just the un-threaded portion of the stud) I was able to get the new mounts in pretty easily. However, this leaves no extra threading once you install the upper bolts. Once tightened down, the studs barely extended above the bolts. I think this is okay, but I'm by no means sure. I will keep an eye on them and report back if this causes any problems.
An old pilot's joke is that the three most useless things in an emergency are: altitude above you, fuel on the ground, and runway behind you.EAnton781 said:I think this is okay, but I'm by no means sure.
Threads sticking up past a nut are in this category. They add no strength - they are only useful during installation as a guide or if you need to cinch down a loose fit.