SOLVED! Loose, Rattle-y Heat Sheilds

l008com

Original poster
Member
Feb 19, 2016
896
Massachusetts
Heyooooo

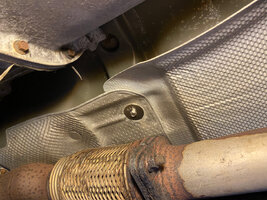
New problem of the day. My exhaust heat shields are very loose and rattling a lot.
They're making a new, very loud noise. But I suspect they are also the cause of some existing noises I've been getting on bumps lately too.

So the problem is clear. The bolt holes corroded away so theres nothing to keep them fastened.
Here I made a quick video so you can see first hand:

There's at least two shields with these rotted out holes. I'll have to take a closer look and actually count before I start doing anything.

- One obvious fix is that I can just get some larger diameter stainless steel washers and bolt them up with that to keep them in place.

- Another fix could be to get new ones? Assuming these are even sold any more? Which do people typically do when this happens?

- I suppose I could also just rip them off and go without. But you know, I'd rather not be melting wires I then have to replace under there. I'd much rather leave them on and fix them.
 

cornchip

Member
Jan 6, 2013
637
It's simple as you said....just use a larger washer or even add a few extra screws to firm it up. I did mine at the same time I did my muffler.
 

l008com

Original poster
Member
Feb 19, 2016
896
Massachusetts
Gotcha. Follow-up questions:

Those heat shields are in pretty good shape, little to no rust or corrosion, EXCEPT exactly where the steel washers held them in place. So is the issue not that they just corroded over time, but that the aluminum/steel interface caused electrolysis or whatever and cleanly corroded just the contact points?

And if that ^ is the case, then does it make sense to pick up some large nylon washers if they make them big enough. And make a Heat Shield/Nylon Washer/Stainless Steel washer/Nut sandwich to hold them in place?

Also does anyone know off hand what exact size nut you need for those rusty posts? Since I can't bring my truck INTO the hardware store to try a bunch of different sizes, it would be handy if the spec was known so I could just buy a handful without going back and forth 100 times.
 

Mooseman

Moderator
Dec 4, 2011
25,392
Ottawa, ON
I think they are aluminum and they just wore a hole through the nut from vibrations. Using wide fender washers will spread the load and hopefully stop the vibration.

I don't think using nylon is a good idea in any area with heat.
 

otter44

Member
Nov 23, 2022
3
RR#1 Elmwood On
Just take some pieces of tin (a can if nothing else available) cut them about 1 inch or so square , drill hole in the middle and use as a washer. I done this on a few of my GM vehicles.
 

l008com

Original poster
Member
Feb 19, 2016
896
Massachusetts
The hardware store down the street has a very big supply of nuts and bolts and washers and they're going to be pretty cheap. I'm more apt to just do that with some stainless ones.

So I guess the next step is that I need to climb under there again and actually count how many holes I need to fix.
 

l008com

Original poster
Member
Feb 19, 2016
896
Massachusetts
OK more problems to add to my week of TB trouble.

What I was under the truck failing to fix the starting issue, I figured I'd count how many new heat sheild fasteners I need (6). Then I figured let me unscrew one so I can bring it to the hardware store and match it up with a large stainless washer and new stainless nut.

I was unscrewing the nut, and unscrewing and unscrewing. It was almost there. Then the threaded post snapped right off.

They're all equally rusty, so I suspect they're all going to do the same thing if I try to unbolt them. So NOW what should I do? It looks like you'd have to gut the interior of the truck to get at the other side of these posts to replace them, if they're even replaceable?
 

Mooseman

Moderator
Dec 4, 2011
25,392
Ottawa, ON
Just use some self drilling and tapping screws. Just make sure you're not drilling into anything topside.
 

l008com

Original poster
Member
Feb 19, 2016
896
Massachusetts
How do I know how much space I have before they come up through the rug? Should I get some kind of adhesive sealant to make sure no water gets in. Then again how many more years could this truck have so thats probably not needed. So I guess the question is just what length screw should I use? UGH I really don't like the idea of doing this but the two biggest shields are about to fall off so I don't have much choice.
 

Mooseman

Moderator
Dec 4, 2011
25,392
Ottawa, ON
Just use the shortest self drilling and tapping screws you can find. You can apply some silicone or some sort of sealant on the threads.
 

l008com

Original poster
Member
Feb 19, 2016
896
Massachusetts
I've had bad luck with JB weld but in my last comment about using a sealant, I was thinking 3M 5200 marine adhesive. Then I thought... damn I could just glue these in place with that stuff and it would probably last forever. But I don't know how hot it gets on the back side of the shields, and heat is the one condition I'm not sure about with 5200.
 

l008com

Original poster
Member
Feb 19, 2016
896
Massachusetts
Nope. I think I'm best off just using screws anyway since I don't want to full remove them to properly glue them in place. But that also brings up the silicon sealing too.... Is there some kind of high heat silicon sealant I can use. Even if the shields work, the screws will probably heat up a decent amount.
 

l008com

Original poster
Member
Feb 19, 2016
896
Massachusetts
OK I climbed under the truck again and took a closer look.
I also tried to unscrew another nut so I could take it to the hardware store. And even after soaking it with penetrating oil for a while first, I unscrewed it and eventually the bolt snapped.

So of the 6 fasteners I need to replace, four of them are already on support braces, meaning I can screw through that with no risk of going through the floor.

But the remaining 2 do not appear to be going into support brackets, they look like they screw right into the floor. Is there a space above the sheet metal you see when laying under the truck, and the metal that is underneath the rug in the interior? Or is that the same metal?

Also, of the 4 fasteners that are going into support brackets, 2 of them can be accessed as-is, but two of them are above the muffler with no possible way I can get a drill and then a wrench in there to screw in a new screw. Is there a way I can move the muffler without breaking anything? And I assume without unbolting the exhaust pipe. I would expect all those ancient rusty nuts and bolts to snap right away before unscrewing themselves.


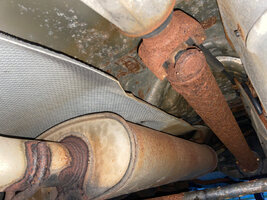
Below you can see how little space is above the muffler. I can't see any way I could put a new bolt in that heat shield without moving that muffler out of the way?
muffler-tight-fit.jpg


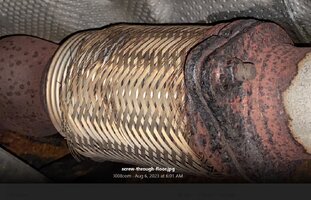
Below you can see 1 one of the 2 screws that do not appear to be going into a support bracket. Not the one close to the camera that is sheered off, the one further to the left edge of the photos, thats still in place and nice and rusty. I think I can replace that one but I don't want to screw through and end up putting a whole in the floor or even worse, a hole in a wire.
screw-through-floor.jpg
 

Mooseman

Moderator
Dec 4, 2011
25,392
Ottawa, ON
You could lower the exhaust by unhooking the rubber hangers and drop it until it rests on the diff. That should give you enough space above the muffler.

I wouldn't worry too much about drilling through the floor into a wire. They generally go front to rear in channels along the sides of the floor except around the fuse box, which is on the other side, or under the seats. You could peel the carpet a bit to see if there's anything around where you plan to screw into the floor.
 

cornchip

Member
Jan 6, 2013
637
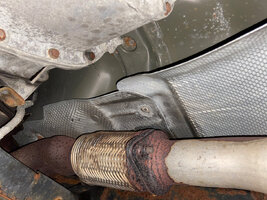
I'd use extreme caution lowering that rear portion of the exhaust. Your expansion joint is in real poor shape and is likely going to crack if it isn't already leaking. Overall....your rear exhaust system is on it's last legs. Time to consider a new rear system and fix that shield while your in there.
 

Attachments

  • exhaust joint.JPG
    exhaust joint.JPG
    154.9 KB · Views: 2

l008com

Original poster
Member
Feb 19, 2016
896
Massachusetts
Ok I'm going to try to poke around with this today. Question if anyone has an experience with this:

I know how to size a pre-drill hole for a screw when I'm screwing into wood, but how do I size the drill bit when I'm trying to screw in to thick trailblazer metal?
 

Redbeard

Member
Jan 26, 2013
3,491
To keep it simple could you use a self tapping screw? Otherwise take your screw and place the drill bit over the "center" part of the screw. You want to see the threads on both sides of the drill bit and the drill bit taking up all of the center of the screw. And make sure you are using a sheet metal screw meant for steel and not for wood. Screws designed for wood are not very strong and strip out easily. I did a quick search on youtube and this guy is showing what I am trying to type, but for wood and you will get the idea.
 

l008com

Original poster
Member
Feb 19, 2016
896
Massachusetts
I've never had a self-tapping screw that didn't snap when screwing it in to metal without pre-drilling first. That video is about wood screws going into wood. I guess I'll do the same thing and hope for the best.
 

Mooseman

Moderator
Dec 4, 2011
25,392
Ottawa, ON
There are self drilling and tapping screws. They essentially have a drill bit on the end.

SDvsST.jpg
 

l008com

Original poster
Member
Feb 19, 2016
896
Massachusetts
I've always seen the "self drilling screw" pictures above referred to as "self tapping". Those are the ones I've never had successfully screw into metal on their own.

The ones I ended up using are very similar to the one on the left.
Stainless steel, #14, pretty short. Plus some 1.5" stainless steel washers.
I did two above the exhaust pipe as seen. In this spot, the two shields are overlapping so it got both of them. I couldn't see any way to get enough space above the muffler to drill a hole and screw something in. Like not even remotely close. So that shield is attached now at both ends but it's still loose in the middle. So big improvement but still some rattling.

Also I pre-drilled with a 3/16" and after some initial troubles, it went pretty smooth.
 

Attachments

  • bolt.jpg
    bolt.jpg
    1.1 MB · Views: 6
Last edited:
  • Like
Reactions: Mooseman

JayArr

Member
Sep 24, 2018
515
Mission BC Canada
Nothing says you need to use the old holes. You may be better off to move to fresh material to fasten it back up.

Using self tapping screws and large washers just find a bunch of places that are convenient and will hold the shield in place.
 

Forum Statistics

Threads
23,355
Posts
638,320
Members
18,563
Latest member
memoremix

Members Online

No members online now.