Pages 18 and 20 of the attached linked PDF White Paper show advantaged line imagery of where the Ten (10MM ??? or 13MM) Bolts are located along the Segmented Flange and usually are held fast with only 87 -89 Inch Pounds of force needed to clamp a good enough seal between the Plastic "O"Ring Oval Gaskets and the Aluminum Engine Head. It makes sense to tighten these from the middle area out towards the edges in an expanding circle and not over-tighten the Bolts.
http://vortec4200.com/index_htm_files/vortec4200.pdf
Be aware of the "Elbow Hose" that runs from the center bottom to the middle outer portion of the Intake Manifold as it conceals the presence of One Bolt Head underneath at the upper side of the "Zig-Zag" pattern along the Flange... and is both difficult to remove... and easy to destroy if you lose patience when trying to loosen it from where it attaches the Nylon Pipe.
Having an assortment of 10-13MM Shallow and Deep "Wobble" Sockets with short, medium and long extensions might be helpful and using some Duct Tape to secure the Socket to the Extensions will make life easier when they don't drop off and wind up under the vehicle or somewhere inconvenient below the work area. The Fasteners are locked into the manifold and will not ordinarily come out unless force is applied... so if they all need to be removed and then new Gaskets installed... you won't have to worry about losing them when adjusting the IM back into place. These images can help you to visualize where they are "by feel"
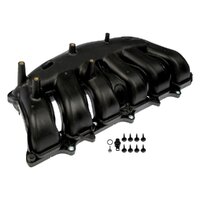
These first images show the New Style Intake Manifold for Later Model Vehicle...


This last image is of the Early Model Style.... Note the Small "Elbow Hose" in the Middle... The Brake Reservoir Hose is above and to the Right of it...