- Jan 5, 2012
- 321
This is for folks that have a hood light (2002) and the light is not working. Most likely it's not a bulb issue, it's a corroded contact issue. The light system works by a weight that's in the light housing then slides two contacts together when the hood is open. This is why you have a lot people who "tap" the light and it works. Sometimes the metal weight inside doesn't slide. Check the bulb first by removing the plastic cover to see if it's burned. If the bulb is not burned out then replace the plastic cover then proceed below.
Perform at your own risk. This is how "I" did it.
Time: 45 minutes with pictures. I would allot yourself 30 minutes.
Tools:
1. Small Screwdriver
2. Rubbing Alcohol
3. Q-Tips
4. Rag
5. Windex
6. Patience
1. Open Hood
2. Prop with hood bar. The metal rod that holds your hood up.
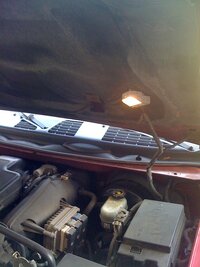
3. Locate light on underside of the hood. (Here it's working, b/c this is after I fixed it.)
View attachment 21732
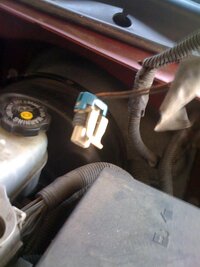
4. Disconnect the electrical light connector. Gently squeeze out the clip going into the hood. The clip closest to the driver's side.
View attachment 21733
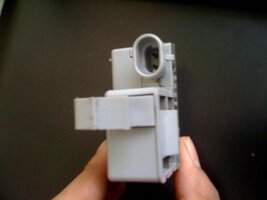
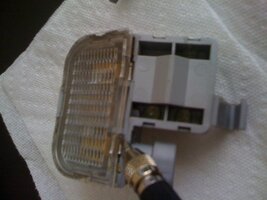
5. Remove unit and put on work table. Make sure you have some newspaper or something so your table doesn't get damaged.
6. Close hood if you need to at this point.
View attachment 21734
View attachment 21735
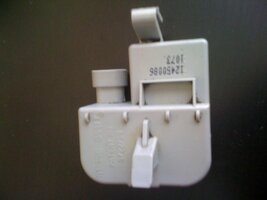
7. Gently pry up the plastic clear cover to get to the bulb. Clean the plastic cover with some windex and place to the side.
View attachment 21736
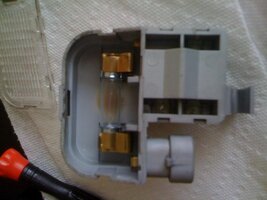
8. Pop the bulb out (I used a small screw driver on each end of the bulb on the metal part to GENTLY push it forward to remove it.)
View attachment 21737
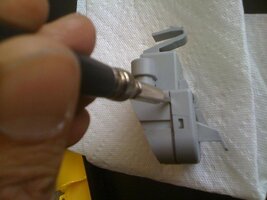
9. The housing is two plastic pieces, you'll see small channels around the whole housing where it clips in, this where you can insert a small screw driver. The picture below is the WRONG place to put the screwdriver. If you look, 1/2 inch down you can see where the screwdriver is supposed go.
View attachment 21738
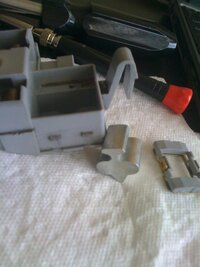
10. Carefully separate the two plastic pieces or else the parts inside will go flying on to your laptop. Don't ask me how I know.
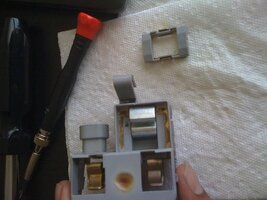
11. At this point you'll see the slide contact and the metal rocker that helps it slide when the hood is open or closed. In the pic below I had already removed the slide contact (Square looking plastic metal thing)
View attachment 21739
12. At this point remove the slide contact then the metal rocker and set aside.
View attachment 21740
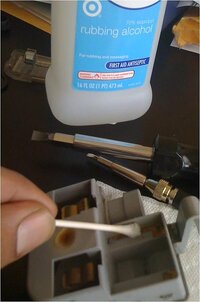
13. Clean the contacts (gold strip things) with some rubbing alcohol (a lot less conductive than water and it evaporates) and some Q-Tips to remove any grease or dirt off of the contacts.
View attachment 21741
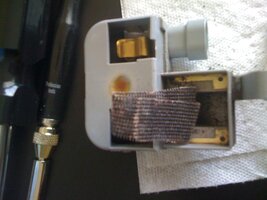
14. Scrub the contacts where you cleaned it with the Rubbing Alcohol using 120 grit sandpaper. Minimum scrubbing time of 5 minutes for each side. Time yourself...it gets boring just after 2 minutes. Try different angles. Constantly use a new area of the sandpaper.
15. Reuse Rubbing alcohol to get the grit out. Use an air compressor and shoot air into if you need to get more out or just use a rag to clean it.
View attachment 21742
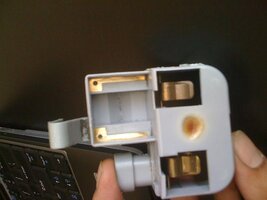
16. Now you have nice and clean contacts. Installation is reverse; enjoy your lights again, even though they're not that bright to begin with. Might do an LED upgrade.
View attachment 21743
Perform at your own risk. This is how "I" did it.
Time: 45 minutes with pictures. I would allot yourself 30 minutes.
Tools:
1. Small Screwdriver
2. Rubbing Alcohol
3. Q-Tips
4. Rag
5. Windex
6. Patience
1. Open Hood
2. Prop with hood bar. The metal rod that holds your hood up.
3. Locate light on underside of the hood. (Here it's working, b/c this is after I fixed it.)
View attachment 21732
4. Disconnect the electrical light connector. Gently squeeze out the clip going into the hood. The clip closest to the driver's side.
View attachment 21733
5. Remove unit and put on work table. Make sure you have some newspaper or something so your table doesn't get damaged.
6. Close hood if you need to at this point.
View attachment 21734
View attachment 21735
7. Gently pry up the plastic clear cover to get to the bulb. Clean the plastic cover with some windex and place to the side.
View attachment 21736
8. Pop the bulb out (I used a small screw driver on each end of the bulb on the metal part to GENTLY push it forward to remove it.)
View attachment 21737
9. The housing is two plastic pieces, you'll see small channels around the whole housing where it clips in, this where you can insert a small screw driver. The picture below is the WRONG place to put the screwdriver. If you look, 1/2 inch down you can see where the screwdriver is supposed go.
View attachment 21738
10. Carefully separate the two plastic pieces or else the parts inside will go flying on to your laptop. Don't ask me how I know.
11. At this point you'll see the slide contact and the metal rocker that helps it slide when the hood is open or closed. In the pic below I had already removed the slide contact (Square looking plastic metal thing)
View attachment 21739
12. At this point remove the slide contact then the metal rocker and set aside.
View attachment 21740
13. Clean the contacts (gold strip things) with some rubbing alcohol (a lot less conductive than water and it evaporates) and some Q-Tips to remove any grease or dirt off of the contacts.
View attachment 21741
14. Scrub the contacts where you cleaned it with the Rubbing Alcohol using 120 grit sandpaper. Minimum scrubbing time of 5 minutes for each side. Time yourself...it gets boring just after 2 minutes. Try different angles. Constantly use a new area of the sandpaper.
15. Reuse Rubbing alcohol to get the grit out. Use an air compressor and shoot air into if you need to get more out or just use a rag to clean it.
View attachment 21742
16. Now you have nice and clean contacts. Installation is reverse; enjoy your lights again, even though they're not that bright to begin with. Might do an LED upgrade.
View attachment 21743
Attachments
-
 pic 1.jpg59 KB · Views: 21
 -
 pic 2.jpg52.4 KB · Views: 21
 -
 pic 3.jpg37.3 KB · Views: 22
 -
 pic 4.jpg31.4 KB · Views: 22
 -
 pic 5.jpg42.5 KB · Views: 22
 -
 pic 6.jpg44 KB · Views: 21
 -
 pic 7.jpg45.7 KB · Views: 20
 -
 pic 8.jpg53.4 KB · Views: 22
 -
 pic 9.jpg48.2 KB · Views: 20
 -
 pic 10.jpg44.8 KB · Views: 20
 -
 pic 11.jpg46.3 KB · Views: 22
 -
 pic 12.jpg40.5 KB · Views: 16
