- Dec 4, 2011
- 327
There have been so many questions on this and so many threads in another forum, maybe this will help someone.
DISCLAIMER - I ACCEPT NO RESPONSIBILITY TO ANY DMAGE DONE TO YOUR VEHICLE BY PERFORMING ANYTHING IN THIS HOW-TO
This How-To is designed to help you install a rear view mirror that has the temperature and compass in it if you do not have those features already. This was written based off my install on a 2006 Trailblazer LS with manual HVAC controls, as well as information from other forum members.
Here we go
1) You need to make sure you can even do this mod . Look at the back of your rear view mirror. Does it have a 16 pin plug on the back?

If no, STOP HERE
If yes, then keep reading.
2) Obtain new rear view mirror with compass and temperature display. I found mine on E-Bay. Keep in mind that GM used the same mirrors on MANY models, so it does not necessarily need to be from a Trailblazer. Mine was from a Silverado
The important thing is to get a mirror that matched the FEATURES your vehicle has (Onstar, Passenger side air bag indicator, integrated phone, etc.)
If you don't have Onstar or air bag indicator, you can get a mirror with those, just those features will not be operational.
3) Get other required parts.
You will need:
1 SENSOR - GM Part # 15047946
1 CONNECTOR - GMPart # 12101856
2 Female terminals -Delphi Part # 12191818
2 Cable seals - Delphi Part # 15366021 (these are available but honestly, I did not use them and have not had an issue)
In addition, you will need wire, butt end connectors or soldering iron / solder, wire loom (if desired) and basic electrical knowledge.
4) Once you have all the parts, you can begin!
Step 1: Unplug the 16 pin connector from the back of your existing mirror.
Remove mirror. There is a set screw at the base of the mirror. This is a TORX screw.
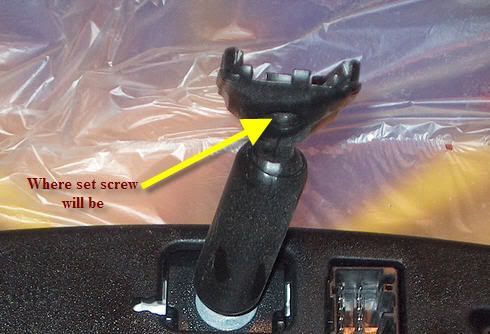
Once screw is removed, the mirror assembly should slide up and off the mount on the windshield.
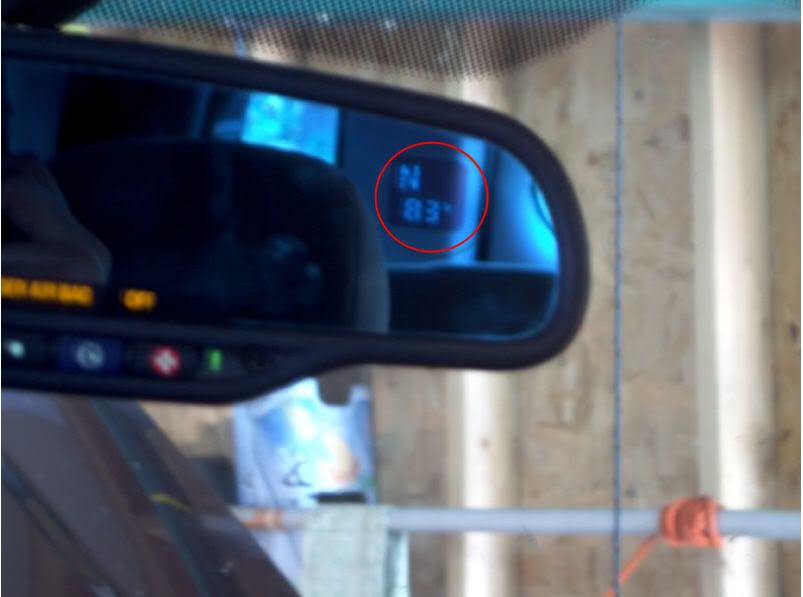
Step 2: Install new mirror. Slide new mirror onto the base on the windshield and insert set screw. DO NOT OVERTIGHTEN THE SET SCREW!!!!. Connect the 16 pin connector.
At this point, if you turn the truck on the compass should work, but the temp area will read OC. OC stands for OPEN CIRCUIT and this lets you know there is an issue with the sensor or wiring to the temp sensor.
Step 3: Open Hood (duh).
Step 4. Locate the hole in the top of the radiator shroud where the sensor should go. It will be at the front of the vehicle, just about in the middle.

The sensor you buy will have a mount attached to it. It will look something like this:
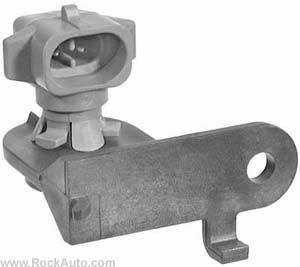
The bottom part is the mount and it is NOT used in our application. You can easily remove the sensor from the mount.
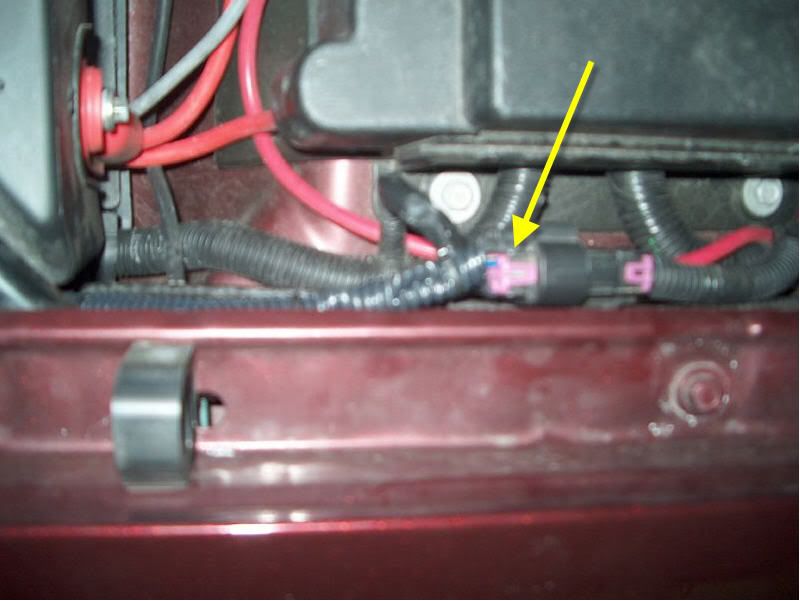
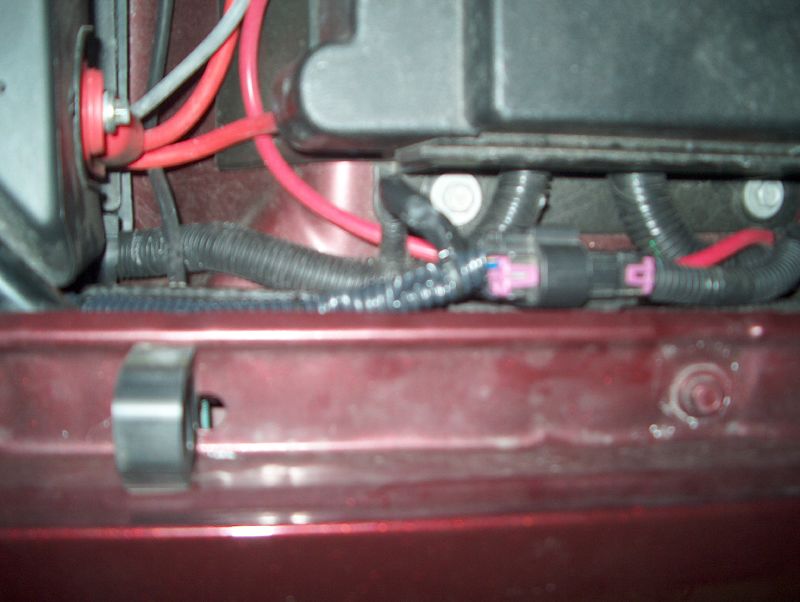
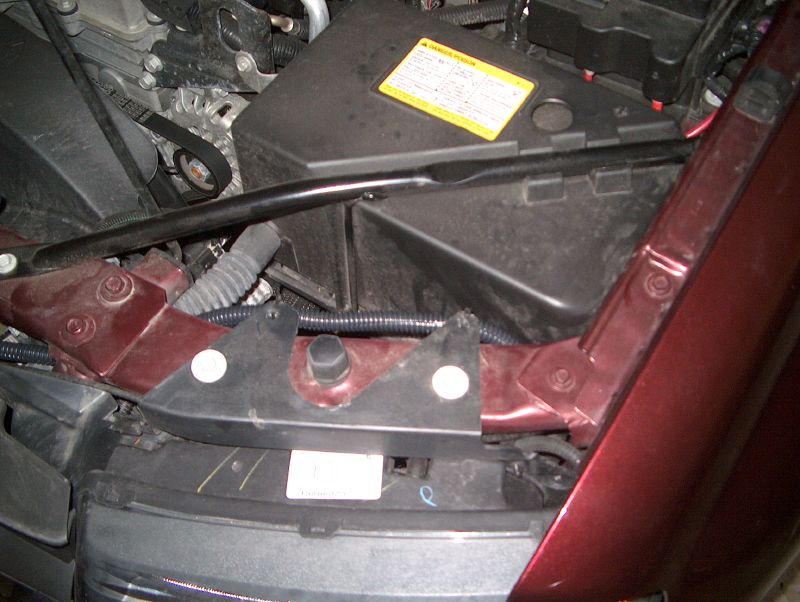
Also locate the plug just behind the battery on the drivers side firewall of the truck:
Now the fun begins
Connect your temp sensor to the sensor wiring harness. The wires on the harness are only about 12 inches long. You will need to use wire and butt end connectors to extend these wires to get to the connector in the firewall. If you don't like solderless connectors, then do what you need to do.
Once that is done, you can pop the sensor to the hole in the radiator shroud. It should pop in there easily.
Once in, it should look like this:
Trailblazer -
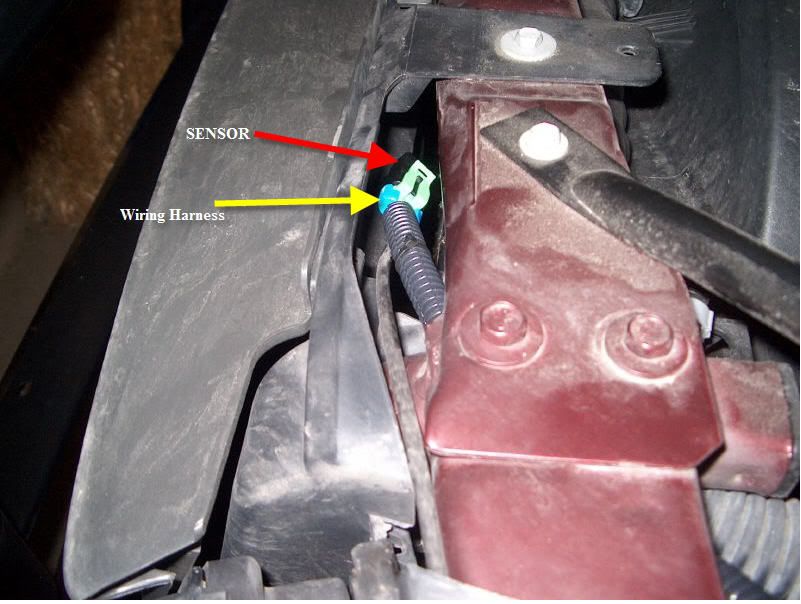
Envoy:
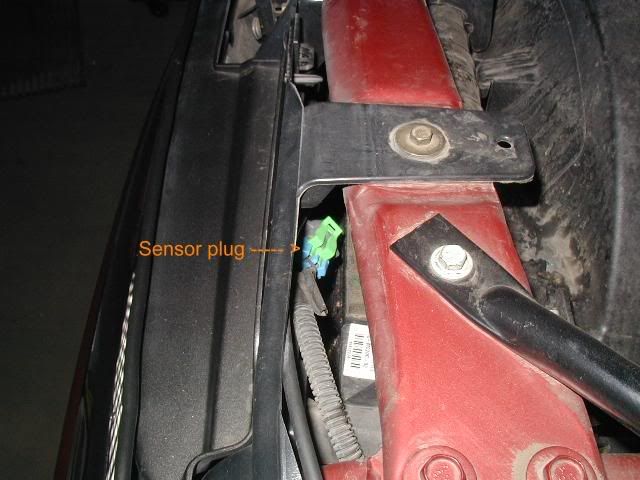
Locations should be the same, pictures are for reference. Nothing needed to be removed to get to those locations.
Now that the sensor is installed, you need to connect the 2 wires you extended to the plug on the firewall. The 2 female connectors listed in the parts needed above come in here. Connect those to the ends of the wires you extended.
Then feed them up to the purple connector in the firewall.
The connector has a purple colored plastic wire seperator on the outside. If you are standing beside the driver's fender looking at the fusebox, the connector is directly in front of you, closer than the fusebox, mounted on the inner fender. Now looking at the right side of the connector (the side facing the cab), you will notice the green/black stripe and brown wire at the top of the connector. Also notice, that on the left side of the connector, you will have 2 blank places. These two blanks are where your temperature sensor wires go. Pull the two rubber plugs out and you can temporarily test your sensor here until you get your wire routed.
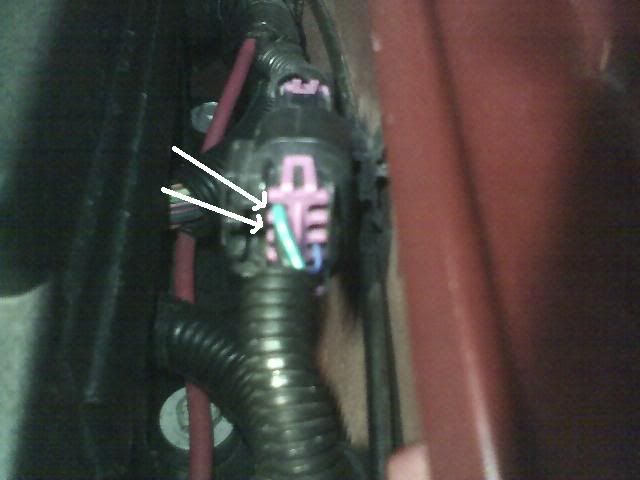
Once those wires are connected, the temp sensor should be operational! Those are the 2 spots needed, but in my personal experience the wire position in those 2 spots are irrelevant.
Clean up your wiring with wire loom for that factory-ish look
Chris
Thank you to MTT, APPSTATEGIRL, ROADIE, SONICAIDE and any other member whose picture or information I used. Most pictures were mine, but some were taken from the multiple threads on this subject, as well as the internet. If I used a picture of yours that you would like removed, please PM or e-mail me and I will remove it. This is a resource only and is not to be used for any capital gain.
DISCLAIMER - I ACCEPT NO RESPONSIBILITY TO ANY DMAGE DONE TO YOUR VEHICLE BY PERFORMING ANYTHING IN THIS HOW-TO
This How-To is designed to help you install a rear view mirror that has the temperature and compass in it if you do not have those features already. This was written based off my install on a 2006 Trailblazer LS with manual HVAC controls, as well as information from other forum members.
Here we go
1) You need to make sure you can even do this mod
. Look at the back of your rear view mirror. Does it have a 16 pin plug on the back?
If no, STOP HERE
If yes, then keep reading.
2) Obtain new rear view mirror with compass and temperature display. I found mine on E-Bay. Keep in mind that GM used the same mirrors on MANY models, so it does not necessarily need to be from a Trailblazer. Mine was from a Silverado
The important thing is to get a mirror that matched the FEATURES your vehicle has (Onstar, Passenger side air bag indicator, integrated phone, etc.)
If you don't have Onstar or air bag indicator, you can get a mirror with those, just those features will not be operational.
3) Get other required parts.
You will need:
1 SENSOR - GM Part # 15047946
1 CONNECTOR - GMPart # 12101856
2 Female terminals -Delphi Part # 12191818
2 Cable seals - Delphi Part # 15366021 (these are available but honestly, I did not use them and have not had an issue)
In addition, you will need wire, butt end connectors or soldering iron / solder, wire loom (if desired) and basic electrical knowledge.
4) Once you have all the parts, you can begin!
Step 1: Unplug the 16 pin connector from the back of your existing mirror.
Remove mirror. There is a set screw at the base of the mirror. This is a TORX screw.
Once screw is removed, the mirror assembly should slide up and off the mount on the windshield.
Step 2: Install new mirror. Slide new mirror onto the base on the windshield and insert set screw. DO NOT OVERTIGHTEN THE SET SCREW!!!!. Connect the 16 pin connector.
At this point, if you turn the truck on the compass should work, but the temp area will read OC. OC stands for OPEN CIRCUIT and this lets you know there is an issue with the sensor or wiring to the temp sensor.
Step 3: Open Hood (duh).
Step 4. Locate the hole in the top of the radiator shroud where the sensor should go. It will be at the front of the vehicle, just about in the middle.
The sensor you buy will have a mount attached to it. It will look something like this:
The bottom part is the mount and it is NOT used in our application. You can easily remove the sensor from the mount.
Also locate the plug just behind the battery on the drivers side firewall of the truck:
Now the fun begins
Connect your temp sensor to the sensor wiring harness. The wires on the harness are only about 12 inches long. You will need to use wire and butt end connectors to extend these wires to get to the connector in the firewall. If you don't like solderless connectors, then do what you need to do.
Once that is done, you can pop the sensor to the hole in the radiator shroud. It should pop in there easily.
Once in, it should look like this:
Trailblazer -
Envoy:
Locations should be the same, pictures are for reference. Nothing needed to be removed to get to those locations.
Now that the sensor is installed, you need to connect the 2 wires you extended to the plug on the firewall. The 2 female connectors listed in the parts needed above come in here. Connect those to the ends of the wires you extended.
Then feed them up to the purple connector in the firewall.
The connector has a purple colored plastic wire seperator on the outside. If you are standing beside the driver's fender looking at the fusebox, the connector is directly in front of you, closer than the fusebox, mounted on the inner fender. Now looking at the right side of the connector (the side facing the cab), you will notice the green/black stripe and brown wire at the top of the connector. Also notice, that on the left side of the connector, you will have 2 blank places. These two blanks are where your temperature sensor wires go. Pull the two rubber plugs out and you can temporarily test your sensor here until you get your wire routed.
Once those wires are connected, the temp sensor should be operational! Those are the 2 spots needed, but in my personal experience the wire position in those 2 spots are irrelevant.
Clean up your wiring with wire loom for that factory-ish look
Chris
Thank you to MTT, APPSTATEGIRL, ROADIE, SONICAIDE and any other member whose picture or information I used. Most pictures were mine, but some were taken from the multiple threads on this subject, as well as the internet. If I used a picture of yours that you would like removed, please PM or e-mail me and I will remove it. This is a resource only and is not to be used for any capital gain.

 Are you asking how to solder wires together? Cuz that's what it sounded like...


.jpg")
.jpg")


 Just haven't been able to get to it with exams right around the corner
  . Although I got some better oil and gas proof nicely insulated thick wires. Thought I'd update you all. Hope to get around to it soon