Alright I will see what I will do when the headlight assembly gets here.
What holds the projector in the reflector once you cut it? I was watching
this video at around the 3:30 minute mark you can see it fits but what holds it? Do you use epoxy or drill holes... How are you supposed to make sure that it is even horizontally? As that depends on the rotation of the projector.
I am not quite sure what you are cutting? If anything, you might need to open up the inner diameter of the hole in the reflector for the headlight bulb so that the shaft on the projector will slid through.
In the video, TRS was retrofitting a full size projector in a smaller housing than whats on the TB. Some projectors are not made with the threaded shaft coming out of the back of the projector which will require the reflector bowl to be cut so that the projector recesses further back into the housing. Also, some projectors are longer than others or some headlight housings are smaller than others and you cannot just use the lock nut on the threaded shaft to secure the projector to the reflector bowl because there would not be enough clearance for the headlight lens to fit because the projector would be sticking out too far and needs to be recessed.
The MMH1 projector is designed to be like a plug and play type projector. Easy to install with minimal to no cutting at all. Other larger projectors or OEM projectors would require a lot of cutting and modification. BlckShdw is working on a retro with the Lexus LS430 projectors which are much larger and requires a lot of modification.
There are many ways to secure a projector. Anything from JB Weld, epoxy, high temp RTV, to custom brackets to bolt the projector to the reflector bowl. Like with the projectors in my fogs light, I used the holes in the projector meant for the shroud to bolt the projector to the housing.
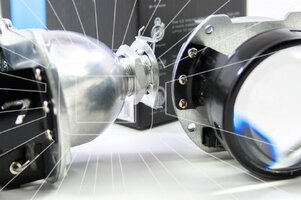
If you look in the picture below, you will see the threaded shaft coming out of the backside of the projector. There will be a thin rubber washer that comes in the hardware bag. Slip that washer over the threaded shaft on the projector. That washer will sit in between the reflector housing and the projector to adsorb vibrations. There will also be a lock nut and metal washer that comes with the hardware. Once the thread shaft of the projector has been installed through the hole in the reflector meant for the headlight bulb, you will install the washer then use the lock nut to tighten down. That lock nut is what holds the projector in place.

You do not want to tighten the lock nut down all the way until you are happy with the horizontal alignment of the cutoff. The nut is design so that the threads deform as you tightened it down so that the nut does not loosed over time. I used a bit of blue Loctite on mine as well.
For horizontal alignment, you will want to have the projectors installed into the headlights with the lock nut somewhat tight. Then install the headlights on the vehicle with the headlight lens still off. Install the HID in the projector and hook up the ballasts. Have your truck parked on flat/level ground at least 25ft away from a flat wall, then turn the headlights on. Then you can see how your horizontal alignment looks. If one or both projectors are off, you can turn the projector by hand until the cutoff line is level. Once you are happy with the cutoff of each projector, you can tighten down the lock nut while the headlights are on the vehicle. Make sure you are holding onto the projector while tightening down the lock nut to make sure the projector does not turn.
As far as I know, you will be the first person I am aware of the retro the MMH1 7.0 into TrailBlazer headlights. Others have done the 6.0s with no problems and minimal modifications.


 lol yeah, do what


