Ok just to follow up on this, I am including some pictures and my procedure in case this helps anyone else. I wrote this shortly after I did my job, but held off for a while until I was pretty sure everything was working right. I've had it in 4 wheel drive a few times and everything worked just fine. It's been a little over 2 months and around 4,000 miles.
Ok so in case this helps anyone down the road, here are some pictures and info on changing upper ball joints. I would have liked to change out the lowers as well, but my timing was really bad on this. I ended up failing an inspection due to bad uppers, I knew they were going bad but they went south pretty quickly. So christmas eve morning I am changing out upper ball joints to get the vehicle back on the road for some holiday traveling! Plus I am planning on changing other front end stuff, like struts as well so I will probably do the lowers then. (and another alignment!)
As was mentioned before, I did not follow the service manual from GM, which for the job of changing the upper ball joints you are supposed to remove the steering knuckle (which includes the brake rotor and hub and bearing asssembly). That seemed like a lot of extra work, plus I really really did not want to touch the bearing assembly, I had such bad luck with the cheaper carquest wheel bearings that when I broke down and put on some nice skf bearings (from napa), they are working great and I didn't want to touch them if possible.
By the way, I was quoted about $550 for this job using the cheaper ball joints, and it was over $600 using "lifetime warranty" ball joints. (aligment not included). I bought my own high quality usa ball joints from napa for about $160, plus tax. Remember you are going to have to get an aligment done for your vehicle after a ball joint job. I measured my tires with a tape measure and front was 1/4 inch different from the back after my work.
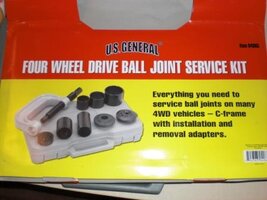
I bought the 4-wheel drive ball joint service kit from harbor freight for this job, see below:
View attachment 19252
It worked great, and I did not need to buy the separate adapter kit. Very beefy and sturdy. You can also get something from autozone or other places where you pay up front and then return it so the rental ends up being free.
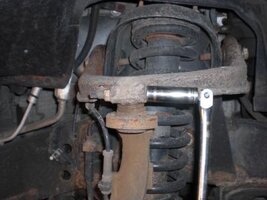
I knew my ball joints were going bad, but when I jacked up the vehicle and tried to move the wheel at 12 and 6 o'clock, there wasn't really a whole lot of movement. However, once a got the wheel off, and put a socket and rachet as shown below, it was obvious when I turned the rachet handle as the whole joint had a lot of movement:
View attachment 19253
Basically you could move up and down a *lot* more than you are supposed too...
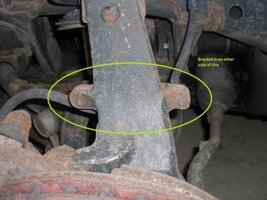
That is the original ball joint from 6 years and 135,000 miles ago. So of course step one was to jack up the wheel and support with jack stands, remove the wheel. In order to lean out the ball joint, you need to remove the wheel speed sensor wire from how it is mounted to the frame and steering knuckle in a few spots. I used a screw driver or pliers to either pull out the brackets, or remove the cable from the bracket. If you break one you can always use a cable strap to tie it back down when you are done:
View attachment 19254
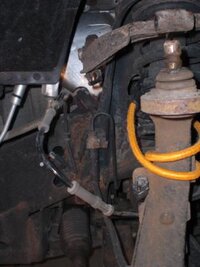
Also you will need to remove the brake line bracket from the steering knuckle which holds the brake line. I think these bolts are only 10mm or so, and come off pretty easy. Again the idea is to allow the ball joint to be able to lean out some, so this bracket needs to come off. Oh by the way it's much easier to do these two steps before you pull apart the pinch bolt for the ball joint, that's all I'm going to say haha. I put my car jack under the steering knuckle for some support before I took the pinch bolt off.
View attachment 19256
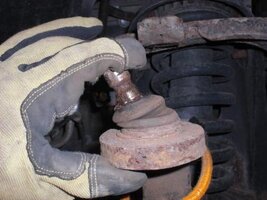
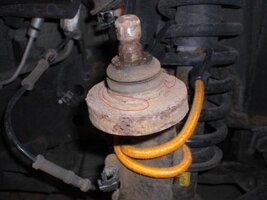
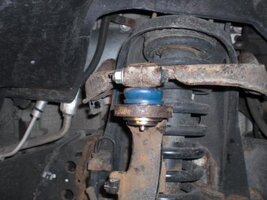
The pinch bolt which holds the control arm to the ball joint next comes off, it was 15mm, and you will need something on both the nut and bolt side. Here is a shot of how loose my ball joint was, in looking back I could have taken a pic with my pinky finger holding it like this:
View attachment 19255
It's all wet because the boot was full of rusty water! Strange how the ball joints went bad. You are looking at how rusty things can get living near buffalo ny. Some people have reported that the ball joint falls right out of the control arm, not mine I had to use a hammer and tap it out with some minor taps. I'm using bungee cords to keep things from flopping all over the place.
Here is a shot of the ball joint right before the next step. See the snap ring that holds the ball joint in? If you forget to remove this you will make the job of pressing out the ball joint extremely fun...if not impossible. I used a screwdriver and a hammer to get the snap ring out, it was pretty simple. See how the snap ring fits inside a ledge of the ball joint? It's kind of tough to see in my picture because things are so rusty, but I circled it in red. When you put the new ball joint in, make sure it's all the way on so there is a ledge for the new snap ring.
View attachment 19257
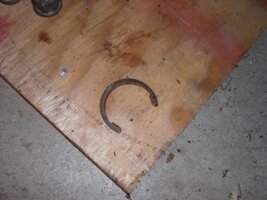
Here is the snap ring that came out, a bit different from the new one that goes in:
View attachment 19258
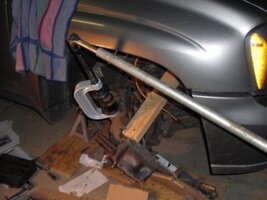
So after you take the snap ring off, I tipped out the ball joint, enough so that there is clearance for the ball joint press tool to be able to clear the body of the car. Here is where a second person can help, but it can still be done by yourself (which is how I did it). Be careful you do not tear the cv boots. I needed a piece of 2x4 to keep the assembly from tipping back in, you can see it propped in the picture. Also, a 3rd hand would have been helpful holding the ball joint press together during the initial tightening until things were snugged up. I did put some penetrating oil around the ball joint to help loosen things up.
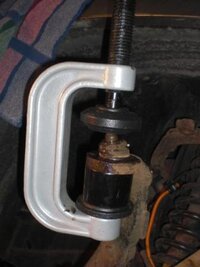
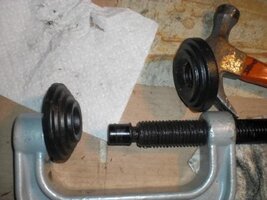
Here is a shot of the ball joint press lined up to use for the most part. You will want to lubricate those threads before using like I have. Also if you look at the parts closely, you will see that there is really only one way to assemble it, just by the way the round adapters fit on the c-clamp. For the spacer, I used the middle size.
View attachment 19260
Here is a shot of the ball joint press on the ball joint. You want the tool parts to stay lined up if possible when using this thing, I think I had to undo things once and put it back together. In my picture you can see the top of the ball joint slanted, that couldn't be helped it was so loose, but the press was pretty lined up for use. You use the press to push the ball joint down out of the hole.
View attachment 19259
Here is a shot of my ball joint press in action. There is a half inch breaker bar and one of my all time favorite cheater pipes. An impact wrench would make this easier, but in all honesty the ball joint came right out with my cheater pipe. And this on original ball joints on a vehicle with 135,000 miles rusty buffalo ny winters. The trick to doing this is do not try and do giant pulls with the cheater pipe - you will turn everything and hit the car body. Do small 10 degree bursts, kind of like an impact wrench. This was my first time using a ball joint press like that and I was surprised how easy it was. I had a towel there just in case murphy was hanging around. One thing that I am adding is that when everything comes real loose the ball joint press may come apart and tumbling down over everything so just be aware of that.
View attachment 19261
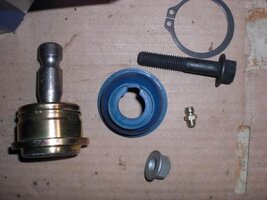
Here is a shot of the new ball joint and accessories. See the new boot? The notch goes toward the inside, that is where the excess grease comes out. If you have the notch facing out, the grease can potentially run down onto your brake rotor, which is not the best of ideas. Putting the new joint in is even easier than removing it. I do not have a picture of it going back in, but the press assembly is the same, except the spacer goes on top.
View attachment 19262
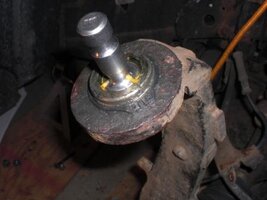
Here is a shot of the new ball joint installed. See the snap ring already installed? It fits in a little ledge. Also if you have snap ring pliers they can make this easier to do. The yellow stuff is grease from the manufacturer. I cleaned up the area before putting the ball joint in with my dremel and wire brush.
View attachment 19263
A shot of the new ball joint installed. Don't forget to put the boot on before you put the control arm down onto the ball joint. Also I lubed up where the boot goes and around the bottom of the boot, it was a snug fit but goes on. I had to apply pressure to keep my control arm down while I tightened up the pinch bolt. New zerk fitting goes on the bottom and mobil synthetic grease pumped in until it runs out the notch in the back.
View attachment 19264
In regards to the above posts, when I went to push things back in and fit the control arm on top of the ball joint was when I noticed the wheel shaft needing to be "wiggled" back in to the cv joint. The boot and everything else were intact and looked fine. It went right back in just fine, I'm not even sure how far out it was, but enough so that I noticed that the whole assembly didn't just tip back in as easy as it came out. I did not have to use a hammer or anything else, just some mild hand pressure and wiggling and it slipped right in.
I would rate this difficulty wise a 3 on a scale of 1 to 10, with 10 being hardest. Easier than brakes. (remember just upper ball joint job).
Hope this helps,
-Jerry
 It doesn't look like there is a seal in the manual that I may have ruined. When I went to have my vehicle aligned, I asked the mechanic about this and he said that was normal. (I pay him cash under the table to ask questions occasionally about repair jobs that I do)