You are using an out of date browser. It may not display this or other websites correctly.
You should upgrade or use an alternative browser.
You should upgrade or use an alternative browser.
NEED HELP Bad knocking
- Thread starter redline customs
- Start date
Yup I will post as soon I can. Having a time trying to get the bolts on the intake manifold off.
Alright, so I got the valve cover off... Can anyone take a guess at what I found wrong? Anyone? No? Well I'll give you a hint... NOT A DAMN THING!!!! The lifters are all there as well as the springs. No cracks(that I seen) on the cams. And the timing chain was still on the sprockets as well as fairly tight. The shoe was on top and looked like it had some going down into the engine. I have no friggin clue. Back to the drawing board. I started removing the oil pan and when I drained it... No sparkles or weird stuff. Aside from being black as night even though this oil has less than 100 miles on it. I did however see a tiny bit of water in it though so I have a feeling that either way I'm screwed. Imma start checking for a used engine. After I get the pan off I'll see what the crank looks like but since she turns over just fine, I'm pretty optimistic about that. Any ideas guys? She just made a pop and shut down. I tried to start er up on the road and she fired a bit but no start. Also, what do I need to get off to remove timing cover? Looks like the fan, tensioner pulley, and harmonic balancer?
Your anger and frustration is very well understood and felt as equally bone deep by many of us... But from here on out ...how you go about working things out sits on a strange Balance Beam that involves deciding whether or not you should to continue tearing down the in-dwelling engine...or replace it. Under the present circumstances, doing this work on the present motor will make you feel like a Chimpanzee working upside down while hanging from a Banyan Tree using Special Tools down inside the Elevator Shaft that the area in front of the engine will feel like. Right now... You are standing inside a Hole that will just keep getting Deeper as you Dig... unless you take a moment to step back... and Put Down The Shovel!
Your allies here are more than a handful of Members with sound documentation and images on Repair Procedures and Parts Lists to aid in how things can best be accomplished and in what order they MUST be done. Number One on that Runway is @Mooseman and his Epic Posts Parts 1&2 on "How to Change the Phaser in the GM Atlas 4.2L I6 Engine". His two posts address your original request for learning how to remove the Front Engine Cover. I located this post for you in the Articles Section of the Forum... but I used the "Search" Box located near the upper right hand corner of your screen to get to it... and using it will well and truly serve you in the same fashion when seeking the posts that will make all the difference... "God Helps Those... That Help Themselves":
http://gmtnation.com/forums/threads/how-to-replace-the-cam-phaser-aka-vvt-actuator.14924/
On the OTHER side of the Balance Beam... If you are doing research to locate a viable Donor Engine... I can tell you from personal experience it is possible to do so and keep your expenses somewhere below $1,000.00. However... you will need to know the pedigree of the engine and the circumstances by which the engine you want became available. Your best options will involve searching eBay and other places for SIMILAR vehicles (Yes... Envoy, Ranier, SAAB...AND Trailblazers... for Low Mileage Vehicles that were immediately disabled by Motor Vehicle Accidents.
I found mine recently on eBay involving a 2WD Envoy (recommended for the obvious lack of additional stress caused by 4WD use...Off Road.. Trailer Towing...etc) This translates to being PROOF that the engine I wanted... was actually running right up to the very moment the vehicle became disabled. What you DON'T want is one that arrived from one towed in as a completely disabled SUV that was sitting around for years in someone's driveway... with even more mechanical problems inside than the engine inside of your own vehicle right now.
In the meantime... while weighing out your options that will tend to tilt the Balance Beam from one side to the other and back again... STOP WORKING ON THE ENGINE... The reason here is because if you decide to buy a replacement Donor Engine... you do not want to Waste One More $$$ or One More Minute tearing apart something that will not be getting used in the near future. Trust me... The Deeper you get inside that Atlas Engine...the Greater the Skill and the Number of Tools and Experience you will need in order to keep going forward and resolve everything that might be wrong.
You have many Unsung Friends here at GMT Nation... So Take a Breath... and think things through for just a bit. Regardless of what you decide to do.... More Help is here if you need it!
Last edited:

Thanks for the support. I've tried using search but I can't get it to work right. Every thread that has had any words I put in is pulled up. I tried something someone told me to put the gmtnation thing in but it just says no results. Probably my pos phone. I checked that link but didn't see anything about getting front cover off. Just the valve cover. I talking about the cover that runs down the very front of the engine. Mostly I'm doing this because I feel like I need to IG. Wanting to find another engine as a last resort. I finally got the fan off. I ended up having to take the bolts off the pulley and pulling the bolts for the water pump out and taking fan and water pump as one unit. I rented the fan clutch holder that holds the pulley still while you loosen the but, but I actually broke the little hook off he end voiding the rental fee($88). I bent it at first then I tried what someone suggested with loosing the pulley bolts then putting the tool behind it and retightening around it, which resulted in me breaking the expensive ass rental as well as bending one of the pulley bolts and snapping another. Idk who put this thing on so tight but I really hate them right now. I have a huge gash in my arm and multiple cuts and bruise on my hands and arms(as well as a torn up pair of $30 mechanics gloves). I'll have to take the pump to a shop and let them get the bastard off. The more problems I run into, the more I need to do this myself. And though I did have a weak moment after breaking the tool where I called my dealer and begged them to let me trade it in(they wouldn't), I feel better and have gotten farther along. Right now I am working on getting the harmonic balancer off so I can get to the bolts on the cover. While working on this, I rolled the engine over by hand and I can see that the cams are turning with it. Kind of bittersweet considering I still have no friggin clue on what the problem is. Would the chain be tight across the top if the tensioner was bad? I wouldn't think so but you guys know more about this engine than I do so I'm leaving assumptions out. I decided to go buy another vehicle to get around in while I work on this so that I can take it slow and do it right(not working out that way, but at least I'm trying). I pulled the whole front end off(radiator, condensor,fan,shroud, grill, and core support) to allow ease of access as well as minimise risk of damaging other parts in case of a mishap. I still want to get this done asap, but I'm able to take my time on it. One thing (I think) I forgot to mention was the unbelievable loss of power in the days leading up to this. The day that she died, I did notice a fluctuation in oil pressure when I first hit the gas(it would drop, the check guages light came on, then it'd go back up after about a second). Also noticed a squeaking sound whenever it would miss. I would have to put the pedal to the floor(which had a VERY delayed reaction before downshifting, like 5 seconds) to get up small hills that I normalling cruise up. When she died I just heard a snap sound(not even real loud) then it just quit running. Wasn't really anything violent to it, no shaking, grinding, or any other strange noises.
m.mcmillen
Member
To get the front cover off you have to remove the oil pan and the pickup tube since the oil pump is in the front cover. Removing the oil pan is no picnic but it would be a lot less work if you don't have 4wd.
I just pulled the balancer off of mine and I had to use a 3 jaw puller to get it off. Good luck with your repair.
I just pulled the balancer off of mine and I had to use a 3 jaw puller to get it off. Good luck with your repair.
To echo @m.mcmillen ... The GM Atlas 4.2L LL8 I-6 Engine is constructed more like a Building than an Automotive Engine in that due to its All Aluminum Materials and the fact that this engine produces Horsepower and Torque all out of proportion with most In-Line Six Engines... The GM Engineers opted to have the additional butressing of JOINING ALL MAJOR STRUCTURAL MEMBERS TOGETHER AS A SINGLE UNIT. Ergo... The Ultra Strong Crankcase gets bolted up to the Front Timing Chain Cover from a strong lower flange to the Engine Block and the Oil Pick-Up Tube also gets fastened into the lower section of the Front Cover where the Gerotor Style Oil Pump is located just below the area where the Timing Chain Tensioner is fastened to the the front of the Engine Block. Once the Front Cover is removed... a careful disassembly of the Gerotor Oil Pump is in order... and TAKE PHOTOS OF THE INTERIOR GEAR POSITIONS BEFORE REMOVING THEM!
In orders of operation... First loosen all of the Crankcase bolts working from the centre out on both sides...and Front under the Timing Cover and at the Back of the Engine. Next.. Place Two of the Removed Fasteners into the Threaded Holes located on the Outer Tangs at the Front of the Crankcase...meaning towards the Front Bumper. Look at the images attached below to find the two Red Circles and note that when your engine was assembled at the GM Factory... A Special AC-Delco Sealer was used that is both Very Adhesive and Very Durable... so when the time comes to put the these casings back together...it will be best to use THAT Specific RTV (Room Temperature Vulcanizing) Rubber Sealant.
As you tighten these two bolts... you must ensure a balanced effort to avoid stressing or cracking the Aluminum Oil Pan... You will see the adhesive thread-line begin to separate... so having some of the other Fasteners installed loosely around the perimeter of the Crankcase to prevent the heavy pan from from falling on you. Wear Eye Protection to avoid falling debris and dripping oil and wear Work Gloves as the margins of the Crankcase and Engine Block can be Razor Sharp... use care when moving your hands and fingers around their edges.
Once the Crankcase - Oil-Pan is completely unbolted, lowered and set safely aside... The next action will involve using a Bright Flash light to inspect the Lower End for any signs of darkened or Blued areas along the Crankshaft and Cradle and look for any obvious scoring or scratches that might be visible in the cylinders where the pistons are closer to TDC in the block. From here on out... You are a Detective seeking clues EVERYWHERE... and your best ally is your Using Your Wits... and a Digital Camera to use for recording and memorialising all of your actions. This is especially important if a great deal of time will pass between the Start of this work and the Final Re-Assembly of EVERYTHING.
Okay...now after your initial inspection and photography...remove the Oil Pick-Up Tube Bolt from where it attaches into the Front Cover Oil Pump Manifold and note the position and condition of the "O"Ring inside or on the end of the Tube Flange. Maintain possession of EVERY SINGLE PART, FASTENER AND GASKET using Plastic Zip-Lock Baggies and use a Permanent Magic Marker to describe what everything is...and where these parts and pieces came from once they are removed from the engine. I have very extensive photos of New Components, including their Boxing and Packaging as well as images of the Special Tools required at certain times during this work. These include the removal of the Engine Head...should this action become necessary during your repairs.
Here is the link to my Photobucket that can be of some help to you along the way... Oh... and as you continue to write about your progress or problems... keeping your Paragraphs to around 2" Deep here will allow your Readers to "take a breath" and absorb what you are trying to say much easier and not lose their places when 'READING A WALL OF WORDS'... ;>)
This is one of two major posts involving working deep into this engine.... There is a Lot to Read...but its better to have TOO MUCH INFORMATION... than NOT ENOUGH! Most of the Photobucket images directly support this long and difficult repair. Check with @Mooseman about Downloading the Full Service Manual for your Vehicle and follow it religiously for each Inspection Action and Removal-Re-Assembly Procedure,
http://gmtnation.com/forums/threads/the-85-000-00-gm-4-2l-engine-repair.14423/page-1
@Matt invented the Simplest and Most Elegant means around to remove the Electro-Viscous Fan... Very Well described here:
http://gmtnation.com/forums/threads/how-to-replace-the-water-pump.15639/
As for my own means to reliably remove the Electro-Viscous Fan Assembly... Mine is a Moon Cast Shadow compared to @Matt 's Genius Design... But I did not know of his idea way back when I was getting tired of using "Speciality Tools" that failed and finally decided to invent and build my own for this express purpose:
http://s557.photobucket.com/user/60dgrzbelow0/library/TRAILBLAZER_2002?sort=6&page=1
This is the 2nd Choice as a Less Expensive, but still Effective Puller for use on the GM Atlas 4.2L Engine's Harmonic Balancer ALWAYS COAT THE THREADS ON PULLERS THOROUGHLY WITH HIGH PRESSURE GREASE!... It will make the Tool Work MUCH Better:
https://www.amazon.com/OTC-6667-Harmonic-Damper-Puller/dp/B000P6UT2I
As for everything else involved in your repair... there are Four Sub-Albums here ...with MANY Photos for you to look over and download and save as needed... Parts... Old and New... Tear Down Images... and TOOLS!
http://s557.photobucket.com/user/60dgrzbelow0/library/0000TRAILBLAZERENGINEREPAIR?sort=3&page=1
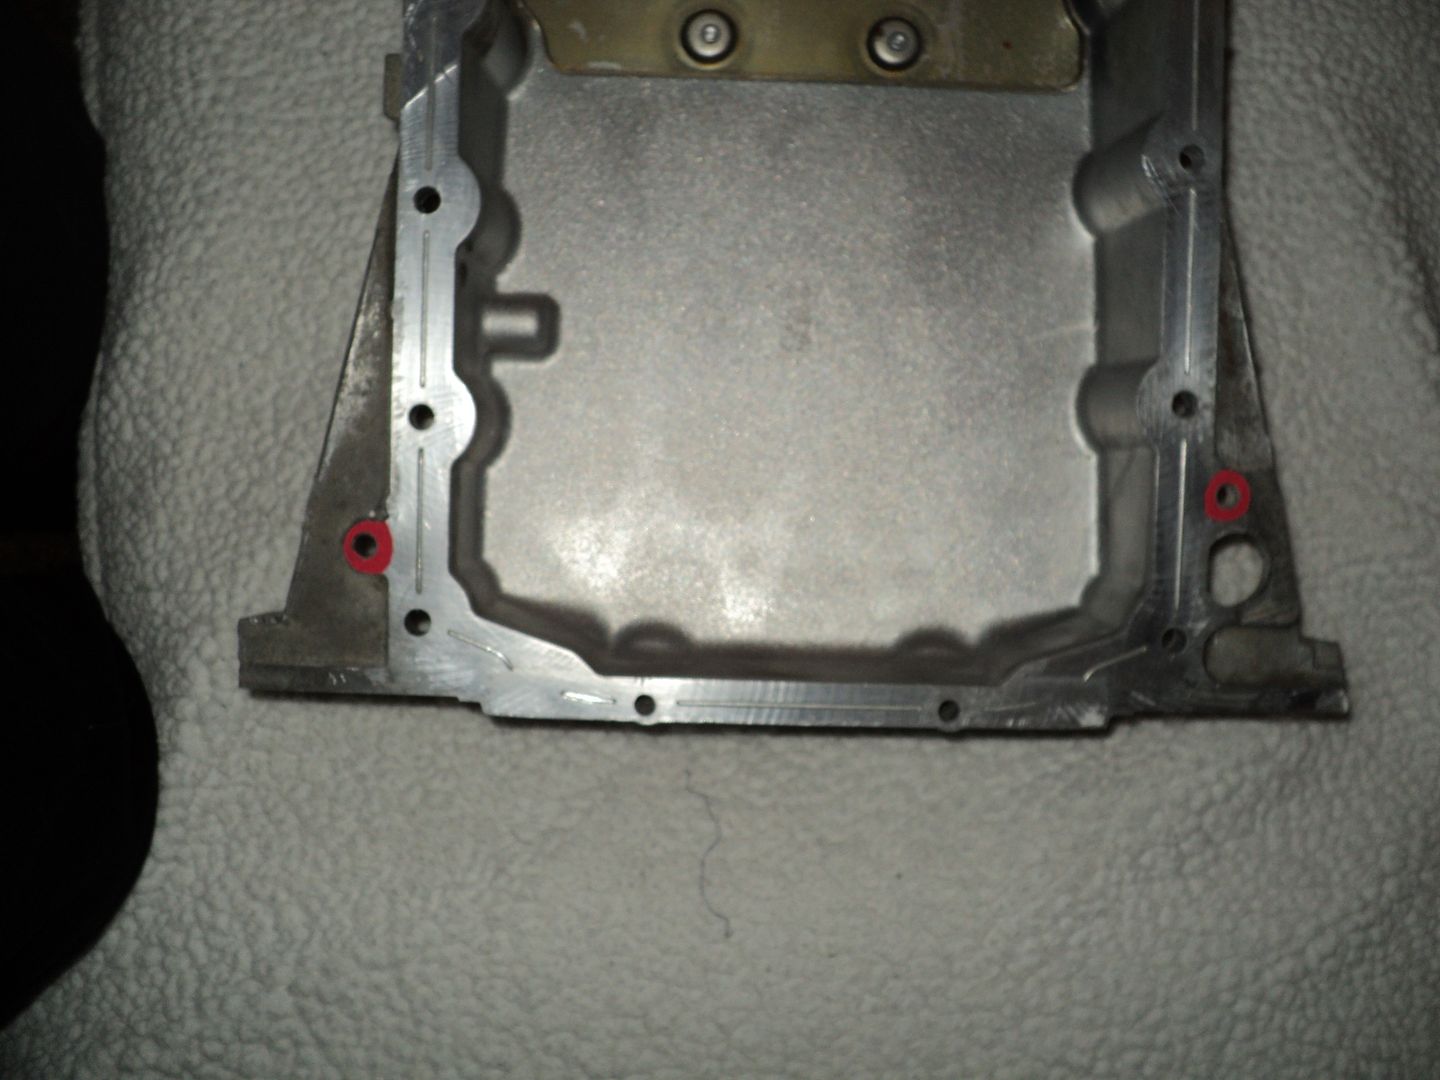
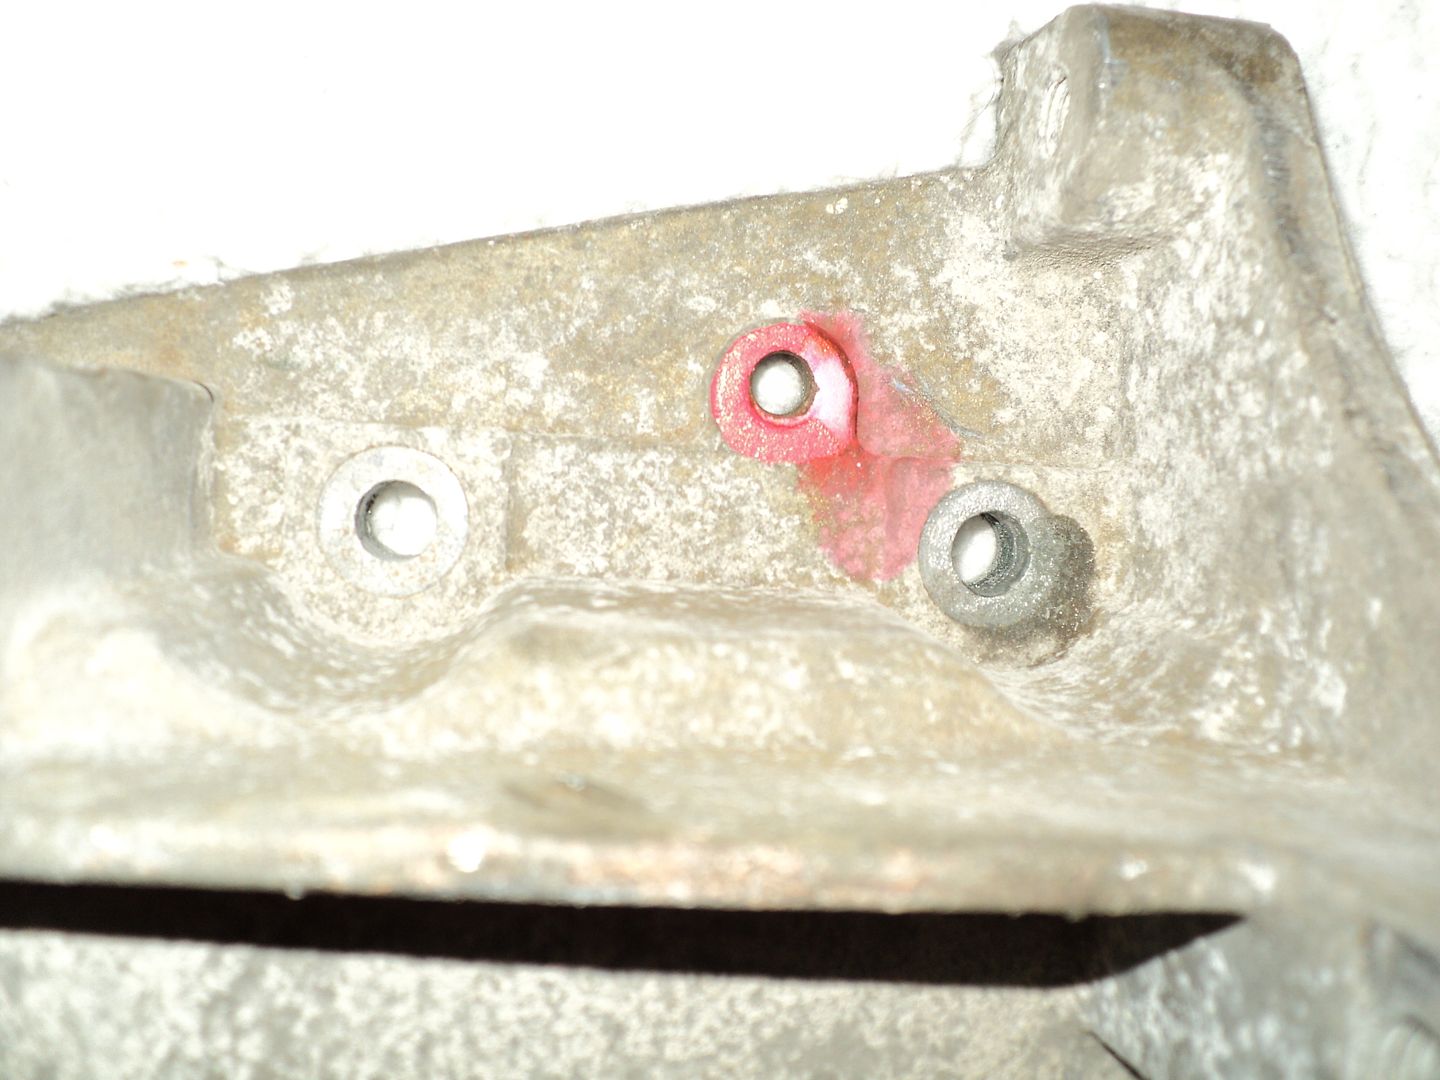
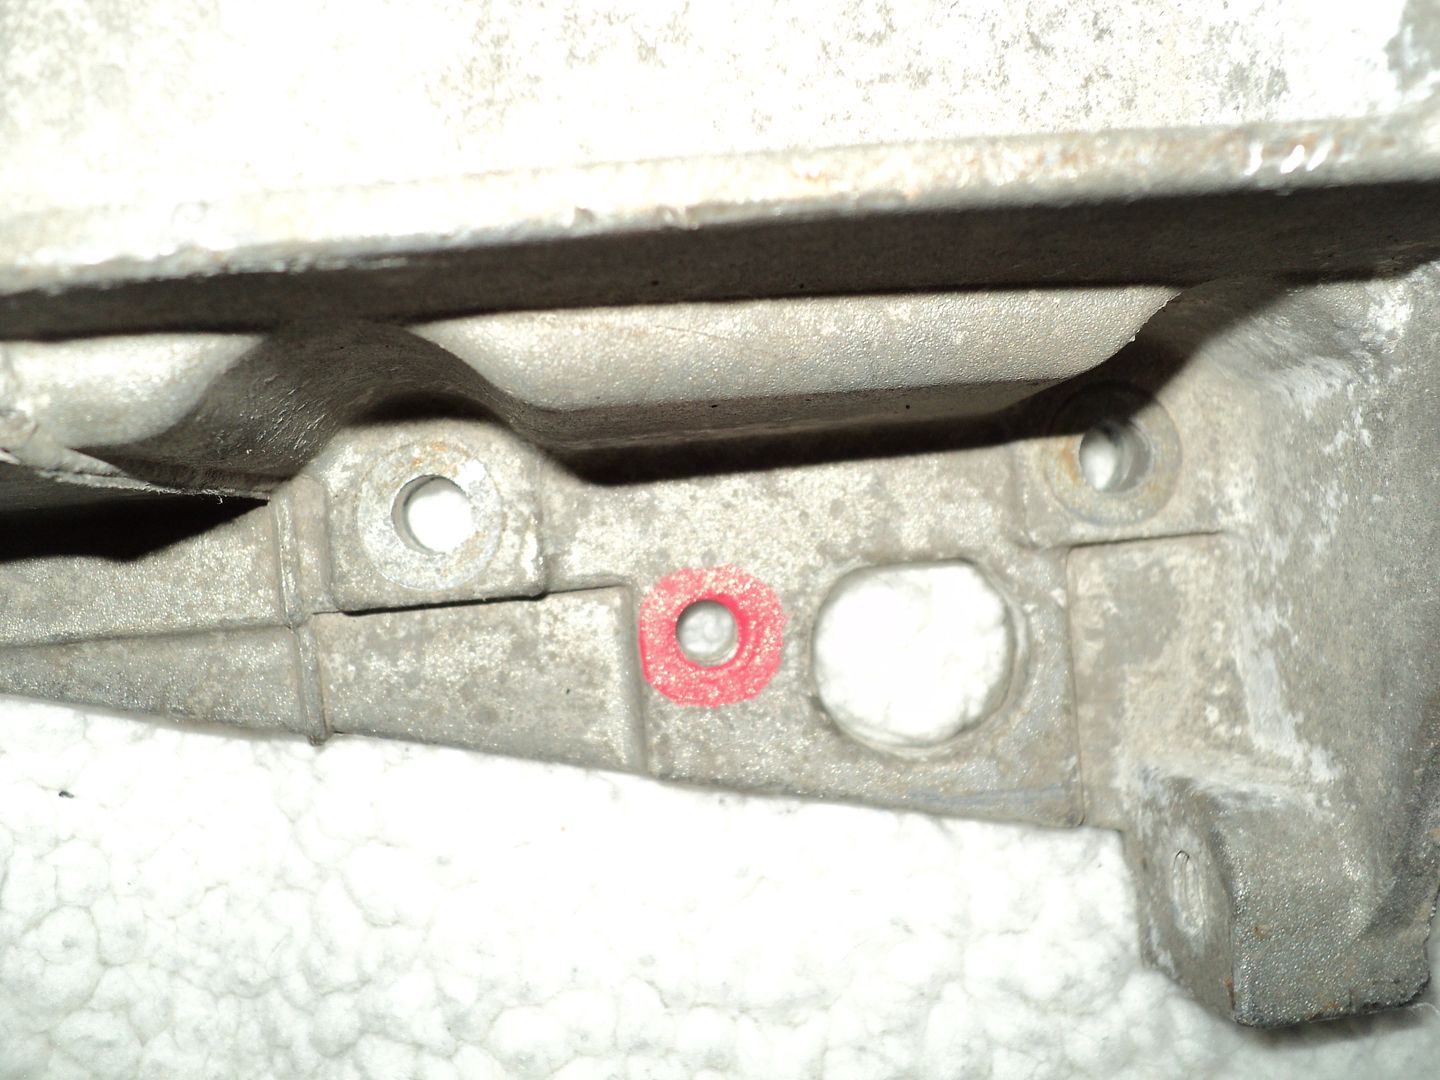
Last edited:
Thanks again. I was looking at the oil pan and noticed that it doesn't have the threaded holes in the front but it does in the back(right near the trans). Can these pans be put on backwards? I mean there are NO threaded holes on the front. Also I was staring at the engine yesterday thinking WHY?!?! and decided to start fiddling. I was wiggling the rocker arms and there are six or seven that are EXTREMELY loose. I can almost remove them from under the cam shaft. I am assuming that the lifters are bad? I know these are self adjusting and was wondering if they would still have pressure in them even if there is no oil? Just wiggling them I hear a sound very reminiscent of what I heard bbefore she passed.I am thinking that this was my problem. Will be going forward with replacing them to check
m.mcmillen
Member
The threaded holes are in the back of mine also. What year is yours? Perhaps they made some changes over the years. Mine is a 2003.
Mine is 03 also. Is there a write up on how to use the search correctly? I need to find a write up for how to change the lifters. I tried to search and again failed. Probably doing something wrong.
I am going to change the lifters as well as head gasket(provided it isn't the head or block that is cracked) as I had water in my oil. If either is true, then I have had a swap planned for quite some time, and I may go through with it.
My baddy has a good 383 stroker and 700r4 that would feel right at home between my fenders. I know this will "fit" because I've seen a tb that had a 350 put in.
Please guys don't think that I am dumb to mechanics. Its just that ,despite only being 20, I have only ever worked on old engines. My whole family raced and so I can rebuild just about any pre obd engine with a blind fold. This computer crap sucks(to me anyway) and I would love to get back to my roots.
I know this swap would take modifications(I am no slouch at fabricating) and I think this would be a good project for me and my kids. I ended up going out and buying a new dd the other day, so time doesn't really matter anymore.
Sparky
Member
- Dec 4, 2011
- 12,927
Search on forums in general seems finicky for whatever reason. Easiest way to find something seems to be to use google. Put in "site:gmtnation.com <search term here>" (without quotes of course) and that seems to work pretty darn well.
If there is water in the oil I'd be inspecting the crank, bearings, etc. Water in oil can mess bearing surfaces up pretty quickly.
If there is water in the oil I'd be inspecting the crank, bearings, etc. Water in oil can mess bearing surfaces up pretty quickly.
You’ve Mixed your Missions together just a bit here... so I’m not sure if you have decided to abandon the GM 4.2L Atlas engine for an equally difficult (if not more so) Engine and Transmission swap to the GM 350 CID V8 Motor. Having steady transportation now will take the pressure off of you and the urgency to make a snap decision. In the meantime... if you want to work further with the 4.2L engine... hopefully. before you removed the Crankshaft Bolt and pulled the Harmonic Balancer off of the engine... First you set the #1 Cylinder to Top Dead Centrer. If you are intent upon doing any work on the engine that includes Reconditioning the Engine Head, Figuring out if the Timing Chain Entire apparatus is involved in the catastrophic failure, including the VVT Phaser as suggested by @Sparky and @Mooseman, then the best thing to do is to pull the engine head while its still inside the TB without removing ANY of the Camshaft Hardware first.
You will need to secure the two camshafts with their rear exposed “Flats” Horizontal with the Engine Head and facing UP with a special tool...but ONLY do this if you have previously positioned the #1 Cylinder at TDC. If you cannot rotate the Crankshaft Clockwise ONLY to achieve TDC in the #1 Cylinder... you wont be able to do it now without reinstalling the Crankshaft Bolt with NO Harmonic Balancer there... and you risk “pranging” or damaging the “Tuning” of the Crankshaft by turning it in this sketchy manner. But... before going one step further... if you WILL be removing the Front Timing Cover, the above step will not apply and if you are intent on trying to replace the two Timing Chain Sprockets and Chain, reading @Mooseman 's Epic Post on this job then becomes paramount. After removing the two Timing Chain Sprockets and allowing the Timing chain to either be held fast to prevent it from falling off of the Crankshaft Cog... or with the cover off, completely removing the chain, the next procedure is the removal of all the Head Bolts.
Following a Reverse Torque pattern is described as a “Best Practice with Aluminum Engine Heads” to minimize the chance of warping the head. To minimize Breaking Off head Bolts... This must be done by first Hammering on each Hex Cap Screw (Head Bolts) Dead Centre with a Black Steel H10 Hex Socket inserted and also fitting the H10 Tool with a “Sacrificial” 1/2” Male to 3/8” female adapter to “Beat the Hell Out Of It” and loosen the grip of each bolt. Doing this first lessens the chances of breaking off most of the bolts. You will have to be very careful not to become overzealous and “Miss the Mark” when applying the hammer blows straight down. After the Bolts either unscrew properly or... break off... you will find lifting the head impossible unless you first unscrew the two Plastic Chain Guide Covers and then unbolt the Left and Right Chain Guides to free the head there, too.
Take your time with using a Breaker Bar and use several VERY TINY, VERY SLOW passes when trying to unbolt the Head Bolts. Use several, reasonable Hammering Sessions in between your Breaker Bar small but steady pulls... especially at the BACK OF THE BLOCK. The last place you want to be doing Centre Drilling of Broken Bolt Shanks and using Easy Outs is Under the Cowling at the Firewall when working on Broken Bolts around the # 5 and/or #6 Cylinders. I cannot emphasize this enough... Use the Leverage of your Breaker Bar... Gingerly...and you might save yourself a week’s worth of worry and extra toil trying to extract any Head Bolts that WILL break off if you get too hectic with the tools while trying to get those 14 Bad Boys out. You do NOT want to “REDLINE” your RPM Here... ;>)
I wound up using a Plastic Covered Bicycle Security Chain that I snaked in and around the open spaces of the Intake and Exhaust Camshafts and once chained up ...it lifted straight up with the Engine hoist. The head only weighs about 100 Pounds, but mind you... if you start dragging those soft Aluminum under-surfaces across anything and scratch them up...you will wind up needing another engine head. Use small blocks of 1”X2” Pieces of Wood to slip in between the underside of the head and the Upper Engine Block to rest the head and make support adjustments as needed. It is best to lift it off the engine block VERY SLOWLY and then just guide the lift straight back. Walgreens sells an assortment of Walking Canes that can be very handy when positioned under the hood to hold it up and and out of the way of everything as the extraction occurs.
The best way to deal with that PITA Low Side AC Return Line at the top front of the engine...is to first undo all of the retention fasteners at its hold-down flanges...and then unscrew the clamp that holds the entire Accumulator and Rubber Boot. Then by carefully lifting the Accumulator Up and Out of its position inside of the White Plastic Coolant Reservoir... the short Flex-Line will loosen and give you just enough wiggle room to pull the Aluminum Pipe towards the Radiator and well clear of the upper engine. This will leave you with enough room to R&R the Head and not have to disconnect and bleed out your AC Lines. Use sturdy Zip-Ties to hold the AC towards the front and towards the passenger fender well.. .but do NOT pull too hard ...or you'll wind up kinking the Aluminum Pipe.
If you have to close the Hood later on...be mindful that while in this position...the Accumulator will have to be gently pushed down just enough to close the hood and not damage the AC lines. If it turns out that you have to pull the Engine Block later on... not having the Engine Head blocking access to the two upper, hidden Engine to Transmission Bolts at the top and under the Firewall area makes unbolting the Transmission much easier.
Once the Engine Head is removed from the Block.. "Bench Working" on it to R&R the Camshafts, Rocker Arms and Push Rod Assemblies will be a breeze while it is elevated and resting upon a pre-fab set of clean wooden rectangles that serve to prevent damaging any Open Valves that will be vulnerable underneath and easily harmed if arrangements to support the head when it is sitting face down on the bench have not been anticipated.
As for the Alternative Mission ... The Theoretical Engine Swap issues become Real Problems if you have a 4WD flavour in your Trailblazer... as the GM 350 CID Engine (Stroked to 383 in your case) has no “Hole Through the Crankcase”. Also, the shape and conditions necessary to align the back of the block to the 700R4 Transmission and the need to accommodate the V8 Oil Pan-to-Front differential issues must also be dealt with. It goes without saying that figuring out how to mix the PCM, Power Steering, Alternator and Accessories as well as Engine Cooling Power and Ground Cabling , Throttle Cabling and Accelerator Pedal Requirements and of course... a Carburettor Fed NA GM 350 CID Engine and Exhaust problems must also be solved. However... Here are some GM 4.2L -to- GM 350 CID Engine Swap videos that prove it can be done:
https://www.youtube.com/watch?v=nJ0SueqAtPQ
Last edited:
Thanks again. I was looking at the oil pan and noticed that it doesn't have the threaded holes in the front but it does in the back(right near the trans). Can these pans be put on backwards? I mean there are NO threaded holes on the front. Also I was staring at the engine yesterday thinking WHY?!?! and decided to start fiddling. I was wiggling the rocker arms and there are six or seven that are EXTREMELY loose. I can almost remove them from under the cam shaft. I am assuming that the lifters are bad? I know these are self adjusting and was wondering if they would still have pressure in them even if there is no oil? Just wiggling them I hear a sound very reminiscent of what I heard bbefore she passed.I am thinking that this was my problem. Will be going forward with replacing them to check
Ooops... My Bad... I had a "Dyslexic" moment when reviewing my images and got their positions described Bass-Ackwards... I mean Back-Asswards... well... LOL You know what I mean... Sorry about that... :>(
EDIT:
I'm hoping that if it comes down to cases and you begin thinking about cutting your losses and contemplate just getting a Donor Motor... Have a look at why THIS engine is a Perfect Example of One that would NOT be a Good Choice. Any time a Motor has been sitting anywhere out in the elements long enough to have the Exterior Pulleys Rust Up Badly and look as Gnarly and disgusting in its overall appearance as THIS one does... It would be best to just 'Shine It On'... because you will NOT be able to prove that it was not removed and dumped due to having problems worse than what you are dealing with right now. If you can get the Used Engine Vendor to provide the VIN...getting a CarFAXX on the Donor Vehicle will settle the matter.
A Better Choice if you can find one... is for one that comes out of a Recently Wrecked vehicle that was running right up to the very last minute just before the SUV was disabled... and you will be more likely to get something that will swap in readily... and actually RUN when you fire it up:
Here is another "Trailblazer with a 350" Video:
And if you want to Dream and use your $$$ and Old School Mechicanic Skills... THIS is what is Possible:
Last edited:
I'm very sorry about the mixed thoughts. Not trying to confuse anyone, just putting up my options. I have not abandoned my 4.2 as of yet, just haven't had a whole lot of time to keep digging into it. I was merely saying the 383 as an alternative.
On the very bright side, my friend is on a used vehicle sale page on Facebook and he informed me that someone posted a 2005 tb TODAY that had been rear ended. The post says that it does run and drive(albeit crooked) and can even been shown to the buyer as such. Even better, they only are wanting $500 for the whole truck!!!!
My only concern is that this vehicle has the 5.3 and mine is the 4.2. I will be searching to see what all is involved with this swap such as any mods to the frame or whatever. I understand I will need the PCM and wire harness from the donor. If this becomes very labor intensive for this swap, then I will continue with my already planned 383.
As for the 383, My 4.2 is not a 4wd so no worries about the pass through crank case. The engine and trans is in a running and partially driving truck(needs new rear end and I have already seen this one run. Its only been sitting for a couple of months and has been started about 2 weeks ago.
As for the charging system and accessories, it has everything still in it(except for a/c since the truck didn't have it) and shouldn't be too much of a problem to retrofit my existing ac into it. The cooling should(and I use that term lightly) be fairly simple as mounting the donor radiator. I doubt the will be room for a mechanical fan, so I may have to go to e fans(ooooohh noooo, the horror!!!).
The exhaust I'm not too worried about. I have a good air over hydraulic tubing bender(used to build dirt track roll cages) and I can always make it fit. Honestly, this would probably become more of a street able drag truck than anything, so I'm not too worried about regulations(not that there are very many here in Arkansas.) and are easily got around with minor adjustments.
All of this is dependent on how my 4.2 comes into play. Again I wasn't trying to confuse anyone or bring mixed missions in here, just stating the options I have found. Once again I will be continuing my quest to be among the search gods. I tried that trick with google and turned up nothing, but I believe I put it in wrong and will try again. More on this as the story unfolds.
Last edited:
No Problem, Brother... There is "No Test On Friday" here... so no one is going to challenge your free thinking ambiguity and open ideas... I only mentioned the issue of Mixed Missions because I generally try to render as much information at one go as I can... so I don't wind up missing anything that might be important. But thinking about both of those solution repair vectors at the same time had me going for a while. There are some folks here at GMTN with experience doing "The Bigger Engine Upgrade" who might be able to give you some good pointers.
One in particular: @Decembersend was working on a 6L Swap for his 4.2L LL8 and perhaps he can help you decide which way to go with this. The vehicle you mentioned at that $500 price sounds like a pretty good deal... and probably has nearly everything necessary for the swap and whatever you have left over could be parted out here to other interested members.
Oh...and if you were able to Template Build a set of decent Steel Headers for the 4.2L that matches up well with the Stock CAT piping... you'd have people climbing all over you to either get their hands on them... or have you show them How to Get The Headers Made.
Incidentally... This attached GMT Nation Post involves the Four Part Series covering the R&R of a GM 5.3L Engine in and out of a Chevrolet 1500 Pick Up Truck... But there will be so many similarities for you to observe and learn from should you decide to install The $500 5.3L Engine into your own vehicle. His Real Time Instructions and Camera Angles are just amazingly informative and entertaining...so... these videos are well worth watching:
http://gmtnation.com/forums/threads/complete-r-r-videos-of-chevrolet-1500-4x4-5-3l-engine.16137/
Last edited:
Well. The 4.2 is q no go. Was rolling it over to tdc and #1 doesn't want to move. I'm assuming busted rod or wrist pin. Will let y'all know what I decide to do
That's what I was thinking. Still can't explain the lifters though. Could they have lost their pressure and bled down with no oil in it? Or do they always hold their pressure?
littleblazer
Member
- Jul 6, 2014
- 9,265