4.2L I6 Head Removal/Engine Restoration

OctaneRider03

Original poster
Member
Jul 31, 2012
430
All new parts just got placed on order.. They will be here by tomorrow morning from Charlotte..

Cam posistioner actuator valve..

One sensor that sits in front of the actuator valve..

Along with those here are two part #'s I've listed to enable you to see what else additional I'll be buying..

12568776
12580314
 

OctaneRider03

Original poster
Member
Jul 31, 2012
430

Attachments

  • ImageUploadedByTapatalk1346426507.471804.jpg
    ImageUploadedByTapatalk1346426507.471804.jpg
    15.5 KB · Views: 233

OctaneRider03

Original poster
Member
Jul 31, 2012
430
Alright guys, we're back in the garage now with all new parts ready to start reinstalling.

There's one problem though..

We have the center bolt out of the crank-pulley and a proper gear puller (reversible jaw), but the pulley will NOT pop off.

If any of of you are out there right now online, I need you guys at the moment.. -Octane
 

MAY03LT

Member
Nov 18, 2011
3,422
Delmarva
OctaneRider03 said:
We have the center bolt out of the crank-pulley and a proper gear puller (reversible jaw), but the pulley will NOT pop off.

If any of of you are out there right now online, I need you guys at the moment.. -Octane

As far as I know the only puller that works is the OTC 6667. One of the small inserts fits in the pulley bolt hole and bottoms out in the crank which gives the puller something to push off of. I have the Matco version mst9740c (which is the same thing just rebadged) and it works like a champ. I've read some threads on the other site where folks messed up the crank by trying to do it with a general puller so be careful.
 

Mooseman

Moderator
Dec 4, 2011
25,462
Ottawa, ON
Leave it to GM to make it so you need a special (read "expensive") tool to do the simplest things. I was going to replace my seal when I replaced the engine last year but when I saw this whacky thing, I changed my mind.

On thinking about it more, what if we were to drill and tap three holes into the balancer so we could use an old fashion "duck foot" style balancer puller?
 

OctaneRider03

Original poster
Member
Jul 31, 2012
430
We are all kinds of screwed at the moment guys. I'm pretty sure it's seized, we were able to pull it only slightly but the teeth behind it wouldn't give. We're going to let it sit with the clamps on tightened over night and see what happens. I've sprayed the living daylights out of it trying to get it to loosen up but so far nothing.

We have the head back. We have all new parts and sensors to throw on, but until I can get the crankshaft pulley off we're going nowhere with the reinstall considering I HAVE to have it off to take the plate behind the pulley off so we can install the new timing chain guides and of course, reset the timing...

What a kick to the face this has been..

Tomorrow.. We fight once more.. -Octane

View attachment 22600

This is hell.
 

Attachments

  • ImageUploadedByTapatalk1346473403.663900.jpg
    ImageUploadedByTapatalk1346473403.663900.jpg
    24.8 KB · Views: 230

Mooseman

Moderator
Dec 4, 2011
25,462
Ottawa, ON
A couple of suggestions... Maybe a bit of heat on the hub just to expand it a little and hopefully help it lose its grip. Do this with the puller giving tension on it. Don't go too crazy with the heat as the outer ring of the balancer is retained by a rubber ring. Another thing to try is to smack the end of the puller screw. The vibration often helps break that grip.
 

NJTB

Member
Aug 27, 2012
612
Flemington, NJ
What Mooseman said. It works a whole lot better with a oxy/acetaline torch, but MAYBE a plumbers torch will work.
Keep the heat away from the crank, you want to expand the pulley.
Ask the dealership mechanics if they use any tricks.

Since you're waiting, do what you can to de-glaze the cylinder walls. Saw your de-carboning pics.
 

Mooseman

Moderator
Dec 4, 2011
25,462
Ottawa, ON
I wouldn't even attempt to deglaze the cylinder walls. You can't get to the last bit between the top of the piston to the rings and is a procedure for full engine rebuilds. That glaze is the wear-in of the rings to the cylinder walls so unless you're replacing the rings, I would advise against it.
 

OctaneRider03

Original poster
Member
Jul 31, 2012
430
What a night that was last night.. Unbelievable.. Hey, thanks again for pulling through for me yesterday on such short notice gents. I for sure thought ya'll would have been passed out by the time I sent out that distress post. Thanks again to May03 and Moose!

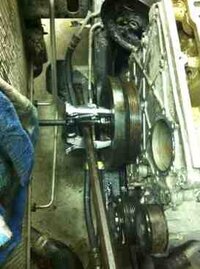
I've realized that there's no reason in getting worked up over it. It won't get us our result any faster. So as I sit here in the living room of my house with this cup of coffee in my left hand, I can only think about what I could have done to go about things differently.. I mean, we had the puller on with a death-grip hold, as tight as we could possible get it, and started attempting to pry from behind the pulley with crowbars. Nothing.

We turned the crankshaft and positioned ourselves in different areas in an attempt to evenly disperse the amount of "pull" all the way around.

I put a five-ton pulley puller on it! I seriously doubt that me going for a different branded tool that does exactly what this one does will do much difference. This hatred of tools isn't towards you and your advise May03, it's towards the general subject alone. There's got to be a way...

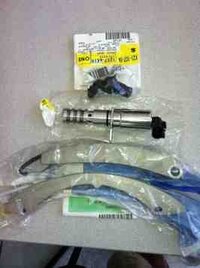
I'm aware of the rubber ring involved with it. Apparently if we torch it we risk burning it up eh? We discussed that point as well last night before it came up on here. I spent a considerable amount of time looking at diagram after diagram after diagram trying to gain a different perspective here..

Here's another thing. My radiator's still on. Therefor, when this thing comes off, the puller screw is probably going to shoot straight through it. I'm having to be very cautious with that.

It's not a matter of if but when it's going to come off.
 

MAY03LT

Member
Nov 18, 2011
3,422
Delmarva
Does anyone out your way rent specialty tools? It would really be worth renting out that piece. If the crank got messed up it would be a major setback.
 

OctaneRider03

Original poster
Member
Jul 31, 2012
430
I know man.. That's why I'm taking our approach slowly. Yeah, we actually rented the kit for the puller or "hormonic-balancer" from autozone. We have it for as long as we need it of course. If you mean other tools, I'm not sure. I've got a tech from the dealership on the phone now, he's actually another good friend of mine that's tracking on our situation. I'm going to attempt to go by a few of his methods to see what I can do.
 

rywegh

Member
Jul 4, 2012
56
If you have an AdvanceAuto around maybe go take a look at the puller they have. They seem to have some of the better tools for rental. IE works with our trucks, esp ball joints.

Umm with all the work you are doing, why not go ahead and remove radiator. Ive not done this job before taking the radiator out has always been something I have done on other jobs when dealing with crank pulley removal and water pump replacement. the added room limits my intake of Tylenol.
 

Mooseman

Moderator
Dec 4, 2011
25,462
Ottawa, ON
At this point, removing the radiator would be a minor inconvenience so recommend that to give you more room and peace of mind. Smacking the end of the puller screw would probably work. And yes, it will likely shoot right into your radiator.
 

OctaneRider03

Original poster
Member
Jul 31, 2012
430
Mooseman said:
At this point, removing the radiator would be a minor inconvenience so recommend that to give you more room and peace of mind. Smacking the end of the puller screw would probably work. And yes, it will likely shoot right into your radiator.

Alright.. We'll take it off..

Here's our new plan of attack.. Tonight we focus on pulling the radiator out in order to gain more clearance with the crankshaft removal. We then put our puller back on and tighten back down with a death-grip hold all over again. Once the puller's set, we spray the hell out of the crankshaft with PB Blaster. Once we know it's soaked in nice and good, we'll start banging on the puller screw to help break the hold.

The idea came from my buddy over the phone.. Chevy has him working today at the dealership otherwise he'd be at our garage tonight when we go back. Poor guy. Hah!

Keep the faith! The radiator comes out tonight!
 

OctaneRider03

Original poster
Member
Jul 31, 2012
430
Okay gents, we're here in the garage now. There's three of us this time. We're in the process of removing the grill, then the radiator. From that point we'll be able to tighten our clamp back down and start beating the end of the screw ridiculously hard to use the ole' opposing force technique and hopefully pop this crankshaft pulley off in no time. To help with this process, we brought in a new can of PB blaster to help break the hold this thing has. Should be pretty gnarley.. -Octane
 

GCTB1289

Member
Mar 19, 2012
699
OctaneRider03 said:
Okay gents, we're here in the garage now. There's three of us this time. We're in the process of removing the grill, then the radiator. From that point we'll be able to tighten our clamp back down and start beating the end of the screw ridiculously hard to use the ole' opposing force technique and hopefully pop this crankshaft pulley off in no time. To help with this process, we brought in a new can of PB blaster to help break the hold this thing has. Should be pretty gnarley.. -Octane

nice good luck keep us posted
 

OctaneRider03

Original poster
Member
Jul 31, 2012
430
We have movement! It's coming off! We sprayed the PB on it and used the clamps just to see if it loosened any and sure as heck it's loose! The radiator's still on so we've got our hand there on the clamps to help catch it so it comes out nice and slow! We've got about a quater inch left until it comes off..
 

OctaneRider03

Original poster
Member
Jul 31, 2012
430
It's off! Hah! It came off nice and smooth and tee didn't have to remove the radiator after all! When we took it off I looked in the center and saw a bunch of build up, I guess the PB worked well! Now we're taking the back plate off to expose the timing chain hanging down and our broken timing chain guides that will be replaced! Sweet!

After removing all the bolts for the front engine cover, I noticed quickly that it's not only held on with bolts, but RTV sealant. Make sure you have a hammer for the job to give it a few taps while prying... The cover is cast-aluminum..

You MAY have to drop the oil pan beneath to get it off as well..
 

OctaneRider03

Original poster
Member
Jul 31, 2012
430

Attachments

  • ImageUploadedByTapatalk1346552103.772421.jpg
    ImageUploadedByTapatalk1346552103.772421.jpg
    33.4 KB · Views: 28

OctaneRider03

Original poster
Member
Jul 31, 2012
430
We're done for the night. We realized while trying to remove the plate, we're going to have to mess around with the oil pan at the bottom, I took the skid plate off and started working around what I could and saw cross-bars that needed to come off.. We may actually be pulling the engine out...... I'm not sure yet. Stay tuned..
 

GCTB1289

Member
Mar 19, 2012
699
OctaneRider03 said:
We're done for the night. We realized while trying to remove the plate, we're going to have to mess around with the oil pan at the bottom, I took the skid plate off and started working around what I could and saw cross-bars that needed to come off.. We may actually be pulling the engine out...... I'm not sure yet. Stay tuned..

if you go that far you might as well just rebuild the entire thing. and then you won't have to worry about anything going wrong for awhile.
 

Mooseman

Moderator
Dec 4, 2011
25,462
Ottawa, ON
You do not want to remove the engine. Trust me. Been there, done that and got the t-shirt. You can count yourself lucky in that you have a 2WD and don't have to deal with the axles going through the pan.

Removal Procedure
1. Remove the A/C compressor bottom bolts (4) and loosen the top bolts (2, 3).
2. Remove the oil level indicator and tube.
3. Raise the vehicle. Refer to Vehicle Lifting.
4. Remove left and right front tire and wheel assemblies.(Except 2WD)
5. Remove the engine protection shield mounting bolts.
6. Remove the engine protection shield.
7. Remove the steering gear crossmember, front.
8. Remove the left and right wheel drive shaft. (Except 2WD)
9. Remove the front drive axle clutch fork assembly. (Except 2WD)
10. Disconnect the prop shaft from the front axle pinion yoke.(Except 2WD)
11. Remove the oil pan drain plug and drain the oil.
12. Unclip the transmission cooler lines from the engine block.
13. Remove the front differential bolts and set aside the front differential.(Except 2WD)
14. Remove 4 transmission bell housing bolts that are attached to the oil pan.
15. Remove the remaining oil pan bolts.
16. Place 2 oil pan bolts in the jack screws on the oil pan and tighten evenly to release the oil pan from the engine.
17. Clean and inspect the oil pan.
 

OctaneRider03

Original poster
Member
Jul 31, 2012
430
Mooseman said:
You do not want to remove the engine. Trust me. Been there, done that and got the t-shirt. You can count yourself lucky in that you have a 2WD and don't have to deal with the axles going through the pan.

Removal Procedure
1. Remove the A/C compressor bottom bolts (4) and loosen the top bolts (2, 3).
2. Remove the oil level indicator and tube.
3. Raise the vehicle. Refer to Vehicle Lifting.
4. Remove left and right front tire and wheel assemblies.(Except 2WD)
5. Remove the engine protection shield mounting bolts.
6. Remove the engine protection shield.
7. Remove the steering gear crossmember, front.
8. Remove the left and right wheel drive shaft. (Except 2WD)
9. Remove the front drive axle clutch fork assembly. (Except 2WD)
10. Disconnect the prop shaft from the front axle pinion yoke.(Except 2WD)
11. Remove the oil pan drain plug and drain the oil.
12. Unclip the transmission cooler lines from the engine block.
13. Remove the front differential bolts and set aside the front differential.(Except 2WD)
14. Remove 4 transmission bell housing bolts that are attached to the oil pan.
15. Remove the remaining oil pan bolts.
16. Place 2 oil pan bolts in the jack screws on the oil pan and tighten evenly to release the oil pan from the engine.
17. Clean and inspect the oil pan.

Faaaaaaaannnntastic. I'll pass word over to the mechanic then. We're taking tonight off, when I was prying at the crankshaft pulley lastnight my crowbar slipped and I went face first into my right headlight assembly. There's a line through my eyelid and eyebrow now.

We pick back up tomorrow Moose!
 

OctaneRider03

Original poster
Member
Jul 31, 2012
430
We roll in to the garage tonight around 8:30 eastern. Have your Tapatalk on standby.. Tonight we'll be focusing on dropping the oil pan and pulling the plate in front of the engine (behind the crankshaft pulley) completely off exposing the timing chain guides and chain that's currently hanging down. While this is going on, I'll be above the engine with a drill trying to pull the three broken head bolt segments that broke off out of the block.

After this it's all gravy gents. The reinstall kicks off and it's only a matter of time until everything goes back together. Then it's go-time.

I've spent more time working with the pistons. Trying to clean the top of them off is a very slow, persistent process. It's coming along well. Tonight! -Octane
 

OctaneRider03

Original poster
Member
Jul 31, 2012
430
I don't always rebuild my engine, but when I do it's after drinking Dos Equis because of bad misfire codes for seven straight months.

Stay thirsty my friends..
 

OctaneRider03

Original poster
Member
Jul 31, 2012
430
We're here right now going live. After several attempts to take out the three head bolt segments, we ended up wearing our drill bits down. Yes, they were reverse thread so we were right on target there, but they weren't strong enough to dig into the center or the broken bolts. So, first thing tomorrow morning we head to sears to pick up better drill bits. Not a problem, we're going to go underneath the truck now and continue on with the oil pan removal.

Btw, if you have broken head bolt segments in the block, your SOL with your motor if you can't get them out OR you screw up the threading and aren't able to rethread them. This goes out to the guys that don't know already. -Octane
 

OctaneRider03

Original poster
Member
Jul 31, 2012
430
Currently underneath removing the cross-bars.. Two more bolts before my shoulder goes out! Hah!

Question, why in the world do we have to remove the transmission cooler lines?? Moose?
 

C-ya

Member
Aug 24, 2012
1,098
OctaneRider03 said:
Question, why in the world do we have to remove the transmission cooler lines?? Moose?

It just says to unclip them from the block. Maybe to get them out of the way as the pan may need to move in that direction??
 

OctaneRider03

Original poster
Member
Jul 31, 2012
430
Yeah, I just saw that not too long ago. It's done. At first I was like "wait, what?" but I understand now.. I'm currently removing more bolts under here.. Should have brought more bottled water, it's hot under here!
 

Mooseman

Moderator
Dec 4, 2011
25,462
Ottawa, ON
OctaneRider03 said:
Currently underneath removing the cross-bars.. Two more bolts before my shoulder goes out! Hah!

Question, why in the world do we have to remove the transmission cooler lines?? Moose?

12. Unclip the transmission cooler lines from the engine block.

That's all there is to that. Just the clip that's bolted to the oil pan. And for the "Place 2 oil pan bolts in the jack screws on the oil pan and tighten evenly to release the oil pan from the engine", it's the two threaded bolt holes at the rear of the pan on each side that has no corresponding hole in the block. These will push the pan from the block.
 

Mooseman

Moderator
Dec 4, 2011
25,462
Ottawa, ON
Talk about fast responses! Anyway, hope it helps.
 

OctaneRider03

Original poster
Member
Jul 31, 2012
430

Attachments

  • ImageUploadedByTapatalk1346727360.545995.jpg
    ImageUploadedByTapatalk1346727360.545995.jpg
    31.4 KB · Views: 204

OctaneRider03

Original poster
Member
Jul 31, 2012
430

Attachments

  • ImageUploadedByTapatalk1346727618.011486.jpg
    ImageUploadedByTapatalk1346727618.011486.jpg
    24.1 KB · Views: 198

OctaneRider03

Original poster
Member
Jul 31, 2012
430
Oil pan's coming down now... This thing has GOT to have RVT on it too.. Yet another kick to the teeth.. I suppose I'll be spraying it down with carburetor cleaner as well here momentarily..
 

OctaneRider03

Original poster
Member
Jul 31, 2012
430
We're done for the night... Tomorrow we pick back up with removing this "screen" above the oil pan.. It appears to be what's holding onto or preventing our cast-aluminum cover in front of the motor from coming off completely.. I'm not entirely sure what the proper term for it is. I'm pretty sure it helps separate metal shavings and whatever else that may be loose from shooting into the motor. Very very interesting stuff. If you guys know what this screen I'm seeing is, be sure to drop a line please.

In any case, tonight was successful. I'm inching closer and closer to throwing everything back together. Which reminds me, if any of you might happen to be aware of certain screw/bolt specs and exactly how tight certain things need to be that pertain to my project, again, drop a line! Tomorrow Nation! -Octane
 

OctaneRider03

Original poster
Member
Jul 31, 2012
430
Sweet! Thanks! Something like having that kind of information is extremely vital to this whole article in my opinion! Thanks again!! -Octane
 

OctaneRider03

Original poster
Member
Jul 31, 2012
430
Hey Nation! Just a quick heads up, I'll be posting two video's from tonight pretty much summing up some of the things we've done as an attempt to catch some of you up to speed with what we've been up to here in the garage! Hang tight! -Octane
 

Forum Statistics

Threads
23,387
Posts
638,686
Members
18,592
Latest member
Chadla11

Members Online