You are using an out of date browser. It may not display this or other websites correctly.
You should upgrade or use an alternative browser.
You should upgrade or use an alternative browser.
What did you do to your GMT today?
- Thread starter MAY03LT
- Start date
- Status
- Not open for further replies.
Busy day. Packed in a lot of maintenance between the TB and F150.
Oil change.

Tire rotation/put on summer wheels. Also inspected the brakes.

While I was waiting for the Green intake filter to dry, I cleaned the throttle body and MAF sensor. Also installed new wiper blades.

Finally got around to repairing my rear defrost. Compound has to cure for at least 24 hours before hooking up.

Oil change.
Tire rotation/put on summer wheels. Also inspected the brakes.
While I was waiting for the Green intake filter to dry, I cleaned the throttle body and MAF sensor. Also installed new wiper blades.
Finally got around to repairing my rear defrost. Compound has to cure for at least 24 hours before hooking up.

smt 59
Member
linneje
Member
- Apr 26, 2012
- 404
Had one bad rear speaker, would work sometimes and other times nothing (actually, nothing most of the time, especially if my kids were trying to watch a movie). Switched sides last summer and the trouble followed the speaker, so it wasn't the wiring. Finally got around to putting some Pioneer 5 1/4 " in to replace the Bose originals. Much better sound now, and the kids can actually hear from both sides.
Boricua SS
Member
Well I splurged a little more after buying new car. I showed the beaSSt some love too. Last year leaving the Midwest meet I blew out my subs. So I went and saw my brother from another mother (Glen, ghenny440) at his shop and dropped some,serious cash on a complete audio overhaul. I already have 6.5" components in each door but they're cheap and old. So I upgraded those to the Rockford Fosgate Prime Series Components. I had American Bass DX 12's in the cargo and I upgraded those to the new Rockford Fosgate punch P3's. I already have a Pioneer 7" DD (avh4300) and I have 2 Kenwood 1000W amps. I'll be swapping those out for either a Rockford 2000W amp or an American Bass 3000W amp. I'm going to have a busy few days,working on the beaSSt when she comes out of storage. I've stock piled a TON of parts over the winter........
littleblazer
Member
- Jul 6, 2014
- 9,265

Matt
Member
- Dec 2, 2011
- 4,023
SnowBlazer
Member


I let the Permatex defogger compund cure for 3 days with masking tape applying constant pressure. Pulled the tape off today and the contactor felt very solid. Hooked up the wire and I have a functional rear defogger againdmanns67 said:Finally got around to repairing my rear defrost. Compound has to cure for at least 24 hours before hooking up.
20150322_202238.jpg

I have read a lot of reviews about the Permatex kit and the majority of them were negative. Most of the reviews mentioned that the contactor fell off the glass in 2-3 days. Also the reviews mentioned that the compound is not conductive. If you followed the instructions on the package, then I could see why the contactor would fall off or be not conductive. Permatex has a how-to video on their site that is helpful, http://www.permatex.com/training/training-videos .
No matter what brand of rear defogger repair kit I looked up, they all had bad reviews with the same comments. The compound has an initial operating temperature window. If you tried this during the middle of winter, you might not achieve the same results which is way I have been waiting for a warm day.
Additional to the steps on the package, I used my Dremel with the sanding drum attachment to remove all residual compund from the glass and contactor so that I had a smooth surface on each. Applied the activator to both surfaces as well as the compound. Hold in place for two minutes to allow compund to setup. Says to let cure for 24hrs, but I went 72 hours with masking tape applying constant pressure.
Short term, the Permatex defogger repair kit works great. We shall see how the long term results look.
BlazingTrails
Member
- Apr 27, 2014
- 19,409
That's the reason people like us get results David, we want it to work so we look into it before we do it. I think it will hold up fine.dmanns67 said:I let the Permatex defogger compund cure for 3 days with masking tape applying constant pressure. Pulled the tape off today and the contactor felt very solid. Hooked up the wire and I have a functional rear defogger again
I have read a lot of reviews about the Permatex kit and the majority of them were negative. Most of the reviews mentioned that the contactor fell off the glass in 2-3 days. Also the reviews mentioned that the compound is not conductive. If you followed the instructions on the package, then I could see why the contactor would fall off or be not conductive. Permatex has a how-to video on their site that is helpful, http://www.permatex.com/training/training-videos .
No matter what brand of rear defogger repair kit I looked up, they all had bad reviews with the same comments. The compound has an initial operating temperature window. If you tried this during the middle of winter, you might not achieve the same results which is way I have been waiting for a warm day.
Additional to the steps on the package, I used my Dremel with the sanding drum attachment to remove all residual compund from the glass and contactor so that I had a smooth surface on each. Applied the activator to both surfaces as well as the compound. Hold in place for two minutes to allow compund to setup. Says to let cure for 24hrs, but I went 72 hours with masking tape applying constant pressure.
Short term, the Permatex defogger repair kit works great. We shall see how the long term results look.
Boricua SS
Member

jpimp
Member
- Feb 1, 2013
- 176
Mines been on for more than a year, you should be fine.dmanns67 said:I let the Permatex defogger compund cure for 3 days with masking tape applying constant pressure. Pulled the tape off today and the contactor felt very solid. Hooked up the wire and I have a functional rear defogger again
I have read a lot of reviews about the Permatex kit and the majority of them were negative. Most of the reviews mentioned that the contactor fell off the glass in 2-3 days. Also the reviews mentioned that the compound is not conductive. If you followed the instructions on the package, then I could see why the contactor would fall off or be not conductive. Permatex has a how-to video on their site that is helpful, http://www.permatex.com/training/training-videos .
No matter what brand of rear defogger repair kit I looked up, they all had bad reviews with the same comments. The compound has an initial operating temperature window. If you tried this during the middle of winter, you might not achieve the same results which is way I have been waiting for a warm day.
Additional to the steps on the package, I used my Dremel with the sanding drum attachment to remove all residual compund from the glass and contactor so that I had a smooth surface on each. Applied the activator to both surfaces as well as the compound. Hold in place for two minutes to allow compund to setup. Says to let cure for 24hrs, but I went 72 hours with masking tape applying constant pressure.
Short term, the Permatex defogger repair kit works great. We shall see how the long term results look.
This what I'm fixing today...

SnowBlazer
Member
BlazingTrails
Member
- Apr 27, 2014
- 19,409
Replaced the oil pressure switch. I looked down and the oil gauge was on zero. Heart attack lol
Also rotated the tires, and drove to Albany for the day.
Also rotated the tires, and drove to Albany for the day.
Mirage
Member
- Feb 23, 2014
- 60
Installed my WAAG guard I got in January. Had to make custom lower mounts.
Sooo happy with the result. Now to pick some lights to install on it.
Sooo happy with the result. Now to pick some lights to install on it.
mcsteven
Member
- Apr 18, 2012
- 6,584
Had heard a rattle Thursday and grinding so was thinking it was a problem with the brake upgrade. Looked at it today. Seems the bridge bolt for the upper side of the driver's rear caliper broke or came out. The caliper was scraping the inside of the wheel.
Ordered that part (not in stock until Monday). After 6K miles and the oil indicator getting to 20%, the dipstick only showed about 1/2 way down in the acceptable range (no top offs) Changed the oil (it was conventional since they swapped the motor) so this one is on Mobil 1 Extended Performance full synthetic with a Fram Tough Guard filter. All the fluids looked fine. Also swapped out the reverse lights with the LEDs I had ordered. I'll see how bright those are tonight but they look good.
Want to get some lights for the bull bar now but $$ are super tight. Another client though that wants to some in trade and he's got an accessories store. I haven't closed the deal because I don't know how much I'd want from his store.
24v 4.2
Member
- Jan 16, 2013
- 430
djthumper
Administrator
Ouch...Happened to me last fall. Got me on the top of the head.djthumper said:Replaced both hatch struts. Went to put some stuff into it and it came down on top of me.
djthumper
Administrator
One strut just finally gave out. I replaced them both so they are matched. Now the wife has a hard time closing it.
Matt
Member
- Dec 2, 2011
- 4,023
Putting the new hood on today...pics will follow.
ETA: New hood and old one showing how bad the rust is, yeah, it was that bad.


ETA: New hood and old one showing how bad the rust is, yeah, it was that bad.
RedEnvoyDenali
Member
- Dec 4, 2011
- 520
It was winter tire to summer tire day yesterday. Looks likes any more snow will be short lived at best. Can't tell you how it feels to put the winter stuff away. Starting to dream about getting the boat out of storage and ready for summer. Cabin day is only 33 days away (they don't let us in until May 1).
Blckshdw
Moderator
Not on mine, but helped the roommate replace the bump stops on his XUV. Old ones were crumbling to pieces.
 Mike did you ever get over to that tint shop and have your windows redone? Carlos and I were talking about that yesterday.

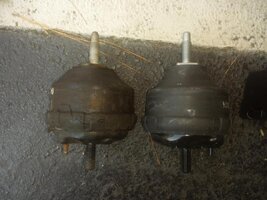
24v 4.2 said:Motor mounts. Old ones were pretty compressed.
Mike did you ever get over to that tint shop and have your windows redone? Carlos and I were talking about that yesterday.Those headlights though...Matt said:Putting the new hood on today...pics will follow.
ETA: New hood and old one showing how bad the rust is, yeah, it was that bad.
Matt
Member
- Dec 2, 2011
- 4,023
Trick of the light and camera...they're as clear as the day it rolled out of the factory, just a bit dirty.Blckshdw said:Those headlights though...


Saw both of my SMAXX rear end links had sheared/broken, so I got some Moogs and put them on...what a PITA.
24v 4.2
Member
- Jan 16, 2013
- 430
Yep. Had them redo the front windows with ceramic and put clear ceramic on the all the rear windows. Really cut down on the heat.Blckshdw said:Mike did you ever get over to that tint shop and have your windows redone? Carlos and I were talking about that yesterday.

Wishbone
Member
- Dec 5, 2011
- 343
Wednesday I replaced the sway bar bushings all the way around.
Friday replaced the upper and lower ball joints and CV shafts both sides. OMG, I was really taking my life in my own hands, they were just wobbly all over the place... Can't believe my whole front end didn't fall off... Drives almost like a brand new truck now.
Saturday ordered new outer tie rod ends for both sides, should be here on Monday.
I still hear a faint squeak from what must be the passenger side control arm bushings or the Bilstien HD shocks (since I've replaced about everything else in the area).
BlazingTrails
Member
- Apr 27, 2014
- 19,409
HARDTRAILZ
Moderator
- Nov 18, 2011
- 49,665
BlazingTrails
Member
- Apr 27, 2014
- 19,409
Grimor
Member
- Mar 28, 2013
- 954

began wiring up the relays and wireless controller for my lighting. i always solder my terminals if possible.
i plan on wiring indicator lights under the main switch. this is going under the rear seat where the stock jack is.
gmcman
Member
- Dec 12, 2011
- 4,656
Swapped the winter tires for the warm season set....now we'll get a foot of snow next week. 
Sib
Member
- Sep 6, 2014
- 3,446

Soldered some extra wire to lengthen the positive and ground wires and put in my new HID fogs. Hope they give some good output. We'll find out tonight when I head home from work.
mcsteven
Member
- Apr 18, 2012
- 6,584
Friend helped pull the wheel and I got the bridge bolts replaced on the driver's side rear caliper. The inside of that wheel has some scrapes all around but luckily nothing too bad and nothing really on the caliper.
Cleaned it out, vacuumed, going to do the extra cleaning this weekend on the inside. Usually grab a bunch of stir sticks from Starbucks and with the disposable cloths use them to clean the vents and all the crevices. I want to get the outside done (maybe clay bar treatment) but I can't hold a buffer anymore so I'll see if I can find someone to trade it out. I doubt it needs much buffing, but I'd like it really shiny again.
Cleaned it out, vacuumed, going to do the extra cleaning this weekend on the inside. Usually grab a bunch of stir sticks from Starbucks and with the disposable cloths use them to clean the vents and all the crevices. I want to get the outside done (maybe clay bar treatment) but I can't hold a buffer anymore so I'll see if I can find someone to trade it out. I doubt it needs much buffing, but I'd like it really shiny again.

- Status
- Not open for further replies.