Under Hood Emissions and other OEM decals

jmonica

Original poster
Member
Apr 2, 2013
386
Hamburg, NJ
I'm working on cleaning up my '06 Envoy SLT. Part of the under hood cleanup involves returning it to look like it came from the factory. I've repainted or replaced brackets, and other things that were rusted or just messed up.

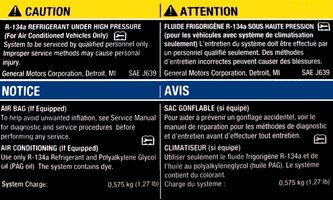
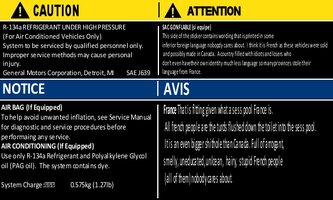
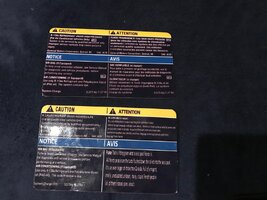
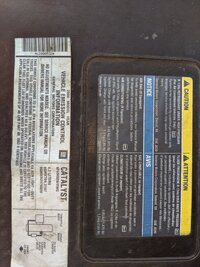
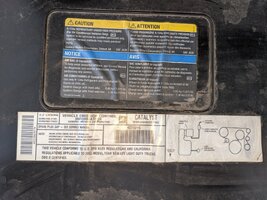
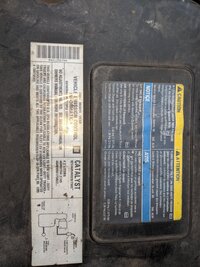
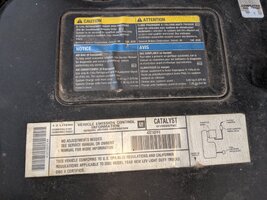
My two biggest hold ups now are the emissions decals on the air box and the one on the battery. Please see pic.
My decals are gone. There's a company that will recreate new ones for you, but you have to send in your old ones. Uh yea, I have a computer and a printer. I can recreate them myself thank you, but I don't know what they look like or I would. I could download some that look similar and copy those but I want them to be correct and have the correct info on them if its possible. Does anyone know where I can get new ones or at least see a photo of one for my vehicle so I can create them myself?

These are the three I am mainly concerned with finding.
Underhood decal examples.jpg

That AC pipe that runs along the top front of the engine on mine is not coated in black. Its shiny and now its REALLY shiny like chrome since I polished it.
In order to make this cleanup really look like the car is new is to cleanup the overflow tank, master cylinder reservoir and WW fluid tank not that important). I've watched some You tube videos on how to clean them "Like New" they claim but the videos are lame. There's nothing really unique that they use or do to get them cleaned up and they are far from new looking. I can come up with better solutions than those videos but still not good enough to make them look that new crisp white color. I can buy a new Dorman tank for $40 I think and I will if I can't figure out how better to clean what I have. Does anyone have any ideas on how to clean them?

I'm going to try to replace all of the wire loom stuff. The clips that hold wires in place that have broken off, replacing the valve cover gaskets, I painted the pulleys and brackets, cleaned up any rusted nuts and bolts I could see and replaced any that were missing. I replaced all of the caps for the tanks and Valve cover etc.. so that the wording on them is readable and painted like new, Oh I also plated all of the door and trunk strikers with nickel.cobalt to prevent them from rusting. I had the plating kit for another project so that's how that idea came about. All of my latches and strikers etc were so ridiculously rusted man. Doors wouldn't latch or the hood. I painted the hood latch mechanisms as well. etc. I want this sucker looking showroom fresh! :smile:

Oh I also want to replace the under hood insulation that's on the underside of the hood itself. Some company should produce a line of those things and offer custom ones. Guys who show their rides at car shows etc would go crazy for something like that. I'd maybe make them from thin aluminum plate. OK I'm getting way off track here.

Thank you in advance!!!
 

Mooseman

Moderator
Dec 4, 2011
25,310
Ottawa, ON
I'll defer posting pics of the stickers to members from the US in case they are different than Canadian versions.

For the tanks, I usually get nice results by using a pressure washers with soap and then rinse. That includes the master cylinder. I do remember one member who had a Dorman tank that leaked so I'd be careful with those.

Certainly sounds like a cool project. Haven't heard of anyone doing an actual restoration of one of these trucks. Do post up the results in the Member's builds section. Will be nice to see!
 
  • Like
Reactions: jmonica

Reprise

Lifetime VIP Donor
Supporting Donor
Member
Jul 22, 2015
2,724
Oh I also want to replace the under hood insulation that's on the underside of the hood itself. Some company should produce a line of those things and offer custom ones. Guys who show their rides at car shows etc would go crazy for something like that. I'd maybe make them from thin aluminum plate.

Some nice work, looking at the pics. Are you planning on using it as a DD?

You might be able to find images of the areas you're looking to duplicate the stickers from, via Google.
I'd drop you an image of the one from my airbox, but I've got the V8, so the bottom one wouldn't be correct, and I don't know if I have the top one on my '03 or not... can't remember, as most of my time is spent on the pickup, these days.

Re: underhood insulation and aluminum plate... from an appearance standpoint, that might work. But don't expect it to be functional (it might actually make things louder -?)

PS: I'd stay away from that Dorman tank, too. Too many crack after about a year.
As far as cleaning, I recall someone using ice, along with some household-type cleaners, and doing the 'shake shake shake' thing... his yellowed (GM) coolant reservoir came out looking almost new. If you're interested, I'll see if I can find it again.
 

Maverick6587

Member
Dec 16, 2018
730
Sterling Heights, Michigan
Quite the project!

I'm actually headed to the junkyard today to grab a hood for mine. I'll peek around and see if I can grab a few pics of those stickers for you. I don't have the battery cover and my air filter intake stickers are gone as well.
 
  • Like
Reactions: jmonica

Maverick6587

Member
Dec 16, 2018
730
Sterling Heights, Michigan
Here are the pics I was able to get. I could only find battery cover.
 

Attachments

  • IMG_20191205_160916.jpg
    IMG_20191205_160916.jpg
    649.8 KB · Views: 8
  • IMG_20191205_163407.jpg
    IMG_20191205_163407.jpg
    656.3 KB · Views: 9
  • IMG_20191205_163440.jpg
    IMG_20191205_163440.jpg
    688.9 KB · Views: 7
  • IMG_20191205_163651.jpg
    IMG_20191205_163651.jpg
    638.7 KB · Views: 8
  • IMG_20191205_163854.jpg
    IMG_20191205_163854.jpg
    652.8 KB · Views: 9

Maverick6587

Member
Dec 16, 2018
730
Sterling Heights, Michigan
I'm working on cleaning up my '06 Envoy SLT. Part of the under hood cleanup involves returning it to look like it came from the factory.

Are you just trying to get it to look pretty again or are you turning into a show vehicle? Are you also replacing the interior? If so, let me know where you find decent replacement new parts for the interior. I'd be interested in that process as well. I'm looking to get my leather replaced on the seats next year. I'd also like to replace the roof liner as well.

I might just replace the carpet with a rubber floor. The salty winter is too much to keep up with cleaning the carpet every few months.
 
  • Like
Reactions: jmonica

Mooseman

Moderator
Dec 4, 2011
25,310
Ottawa, ON
I might just replace the carpet with a rubber floor. The salty winter is too much to keep up with cleaning the carpet every few months.

Husky liners are the cat's ass for this. Weathertech are OK but the Husky's cover more and retain the crap a lot better. Having been in a lot of vehicles with rubber carpets, they do wear out and once you have a hole in it, your floor underneath will get wet and rust. And you can't take them out to dump and clean them. A real PITA when you have a bunch of melted snow and slush.
 

jmonica

Original poster
Member
Apr 2, 2013
386
Hamburg, NJ
Are you just trying to get it to look pretty again or are you turning into a show vehicle? Are you also replacing the interior? If so, let me know where you find decent replacement new parts for the interior. I'd be interested in that process as well. I'm looking to get my leather replaced on the seats next year. I'd also like to replace the roof liner as well.

I might just replace the carpet with a rubber floor. The salty winter is too much to keep up with cleaning the carpet every few months.
Maverick you're the best ! Thank You for the pics They are exactly what I was looking for. If I can get a decent one made I'm happy to make one for anyone on here who wants one. I bought the vinyl paper to print them on and it says it will last outdoors for at least 10 years. I wish it would snow again so I had a day of f work and so I could stay inside to work on these without feeling guilty. I was planning n starting tonight but in usual fashion for me and this transmission swap, ran into a whole new problem. Replacing the u Joints. An hr long project turned into 5 again. I only had to install the u joint, then install the rear drive shaft, fill up the fluids and I a done. Nope get u joint installed but its very stiff. I don't know whether or not to just try to use it, I don;t think they are supposed to be this tight I can move it but the front one I installed is easy to move and nice and smooth. To add insult to injury, I broke my bench vise when pressing the new ones in. That was not cheap vise either. IT was super heavy as well. For it to break the way it did is just baffling to me. I guess I was wrong, it was a cheap vise, I just paid alot for a cheap Chinese POS.

I am hoping that a garage around me will maybe take out the new one I just put in and press in another new one without raking me over the coals. I have no cue how much that should cost. If i bring them thee new joint and the drive haft? I hate to have anyone do it for me since I'v done everything else completely by myself.

So I' not planning on making this a show truck. I am planning n keeping it forever though so I just want t clean it up and keep it like that. Assuming of course that I EVER get done with this trans swap which I a doubting right about now.

Do you think it's OK to install the S with the new UJ that I mentioned that is stiff? This Bluetooth Keyboard I am on is killing me. Skips every 3rd letter so will replay later. Thank You again!

JIm
 

Attachments

  • 20191210_000138.jpg
    20191210_000138.jpg
    442.5 KB · Views: 12

Mooseman

Moderator
Dec 4, 2011
25,310
Ottawa, ON
Although off-topic, will ask, did you give each of the ears on the driveshaft and spindle a rap with a hammer? This relaxes the tension against the U-joint.
 
  • Like
Reactions: jmonica

jmonica

Original poster
Member
Apr 2, 2013
386
Hamburg, NJ
Are you just trying to get it to look pretty again or are you turning into a show vehicle? Are you also replacing the interior? If so, let me know where you find decent replacement new parts for the interior. I'd be interested in that process as well. I'm looking to get my leather replaced on the seats next year. I'd also like to replace the roof liner as well.

I might just replace the carpet with a rubber floor. The salty winter is too much to keep up with cleaning the carpet every few months.
I'll defer posting pics of the stickers to members from the US in case they are different than Canadian versions.

For the tanks, I usually get nice results by using a pressure washers with soap and then rinse. That includes the master cylinder. I do remember one member who had a Dorman tank that leaked so I'd be careful with those.

Certainly sounds like a cool project. Haven't heard of anyone doing an actual restoration of one of these trucks. Do post up the results in the Member's builds section. Will be nice to see!
Thanks for the information on the Dorman tank(s). I had decided that I was going to buy the overflow and brake fluid reservoir, but now I think I’ll give cleaning them s try. I just don’t think ox
Although off-topic, will ask, did you give each of the ears on the driveshaft and spindle a rap with a hammer? This relaxes the tension against the U-joint.
Thank You Mooseman for the tip on the U-Joints. I did try tapping on it and to no avail. I did finally get it free up but I am a little nervous about being ostracized if I say how I did it. Oh well, here goes. So after a lengthy tapping session, I had resigned myself to the fact that I screwed it up and was going to have to do a new one. I found a local garage that said they would do it for me. To avoid having to pay them to remove the one I had installed, I started to remove it. The second I popped one of the C Clips off, it free'd up. ok so I didn't ruin it yet! Removed the other c clip, grabbed my ball joint tool and attempted to compress both ends. Then put on one clip compressed again, everything was good. Popped on 2nd clip, back to binding. Tried switching which clip I tool doff before compressing the opposite side. Tried installing clips then tapping with a brass punch at angle to hopefully get the end backed off the clip ever so slightly. I f'd around with this thing for about two hours. Trying every which way I could think of. Finally and here's where I can hear people shaking their heads in disgust as they read this...I removed one of the clips, laid down a piece of 220 grit sandpaper, held the c clip flat on it with two fingers, went back and forth about 3 times. popped the clip back in, bam! It worked like a charm. The c-clip was still tight to put it. its not like it just fell into place. I'm satisfied with it enough that I'll drive my young son around in it. I know its not coming out. So let it rip. Tear me a new one. I"m ready for it.

Just did my first test drive tonight, all is well except for the trans line fittings into the radiator. They leak. I really thought they would be fine too. :sadcry: They didn't come with o-rings so I bought some that I thought would work. I am hoping that I was wrong and that the only reason its leaking. I wish I knew exactly which ones to buy that came with the o-rings that will mate up with the AN fittings that I used. I am hoping all AN-6 fittings are the same throughout for instance Russell's will work with XYZ brand no problem. I only need the two fittings that go into the radiator. I will start googling again. I'm embarrassed to say that I got overwhelmed looking at this stuff. I bought a set that had the braided line AN fittings etc, but it didn't have the o-rings or the right fittings for the radiator. So I went searching for just thee fittings and then another place to locate the correct o-rings.
 
  • Like
Reactions: Mooseman

jmonica

Original poster
Member
Apr 2, 2013
386
Hamburg, NJ
Here are the pics I was able to get. I could only find battery cover.
Hey Maverick, so here's my first attempt at recreating the emissions sticker for under my hood. It
s not as good as I was hoping but its a work in progress. I still have to iron out all of the bugs with the trans install before I start to to do the cleanup.

I can't thank you enough for taking the time to take and post these pics for me.
The attached pics are... 1) a cleaned up version of one of the originals Maverick posted for me. 2) I recreated this one from a blank image. Still can't find the same exact font that the original used. 3) actual printed versions of each.
 

Attachments

  • Cleanup or Original.jpg
    Cleanup or Original.jpg
    124.8 KB · Views: 8
  • From Scratch.jpg
    From Scratch.jpg
    101.2 KB · Views: 7
  • Printed Decals.jpg
    Printed Decals.jpg
    279.7 KB · Views: 6

Blckshdw

Moderator
Nov 20, 2011
10,676
Tampa Bay Area, FL
When I replaced my radiator, I don't remember there being any O rings. (although I wasn't looking in there like that) When I had an issue with them leaking, the fittings in the radiator weren't as tight as they needed to be, and required another half turn with a wrench, then they stopped.

I removed one of the clips, laid down a piece of 220 grit sandpaper, held the c clip flat on it with two fingers, went back and forth about 3 times. popped the clip back in, bam! It worked like a charm.

Rip you a new one? That's freaking genius!
 
  • Like
Reactions: jmonica

Mooseman

Moderator
Dec 4, 2011
25,310
Ottawa, ON
I didn't realize that US stickers also had French. Thought it would have been Spanish or no second language at all.
 

jmonica

Original poster
Member
Apr 2, 2013
386
Hamburg, NJ
You can purchase the labels, but they are ~$20+ each


Yes thank you for this. I was able to source some of them but as you said they are $20 each. I just think since I already have the paper, why not try to save some money. There are lots of other parts I need to get for it. Given that I do not have the luxury of an unlimited budget. It’s the exact opposite of that in fact, there are other more important parts I neef and l so the decals aren’t the highest priority in terms of what to spend the money on. Plus I think can recreate something that will look good enough to accomplish my goal. I’d love to be able to just buy the new ones and be done with it though.
Thanks for all your tips and help guys! I will post pics as soon as the under-hood cleanup is done. Right after I find the transcooler leak solution and diagnose the five trouble codes that popped up on my test drive last night. They are all do tyo the fact that the vehicle sat unused outside for 18 months. Bad bad bad. Nothing destroys a car faster IMHO than letting one sit idle without prepping it for storage.
 
Last edited:
  • Like
Reactions: Redbeard

Forum Statistics

Threads
23,310
Posts
637,778
Members
18,515
Latest member
jonnnnyj

Members Online