I have noticed lately that there has been talk of replacing the front differential with some. As these vehicles age, the likelihood of the front differential needing to be replaced will be going up, so I thought I'd share how I have replaced a couple of these, and it works pretty well.
For comparison sake, I have done this job "the right way". The service manual says that the oil pan and rack and pinion have to be pulled to change the front differential. This way is crazy hard.
I have done two of these front differentials in the last couple of months. I jacked the engine up and moved it over to the side. It is much easier than any other way I've read or tried. Here is how I have done it:
Some of these steps are things that most have already done so I won't dwell on them too long. If you have questions, feel free to ask.
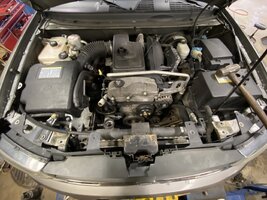
First off, since you will be raising the engine, you need to remove the fan and shroud, so you don't damage anything there. I remove the shroud by removing the top radiator support to help lean the radiator back so the shroud will clear the upper outlet on the radiator. You also need to remove the upper radiator hose. You might want to drain a little coolant or use a suction gun to pull some out. Once you get done, it should look like this.
Next, you need to pull both of the front CV axles and the axle disconnect on the passenger side. Once the axle disconnect is out, pull the intermediate shaft out of the oil pan. These aren't usually hard to get out. Most times, you can screw a 6MM bolt into the end of the shaft and pull on it with vise grips. There is no retaining clip on the differential side so there isn't much holding on to the shaft. Now would be a good time to disconnect the front drive shaft from the differential. You should get some sort of tape (I use electrical tape) and wrap it around the u-joint caps so they don't fall off while you're working. You don't want to chase needle bearings around.
Now comes the fun part - The lower nuts for the engine mounts need to come out. Once you get the nuts off use a jack and a piece of wood and raise the engine up just enough so that the threads of the stud on the engine mount are through the hole. You don't want to move the engine any more than you have to.
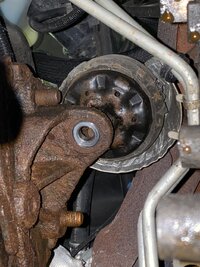
Once the engine is up, get a ratchet strap and hook it through the lifting eye on the drivers side of the engine. Connect the other end to something solid on the passenger side (or if you have something solid not connected to the vehicle that is fine too). Here is how I hooked it.
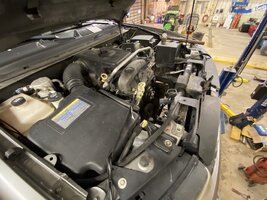
Once you're hooked on, pull the engine over as far as you can with the ratchet strap. It doesn't take a whole lot of force. Make sure when you're doing this that you don't go too far, the first time I attempted this, I poked a hole in one of the heater hoses that goes into the heater core by the firewall.
Here’s a picture of what it looks like when there’s enough room to wiggle it out.
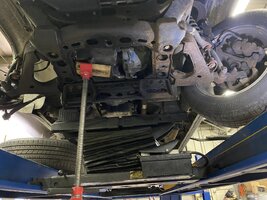
Now, go back underneath and unbolt the differential from the oil pan. Sometimes the differential is really corroded in there so it might take some persuasion and some penetrating oil. Once the differential is free from the pan, move it over to the side and lower the engine a bit. Keep an eye on it because as you lower it, it will move more to the passenger's side and give you more room. You might have to go up and down a couple times to see where it will give you the most clearance.
As you're getting the differential out, bear in mind that even though it will come out the bottom it isn't going to just fall out. It will take some wiggling and maneuvering around to find the right angle to get it out.
An idea of how tight it is, I had to use a pry bar to gently coax the differential back in. Coming out, I had to give it a good pull as I was standing underneath and it popped loose almost sending it to the floor.
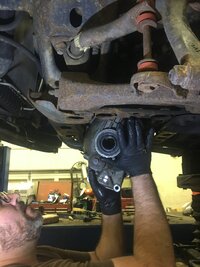
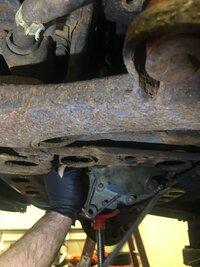
And there, it is free! Note the position of those engine mounts to see how far the engine moved over.
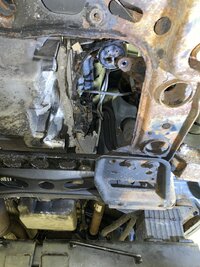
If you're installing a used unit, now would be a good time to replace both of the output seals. I wouldn't mess with the pinion seal unless it is leaking. It is also a good idea when you're putting it back together to put a coating of anti seize on the axle disconnect and the differential so if either has to come out later, they will come out easier.
Now you pretty much reverse the procedure. I will note that the best way to get the engine lined back up would be to jack it up so that the studs are high enough and then release the strap. You will probably need some help getting the mounts lined back up.
This should work on all 4.2 liter inline 6 engines in Trailblazers, Envoys, Ascenders, and 9-7X
For comparison sake, I have done this job "the right way". The service manual says that the oil pan and rack and pinion have to be pulled to change the front differential. This way is crazy hard.
I have done two of these front differentials in the last couple of months. I jacked the engine up and moved it over to the side. It is much easier than any other way I've read or tried. Here is how I have done it:
Some of these steps are things that most have already done so I won't dwell on them too long. If you have questions, feel free to ask.
First off, since you will be raising the engine, you need to remove the fan and shroud, so you don't damage anything there. I remove the shroud by removing the top radiator support to help lean the radiator back so the shroud will clear the upper outlet on the radiator. You also need to remove the upper radiator hose. You might want to drain a little coolant or use a suction gun to pull some out. Once you get done, it should look like this.

Next, you need to pull both of the front CV axles and the axle disconnect on the passenger side. Once the axle disconnect is out, pull the intermediate shaft out of the oil pan. These aren't usually hard to get out. Most times, you can screw a 6MM bolt into the end of the shaft and pull on it with vise grips. There is no retaining clip on the differential side so there isn't much holding on to the shaft. Now would be a good time to disconnect the front drive shaft from the differential. You should get some sort of tape (I use electrical tape) and wrap it around the u-joint caps so they don't fall off while you're working. You don't want to chase needle bearings around.
Now comes the fun part - The lower nuts for the engine mounts need to come out. Once you get the nuts off use a jack and a piece of wood and raise the engine up just enough so that the threads of the stud on the engine mount are through the hole. You don't want to move the engine any more than you have to.

Once the engine is up, get a ratchet strap and hook it through the lifting eye on the drivers side of the engine. Connect the other end to something solid on the passenger side (or if you have something solid not connected to the vehicle that is fine too). Here is how I hooked it.

Once you're hooked on, pull the engine over as far as you can with the ratchet strap. It doesn't take a whole lot of force. Make sure when you're doing this that you don't go too far, the first time I attempted this, I poked a hole in one of the heater hoses that goes into the heater core by the firewall.
Here’s a picture of what it looks like when there’s enough room to wiggle it out.

Now, go back underneath and unbolt the differential from the oil pan. Sometimes the differential is really corroded in there so it might take some persuasion and some penetrating oil. Once the differential is free from the pan, move it over to the side and lower the engine a bit. Keep an eye on it because as you lower it, it will move more to the passenger's side and give you more room. You might have to go up and down a couple times to see where it will give you the most clearance.
As you're getting the differential out, bear in mind that even though it will come out the bottom it isn't going to just fall out. It will take some wiggling and maneuvering around to find the right angle to get it out.
An idea of how tight it is, I had to use a pry bar to gently coax the differential back in. Coming out, I had to give it a good pull as I was standing underneath and it popped loose almost sending it to the floor.


And there, it is free! Note the position of those engine mounts to see how far the engine moved over.

If you're installing a used unit, now would be a good time to replace both of the output seals. I wouldn't mess with the pinion seal unless it is leaking. It is also a good idea when you're putting it back together to put a coating of anti seize on the axle disconnect and the differential so if either has to come out later, they will come out easier.
Now you pretty much reverse the procedure. I will note that the best way to get the engine lined back up would be to jack it up so that the studs are high enough and then release the strap. You will probably need some help getting the mounts lined back up.
This should work on all 4.2 liter inline 6 engines in Trailblazers, Envoys, Ascenders, and 9-7X
Last edited:
