The Friendly Face of Linux

C-ya

Member
Aug 24, 2012
1,098
Desktop works with 64-bit Ubuntu. I'll put the 64-bit Mint ISO on a stick and try it again to see what happens.
 

mrrsm

Original poster
Lifetime VIP Donor
Supporting Donor
Member
Oct 22, 2015
7,730
Tampa Bay Area
For those of us interested in the PICO-Scope Pro Grade Oscilloscopes who prefer running their Automotive Diagnostics on the Linux Mint 20+ Operating System Platform... The Folks over at PICO have created a FREE Beta Version 7.0 that installs via Command Line (Terminal) of their latest PICO Professional Automotive Suite, native to the Linux Kernel.

I followed these steps (Coded in Green Text) and successfully installed this PICO Pro SW Suite in Very Short Order using this Linked Site. It runs as flawlessly as the Windows 10 API Version. The Ubuntu 18 LTS flavor is the one that worked best over choosing the Ubuntu 20 OS (Debian Based) for an easy, trouble free installation:


THIS was a Very Pleasant Surprise... RIGHT UP UNTIL I FIGURED OUT THAT IT WOULD NOT WORK WITH MY PICO-SCOPE MODEL# 2204A UNIT… BUT DO NOT DESPAIR, AS I’M STILL ONE PRETTY DAMNED SMART OLD DUDE… SO READ ON, PLEASE ...FOR THE WORK-AROUND :>)

In order for the PICO-Scope Model # 2204A (2) Channel Oscilloscope to be able to use this software ordinarily meant for the PICO 4 Channel Variants... on the "Normal" Windows 7-10 Operating Systems, it will be necessary to Delete the File called "OEM.DLL". Here is How to Do That:


However… for Linux Mint Users… You will be VERY Happy To Know that I just figured out How to Get the PICO-Scope Model# 2204A to Work Properly on the Latest Linux Mint version of the PICO-Scope Beta 7 Software. Just follow my lead here in this Fairly Technical Step By Step:

Part One:


Visit THIS Link and go to the Bottom of the Page to Download the UBUNTU Version 18.4 LTS Selection:

https://oem.picoauto.com/p7beta/download

Follow THESE Instructions. Open a Terminal in Linux Mint and Copy-Paste these Commands exactly as you see them separated and listed below… One at a Time. After using the ‘sudo’ command… type in your Linux Mint OS “Super-User” System Password if you’re requested to do so:

sudo apt install gnupg ca-certificates

sudo apt-key adv --keyserver hkp://keyserver.ubuntu.com:80 --recv-keys 3FA7E0328081BFF6A14DA29AA6A19B38D3D831EF

echo "deb https://download.mono-project.com/repo/ubuntu stable-bionic main" | sudo tee /etc/apt/sources.list.d/mono-official-stable.list

Import the public key (only this wget command only once, no need to repeat it):

wget -O - https://labs.picotech.com/Release.gpg.key | sudo apt-key add -

Configure your system repository:

sudo bash -c 'echo "deb https://labs.picotech.com/rc/picoscope7auto/debian/ picoscope main" >/etc/apt/sources.list.d/picoscope7.list'
Update the package manager cache:

sudo apt-get update

Now… Install PicoScope:

sudo apt-get install picoscope

And finally for this part… Update ALL Linux Mint Installation Apps:

sudo apt-get update

Part Two

Open up a Linux Mint Terminal and at the Command Prompt, Key In:

cd /opt/picoscope/include/libps2000

Then, from within that /opt/picoscope/include/libps2000 Sub-Directory, Key In:

ls

You should see one single file listed therein called:

ps2000.h

Next, you must install and run the Linux Mint GEDIT Basic Notepad APP as follows:


sudo apt-get install gedit

Then, Key in the following commands:

sudo gedit /opt/picoscope/include/libps2000/ps2000.h

As soon as the Text Editor displays the contents and programming of the ‘ps2000.h’ File, you MUST search for ANY expressions that are preceded by the Pound Sign “#” and DELETE just that Entry… WITHOUT CHANGING THE POSITION OF ANY OTHER WORDS, NUMBERS OR CHARACTERS WHILE WORKING ON EACH LINE AND ALSO WITHOUT ADDING ANY OTHER INFORMATION.

I have copied and saved a Microsoft Word Document called “PA2000H.DOC” that you can use to check with and compare to the On Screen Terminal after you have finished Editing that Original File. Be Very Patient and Very Careful as you make every single Deletion of all of those “#” Characters. When you have successfully checked and edited all of the lines between Line 1 through Line 607 then press the “Save” Button on the Upper Right Hand Area of the GEDIT Text Editor Border and then X (Exit) out of this application.

Reboot the Computer and install your PICO-Scope Model # 2204A via the USB Cable into the Powered USB Port on your Laptop. Open a Terminal again and at the Command Prompt… Key in:

picoscope

After the PICO-Scope Application starts to run… watch in the center of the screen as the APP begins to finally recognize your PICO-Scope Model # 2204A for the Very First Time. Proceed on from there with other instructions for using the Scope for various types of Automotive Diagnostics with this High End APP..
 

Attachments

  • ps2000hrepaired.doc
    45 KB · Views: 4
  • Like
Reactions: christo829

mrrsm

Original poster
Lifetime VIP Donor
Supporting Donor
Member
Oct 22, 2015
7,730
Tampa Bay Area
Within days of installing the PICO-Scope Beta Version 7 Automotive Suite Program... my 'set for manual installation' Synaptic Package Manager alerted me on screen to a whole new raft of updated Hardware Headers for all of the variants for each PICO Model awaiting installation. These started with the Pro Versions that cost around $15,000.00 for The Big Boys and ended with the PICO-Scope Model #2204 as the affordable version in question.

I suspected that if I accepted the Updates and allowed them to install that the New PICO Beta 7 profiles would all be over-written and I'd be right back to Square One with an Original ps2000.h file. Thus, I'd have to go back through the same routine I described in detail in Post# 42 to rectify that file and allow the Updated Application Suite to work on my Model #2204A.

Yup... Sure enough...when viewing the "New" ps2000.h in GEDIT, all of the '#' signs excluding recognition and header functionality were right back on each relevant lines between Line #1 through Line #607.

Now you might think that making and saving a copy of the Modified ps2000.h file to swap in AFTER performing these irregular Application Updates would be the way to go... and I had done so by saving said copy in anticipation and set it aside.

However, after seeing all of the changes passing by on screen during its follow on installation, rather than risk breaking the New Package that may have enough new modifications in code to make the whole Damned Thing NOT work as I proved it previously had, I just opted to repeat the Mod Process on modifying the ps2000.h file as before. And so once again, my inexpensive PICO Hardware STILL works with the High End PICO Automotive Suite. (Sweet) :>)
 
  • Like
Reactions: christo829

n0sleeves

Member
Sep 21, 2021
2
New Orleans
New member here. Big smile appeared on my face when I saw a Linux thread on the same site where my Trailblazer questions and comments will see light :smile: Nice to see so many users here. I'm a huge Linux fan and have tried so many flavors. It's addicting. I love them all but have always gone back to Manjaro which currently runs on this laptop I nuked Windows on :smile: There is something about Arch which gels with my soul. I always wipe and flush any Microsoft machines and put Linux on them. Hate to admit I'm still running a couple windows PCs but only because of the very picky software I need to use to run my business. However, Windows Subsystem for Linux is installed on all of them and keeps me sane when I need to use those.

Keep up the great post! Cheers!
 

mrrsm

Original poster
Lifetime VIP Donor
Supporting Donor
Member
Oct 22, 2015
7,730
Tampa Bay Area
@Blckshdw ... You and perhaps a few others in the IT world might already know about this incident... but since I recently stumbled over it while browsing Linux information from back around the Y2K Transition, when I saw the Advert, I laughed so hard I almost "P'd" in my pants. I'm sorry...but THIS situation was just too damned clever NOT to be Funny...


mrrsm

Original poster
Lifetime VIP Donor
Supporting Donor
Member
Oct 22, 2015
7,730
Tampa Bay Area
Something strange happened as I was watching the latest Starship Activity from the SpaceX StarBase down in Boca Chica, Texas from the NASASPACEFLIGHT Folks via their YouTube Channel this morning:


I noticed an odd “Wavy Gray Gravy Line” populating the lower portion of the YouTube Viewing Frame on their Web Page. I began to wonder if this artifact involved any issue with either my Dell Precision 4800 nVidia Work Station CAD Quality Video Card, the 32 Gigs of RAM on board or perhaps problems with any of the Quad CPUs installed inside of this otherwise perfectly reliable machine.

Then I realized that I’ve never had to Question or Test out the Very High Definition Graphics on my Dell Laptop Screen before, so I wasn’t certain about "What Computer Graphics Bench Mark Test Suite Should I Use?". After that, I ‘Goggle-Eyed” around and then found, downloaded and installed THIS Phoronix Test Suite for these purposes.

The is latest *.deb File for either the Debian and Ubuntu Linux OS:

https://www.phoronix-test-suite.com/?k=downloads

It follows that I installed the Phoronix Test Suite after opening a Fresh Terminal and Typing in these Commands after adding in my SU (Super-User) password as needed of course,

sudo apt install gdebi-core <E>
sudo gdebi phoronix-test-suite_*.deb <E>

I then clicked on the LM (Linux Mint) Icon in the Lower Left of the Laptop Screen and Typed in “PHOR” (sans Quotes) into the Search String Line. The Program TAB for selecting The Phoronix Test Suite appeared to the right and after clicking on it, a New Terminal Opened up and the Test Suite automatically ran its course in just a matter of minutes.

Once all of the Tests were complete, they listed out their very comprehensive results on the screen ...showing nothing untoward had occurred. Then I opened up a Fresh Terminal and typed in:

sudo apt update <E>

When I went back to look at the minimized YouTube Screen, that mysterious “Wavy Gray Gravy Line” artifact had disappeared completely. Problem Solved.

I'm not certain whether or not the recently updated Linux Kernel (Valentine's Day 02/14/2022) needed some Additional Love via another Update Refreshment to sort this out. Nevertheless, having a Decent Computer Bench Mark Test Suite that will work on Linux Mint, Ubuntu and Cross-Platform over to Windows OS Flavors as well ...is never a Bad Thing. :>)

That's That... And No Harm Done!
 

mrrsm

Original poster
Lifetime VIP Donor
Supporting Donor
Member
Oct 22, 2015
7,730
Tampa Bay Area
So... Imagine that you're in your own Home and you have your Laptop Open and Running on your Kitchen Counter and you want to share a Private Conversation you've just had while on Zoom with your Boss related to Work with your Wife. The Zoom Session has been off for over an hour or so.

But... How do you KNOW for certain whether or not your Microphone(s) and Web Cameras are Turned OFF on your Laptop Computer? Not Paranoid enough to be worried about this because YOU just happen to be an Experienced Linux User...?

And so You don't think your system has the same Miserable Vulnerabilities as the Average Windows OS User has to deal with? ...even given the present conditions happening around the World?

Hmmm... Better Think Again...
And Read THIS:


For any concerned Linux Mint Users … If you are using Google Chrome or any of its Variants as your Internet Browser and You DO have any worries that your Microphone might be getting Remotely Turned On without your Knowledge or Permission… Try using this “Little Script” that allows you to Check in ... and Toggle ALL of the Laptop Microphone(s) either OFF or ON whenever you are using the Linux Mint 20.3 OS on your Laptop Computers:

Remember.. using the <E> Enter Key after each Command Entry described below is an assumed action:


First, Open up a Terminal from:

Menu - Accessories- Terminal

Then... Select and Copy Everything below but NOT including the word ‘Code:' down to and including the expression ‘fi’

Code:
#!/bin/bash
# mic toggle

tgl=$(amixer -D pulse sset Capture toggle)
if echo "$tgl" | grep "\] \[off\]"; then
echo "Mic is toggled OFF"
else
echo "Mic is toggled ON"
fi

Next… While you still have a Terminal Open:

Type: nano mike.sh

When the Nano Text Editor Desktop Opens… Paste the Copied Coding from above onto the Nano Marquis (Desktop):

Then Press CTRL X and Save this File Name as mike.sh

Next... If you want to ...Open up a Terminal from

Menu - Accessories- Terminal

To create the New toggler Folder:

Type: mkdir toggler

Then Copy the mike.sh File over into the toggler Folder:

Type: cp mike.sh toggler

Then switch over to the toggler Folder (Change Directory)

Type: cd toggler

Then Check for the presence of the mike.sh File in toggler:

Type: ls mike.sh

The File mike.sh should the present as the only File in that toggler folder and appear in there as White Text.

To make mike.sh an Executable File …Follow THIS Tutorial:

Type: ls *.sh to ensure that mike.sh is still present in the toggler Folder you are in and shows up as White Text:

Then… Open up a Terminal from

Menu - Accessories- Terminal

Then … To make this mike.sh File Executable...

Type: cd toggler

Type: chmod +x mike.sh

Then … To confirm that the File Name Color has turned from White to Green, thus confirming that it WILL Execute.

Type: ls mike.sh

If you can see the mike.sh File name is now GREEN ... then it is Ready to Execute:

Now… To Toggle ALL In-Dwelling Laptop Microphones either ON or OFF by Executing mike.sh ...use these Commands while you are still INSIDE of the toggler Folder (Directory)::

Type: sh ./mike.sh to execute the file.

The Results of this action will appear 'On Screen' in Terminal like the image below, explaining that the Microphones have either been Toggled ON or Toggled OFF:

The SAME Command...
sh ./mike.sh
Performs BOTH Tasks:

MICROPHONETOGGLER.jpg

"Keep Your Wits About You vs. Prying Eyes ... And Place a Piece of Black Gorilla Tape as a Folding Flip-Up Flap ...just above your Laptop Screen Webcam, too." :>)
 

mrrsm

Original poster
Lifetime VIP Donor
Supporting Donor
Member
Oct 22, 2015
7,730
Tampa Bay Area
An Homage to the Talents of@TJBaker57 ...

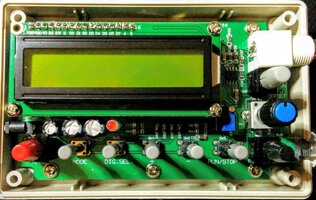
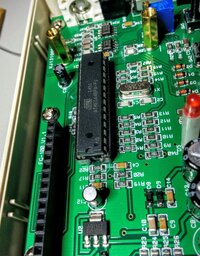
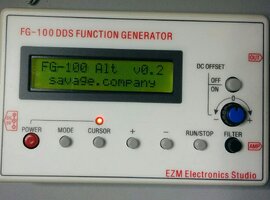
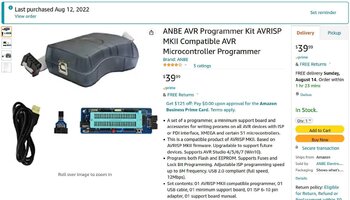
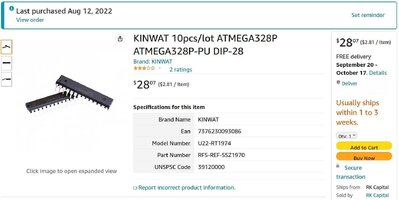
Linux and Arduino Geeks ...and Especially… “The Minty-Linux Freaks”… Cast your gaze at THIS Lil’ Enterprise from 'The Mind of Tim Savage' way back around 8 Years ago as a GIT Project for installing New Firmware onto an ATMEL EPROM Chip ATMEGA328P and then swapping them In and Out of a useful FG-100 Electronic Signal (Function) Generator Logic Board:

… He used THESE Instructions, along with installing the Linux Mint OS with the AVRDude Installation Set Up ...and of course, while using the GIT File Pile (Stuff) from HERE:

https://hackaday.io/project/7985-alternate-firmware-for-fg-100-dds-function-gen

https://github.com/timsavage/fg100alt-firmware/

https://www.instructables.com/How-to-Setup-AVR-Programming-Environment-on-Linux/

...and while using THIS Gear:

KINWAT ATMEGA328P EPROM Chip
ANBE AVR Programmer Kit (AVRISP Micro-Controller Programmer)
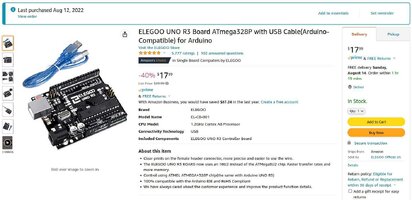
ELAGOO UNO ARDUINO BOARD

1720281444316293043.jpg2425241444316178667.jpg1861431449839536344.jpgELAGOOBOARD.jpgANBEAVRPROGRAMMER.jpgATMEGACHIIPS.jpg


...and while Following THESE Drop In EPROM File Instructions:

FG-100 alt firmware
Alternate firmware for the FG-100 function generator
The FG 100 is a cheap function generator widely available on Ebay.

See https://hackaday.io/project/7985-alternate-firmware-for-fg-100-dds-function-gen for details

Requirements​

You will need:
  • Obviously, an FG-100 (ebay is a good source)
  • ATMega328p 28pin DIP micro-controller
  • AVR programmer/ISP (the Makefile defaults to using a USBTiny ISP)
  • AVR toolchain (eg avr-gcc, avrdude and gnumake) installed
Warning: There are many sources for the FG-100 of varying quality and performance. My particular unit has a high quality PCB with quality components (Rubicon capacitors), the output is clean with minimal noise. Other people (including a review on Hackaday) have not had such luck. YMMV
If you are using a different programmer you will need to update the Makefile with the currect programmer code for AVRdude, update the AVRDUDE_PROGRAMMER parameter with the correct value for your programmer (see AVR dude documentation for info).

Compile/Install​

All development was completed on GNU/Linux so all instructions relate to this OS (feel free to generate a project file for AVRStudio and send me a pull request :wink: ).
Steps to build/upload/set correct fuses:
> make program
If you prefer to do the steps separately:
# Compile/Link/Generate Hex
> make hex
# Upload to microcontroller
> make upload
# Set correct fuses
> make fuses
Finally open up the FG-100, unscrew the LCD and remove the existing ATMega48 from it's socket, replace with your newly flashed ATMega328p, replace the LCD.
~ Enjoy!
avr firmware reverse-engineering

… and finally… Check out THIS Follow-On Project for ANOTHER Function Generator Build:

https://hackaday.io/project/19866-funktion-generator
 
Last edited:

mrrsm

Original poster
Lifetime VIP Donor
Supporting Donor
Member
Oct 22, 2015
7,730
Tampa Bay Area
As per their "Major Upgrade Every Two Years..." Policy, Linux Mint Version 21 "Vanessa" is now available to install over the latest active Version 20.3 "Una".

But BEWARE AND PREPARE when performing any Live Linux Mint Swap suggested below and steel your mind to ENDURE AN AGONIZING FOUR (4) HOUR PLUS PERIOD FOR ALL OF THIS TO COMPLETE.

During the First Hour, the User will have to ‘participate’ and respond to many interrogatories appearing in a Microscopic Font/Text in Frame as necessary in order to coax the Mint Software Update to continue doing its ordinarily Automated Job.

My suggestion is to arrange the Mint "Let's GO!" Install Panel side-by-side with the Terminal Screen Panel, so you can see everything that is transpiring.

The whole process eventually did finish with a Good Installation on my Dell Precision M6800 Work Station Laptop… But it literally felt like it took longer than a Lifetime (Well ...perhaps at least that of a May Fly) to arrive at this Happy Result.

Be advised that the “Vanessa” Install Programming Sub-Routines will find much that “upsets its tummy” coming from the Old Linux 20.03 “Una” Flavor via by bringing the activities to a Screeching HALT and providing frequent advisories in Blocks of Red Text whenever it locates Old Stuff that it finds “incompatible”. Just Go With It.

Hopefully… You’ve parked all of your important “Stuff” in Duplicate upon another Drive as the means to protect your sanity, should this installation decide to “Go Sideways”.

For example… it decided to arbitrarily do away with ALL of my PICO-Scope Linux Mint Version 6 and Version 7 Installations, along with a few other Installs of ‘non-standard’ Debian Source Code and their links and locations as well.

Watch for the various Buttons You Will Need To Press in order to allow things to proceed. In time, the hypnotic cascade of on-screen activity will either Fascinate you enough to want to Keep An Eye on on the Terminal Screen after each of these things is allowed to continue… or it will Lull you into a hopelessly Deep Trance.

But, before any or all of this Fun can begin…

DO NOT SKIP THIS NEXT STEP!


Prior to performing this sisyphean task, make certain to visit the link below and Install & Run the "Timeshift" App to Back-Up your files from Linux Mint 20.3 at least ONCE prior to attempting this Latest Linux Mint Upgrade from an Open Terminal in Linux Mint 20.3


Then visit and follow the Command Line Installations Instructions (using Copy-Paste) after reading everything posted on this site from Top to Bottom:


Enjoy Using Linux 21 (Vanessa)… and Let’s Hope that She Does NOT prove to be a “Harsh Mistress”.


PS… Be advised that some of your favorite Old, Familiar Applications” may HAVE been Modified in strange, non-intuitive ways that "Vanessa" will make to seem a lot less convenient.

For example, when using the “GWENVIEW” Image Viewer...They’ve moved the “SAVE” and “SAVE AS” Entries off of the Main Menu Tab normally located in the Upper Left Hand Corner, over to the Upper Right Side of the Screen... all by themselves. Well…? WTF…Dudes!!!
 
Last edited:

mrrsm

Original poster
Lifetime VIP Donor
Supporting Donor
Member
Oct 22, 2015
7,730
Tampa Bay Area
It’s really Not as BAD as it used to be… But for anybody who even accidentally brushes up against using ANY Flavor of the Linux Operating Systems, We all know and understand that “Linux Peeps… ARE … “Geeky Peeps”. Oh Man... Ergo, They always seem to want to make EVERYTHING more Technical and Difficult than “Things” need to be whenever We are in any “Terminal” and trying to use the “KISS” Principle with our Command Line activities.

Take for example … Just the simple process of Adding in a Second (Blu-Ray Drive) and then wanting to run a Quick Installation and “Set-Up & Check-Up”. Well… NOPE! Noggana-Do-THAT-Brah! But… As sure as There are Carts to Horses… There are always Even 'GEEKIER Peeps' around with the Chops to put together a Neat LIL’ Utilities Package to make our Linux Lives ...Just A Little Bit E-Z-R:

Now... Open a Terminal and ‘Copy – Paste’ in JUST THIS Hi-Lighted string:


...THEN ... (Press the Enter Key) <E>

sudo apt install libcdio-utils <E>

...THEN.. Use Your Super-Secret Root PWD <E>


Then, right after a Brief Delay for this Installation… ‘Copy – Paste’ in THIS Hi-Lighted Expression:

cd-drive <E>

...and then... Sit Back... And Watch the Cascade of the “Good Stuff” Populate the Screen.


Read MORE about this Helpful Topic HERE:

https://www.cyberciti.biz/faq/linux-find-out-the-name-of-dvd-cd-rom-writer-blu-ray-device/

Sweet? Oh Yeah, Baby... No Sweat!
 

mrrsm

Original poster
Lifetime VIP Donor
Supporting Donor
Member
Oct 22, 2015
7,730
Tampa Bay Area
Programming Arduino Hardware and Devices ordinarily requires using the Arduino-IDE software installed using a Windows Version of this application. However, for Linux Mint 21 Users... Here is another method for installing the Arduino-IDE App:


mrrsm

Original poster
Lifetime VIP Donor
Supporting Donor
Member
Oct 22, 2015
7,730
Tampa Bay Area
Even if you perform the necessary task of allowing the Linux Back Up Software called “TIMESHIFT” to run on a regular enough basis to collect a half-dozen “Snap Shots” of your Hard Drive… Things can STILL go sideways enough with the Drive itself to make it physically impossible to perform repairs upon it and fully recover the Operating System, the APPS on board and of course...the Precious Data left on 'The Platters'.

About two weeks ago, THIS Nightmare visited me at a time when my DVD Reader-Writer Burner was inoperable. That lead to me investigating the use of a Boot-able USB and running down a handful of different Recovery Programs that I discovered ...with some unfortunate time wasting uses that failed to work.

Now even though I was already familiar with CloneZilla as being THE Premier Program for Disk Duplication, Cloning and Image Creation… I thought because of my having some serious “Tech-Savvy Chops” that I would tinker around with ALL of ‘them others’ and see what worked best. That ridiculous idea lead eventually to my creation of a USB Based Boot-able ISO of CloneZilla… and the results that followed on during this “Recovery and Discovery” effort were nothing less than spectacular.

THIS is a Great “How To” for using CloneZilla worth Downloading, Saving and Reading Cover to Cover:

https://www.systranbox.com/getting-...ep-guide-to-cloning-and-backing-up-your-data/

The MOST important observations are worth mentioning and raising the awareness about on certain actions that CloneZilla engages in that are almost Magical IF you are wise enough to purchase a replacement Hard Drive of the SAME STORAGE SIZE… but not necessarily having an Identical Make and Model Hard Drive ...even though THAT is probably the best way to approach setting things up.

THESE are the Instructions on How to Prepare a Bootable USB for CloneZilla ISO “As EZ as PIE” on Linux Mint...or for Windows if needs be...or ANY other ISO you choose:


And for Ubuntu Users:

https://www.howtogeek.com/414574/how-to-burn-an-iso-file-to-a-usb-drive-in-linux/

THIS is THE Most Important Thing Worth Mentioning…

If your Hard Drive eventually suffers from ANY Physical Damage, avoid using it at all by Reading and Writing to it. CloneZilla has a Suite of “On-The-Fly Read, Repair and Recover the Sectors” Features that are simply amazing.

So as in my case, you would be able to Clone everything from a seemingly Damaged Drive using CloneZilla and then allow the System to Boot Up from One of the Emergency “TIMESHIFT” Snap Shots you previously created and have available under the “Advanced” Features on the GRUB Boot Menu from your New Hard Drive and this should be able to recover the Bulk of your Original System onto the New Hard Drive.

MAN… WHAT A RELIEF!!!

PS… If you are “Geeky Curious…” You can Watch each phase of this CloneZilla process pour out On Screen and learn much more about all of the hidden stuff working away to make this all possible. It IS Wildly Entertaining!


Some Helpful CloneZilla Videos:

 
Last edited:
  • Like
Reactions: christo829

mrrsm

Original poster
Lifetime VIP Donor
Supporting Donor
Member
Oct 22, 2015
7,730
Tampa Bay Area
Even if you are NOT using any flavor of the Amazing FREE Linux Operating System... if you are browsing the Internet on your Windows or MAC Desk-Tops and Laptop Computers WITHOUT having a decent VPN (Virtual Private Network) installed in this Day and Age of all the Hacking and Cracking...

Please... Consider Having Your Head Examined!

No...Seriously though... Right now, you can find FREE Full-Featured (up to a point) VPN Services on line without much of an expense OR difficulty with setting one up on your system.

I patronize several different, Inexpensive "PAY" versions of VPN Systems for the sake of being able to make various comparisons between the one I use on my Android Cell Phones vs. the one I use on all of my Linux Mint and Debian Servers and Laptops.

For the "Dyed In The Wool" Linux Mint Lovers... Check out THIS Video for all the reasons to consider doing this ASAP if you are presently surfing and are unfortunately completely naked and unprotected on-line. Enjoy the Step-By-Step Instructions that provide all of the "Neath The Skin" details of these procedures:

 
Last edited:
  • Like
Reactions: christo829

mrrsm

Original poster
Lifetime VIP Donor
Supporting Donor
Member
Oct 22, 2015
7,730
Tampa Bay Area
If you want to get a "One Over The World" look at your what your Linux Operating System including All of your Internal Computer Component Systems and your Hardware Identification and Performance Specification should looks like in One GO... Just Open a Terminal and Copy Paste in THIS Simple Command String:

inxi -Fxz

After it prints out all of this information on screen... Copy EVERYTHING ...from Prompt to Prompt ... and then open up a Fresh Document in LibreOffice and Drop that Data into the Document. Save that Document with a Familiar Identifier such as "ALLLINUXSTUFF" so you that can observe and refer to it from time to time.

And... You're DONE! :>)
 
Last edited:
  • Like
Reactions: christo829

mrrsm

Original poster
Lifetime VIP Donor
Supporting Donor
Member
Oct 22, 2015
7,730
Tampa Bay Area
Even though for the most part... The Linux Kernel is fairly immune (except for ROOTKITS) to the greater volume of Virus Threats that ordinarily plague the Computers sporting ALL versions of the Windows Operating Systems and perhaps even the Apple MACs as well. In THIS day in age, what with the Russian KGB & GRU Hacker Operations persistently screwing around within the countries information systems and peoples around the Free World... it might be better to Download, Install and Maintain a decent Anti-Virus program.

For those of us using any variation and flavor of Linux... obtaining CLAMAV is the Very Idea in mind (and in particular...its latest version of a GUI interface versus the ordinary Command Line Interface) .... Visit THIS Link and READ EVERY OPTION from Top To Bottom and install the most appropriate features that will go a very long way to increase your sense of protection and security... as Ever... Completely FREE OF CHARGE:


PS.... Don't have a Paid VPN Service for ALL of your devices ...Yet? WHY NOT? The REALLY Good Services that include a KILLSWITCH feature is the way to go... Shop around and Choose WISELY. FWIW, I've been using PIA (Private Internet Access) for my systems and found a HUGE Bang for my Buck by doing so:


mrrsm

Original poster
Lifetime VIP Donor
Supporting Donor
Member
Oct 22, 2015
7,730
Tampa Bay Area
In the wake of any possible illegal activities happening in our communities that might involve Identity Theft, Hardware and Cell-Phone Hacking or YOU NAME IT! From a local High School Kid who stumbled across the KALI Linux Tool Kit and has decided to perform "UNETHICAL HACKING" ...to some genuinely terrifying threats coming from the Russian GRU and KGB International Spying Activities that have managed to make inroads into Europe and of late, *tinkering* within our own political spectrum.

**** Think I'm kidding? Who do you think has been running around all over the country and dramatically shooting up the various Power Station Electrical Grid Control Boxes, trying to take them down?

Spend some time with Liron Segev via THIS YouTube Channel and work your way through each of his tips. Download and SAVE his Videos for Future Use and be just a little more suspicious if you are experiencing any "Odd and Weird" Things with your Cell Phones, Messages, Emails and Streaming that make the hairs on the back of your neck...stand UP. You Do NOT have to be a KALI Linux Aficionado to find great benefit from what follows on below. Windows and MAC Users should look in these Videos, too:


****

 
Last edited:

mrrsm

Original poster
Lifetime VIP Donor
Supporting Donor
Member
Oct 22, 2015
7,730
Tampa Bay Area
If you have not as yet decided to Download and Burn the Latest version of Linux Mint 21.2 "Victoria" either on a DVD or on a USB Thumb Drive to run any time you like for experimentation and want just a brief overview of what this Operating System Looks with its Latest LTS (Long Term Support) bumping it up to 2027... View THIS Video and drop in on the Linux Mint Download Page...and Help Yourself to Something Brand New ...and FREE!


Another Review...of a "Nearly PERFECT Linux Operating System":


...and Last But Not Least:


The Official Linux Mint Site:

 
Last edited:
  • Like
Reactions: christo829

Ignatovd

Member
Nov 28, 2023
1
Brest
my inexpensive PICO Hardware STILL works with the High End PICO Automotive Suite. (Sweet) :>)
Hi, thanks to your post I have installed linux for the first time in my life. Are there now any options to run 2204A together with Picoauto 7?

I followed your instructions, but the libps2000 folder is completely missing in the installed version 7.1.18-1r17.
 
  • Love
Reactions: mrrsm

mrrsm

Original poster
Lifetime VIP Donor
Supporting Donor
Member
Oct 22, 2015
7,730
Tampa Bay Area
Welcome to GMT Nation to @Ignatovd over in Brest, France....

Give THIS Native Pico-Scope Software Instructional a look and see if anything comes to mind:


I would avoid using the PICO Automotive Version 7 and stick with the Version 6 Automotive Suite because even on Windows Machines... the Version 7 can either disable or disadvantage Users working with some of the features; just as it is with the Linux Operating System Platforms.

My suggestion would be to Experiment with the FREE Version 6 Automotive by practicing on a Vehicle in Good Running Condition... taking many "Known Good" Wave Form Samples and saving them in your "Mechanic's Wave Form Library" while you become more and more familiar with your Oscilloscope Hardware and ancillary equipment.

I am so very glad that this approach has worked for you. Please feel free to contribute more of your experiences over time. We are here to Help!
 

Attachments

  • 00-setup.md.pdf
    715.5 KB · Views: 3
Last edited:
  • Like
Reactions: Ignatovd

mrrsm

Original poster
Lifetime VIP Donor
Supporting Donor
Member
Oct 22, 2015
7,730
Tampa Bay Area
Forgot to make mention that we have a Dedicated Oscilloscope Thread available for Users of Windows and Linux Laptop Based Autel, PICO-Scope and Hantek Units as well as for Stand-Alone Systems like Hantek Hand-Helds and MICSIG Units too ...over HERE:

 
Last edited:
  • Love
Reactions: Ignatovd

mrrsm

Original poster
Lifetime VIP Donor
Supporting Donor
Member
Oct 22, 2015
7,730
Tampa Bay Area
This Video shows SIX LLM (Large Language Models) AI Shoot Out:


LLama-GPT: Self-Hosted Off Line and Private:


Last edited:

mrrsm

Original poster
Lifetime VIP Donor
Supporting Donor
Member
Oct 22, 2015
7,730
Tampa Bay Area
If you have been perspicacious and already Downloaded and Installed your Own Off-Line, Private LLM Program and want to install an easy to use LLM based Open Source Programming Language Interpreter… Visit This Link, follow the instructions and use PIP to set things up:

https://github.com/KillianLucas/open-interpreter

This Tutorial will take your through what becomes possible with using this Open Source (Non-OpenAI Non-Token Driven) Programming Language Interpreter:


mrrsm

Original poster
Lifetime VIP Donor
Supporting Donor
Member
Oct 22, 2015
7,730
Tampa Bay Area
If you've recently observed a message for your Synaptic Graphical APT Application that there is an option lately made available to Upgrade from Linux Mint Version 21.2 "Victoria" over to Linux Mint Version 21.3 "Virginia", I am making a few observations worth noting.

If you are unfamiliar with these "Upgrade" vs. "Update" procedures and you are having any qualms about doing this... One of the changes I observed after making this transition (quite seamlessly, actually) was that once the Linux Mint Version 21.3 "Virginia" Upgrade was concluded and I Re-Booted my Dell Precision M6800 Work Station Laptop... As soon as the GRUB Menu appeared (GRand Unified Boot Menu) after the Boot-Up and POST events had completed, there was an Option on the Menu to Select and Use the OLD Linux Mint Version 21.2 "Victoria" OS.

So, if it turns out that your Machine Misbehaves or will NOT properly run the latest Software Upgrade for any reasons, choose THIS Option before the Machine Auto-Boots into the Latest OS. I cannot recall ever seeing this Particularly Handy Option on the GRUB Menu being available during prior Upgrades, and it is a much nicer feature than having to rely upon using the Old Tried and True, Time Tested "Timeshift" Snapshot Feature to return the Laptop to any prior working versions of the Linux Mint Operating System. Good Luck with your pending OS Upgrade!


PS

Obviously, if you've been using the "Timeshift" App for your Back Up Procedures, then if you are satisfied with the way the Latest OS is working... Visit the "Time-Shift" App and perform creating a Snapshot of this Latest Upgrade... ASAP and KEEP a few Copies of the Prior Snapshots for the Linux Mint Version 21.2 "Victoria" as well...Just In Case... for the Time Being.
 
Last edited:

Forum Statistics

Threads
23,330
Posts
637,974
Members
18,530
Latest member
jvest

Members Online