the exhaust manifold crowd... :-(

budwich

Original poster
Member
Jun 16, 2013
2,046
kanata
so, my "replaced under extended warranty" exhaust manifold cracked again... basically about 4 years after the replacement. Of course, it is unlikely that GM or the dealer will do much for me. Not sure that I am willing to spend coin on them as opposed to maybe a third party shop. I suspect if the dealer does it, I am looking at more than $1k. :-(

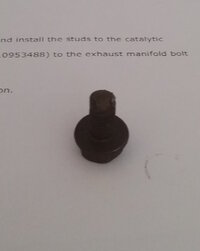
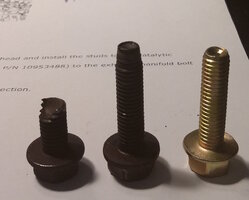
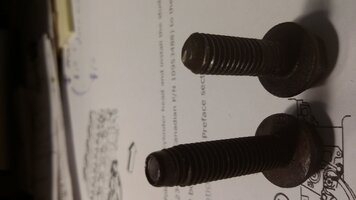
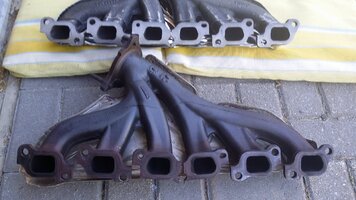
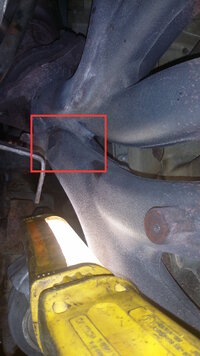
some questions for those in the "crowd", is there a better built unit or are they all part of the basic "design failure" of either the manifold itself or how it was used / fitted on this engine? Not sure if I can do the job myself... I have the heat shield off and can see the crack in the lower portion of the front "Y" just before the exhaust to cat / muffler connection. My big concern is the breaking of bolt and issues thereafter... ie. once you head down a "hole", you have to get to the end one way or t'other.... maybe if I don't talk about it, it won't happen... :smile:

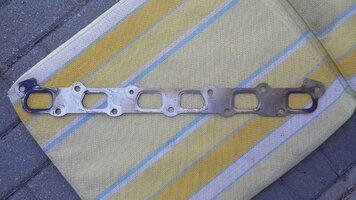
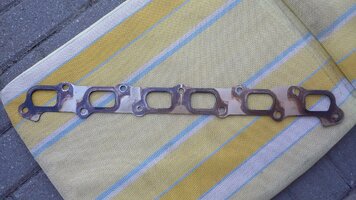
Second, with only two years, do I need to replace the exhaust gasket itself or is it a possible re-use.
Lastly, any gotchas that might make my decision one way or the other.

Thanks for any comments and guidance.

PS. dealer just "quoted" a $700 plus figure depending on what / how it comes off (ie. bolts and such)... it only took them 2 days the first time. :-(
 

Attachments

  • exhaust.jpg
    exhaust.jpg
    369.5 KB · Views: 53
Last edited:

Sparky

Member
Dec 4, 2011
12,927
Was it the new design or still the old design manifold? The new design had more material there, though that may not be enough to actually solve the issue.
 

budwich

Original poster
Member
Jun 16, 2013
2,046
kanata
how would I know? it was done in 2014. Another question.... rockauto has the "suggestion" to replace motor mounts.... my question would be as most indicate that it is more of "design fail" as opposed to things like motor mounts or is that the actual "root cause" and GM only wanted to replace a minimum number of parts... they never even replaced the original heat shield. :-(

it would appear that my "only choice" is a doorman at rockauto. I haven't gone back to see what a gm part is but I would expect double at least especially in canada, you say. :smile:

I see from the "rockford files"... that the kit comes complete except for manifold to engine bolts... so that answers the question about "reuse of gaskets".
 
Last edited:

Mooseman

Moderator
Dec 4, 2011
25,341
Ottawa, ON
Headers!

Yours is an '08? It should be the newer design which was supposed to fix that. Guess not.

My '02 suffered from that. Got an aftermarket white box one that advertised added material to resolve the cracking issues. Lasted the whole 6 years I had it. It was from eBay at the time so I don't know what brand it was.
 

budwich

Original poster
Member
Jun 16, 2013
2,046
kanata
Yah... :-( thanks.... I will what I can scope on the various sites to see what's what.
 

Sparky

Member
Dec 4, 2011
12,927
I don't know how good it really is, but it looks pretty.

https://www.ebay.com/itm/OBX-1-5-8-...ash=item48aa4a8338:g:jZ4AAOSwxwRatrd9&vxp=mtr


Otherwise, the more cost effective part is the Dorman manifold. I don't like Dorman electronics, but I have not had any real issues with their hard stuff. If I was dealing with a bad manifold I'd likely go this route. Actually, I did, except I had a shop do it as they gave a parts + labor warranty so if something went wrong I wouldn't have to screw with it myself, and mine being original I knew would have seized bolts (and it did, they had to extract 7 of them from the side of the head).

https://www.amazon.com/dp/B0087Q61MA/?tag=gmtnation-20

And the bolts are separate, of course.
https://www.amazon.com/dp/B0089T068U/?tag=gmtnation-20
 
  • Like
Reactions: xavierny25

budwich

Original poster
Member
Jun 16, 2013
2,046
kanata
I am hoping that perhaps the dealer "guy" put on some anti-seize but I doubt it. Maybe 4 years isn't so bad in terms of "stuckness". I will at least get the dorman "kit" and go from there.... bowing to the east and west before doing anything. :smile: "Full headers" aren't going to cut it at this point... in general, I am a pretty stock guy.

There is a local garage a block away that does stuff for the neighborhood which some have given good "reviews" for so perhaps that's the backup plan is things go south.
 
Last edited:
  • Like
Reactions: xavierny25

budwich

Original poster
Member
Jun 16, 2013
2,046
kanata
starting the exhaust manifold replacement today. Fingers crossed that no bolts break (along with prayers and anything else). I see that SM indicates threadlock where as I was thinking antiseize... :smile: what strength thread lock should be used?

one other question.... what is holding the oil dip stick into the oil pan... just a rubber push fit or is there some screw / clamp holder. Same question with the transmission dip stick. I need to move these and am afraid of moving them too far over and breaking something down there.
 
Last edited:

Sparky

Member
Dec 4, 2011
12,927
It is just pushed in there with an O ring, and a single bolt on a bracket holds the dipstick in place about halfway up. Try to clean the crud around where the dipstick goes into the block/pan as it tends to collect a lot of junk. I had to replace my dipstick due to rust and it was jammed in there pretty good after all those years. It took some yanking to get it free.

Transmission dipstick is similar I think but not positive.
 

littleblazer

Member
Jul 6, 2014
9,265
starting the exhaust manifold replacement today. Fingers crossed that no bolts break (along with prayers and anything else). I see that SM indicates threadlock where as I was thinking antiseize... :smile: what strength thread lock should be used?

one other question.... what is holding the oil dip stick into the oil pan... just a rubber push fit or is there some screw / clamp holder. Same question with the transmission dip stick. I need to move these and am afraid of moving them too far over and breaking something down there.
Trans should be a rubber bushing. Not sure on the oil dipstick.
 

budwich

Original poster
Member
Jun 16, 2013
2,046
kanata
OK, thanks... so it should have some "flexibility" to move a bit over / out of the way without breaking the tube off.
 

budwich

Original poster
Member
Jun 16, 2013
2,046
kanata
can't get the third bolt off the cat to manifold yoke connection... the one inside closest to the engine. I ain't the strongest guy and because there isn't a "direct path" to the nut (cat in the way), can't use an impact as it cause the universal socket joint to bounce off. :-( will soak it some more with crc freeze off. Might see if I can get a torch in to apply some heat... hopefully without starting the whole thing on fire... :smile:
 

Mooseman

Moderator
Dec 4, 2011
25,341
Ottawa, ON
Since you're replacing it, if you can find a way to break the stud would work. IIRC, I would use a 6 point socket with a wobble extension on that one.
 

mrrsm

Lifetime VIP Donor
Supporting Donor
Member
Oct 22, 2015
7,727
Tampa Bay Area
@budwich... rather than struggle trying to gain access to the hard to reach third flange bolt... why not just begin to spray down the Exhaust Manifold attachment bolts at the Engine Head and unbolt them all first,,, instead? You are going to have to take them out eventually and if you have the EM completely unbolted from the head... it will allow you to swing the entire apparatus towards the Passenger Wheel Well and then you will have much easier access and room to that last, recalcitrant Tri-Bolt.

As for the "Design Flaw" you mentioned... I could not agree more. Look at @Sparky 's image of the Headers you might consider that in lieu of the Cast Iron Exhaust and you can get an idea from that image of the Mechanical Advantage of leverage applied to the Exhaust Manifold as to why these Cast Iron Exhaust Manifolds are Doomed. Take note that the OBX Headers having the Long Flange SPLIT evenly between the (6) Six Cylinders in Banks of Three ....to avoid what has happened to the very restrictive and solid long flange of the OEM Cast Iron Manifold. Note also that if you decide to use the Dorman EM for this repair... You will need to acquire the 35 MM Length Bolts vs the OEM Stock 30 MM length as the Dorman Bolt Up Flanges/Holes are that much THICKER.

Here are all of the physics involved in this Flawed Design:

(1) Cast Iron is ridiculously strong... but extremely brittle and not inclined to flex very much ...even when extremely hot.

(2) Cast Iron is Prone to Rust at all times... and the constant Flexing of the exhaust system while the engine rotates slightly on Motor Mounts and bouncing up and down causes Huge Flakes of Rust to break loose.

(3) With each newly exposed areas subjected to the Flex/Rust/Flake Heating and Cooling Cycle ...the Cast Iron Metal looses mass and strength.

(4) The CAT Forward pipe length, coupled with the long "LEVERAGE" it has ... induces Cracking at the Points where the Pipes Converge and Bend.

(5) At some point... The Weakened, Over-Flexed Cast Iron finally...Cracks and Fails.

(6) These are the very same dynamics that also cause the Head Bolts to become Weakened... and Snapped Off. Be ready to find some in your case.

(7) The same Large Rust Flaking happens INSIDE of the EM as well and can block access to the inlet of the CAT just below the Tri-Bolt Exhaust Manifold Flange.

The suggestion to get Headers is a Brilliant...albeit Pricey Solution!

EXHAUSTLEVERAGE.jpg

REASONS4CRACKEDEXHAUST1.jpgREASONS4CRACKEDEXHAUST2.jpgREASONS4CRACKEDEXHAUST3.jpg

OBXGM42LHEADERS.jpg

OBXGM42LHEADERS1.jpg
 
Last edited:
  • Like
Reactions: Kurb

budwich

Original poster
Member
Jun 16, 2013
2,046
kanata
thanks for follow up... but my bank account (and probably wife) won't allow the "upgrade"... :smile:

anyways, wobbles didn't work as I probably strip the "best portion" of the nut with my previous attempts..... finally gave in and got out the 3 in air cutoff and cut the thing off.... not fun but neither was the struggle with the various "wrenching efforts".

I am done for today as lying on one's back (along with up and down crawling under) and trying to force your arms into various contortions has done me in... that and hockey game coming on the tv. :smile:

One last question about the manifold bolts... which spec at 15ftlb of torque (three times)... can I use a small impact (75ftlb or less) or will they snap off. I know I can't get them all that way (wrenching again... :-( ) but was hoping some comment on how to successfully get the 11 bolts off. I see also they are thread locked which probably won't help things... :-(
 
Last edited:

Capote

Supporting Donor
Member
Jul 14, 2014
24,227
Atlanta, GA
thanks for follow up... but my bank account (and probably wife) won't allow the "upgrade"... :smile:

anyways, wobbles didn't work as I probably strip the "best portion" of the nut with my previous attempts..... finally gave in and got out the 3 in air cutoff and cut the thing off.... not fun but neither was the struggle with the various "wrenching efforts".

I am done for today as lying on one's back (along with up and down crawling under) and trying to force your arms into various contortions has done me in... that and hockey game coming on the tv. :smile:

One last question about the manifold bolts... which spec at 20ftlb of torque (three times)... can I use a small impact (75ftlb or less) or will they snap off. I know I can't get them all that way (wrenching again... :-( ) but was hoping some comment on how to successfully get the 11 bolts off. I see also they are thread locked which probably won't help things... :-(
When I did my swap recently, I removed the exhaust manifold bolts from the other motor manually with a ratchet, those bolts can get pretty corroded and weak over-time. All of them came out with no issues. Best to avoid using an impact.
 

Capote

Supporting Donor
Member
Jul 14, 2014
24,227
Atlanta, GA
thanks... will do. go vegas! (said the oiler fan... :-( )
I had the '08/'09 redesigned manifold on my original motor, upgraded it when the old style one cracked. I wrapped it in header wrap and for the 2 or so years I had it on there, it didn't crack. I put the Kooks Headers on this motor with some DEI brand header wrap, their products are stout. I got these headers dirt cheap because a friend didn't need them after we did his 5.3 swap. OBX makes a copy of the Kooks Headers, which is cheaper. Every once in a while they go on sale, so keep checking from time-to-time in the future if you're ever looking to upgrade from the OEM ones.
 

mrrsm

Lifetime VIP Donor
Supporting Donor
Member
Oct 22, 2015
7,727
Tampa Bay Area
FWIW... This link to my Photobucket covers all the dope on the Alternative Exhaust Manifold Bolts ...with the images of the Miked Out Measurements comparing the GM OEM Flange vs the Dorman flavor. The reasons for using these Bolts are as follows:

(1) Unlike the later version (longer) Dorman Bolts... The Alternative flavor do NOT have full threads hot rolled into the bolt shank that invite early rusting due to more surface area being exposed to the air/water within the thread lines. The FTL (Full Thread Lines) actually weakens the upper Bolt Shanks and invites cracking along those lines.
(2) These Alternative Bolts have thicker partial upper shanks and Larger Head Bolt Washer mating surface to distribute the load on the EM.
(3) These Alternative Bolts are High Quality Grade 8 Bolts (10.9) and will be stronger than either the GM OEM Stock Bolts or the Dorman flavor.

http://s557.photobucket.com/user/60...RENGINEREPAIR/GMATLASENGINESWAP?sort=3&page=1
 
Last edited:

budwich

Original poster
Member
Jun 16, 2013
2,046
kanata
:-( Rockauto only had the doorman's. I can certainly see what you are saying about the threading. I will see what I can find at the local fastner shop. I am hoping that I can get the old ones off without incident. Thanks for the info.
 
  • Like
Reactions: mrrsm

budwich

Original poster
Member
Jun 16, 2013
2,046
kanata
well it looks like it is going to be a long day.... :-((

The bolt closest to the power steering / front of the engine broke....very disappointing.... looks like it broke at about the boundary of the head to manifold.... :-( suggestion on removal?

I haven't loosen the back two closest to the fire wall, the rest I think are loose in some form.
 

Attachments

  • broken bolt.jpg
    broken bolt.jpg
    298.2 KB · Views: 5

budwich

Original poster
Member
Jun 16, 2013
2,046
kanata
any hints on getting the bolt closest to the firewall off. The isn't alot of room in any direction to swing / get access. Through the wheel causes to great an angle (again :-( ).

got it loose with a jointed socket wrench handle that flexes at the head. Now what to do with the one broken bolt... :-(
 

Sparky

Member
Dec 4, 2011
12,927
Only thing I can think of is something like an ez out. Once you have the manfold removed you can see if you have any stub sticking out at all, or if it broke off below the surface of the head.
 

budwich

Original poster
Member
Jun 16, 2013
2,046
kanata
phoned around to a couple of parts places... they only carry dorman bolts. Attached is comparison of the broken, good and new. The top of the good existing bolt (middle)... about the first 1/2 in of thread (point end) appears to be in the "fire path" of the exhaust as the thread is "worn" and not clean as it would be if it was embedded in a threaded receiver part. Related to this... if by chance I can drill... if I drill too far (how far is too far?) and cause what is left of the bolt to fall into the head... is this a problem?

Have to figure out what to do with the broken bolt still. I got an irwin extraction set on order from amazon. Not sure if I am capable of getting the bolt out. Might have to get it to a auto shop (towed) and see what they can do. :-(
 

Attachments

  • bolt comparison.jpg
    bolt comparison.jpg
    426.3 KB · Views: 6
Last edited:

budwich

Original poster
Member
Jun 16, 2013
2,046
kanata
OK... here's one for you. I still haven't gotten all the bolts off yet as I am "gun shy" and am doing a "little ratching, a little crc freeze". Anyways, I got the bolt closest to the firewall out... It actually came out fairly easy BUT... I think it was "modified"... by the GM dealership "work" during the warranty replacement. This kind of ties into my question about the removal of the broken bolt at the front of the exhaust.

It appears that perhaps GM broke a few bolts during their work (I know they said they had problems). Anyways, if you look at the picture, it appears the "shorter" bolt on the right / top has been "modified short"... grounded / rounded. Not sure why yet... did they not get all of the old bolt out and only thread a new one in as far as they could? It is a possible solution for me on the other bolt.... drill out as much as possible, thread out as much left over as possible and then put in a "shortened bolt".
 

Attachments

  • shortened bolt.jpg
    shortened bolt.jpg
    164.4 KB · Views: 9

budwich

Original poster
Member
Jun 16, 2013
2,046
kanata
got the manifold off. the fractures look rather "thin" not sure how long it would have gone before totally failing but it is what it is. Attached is pictures of the gasket faces. It appears that perhaps the two problem area bolts might have been responsible for some exhaust leakage as there is black areas on the "head side" of the gasket at the ends while the middle is basically clean.
 

Attachments

  • head side gasket face.jpg
    head side gasket face.jpg
    899.2 KB · Views: 19
  • exhaust side gasket face.jpg
    exhaust side gasket face.jpg
    927.4 KB · Views: 19

Sparky

Member
Dec 4, 2011
12,927
Yep that was a leak point there.
 

budwich

Original poster
Member
Jun 16, 2013
2,046
kanata
can't really see down into the bolt hole near the firewall but used a "drill bit measuring stick" and it appears the hole is the same depth as others. Threading the new bolt into that hole, it stops / meets resistance with the bolt head still about 1/2 in outstanding which is a bit too much. doing the same on a "good hole", new bolts almost threads completely down... maybe 1/8 in left. I might have to add a washer to the firewall bolt to ensure I can get proper tightness when the time comes. further, it answers my question maybe that the holes aren't open ended but do have an "endpoint". That likely means I have to pretty much get the broken bolt out as opposed to hoping to drill the "contact portion" and the far end would fall into some cavity in the head.
 

Sparky

Member
Dec 4, 2011
12,927
Yes, they're going to be blind holes.
 

budwich

Original poster
Member
Jun 16, 2013
2,046
kanata
well now I am confused..... some one shrunk my manifold!!! :-(

since I am still scratching my head on the bolt removal, I thought I would "check" a few things. One of the weird things I noticed when I was taking pictures of the old gasket, it didn't appear to align with holes of the manifold... WHAT..xxx yyyy! I thought maybe I flipped it or something. Can't really get that wrong since the rust / exposed side can only go outward from the head. So I went to look at the new gasket.... hmmm it lines up perfectly with old gasket. I have now scratched most of my hair off my head... cause, then check the alignment with the new manifold, it is basically totally aligned with the bolt holes of either gasket. Some how, the old manifold, by time you align the hold at one side and go across to the other, the holes are half blocked / out of align. How can this be? Surely the casting hasn't shrunk from heating / cooling cycles.

I am concerned now that the new manifold won't align with the head holes... all I need is to have to force the thing into place... can you say "cccrraaaccckkkk".

I measured the "end to end" dimension... old one (that doesn't align with the gasket) is 22.5 inches while the new one (that aligns with either gasket is 23 inches... where the heck to I put 1/2 inch of cast. The "ear" spacing at the each end are the same so the "extra" isn't "waste castings" on the end. Not sure what to do at this point.
 

Sparky

Member
Dec 4, 2011
12,927
Does the gasket line up with the head holes? If so, then the new manifold will line up, as it lines up with the gasket.

Makes me wonder if the old manifold distorted from heating/cooling cycles, which caused it to crack in the first place from then being "stretched."
 

budwich

Original poster
Member
Jun 16, 2013
2,046
kanata
good idea... set a couple of bolts thru and they are fine. So the funnies are still funny... :smile: Attached is a picture of the two manifolds. Notice how the "center cut" for splitting the manifold "in half" is contorted on the old manifold. Surely that is not a "manufacturing adjustment". It would certainly appear to be largly "twisted" by about 1/4 in.... that might not be very much but not sure cast can take that amount of movement.... yes the whole unit could move in the mounting holes (actually not true as there in one hole bottom mid center that is "fixed" so to speak in that its just a bit bigger than the bolt diameter where is all the other holes have large over sizing... so I guess that one "anchor hole" is set and the rest allow for some degree of expansion for heating and such.... maybe.

interestingly or not, the anchor hole is on the opposite "leg /side" from the fracture / crack.... its with "back section" (three rear cylinder closest to the exhaust / cat) while crack is with the front section. It appear that the "anchor" acts "fulcrum" with exhaust system causing the unit to twist in the middle, just above the anchor point which looks like it eventually stretches the top middle bolt "hole / split" putting pressure on the front arm of the manifold.
 

Attachments

  • manifolds.jpg
    manifolds.jpg
    378.8 KB · Views: 30
Last edited:

mrrsm

Lifetime VIP Donor
Supporting Donor
Member
Oct 22, 2015
7,727
Tampa Bay Area
@budwich... Brother... There is nothing that says that you cannot drill out the Cast Iron Manifold Bolt Holes to accommodate any variations as the primary through-ports for each Exhaust Hole are well inside the S/S MLS Gasket and can make things a lot easier for you... You just have to take your time and if needs be... take a long rectangular piece of Cardboard and while holding it evenly against the length of the exhaust ports on the Aluminum Head... press it inwards real hard and you can create a template “etching” to go over with a Magic Marker and then just lay the New Exhaust Manifold up against it ...shine a Flashlight down into each Bolt Hole and you’ll be able to see which holes require some careful enlargement.

If you don’t get too enthusiastic with your drill outs.. you should be able to get a perfectly modified interface between the New Exhaust Manifold and the Engine Head. By the way... if you search for the box end part number in those after market Bolts... there is an on-line company that sells those with fast S&H ... Forgive me for not remembering the name of the company. The attached images show the complete specs on the M8 X 1.25MM Replacement Bolts needed for the "fatter" EM Bolt Hole Flanges.

The biggest problem you will have is finding some way to keep your Drill Bit from 'wandering' off of the Dead Center of the Hardened Steel broken off stud down inside of the softer Threaded Aluminum 25MM Deep Blind Bolt Hole(s). I'd very much suggest in getting the Full Cobalt Drill Bit Set... and find a Mild Steel Smooth Shank Bolt approx 8MM in diameter that you can drill straight down through the center ...right through the top of the Bolt Head and into the shaft.... and then just cut it off to suit the length needed as a Drill Guide to coax the same size Cobalt Drill Bit down inside and make contact with the surface of the Broken Bolt piece... then slowly drill down straight into it to accommodate an appropriately sized EZ Out... then use counter-clockwise twisting with a proper Bit Holding Tool and they should all yield to this extraction effort... one after the other. Use a Telescoping Magnet to collect all of the Drill Sprue and Shavings as you work. This is Very Important: Drill a little... Remove the Bolt Drill Guide... Clean out the shavings with the Magnet... Wash, Rinse ...Repeat... or else you will wind up wiping out the Aluminum Head Thread lines as the Sprue pushes up and out, trying to get by the Guide!

But... If you have at LEAST 1/4" of the Broken Bolt sticking out of the Head ... Tap it very lightly on the end with a Hammer and then use TWO Pair of Small Vice Grips; One to grab the Bolt Piece 'by the nose' and the other to clamp onto that first pair of VG at a right angle to act as a lever. Sometimes... with enough room to move and work... Channel locks can stand in for the second pair of Vice Grips and provide even more counter clockwise leverage. Apply a slow...steady CC force until the bolt begins to yield ...and once it does so easily then finish the extraction with very small CC turns using the Channel Locks.

DeWALT Cobalt Drill Bit Set:

https://www.amazon.com/dp/B015J5HU4Y/?tag=gmtnation-20

Ratcheting Tap Holding Tool:

https://www.amazon.com/dp/B06XJFMD7X/?tag=gmtnation-20

M8X125X35D.jpg

M8X125X35DX.jpg
 
Last edited:

budwich

Original poster
Member
Jun 16, 2013
2,046
kanata
no problem. It would appears that the "original gm replacement" is actually a "tight fit" in terms of the bolt pattern while the gaskets and the new manifold (dorman) appear to be almost totally aligned and hopefully bolt on well / easy.

I haven't tackled the broken bolt yet... was hoping some "good fairy mechanic" would take out over night... guess I didn't leave enough money under the engine... :smile:

I have to remove the power steering pump to get at the bolt and even then it might be tough.

Good news, while I procrastinate, I replaced the parking brake shoes as they gave me big trouble during my recent camping outing. Chalk one up for me.... me 1, truck 1. :smile:
 
  • Like
Reactions: Blckshdw and mrrsm

mrrsm

Lifetime VIP Donor
Supporting Donor
Member
Oct 22, 2015
7,727
Tampa Bay Area
Bump Post # 34 -^-....for Edit Updates on Bolt Extraction Techniques....-^-
 

budwich

Original poster
Member
Jun 16, 2013
2,046
kanata
thanks again for the info... I like the "guide idea". I will likely give that a try as I know what you are saying about the "wandering drill bit". I ordered the irwin set which seemed to have a reasonable rating as people seemed to think is was close to the snap on and others.

My luck on the broken bolt isn't good as it appears to have broken off just below the "headline"... it might make it difficult to thread in the "guide bolt".... will see once I get the power steering / bracket removed.

It is certainly going to put my drilling techniques to the test.

well we are here... have a question about the thread lock. How much is needed and where... the whole bolt or just near the "top"... ie a bit about 1/2 inch down from the bolt head which puts it at 1/8 in into the head or so? The reason for this, is I potentially expect to have to do this once more if the "history" of the part is any record... about 4 years ... I usually keep vehicles into their 15-18 years life depending on how well the body holds up to the canadian rust climate. Hence, it is possible that I may have to do it one more time (yuk!).... but it is what it is.
 

Mooseman

Moderator
Dec 4, 2011
25,341
Ottawa, ON
When I had a bunch of broken bolts when I replaced the manifold during my engine swap, I used my oxy torch to heat the broken bolts, which were either flush or just under the head surface and used a small screwdriver to start turning it back until enough came out to grab them with pliers. But this was with the engine out and plenty of room. Worked great that way.

I used 10.8 hardened hardware store bolts with washers since they weren't shouldered. In the 6 years they were in, none broke or came out and I didn't use thread locker. What's the point since heat releases it and there is plenty of it there.
 
  • Like
Reactions: mrrsm

mrrsm

Lifetime VIP Donor
Supporting Donor
Member
Oct 22, 2015
7,727
Tampa Bay Area
My opinion is that your observations on Weather and Rust might prompt you to avoid using the stuff in lieu of a regular re-tightening down to around 12 to 15 Ft Pounds and No More. Others believe it an absolute necessity as the Escaping Exhaust from loose EM Bolts makes the SUV occupants nauseous and sleepy from the toxic CO and unburned brew that it blows back into the vehicle(s)... and of course...to stop that Damned Ticking Sound!

You have three distinctly different kinds of metal (Aluminum, Hardened Steel and Cast Iron) trying to peacefully co-exist where all three Heat Up and Cool Down at different rates and thereby their popular prejudice is to loosen up over many hundreds of these cycles. You mentioned observing the warping of your OLD EM Flange.... this is caused by the same problem of having different parts of the EM either heating up or cooling down at very different rates ...and causing some portions to contract while other sections are expanding... thereby twisting those flanges in weird ways... leaving the lonely MLS Gasket to try and make peace with all three items.

As for choosing to use TL... I say that you should use it on the upper threads if you must.... just don't squirt it into the head bolt holes or you could hydro-lock the bolt(s) on there way inside to almost bottoming out. Please... No More than 15 Ft Lbs here... and tighten them all loosely... gradually drawing the whole flange down in an alternating pattern ... just a wee bit at a time. Re-Tighten them all at 50-100 Mile increments until they can behave themselves.

Oh...about the problem of the "Headline Break".... Take your SawzAll to the Old EM...and chop off two matching sections ...side by side... and simply bolt that piece along the flange line for say... two cylinders...without having to wrangle with the full sized EM and use THAT as your external Bolt Guide->Guide.
 
Last edited:

budwich

Original poster
Member
Jun 16, 2013
2,046
kanata
thanks again for the great guidance... especially with respect to the thread... which I kind of agree... since high temp is supposed to turn it back to liquid... what's the point... although maybe the normal engine operation isn't high enough to cause that problem. Perhaps just a bit near the top "head seat line" is enough. At this point, I am getting pretty good at taking the heat shield off ... so rechecking / isn't bad at some point as fighting a broken bolt due to "locking" and other stuff. As for the idea about the "guide"... I like but I think I will try just an aluminum plate (3/16 thinkness) that will bolt to two bolt and align with the hole in question. I will use the manifold or gasket as the "build guide" and should be able to get it close... I hope.

As for the gasket... I find it funny that the both gaskets aligns well with the head and the "third party" manifold but nowhere near the gm manifold... quality is job one... :smile:

I have the tightening pattern from the SM manual so will follow the "three repeat" sequence at 15 ftlbs.
 
  • Like
Reactions: mrrsm

Forum Statistics

Threads
23,327
Posts
637,949
Members
18,531
Latest member
jvest

Members Online