Support Group/Thread For Mod Addiction or MA

Blckshdw

Moderator
Nov 20, 2011
10,681
Tampa Bay Area, FL
You have D2s or h1s?

I went with D2S, since I had planned to go with OEM components down the road after my initial retro.

That's why I ordered them. I also grabbed a set of night breakers to go with it. I picked up the mori ballasts. Ended up being 330.

I'm down to my last pair of bulbs, and have heard good things about the Osram line of bulbs. Current bulbs are supposed to be 5500K, which is fine most of the time, but night driving in the rain on asphalt, is pretty crappy. Seems like the light disappears completely from the road. Think I want to try 4200K next, maybe down to 4000K :undecided:
 
  • Like
Reactions: littleblazer

littleblazer

Member
Jul 6, 2014
9,265
Those night breakers are 4300k. :2thumbsup: They are called the laser and are supposedly the brightest in their class. I had the 4300k moris in the TB and asphalt in the rain still sucked. But the lines lit up excellent. Anything beyond 5000k bothers my eyes. Too blue.
 
  • Like
Reactions: $ Khalid ! 9130

Sparky

Member
Dec 4, 2011
12,927
If I can find the time I'll finish my retro. I got 4500k bulbs this time round (had 5000k prior).
 

Blckshdw

Moderator
Nov 20, 2011
10,681
Tampa Bay Area, FL
My mod bug has been hungry. Putting LED bulbs in my tails was like an appetizer, and seeing @xavierny25's mod bug building that box, made mine jealous. So why not officially start one of my stupid long retrofit projects? :biggrin:

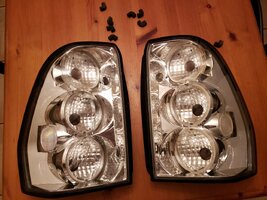
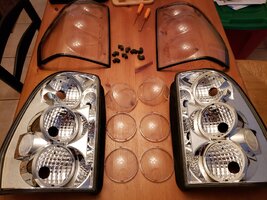
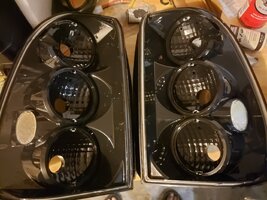
I bought these from a former member who built his own LED tails in this thread. All the rubber vent tubes are hard and split, so I'll have to figure out an alternative to replace those. Plus they were all full of dirt, a little got into the headlights when I flipped them over, so I'll need longer options too.

20191019_094917.jpg


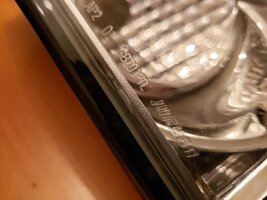
I got pretty lucky, could see some of the butyl rubber that squeezed out of the channel during assembly, so I was assured it wasn't plastic welded shut, or permaseled, which would have required cutting, and resealing with silicone.

20191019_095112.jpg


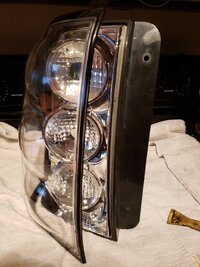
Preheated the oven to 220, and tossed them in for 15 minutes each. Just like with the headlights, start at a sharp corner, in this case, the bottom corner by the lift gate, wedge in a plastic panel tool, and pry. As soon as the corner starts to separate, get fingers in there to apply firm but gentle steady pressure, then the butyl will let go and start to release.

20191019_101805.jpg

Once I got them both opened up, had to pop out the inner clear lenses. I'm hoping the small lip that they sat in, will work perfectly for the round PCBs I have in mind. The bottom 2 reflector bowls are nice and deep, the top one is shallow which concerns me a bit. There won't be very much room in there with the socket from the circuit board, so I may end up removing the sockets and internal wiring completely, and use some smaller male/female pigtails soldered to the board's pins. :undecided:

But the next step, stripping all that chrome, and painting the interior flat black. :thumbsup:


20191019_105806.jpg
 

Blckshdw

Moderator
Nov 20, 2011
10,681
Tampa Bay Area, FL
After some Googling and Youtubing, I settled on a method to remove the chrome from the tail light assemblies. Saw a few videos where people used Super Clean Degreaser, with great ease and success. Previously, I had heard of people spraying oven cleaner, but that carries a lot more risks compared to submerging a part in a bath. Did some pre-testing to see what containers I had that would fit the housing, but not require a ton of product, and ended up going with a 17 quart plastic container out of my office that I was using for storage. Picked up a 2.5 gallon jug from walmart and went for it.

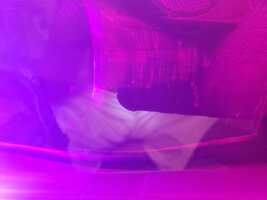
This pic was taken after 30 seconds, you can see the finish bubbling up, and streaking off...

20191022_193043.jpg


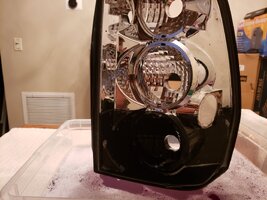
and after less than 2 minutes, everything is stripped clean from the submerged section. (this turned out to be a mistake on my part)

20191022_193157.jpg


I dunked the entire assembly, and let it sit while I went to get some gloves, pulled it out for another peek and a pic.

20191022_193425.jpg


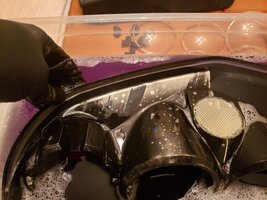
In addition to the spots where the inner lenses clipped in, where I didn't remove 100% of the clear silicone, the passenger side light has a thin line where I stood the light up the first time, and it wouldn't dissolve. :mad:

20191022_195304.jpg


I was hoping the inner finish might be dull enough that I could skip the matte black paint, but this might be too glossy for what I'm going for. :undecided: Either way, I'll have to do some polishing at minimum, since there are water spots from some cleaner I had used before to get some of the dust and dirt off the surfaces. Will have to go rooting through some bins and find my pack of sand paper. Getting into some of those crevices is going to SUCK! :ugh:
 

Mounce

Member
Mar 29, 2014
13,667
Tuscaloosa, AL
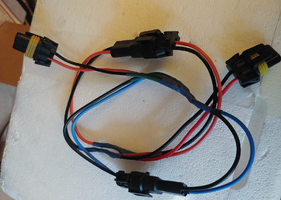
Soldered up some high beam splitters for the incoming mods, knew I was hanging on to these 9006 extensions for some reason. Ya'kno, the ones that come grommeted to hid bulbs.

Screenshot_20191029-170815(1).png


PS: that dremel butane soldering iron I picked up recently is a hoss. On the lowest setting it's way hotter and more effective than your standard cheap 40w electric option.
 

Blckshdw

Moderator
Nov 20, 2011
10,681
Tampa Bay Area, FL
I always come across a few of those when rooting through my spare headlight parts box. :biggrin:

What kinda projectors did you get? Inquiring minds (OK, probably just mine) wanna know :undecided:
 
  • Like
Reactions: xavierny25

Mounce

Member
Mar 29, 2014
13,667
Tuscaloosa, AL
MH1 7.0. Was very very close to getting some of the cheap ones of a latter design. I had real good service out of the 6.0's I put in the Mustang 4-5 years ago and they were even B-stock. They're actually still kicking, my brother has the car now and hasn't had any problems out of them other than the shields sticking here and there.

Decided to pay up for once, seeing how the 7.0's are the latest and greatest and have better output. Plus the Silverado lights are supposedly so shallow that they only clear by a couple millimeters. Thought about getting some mini d2s clones that reportedly out perform the 5.0s but didn't wanna switch over to the d2s platform. Plus I wasn't sure that they would fit. I'm not a particularly artistic person so I avoid all extra trimming and crafting that I can.
 
  • Like
Reactions: xavierny25

Blckshdw

Moderator
Nov 20, 2011
10,681
Tampa Bay Area, FL
I've been itching to do another retrofit too. While organizing my office, I came across my retrofit parts bin. Still have those LS430s as well as an old pair of the MD2S 2.0, same as I used in my first retro. But the RX350s I have now are still doing great, so started on the tails. Been putting that one off the longest.

Got one scuffed up, need to do the other one, and order some paint. Since it's such a small area, just going to rattle can it, instead of using the gun. Plus I'm gonna tint the lenses, so you won't be able to see the inner surface that well for it to really matter.
 

Sparky

Member
Dec 4, 2011
12,927
I've given up on my retro. Truck has 215k and the body is rotting. Why bother at this point. Save the parts for the next thing. I want to get a couple more years out of it (can't afford a replacement truck for a while) but I've dealt with halogens for 4 years ok. By the time I got the snags figured out I lost the place and time to work on it, and now that I have a place I still have no time.

Same with my custom fogs and DRL. Designed and laser cut the bezels and everything, but am I going to install them? Doubt it.

If I soon get an afternoon and evening to work on it without anything else needing my time then maybe these might still happen... unlikely.
 

Mounce

Member
Mar 29, 2014
13,667
Tuscaloosa, AL
That's the spirit, another reformed member brought back from the depths of addiction! This counseling is really helping. :ugh:

Got all my parts in today, need to get some cut off wheels for the dremel and muster up some patience and determination to make it all come together lol.
 

Mooseman

Moderator
Dec 4, 2011
25,332
Ottawa, ON
Well probably my MA will be coming back on full force soon. I just recently swapped the tails for the LEDs I used to have on the '02. They work fine after I modified the flasher module to not hyper flash. But the cruise doesn't work so I'm gonna have to put some resistors on the brake lights.

Then, as time and weather permits, I have a whole LT steering column, steering wheel and DIC gauge cluster waiting to go in. But I'm not gonna be happy to see the mileage of the junker I got the cluster from so I may be looking at getting a "tool" from China to reprogram it. I also want to remove the roof rack to make it easier to remove snow. And a minor mod, I'm upgrading the brakes to the SS.

The headlights are still in good condition and want to prevent hazing so I may try putting a protective film on them. Saw that done somewhere.
 

Blckshdw

Moderator
Nov 20, 2011
10,681
Tampa Bay Area, FL
:undecided: What's different about the steering column? Hadn't heard of that mod before
 

Mooseman

Moderator
Dec 4, 2011
25,332
Ottawa, ON
It's for the steering wheel switches instead of replacing the clockspring and wiring.
 

Sparky

Member
Dec 4, 2011
12,927
Well for what it is worth I have a whole house again to mod, so...
 

Blckshdw

Moderator
Nov 20, 2011
10,681
Tampa Bay Area, FL
Well for what it is worth I have a whole house again to mod, so...

Lol same. I need to replace the roof on one of my outbuildings this "winter" and go back into the attic to remove that electronic water softener (that didn't do what I needed it to do :frown:)
 

Mooseman

Moderator
Dec 4, 2011
25,332
Ottawa, ON
And by this time next year I will have a 20x24 garage to mod as well. Already planning LED lighting, A/C, heat, water, epoxied floor, a urinal (priorities!) and eventually, a lift.

Then, I'll be free to mod my vehicles all year long! :wooot:
 

HARDTRAILZ

Moderator
Nov 18, 2011
49,665
Was supposed to get TB on the lift and under the knife this weekend, but with how shit has gone I had to replan the goal as to cleaning/organizing dads building just to get to put truck on lift.
 
  • Sad
Reactions: Mooseman

Mounce

Member
Mar 29, 2014
13,667
Tuscaloosa, AL
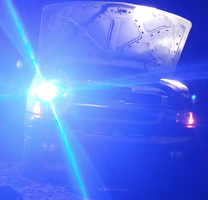
Well I got the retrofit kicked off. Baked them open and started trimming, thought I had it perfect, turns out I need to sink them about 1/4" further. Will hop back on it Saturday and hopefully have them installed by Sunday.
 

gpking

Member
Dec 27, 2013
534
Berkeley Springs, WV
My name is gpking, and I have the mod bug.

The TrailBlazer is really where I want it to be all things considered. 5 years and about $1,500 in just frivolous (albeit some functional, all 110% cool) mods, I really have no strong desire to tear into or add anything anymore. I enjoy everything about driving the TrailBlazer.
(Getting the seat heaters working still would be nice, but I'm not too worried about it).

Let me recap every mod I've sunk my money into since 2014, roughly in chronological order:
  • DIY fog lights / DRLs
  • LED bulbs
  • 4 hi mod
  • DRL killer mod
  • Complete audio upgrade
  • Turn signal mirrors
  • TXBlazer's LED mirror inserts
  • 2nd gen 3rd brake light
  • LimeSwap PCM tune
  • LiftMeister kit
  • LTZ power leather seats
  • Resonator delete
  • NorthFace lights and NorthFace cargo bin thing
  • Wheel spacers

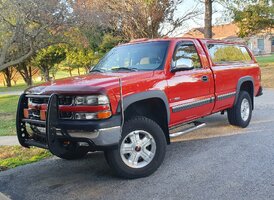
Just when I thought the bug was dead, enter this 2000 Silverado aka "The Rig" into my life.
20191101_172139-s.jpg
(Obviously a lot of mods already done lol)

After exactly 2 weeks of ownership, here's the mods I have planned, in order of likelihood:
  • (Switched) Auto Headlight killer
    (I HAAAAAATE the eBrake trick, the dome override trick was not added until 2000.5)
  • Add dome light functionality to the map lights
    (my overhead console lights are 2-wire and map only, I know 2nd gen Silverados' are map and dome, I want that).
  • Power, Temp, & Compass Rearview Mirror
    (truck is pre-wired for this, just need a mirror :2thumbsup:)
  • 4 hi mod
  • Airbag Switch to Glove Box Relocation
    (so I can add a blank plate and switches in the dash)
  • Double DIN head unit
  • 2nd Gen Steering Column (I'm not even sure on feasibility, but I imagine it could work with just some wiring changes, more research needed)
My poor bank account...
 

Mooseman

Moderator
Dec 4, 2011
25,332
Ottawa, ON
Welcome brother! We will help you feed that bug.... I mean.... help you with your addiction. You're among friends!
 
  • Like
Reactions: Blckshdw and Mounce

Blckshdw

Moderator
Nov 20, 2011
10,681
Tampa Bay Area, FL
Cracked open my Dorman tail light board to start game planning how I want to mod the sockets to work with the pigtails I've got. Think I have an idea that works, but I may have an issue with the connector pins, since I need multiple connections per pin, and don't want to have a bunch of solder joints. Spent a few hours on Mouser last night, and think I found some that can be modified to fit. They're just too long in the contact area, which can easily be addressed.

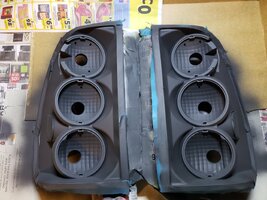
Got the tail lights scuffed, cleaned up, and taped off. Once again was taught the lesson that cheap materials mean you get what you pay for. I had a roll of Harbor Freight painters tape, and usually never had to use much at a time. It wanted to fight me coming off the roll, with the sides separating and starting to tear before I wanted it to, so had to monitor that :mad: And as you can see from the first pic, it would start to lift in spots, so had to keep pressing it back down.
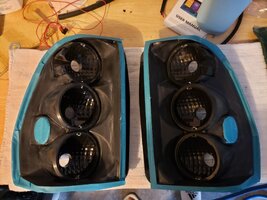
20191129_171918.jpg


Laid down 4 coats of flat black. After scuffing the first one, I started having second thoughts, and considered since I am planning to Niteshade them, leaving the inside gloss black probably would have been fine. But I'm really digging the flat look here. :yes:

20191129_182310.jpg


Let the paint set for a bit, and then pulled the tape. Only a little bit of the butyl got paint on it, on the driver's side light, but I don't think that will be an issue. The tape lifted on the edges of the reflectors, and a little paint got on those too, but no one will notice that.
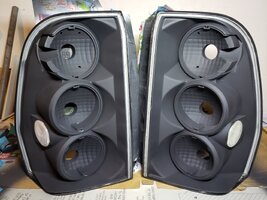
20191129_183040.jpg

Will be leaving these in the garage to cure overnight. PCBs, LEDs, connectors and control modules are in route, should be showing up in pieces over the next couple of weeks.
 
  • Like
Reactions: Mounce and Mooseman

Forum Statistics

Threads
23,319
Posts
637,896
Members
18,519
Latest member
chirobo1

Members Online