- Apr 1, 2012
- 63
I finally replaced mine -- after years of seeing the light pop on in the winter seasons.
Background: I never did experience a performance problem and it typically never came on after the initial first drive of the day unless it was super cold. One other observation was if you turn your wheel to the right it would more likely trigger the idiot light in the winter.
After watching a youtube video:
and doing the work -- here are my tips to help save you time.
read my tips and then watch the video ....and then look back at my anal-retentive notes.
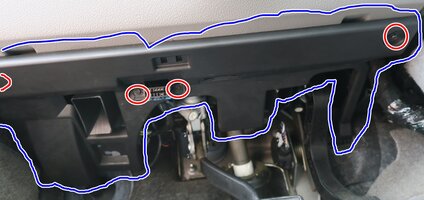
1) You only need to remove the black plastic part not seen in the video. Circled in picture blue below.

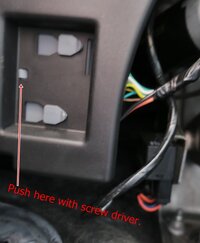
It has two screws on each end (red circle and half circle). plus you'll need to remove the two screws at the OBDII port. To get the part out of the way you need to remove two retainers. I used a screwdriver to help slide off one of the wire's retainer. (photo below)

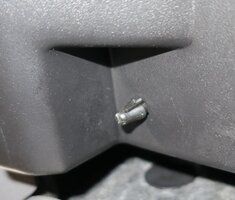
and pliers to squeeze to release the other retainer. (below)

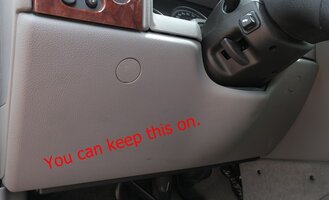
2) In the video he took off the plastic kneeshield (and metal support plate behind that -- which you see in the beginning of the video) off. Big tip - NO NEED TO!!

3) from here jump to the metal plate that 'retains' the sensor we are removing. (seen at the 3:46 mark in video) Remove ONE screw and just loosen the other and the plate will just hang. I did the one closest to the brake pedal (which the pedal was partially in the way) I am unsure if you can set the pedal back in advance... but the pedal did slow me down.
4a) I removed the 15mm nut off the bolt that attaches the shaft parts. (No need to mark the part, as mentioned in video, as long as you don't spin the shaft. ) Do not remove the bolt yet. I did it this way to help maintain steering wheel position integrity. 4b) Now secure the steering wheel from moving. I used a long metal pin that enters the bottom side of the steering wheel and then I taped the wheel.
5a) (now for the pain in the butt) slide the sensor we are replacing off seen at the 5:06 mark in video. It's designed to slide on, not off. You might need a small screwdriver or two, some wiggling, prying from behind and probably a beer. It took me about 15-20 minutes and a beer break in the middle, to get the part 90% off. 5b) Once the part is slid out from it's recess -- now you can remove the bolt that keeps the shaft all together. Do not touch the wheel from here. nor rotate the shaft which includes wiggling. 5c) now pop the lower shaft out and slide the old part out without wiggling the old part. Just pull straight to help keep the position of the steering wheel.
6) -disconnect wiring -- make sure parts look identical before putting on new one -- connect wire on new part -- slide sensor straight-on past bolt holes -- quickly put shaft back in and bolt (no nut yet) -- slide sensor all the way back into the proper place -- reinstall nut on shaft & T25 screw - pull pin spring thingy -- now put everything else on and back together.
real quick processes once the old part is off.
Other notes:
disconnect negative from the battery
Find yourself a structure of some sort (I had a cardboard box) to lay on since it's a drop-off from the floor of the truck to the ground and your back will thank you.
cellphone flashlight helps too.
good luck
Background: I never did experience a performance problem and it typically never came on after the initial first drive of the day unless it was super cold. One other observation was if you turn your wheel to the right it would more likely trigger the idiot light in the winter.
After watching a youtube video:
read my tips and then watch the video ....and then look back at my anal-retentive notes.
1) You only need to remove the black plastic part not seen in the video. Circled in picture blue below.

It has two screws on each end (red circle and half circle). plus you'll need to remove the two screws at the OBDII port. To get the part out of the way you need to remove two retainers. I used a screwdriver to help slide off one of the wire's retainer. (photo below)

and pliers to squeeze to release the other retainer. (below)

2) In the video he took off the plastic kneeshield (and metal support plate behind that -- which you see in the beginning of the video) off. Big tip - NO NEED TO!!

3) from here jump to the metal plate that 'retains' the sensor we are removing. (seen at the 3:46 mark in video) Remove ONE screw and just loosen the other and the plate will just hang. I did the one closest to the brake pedal (which the pedal was partially in the way) I am unsure if you can set the pedal back in advance... but the pedal did slow me down.
4a) I removed the 15mm nut off the bolt that attaches the shaft parts. (No need to mark the part, as mentioned in video, as long as you don't spin the shaft. ) Do not remove the bolt yet. I did it this way to help maintain steering wheel position integrity. 4b) Now secure the steering wheel from moving. I used a long metal pin that enters the bottom side of the steering wheel and then I taped the wheel.
5a) (now for the pain in the butt) slide the sensor we are replacing off seen at the 5:06 mark in video. It's designed to slide on, not off. You might need a small screwdriver or two, some wiggling, prying from behind and probably a beer. It took me about 15-20 minutes and a beer break in the middle, to get the part 90% off. 5b) Once the part is slid out from it's recess -- now you can remove the bolt that keeps the shaft all together. Do not touch the wheel from here. nor rotate the shaft which includes wiggling. 5c) now pop the lower shaft out and slide the old part out without wiggling the old part. Just pull straight to help keep the position of the steering wheel.
6) -disconnect wiring -- make sure parts look identical before putting on new one -- connect wire on new part -- slide sensor straight-on past bolt holes -- quickly put shaft back in and bolt (no nut yet) -- slide sensor all the way back into the proper place -- reinstall nut on shaft & T25 screw - pull pin spring thingy -- now put everything else on and back together.
real quick processes once the old part is off.
Other notes:
disconnect negative from the battery
Find yourself a structure of some sort (I had a cardboard box) to lay on since it's a drop-off from the floor of the truck to the ground and your back will thank you.
cellphone flashlight helps too.
good luck
