I kept getting the "service stabilitrak" DIC message and the yellow traction control warning light on my dash every time temperatures would dip below 40 degrees and I first turned the steering wheel. A quick restart of the vehicle and the light would disappear for the rest of the day. With help from this forum and other places, I pretty quickly figured out that it was my steering angle / position sensor (SAS) so I ordered the 'wrong' part, that's where the $100 savings comes in with only roughly 10min of extra work.
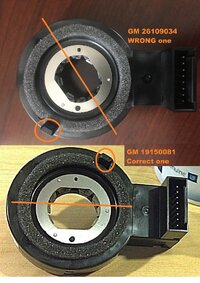
Correct GM steering angle / position sensor (SAS) part number: 19150081
Wrong GM steering angle / position sensor (SAS) part number: 26109034
What I found - There are two differences between the two
1) The outside case locating pin is different by 180*
2) The thin metal piece that slides on the steering column has the wrong orientation. See picture below.
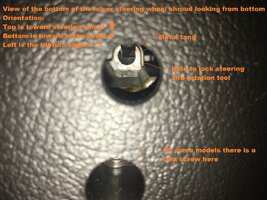
How to fix - Before removing SAS from truck, lock steering wheel using J42640 or a 3/16" allen wrench in the center hole of the lower steering wheel cover. If you can only turn the wheel an 1/8th of a turn in either direction before it stops, you've correctly locked the steering wheel.
1) Order the wrong GM SAS part, it can be found brand new for $30 currently on eBay... The correct one is $140+ at the dealer.
2) Remove your steering angle / position sensor from your truck being careful not to pry on it too much as you remove, you will need it. Just rock it back and forth gently using your hands and easy on using a screw driver to pry it out but totally understood to get it started
For all steps below, the references to orientation will be as you are looking at the SAS, the electrical connection is facing up and in the 6 o'clock position.
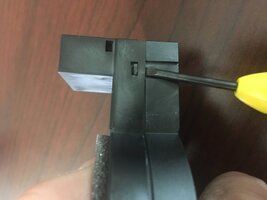
3) On the new SAS - I can't overstate this, do not remove the spring locator sticking out from the back. It won't accidentally fall out, there is some resistance there but leave it alone. Remove the sticker in the 12 o'clock position and break every single plastic bridge around the case so you can easily slide the top half of the case straight up. This should give you an idea of how to separate the the top half of the case. Discard the new top half of the case.
3) On the old SAS, the one that doesn't work well. Carefully remove the top cover, you need to reuse this. Using a very small flatblade screw driver - I used a 2.4mm one. Remove the sticker showing the part number information. Start there, prying open the case and then work your way to the two tabs in the 3 and 9 o'clock positions being careful not to break the cover. Lift this cover straight up and off. If you break it, no worries, just use some super glue on it.
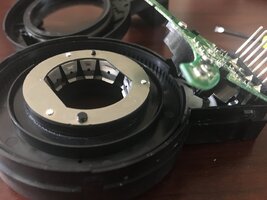
Now lift up on the electronics board from the side facing toward 12 o'clock to free up the center plastic wheel. Note, there are two screws in the electronics board, they can be left alone. You can't really damage anything at this point.
Remove center wheel, this is the part that makes contact with your steering shaft and has metal tangs on it.
4) Go back to the new SAS and remove that center wheel, being slightly more careful and minding the spring alignment pin sticking up on the new one
5) Clean up the teeth on the old wheel using a fine screwdriver or similar. Remove metal washers from the new wheel and replace washers on old wheel with same orientation. Note, these have a very light oil on them.
6) Replace old wheel into new SAS. There are only 3 ways the wheel can go in because there are only 3 holes for the spring alignment pin to go through the wheel. The correct alignment will have the rectangular slit with the long way facing 12 and 6. Lower the ring through the alignment pin and into position in the new SAS. Then bend back the electronic board over the wheel. Then snap on the old cover. Done.
When reinstalling the SAS back into your truck, do not remove the spring until the SAS is fully seated in the steering column and your steering wheel is locked with the special tool or an allen wrench. If you haven't locked the steering wheel, be extremely careful that you don't turn the steering wheel 360* until the intermediate shaft is re-inserted.
As an fyi, I was forced into doing this since I ordered the wrong part number by accident. For somebody that wants to save a few bucks, you can do this. In my opinion it's far cheaper and better than putting some aftermarket part in your truck to save a few bucks. I'm a stickler for using genuine GM parts unless there is a clear and decisive benefit in an aftermarket brand, ie. MOOG or Wagner premium parts. I don't trust aftermarket cheap stuff in my vehicles, my experience only tells me that I will be making the same repair again within a short time.


Last edited:
