At this point, in the absence of other answers to the Mystery...and the relatively low cost for an OEM Part... It might be worth a try. The Internet GM, GMC and Chevrolet Forums are rife with Threads and Posts indicating that on some if not MOST occasions... only "The Right Stuff" will do... and that narrows things down to being either ACDelco... or Delphi. YMMV if other Members chime in with some additional ideas that suggest that throwing away what looks like a "Perfectly Good, Brand New Gas Cap for No Good Reason"... is a Bad Idea.
You are using an out of date browser. It may not display this or other websites correctly.
You should upgrade or use an alternative browser.
You should upgrade or use an alternative browser.
Speed sensor problem, the saga continues...
- Thread starter jmonica
- Start date
"Gas cap was the very first thing I did, however I didn't do a ACDelco OEM. Will that really make a difference? "
Yes. On this platform it seems to very important. ( I can't quite always say why, but it has saved me much hassles by staying oem (ACDelco) in this case). The parts fit better, align better, and last longer. And with all the different places to now purchase oem parts it makes the decision much easier. Over at RockAuto or Amazon often the prices are better than aftermarket pieces of unknown quality. I have replaced my gas cap at least once with the AC Delco and my code went away.
just my 2¢
The problem I am having with the P0443 code is that I do not have voltage to the orange wire going to the sensor. This evening I am going to run a wire from an ignition on lead directly to the solenoid connector and then go from there.
Everything I've read says that wire should have a constant voltage with the ignition on, and that the control circuit (from PCM) grounds the other wire to activate the PCS. As of right now, there's no voltage on the orange wire. I haven't been able to find a break in the wire yet and I need to get it inspected asap so I am going to try this as temporary work around.
This is my daily driver for the next few weeks so once i get my other car back and have time to dig into the Envoy I will track down the wiring problem and fix it correctly.
I also replaced my gas cap but didn't go with ACDelco, but i do agree that it is usually important to go with the OEM parts for this vehicle. I just had two after market speed sensors fail after only about 90 minutes worth of driving because I didn't open my wallet far enough to shell out for the AC Delco sensors like I should have. Lessons learned. Once again.
Maverick6587
Member
Keep re-checking all of the relevant Fuses involved just in case any have burned out in between one series of diagnostic efforts and another.
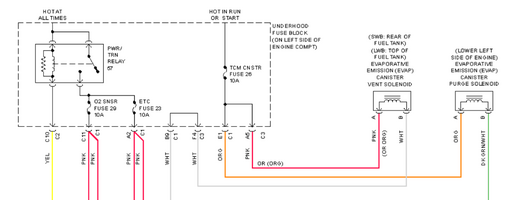
Thanks Maverick. I never got around to working on it last night. Had to stay late at work, but I appreciate your help. I do have one question for you.Looks like the purge solenoid orange wire should be hot in run or start only. If that's the solenoid you're speaking of.
View attachment 93092
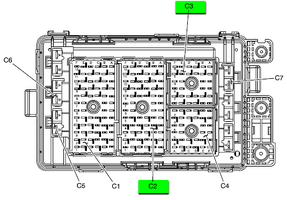
I have been looking at similar wiring diagram and if you look where that orange wire hits the fuse box, it says E1 and C1. Can you possibly tell me what the E1 stands for? I think the C1 refers to the first of the three connectors on the PCM.
Sorry one more question... I was going to tap into the same fuse that it says it should be connected to with the Canister Vent Valve (Fuse 26). Does that sound like the right thing to do?
Thanks again!
Ok, will do, thank You for the heads up!!!Keep re-checking all of the relevant Fuses involved just in case any have burned out in between one series of diagnostic efforts and another.
Maverick6587
Member
It looks like it's the coding for which connector the wire is attached to underneath the fuse box. It also has individual wire coding (x and y axis) as well if you zoom in. You can see the letters at the top of each connector and numbers on the left-hand side of each connector.

Edit: re-added image as it was not clickable. Hopefully that fixes it.

Edit: re-added image as it was not clickable. Hopefully that fixes it.
Last edited:
YES! Thank You. Its been driving me crazy. C1-4 are obvious in your diagram. I just don't know what C5-7 are pointing to. I guess I will have to take the top off of the fuse panel and see what C5-C7 are.It looks like it's the coding for which connector the wire is attached to underneath the fuse box. It also has individual wire coding (x and y axis) as well if you zoom in. You can see the letters at the top of each connector and numbers on the left-hand side of each connector.
View attachment 93100
I have made it my mission in life to understand these diagrams and learn to troubleshoot the electronics in these vehicles. I wish I had someone to show me whats what on these diagrams. It would make it so much easier to figure it all out.
Thanks again for your help man!!!
Maverick6587
Member
OK got it, Thank You. I was laying in bed and just thought of something which is why I got on to post. Your diagram says hot in Run or Start. If I have the key on one click before starting it, I should have a voltage on that wire correct? That's how I tested it. Not with the car running. Seriously appreciate your advice Maverick! Thank You@jmonica e1-c1 is just one side of a fuse socket though. Pull fuse #26 out of the fuse box, use a multimeter to measure which side of the fuse "socket" has power when the key is On. That is the orange wire connection.
Ahh ok that makes sense then. Should be easy enough to confirm if and when I pull the top off the fuse panel. Thank YOou! That's been driving me crazy for a week.If I am reading that right, it looks you you need Harness block C1 (first block on the left in that pic) pin E1 which would be the bottom row, second from the left. That's if I am reading it right.
Maverick6587
Member
Run should be the On position for the key and Start is the position after that (actually trying to start the vehicle. So, in the On position yes, you should have voltage at the orange wire (e1-c1).
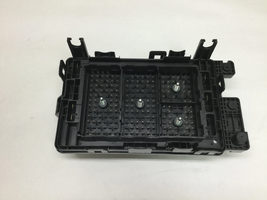
Are you planning on removing just the fuse box cover or the fuse box itself to look at the pins that that the wire harness connectors attach to? I had a mechanic tell me that the trailblazers are notorious for corroded fuse boxes.
So, I removed the fuse box and did not see any corrosion at all. The job takes a few hours and it's not easy removing the bolts and wire harnesses or reconnecting the harnesses to the fuse box. A real PITA!
I advise against removing fuse box for inspection. Unless, you see corrosion seeping out the bottom of the fuse box. If you do see corrosion. I would go go the junkyard first (for practice), remove a fuse box from there and get that one cleaned up first. Then you can just swap the fuse boxes out.
Ok Thats what i thought, Thank You. As far as removing the fuse box, I was going to, but after your warning, I'm not even considering it. The last thing I need right now is to create even more problems which is what usually ends up happening when I dig into unknown territory. I didn't think it would be that big of a project. Thank God you advised against it. Thanks Maverick~!Run should be the On position for the key and Start is the position after that (actually trying to start the vehicle. So, in the On position yes, you should have voltage at the orange wire (e1-c1).
Are you planning on removing just the fuse box cover or the fuse box itself to look at the pins that that the wire harness connectors attach to? I had a mechanic tell me that the trailblazers are notorious for corroded fuse boxes.
So, I removed the fuse box and did not see any corrosion at all. The job takes a few hours and it's not easy removing the bolts and wire harnesses or reconnecting the harnesses to the fuse box. A real PITA!
I advise against removing fuse box for inspection. Unless, you see corrosion seeping out the bottom of the fuse box. If you do see corrosion. I would go go the junkyard first (for practice), remove a fuse box from there and get that one cleaned up first. Then you can just swap the fuse boxes out.
Maverick6587
Member
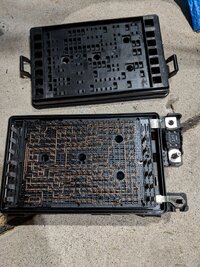
That doesn't look bad at all. Have you ever gone one layer down to see where the wires connect to the fuse box? Thanks!
If you don't mind, can I ask where you get your wiring diagrams? If it's not something that you want to advertise, that's ok, I understand. I subscribed to ALLDIYDATA for the diagrams. It was only $19.95 for a year and they seem to have everything that I've needed so far so it has been worth it to me. I've heard that the Mitchell wiring diagrams are better, but who knows. That service is $20 for a month.It's not a horrible idea. I would just wait until spring and when you have a clean spare fuse box. Here's what mine looked like before I sprayed it with electronics cleaner, from my 06' 97x. I live in Michigan with about as much salt as you get and it was basically spotless.
View attachment 93122
Maverick6587
Member
That would just be the other side of the fuse box. The box at the top of the pic is where you place the fuses. The bottom box is directly underneath the top box. If you flipped the bottom box that would be where the wire harnesses connect to. Which is still just pins like you see the copper wire connected to in the bottom pic.
Edit: This would be the bottom side of the fuse box where the wire harnesses connect to. Those pins go through the bottom and that's what you see in the other pic that the brass/copper wire is connected to.

I get the diagrams from Mooseman's signature. I downloaded all of them.
Edit: This would be the bottom side of the fuse box where the wire harnesses connect to. Those pins go through the bottom and that's what you see in the other pic that the brass/copper wire is connected to.

I get the diagrams from Mooseman's signature. I downloaded all of them.
So it looks like running that wire to the purge solenoid did the trick. Now that I’ve jinxed it. Now I just have to complete the drive cycle to get it inspected. It will be nice to drive it with the pressure off. I wish my other car would hurry up and get finished so I can continue working on the Envoy. I need to redo a lot of the front end components but gonna wait until I don’t need it as my DD. Thanks for your help Maverick!
Mooseman
Moderator
Maverick6587
Member
Here's a link to help complete that drive cycle. Not sure if a drive cycle will/does complete the EVAP side of things, but it could help.
Awesome Thanks Guys. At this point I do only have one drive cycle test not completed. I already had plans to go to the inspection station bright and early tomorrow and then of course. Bam! CEL once again. I was worried is was the P0443 that had come back because I am out of ideas on that one, but no. NOW I have 3 new codes. I'm so bummed.
It looks like I need a thermostat. P0129, the truck never gets to full temp. I was ignoring it thinking that was just because it's cold out, but deep down I knew better.
The other two are P0130 and P0140. Both 02 sensor codes. I have a new 02 sensor on my shelf, but honestly I think the cat is bad in it too. I thought I heard some rattling underneath where the cat is but I tried to ignore that as well, at least until I got through inspection. smh... its never ending...
Maverick6587
Member
At this point, I would probably go ACDelco on the thermostat and probably cheap parts for the O2 sensors and Cat/Cats. That's a lot of expensive parts all at once. They're not show stoppers if they brake or end up being inaccurate. Just replace them down the road with ACD, or leave them if they're working.
Do you have a scanner that you could read live data to actually see which parts are bad/inactive?
Do you have a scanner that you could read live data to actually see which parts are bad/inactive?


