Need help. I was replacing the power steering lines due to rust and managed to over torque the bolt that attaches the lines to the rack and pinion. Does anyone know where I can find that bolt or the dimensions. I got the part out that snapped but need to replace it.
You are using an out of date browser. It may not display this or other websites correctly.
You should upgrade or use an alternative browser.
You should upgrade or use an alternative browser.
Snapped bolt holding power steering line to rack and pinion
- Thread starter Nickhxc4life
- Start date
Mounce
Member
Could go to Lowes or home depot and use their thread checkers to figure out the thread then find a suitable bolt there. Just gotta figure out the thread and length of the bolt and you're set. Just gotta find one with a head size that doesn't interfere.

Just to clarify the Fastener Location... Can you mention which of these images is relevant? If its the one that holds the PS Line Manifold directly to the Power Steering Body (image from TV) I'm going to take a SWAG (Scientific Wild Ass Guess) that it is a Metric 10.9 Hard M10X1.25mm Bolt as per the eBay offer:

These should be available at Home Depot in their Hardware Section (Hardened Bolt Drawers) . If there... you could also pick up a few 10.9 Hard M8X1.25mm Bolts and an additional 10.9 Hard M10X1.50mm Coarse Thread Bolts ...just in case it requires a Wider Thread Pitch. If these are too long... you can always shorten them via a Cut-Off Wheel or a Bench Grinder and work them down to the right length:
NOTE:
Metric = 10.9 Hardness
SAE = Grade 8 Hardness
These Fasteners are available on eBay and you should consider getting a range of sizes and thread pitches to cover all your bases:


Electronics, Cars, Fashion, Collectibles & More | eBay
Buy & sell electronics, cars, clothes, collectibles & more on eBay, the world's online marketplace. Top brands, low prices & free shipping on many items.
rover.ebay.com
These should be available at Home Depot in their Hardware Section (Hardened Bolt Drawers) . If there... you could also pick up a few 10.9 Hard M8X1.25mm Bolts and an additional 10.9 Hard M10X1.50mm Coarse Thread Bolts ...just in case it requires a Wider Thread Pitch. If these are too long... you can always shorten them via a Cut-Off Wheel or a Bench Grinder and work them down to the right length:
NOTE:
Metric = 10.9 Hardness
SAE = Grade 8 Hardness
These Fasteners are available on eBay and you should consider getting a range of sizes and thread pitches to cover all your bases:
Last edited:
Yes, it is the one in the picture you show with the 2 hose connection points. It’s underneath the car in a really awkward place.
coolasice
Member

cornchip
Member
- Jan 6, 2013
- 637
How confident are you of that?
On my 2007, I am certain of the bolt size. I did my lines on my gravel driveway and dropped the bolt only to find it when I had finished the job. I substituted the bolt with a M6x1 SHCS I had in my tool box. I am however fuzzy about the exact length.
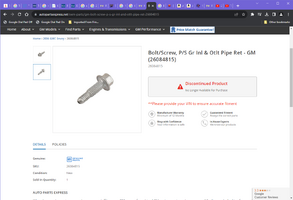
While you have it. What are the part numbers for 18&19?looking at the gm parts site, it doesn't list size, but the part number is specific to our platform, and only used on the steering rack, nowhere else. part number 26084815. #2 in the diagram.
coolasice
Member
coolasice
Member
08txsierra
Member
Need help. I was replacing the power steering lines due to rust and managed to over torque the bolt that attaches the lines to the rack and pinion. Does anyone know where I can find that bolt or the dimensions. I got the part out that snapped but need to replace it.
Sorry for bringing up an old thread but i managed to snap the bolt to my power steering also. Was wondering did the M6 x 1 size bolt work in replacement? Thanks guys for the help
You'll be best served with an M6x25 bolt.
The factory bolt is "special" in that it has about 7mm of dog point on it so that they don't cross thread it at the factory using power tools. You're going to want the extra thread because you'll be hand starting it and need the extra threads to pull the manifold plate to the rack and pierce the seals.
The factory bolt is "special" in that it has about 7mm of dog point on it so that they don't cross thread it at the factory using power tools. You're going to want the extra thread because you'll be hand starting it and need the extra threads to pull the manifold plate to the rack and pierce the seals.
I got one from the local pick your own part junkyard. Luckily the car was already jacked up so it wasn't too bad to get to. Be careful not to let it drop when it's free from being threaded. I used one of those picker things where you push the button at one end and fingers extend from the other end to grab whatever you're trying to grab.
nubbalotus
Member
Stugar gives me hope! I hope the M6x25 works fine, as it is the only thing I can find. I have to carefully extract one of these broken off into the aluminum rack tomorrow. Had to leave my truck in a parking lot over night... I can't find the GM Original one ANYWHERE!!!! Why is this 26084815 such a beyaaa to find ???? Hopefully these bolts from O'Reilly have the same thread pitch, and are good enough grade of metal... fingers crossed! Will post here once I find out!You'll be best served with an M6x25 bolt.
The factory bolt is "special" in that it has about 7mm of dog point on it so that they don't cross thread it at the factory using power tools. You're going to want the extra thread because you'll be hand starting it and need the extra threads to pull the manifold plate to the rack and pierce the seals.

Mooseman
Moderator
Mine came out just using a small magnet. It spun freely out. A regular bolt of the proper thread worked fine.
coolride
Member
Yes, it is the one in the picture you show with the 2 hose connection points. It’s underneath the car in a really awkward place.
It's easier to reach if you remove the big crossmember. It's like 6 bolts per side, but other than that it's no big deal. You can reach up and over the back of the steering rack with your left hand, and also work with your right hand. Trying to do this job one handed is no fun.
I cleaned mine up and painted it.
Installed. Maybe you can get your arm up and over the back of this brace without removing it. I didn't try that. But when I did realize I could get an extra hand in there, it was an "Ah-Ha" moment.
Last edited:
cornchip
Member
- Jan 6, 2013
- 637
Stugar gives me hope! I hope the M6x25 works fine, as it is the only thing I can find. I have to carefully extract one of these broken off into the aluminum rack tomorrow. Had to leave my truck in a parking lot over night... I can't find the GM Original one ANYWHERE!!!! Why is this 26084815 such a beyaaa to find ???? Hopefully these bolts from O'Reilly have the same thread pitch, and are good enough grade of metal... fingers crossed! Will post here once I find out!
During Covid, our industrial nut and bolt guy shut his doors and went curbside only. I found this a little inconvenient and went searching on Amazon instead. There is a surprising selection of excellent hardware among the crap that you would expect to see on a site like Amazon. Worth the look.
Another possible source for replacing the GM Rack & Pinion High Pressure Power Steering Line Manifold Retention Bolt:
10.9 M6 X 1.00 X 25mm

 www.mcmaster.com
Prior to its installation... Best Practices would require Threading the 10.9 Bolt all the way into the body of the R&P High Pressure Manifold and then measuring the space between the manifold block and the underside of the Retention Bolt. Then measure the Thickness of the Power Steering Hose Block between the Top and Bottom of the Insert Block and compare the differences between the two. If the 10.9 Metric Bolt is TOO Long... it can always be ground down slightly to become a perfect fit.
10.9 M6 X 1.00 X 25mm
McMaster-Carr
McMaster-Carr is the complete source for your plant with over 595,000 products. 98% of products ordered ship from stock and deliver same or next day.
Prior to its installation... Best Practices would require Threading the 10.9 Bolt all the way into the body of the R&P High Pressure Manifold and then measuring the space between the manifold block and the underside of the Retention Bolt. Then measure the Thickness of the Power Steering Hose Block between the Top and Bottom of the Insert Block and compare the differences between the two. If the 10.9 Metric Bolt is TOO Long... it can always be ground down slightly to become a perfect fit.
Last edited:
I'm very grateful to find this forum. I was duped (shame on me) into buying an '04 TB with the lines disconnected at the rack and the 8mm bolt snapped off.
How did you extract the broken 8mm bolt? Did you have to drop the R&P? While I found it easy to get to with a long and short extension by going over the axle (either from the outside with the wheel off or from underneath - just as easy) I can't imagine using an easy-out from that position. What size easy out - or other method - did you use to extract the bolt?
And how do you replace the seals without dropping the R&P?
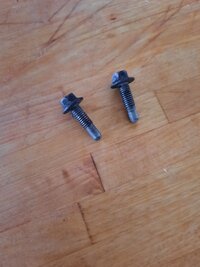
Per my searching, GM has discontinued this bolt. Why?! I actually found 2 bolts on 2 TB's in a junkyard (where I discovered the over-the-axle removal method). Amazingly (while discovering the bolt was snapped), I dropped the replacement bolt 4 times and retrieved it each time with a telescopic magnet.
And the rack and lines are very accessible by running your left hand up from behind the big cross member. I was able to push the LP line onto the HP flange and get them in place on the rack. But I needed a long screwdriver to pry them in further.
Thanks in advance.
How did you extract the broken 8mm bolt? Did you have to drop the R&P? While I found it easy to get to with a long and short extension by going over the axle (either from the outside with the wheel off or from underneath - just as easy) I can't imagine using an easy-out from that position. What size easy out - or other method - did you use to extract the bolt?
And how do you replace the seals without dropping the R&P?
Per my searching, GM has discontinued this bolt. Why?! I actually found 2 bolts on 2 TB's in a junkyard (where I discovered the over-the-axle removal method). Amazingly (while discovering the bolt was snapped), I dropped the replacement bolt 4 times and retrieved it each time with a telescopic magnet.
And the rack and lines are very accessible by running your left hand up from behind the big cross member. I was able to push the LP line onto the HP flange and get them in place on the rack. But I needed a long screwdriver to pry them in further.
Thanks in advance.
Last edited:
The following Photo-play is excerpted from the first of these two linked videos to better describe the issues:


(1) Even in the absence of having to remove the Driver's Side Steering Suspension Knuckle, Outer Ball Joint and Strut connection along with the Wheel, Caliper Brake and CV Half Shaft... the presence of the Support Framing prevents being able to have clear access and literally...enough Elbow Room... to work with any Bolt Extraction tools of any kind due to the lack of having any real Mechanical Advantage..
(2) The Power Rack & Pinion Unit needs to have the Inlet and Outlet ports on the Cast Manifold plugged up to prevent getting any Drill Dross (metal detritus) from invading the hydraulic oil ports.
(3) The Old Power Steering Inlet and Outlet Seals need to be gently pried out and the manifold will need a thorough Cleaning of Rust, Oil and Dirt before introducing the Brand New Seals.
(4) The Retention Bolt is NOT an 8mm Fastener, per se... its Shank Dimensions make it an M6 X 1.00 X 25mm 10.9 Hard Bolt that requires drilling into the center of the remaining Broken Bolt Shaft with a Very Small Left Hand Thread Drill Bit FIRST in order to see if it will unscrew it without any fanfare. If at all possible... This work is Best if Performed in a Bench Top Setting.
(5) The important thing to realize is that once the Bolt has Snapped Off... THERE IS NO LONGER ANY STRESS BEING APPLIED IN BETWEEN THE REMAINING MALE BOLT THREADS AND THE FEMALE THREADED PORTION INSIDE OF THE POWER R&P MANIFOLD. Ergo... it should not require a great deal of counter-clockwise force to unwind the Broken Bolt Remnant.
(6) The Old Seals can be coaxed out with a Sturdy Hook and Pick Set because of the presence of a Steel Lip that you can catch hold of with little difficulty. Study these close up images to observe that when NEW SEALS are being installed... the Two Pipes must be wedged into the Manifold in order to Puncture the Seals WITHOUT USING THE REPLACEMENT RETENTION BOLT TO DRAW THE PIPES AND RETENTION FLANGE PLATE INWARDS.
(7) Instead, Use a Long PRY BAR to gradually coax the Two Pipes and Flange Plate inwards from the TOP SIDE by applying Pressure from the Frame as a Fulcrum... just a little at a time until BOTH Pipes have penetrated well into the Rubber Seals. THEN Install the New Metric Retention Bolt and consider that it is the Rubber Seals that do the sealing ...NOT using Excessive Torque being applied to the Pipe Flange Plate that does the work.
These Two Videos demonstrate just how tight the close quarters really are down there and thus... recommending the Removal of the Power Rack & Pinion Unit to do ALL of this work... PRIOR to Re-Installing the Unit:
Last edited:
Mooseman
Moderator
You will have to drop the rack. The snapped bolt I was able to use a pick and/or a small magnet to spin it out. If that doesn't work, you could use a reverse drill bit. If that doesn't work, then an easy out using the hole you made. Replace it with a regular hex head bolt from a fastener store. Bring the broken stub with you for the proper size, thread and pitch.
Suggestion: Cut off the little flaps from the seals. I had one break off and destroy the rack.
Suggestion: Cut off the little flaps from the seals. I had one break off and destroy the rack.
Wow. Thanks so much @Mooseman and @mrrsm! What a super informative reply! I had found that first video and others like it but the 2nd, long one is great too. By 8mm I meant the head is 8mm. I agree, it doesn't seem like it should take much to extract the broken bolt. Like I said, I was lucky enough to find two bolts at the junkyard.You will have to drop the rack. The snapped bolt I was able to use a pick and/or a small magnet to spin it out. If that doesn't work, you could use a reverse drill bit. If that doesn't work, then an easy out using the hole you made. Replace it with a regular hex head bolt from a fastener store. Bring the broken stub with you for the proper size, thread and pitch.
Suggestion: Cut off the little flaps from the seals. I had one break off and destroy the rack.
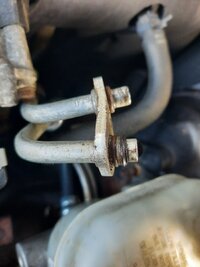
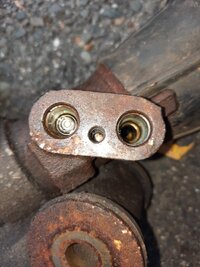
The attached pic is of the bracket to the rack. The seller did install a new HP line though never connected it (probably after he snapped the bolt). The HP line is at the bottom in the pic. Is that the seal stuck onto it? And I simply have to remove it? Should that bracket be bent like that? (I presume no.)
And am I correct in seeing no seals in the rack holes?
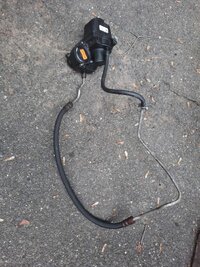
Lastly (ha!), the seller simply did a loop around the pump from the HP outlet to the LP inlet. Can the pump handle getting fluid back at such high pressure? And can you drive without PS fluid going to the rack? A friend's mechanic said yes, and that the loop is a common workaround.
Attachments
-
 2004 Chevy Trailblazer PS pump loop.jpg489.6 KB · Views: 5
 -
 2004 Chevy Trailblazer 8mm bolts PS rack.jpg239.9 KB · Views: 7
 -
 2004 Chevy Trailblazer 8mm bolts PS flange HP line on bottom.jpg457.6 KB · Views: 5
 -
 2004 Chevy Trailblazer 8mm bolts PS to rack.jpg566.6 KB · Views: 6
 -
 Bolt_Screw, P_S Gr Inl & Otlt Pipe Ret 26084815 _ Auto Parts Express - Google Chrome 8_23_2023...png115.1 KB · Views: 6
The "C" Shaped Indentation in both Seals is a "Weakness By Design" in the same shape of the OD of the Tubes as they push past and are meant as a last ditch effort in such a close-quarters installation to limit any chances of "infecting" the Pressure and Return sides of the Hydraulic Powered system with any Dirt and Debris. Likewise, at the very moment that these two "Rubber Hymens" are penetrated and the Twin Pipe Nozzles try to slip inside, Cross-Threading or using Excessive Force to Tighten Down the Plate can invite Bolt Breakage.
The Flat Plate with the Three Drilled Out Holes (and fitted with a side slit to allow the two pipes to have some lateral freedom in between them) accommodates a distributed holding force needed to resist the High and Low Pressures and Hammering Vibrations acting upon the Hot Power Steering Fluid as it is passing through the lines again and again under moderate Steering Actions. But once those Seals begin to fail (Notice the Bend in your Plate Image?) , that single slender Six Millimeter OD Threaded Steel Fastener (With a Flanged, 8 MM Hex Head) can easily fracture from any excessive additional tightening.
You can drive the Vehicle for a brief period of time... but as long as the Serpentine - Harmonic Balancer is delivering power into the Power Steering Pump and pressurizing that single, short line... without fluid circulation through a Cooler...it might cause the Inner Power Steering Pump Seals to Over-Heat and readily fail. The other obvious issue is the immediate change in driveability and the safety issues created here if the vehicle encounters terrain and resists being controlled by the steering efforts needed from the driver.
Last edited:
Thanks for all the help. After dropping the rack I was able to extract the broken bolt with an easy out and very little pressure. So relieved!Wow. Thanks so much @Mooseman and @mrrsm! What a super informative reply! I had found that first video and others like it but the 2nd, long one is great too. By 8mm I meant the head is 8mm. I agree, it doesn't seem like it should take much to extract the broken bolt. Like I said, I was lucky enough to find two bolts at the junkyard.
The attached pic is of the bracket to the rack. The seller did install a new HP line though never connected it (probably after he snapped the bolt). The HP line is at the bottom in the pic. Is that the seal stuck onto it? And I simply have to remove it? Should that bracket be bent like that? (I presume no.)
And am I correct in seeing no seals in the rack holes?
Lastly (ha!), the seller simply did a loop around the pump from the HP outlet to the LP inlet. Can the pump handle getting fluid back at such high pressure? And can you drive without PS fluid going to the rack? A friend's mechanic said yes, and that the loop is a common workaround.
Is it OK to continue this discussion here? Any ideas on how I can straighten the bent plate that holds the 2 lines to the rack? Thanks.
Mooseman
Moderator
Thanks again to everyone on this thread. I just want to confirm what I'm seeing after removing the seals. This relates to the last photo in this set by @mrrsm. Is that some sort of valve in the pressure port hole on the rack? The return line port is an open hole but there's something in the pressure port. I want to be sure it's there by design and not another screwup by the previous owner. Thanks.The following Photo-play is excerpted from the first of these two linked videos to better describe the issues:
View attachment 109499View attachment 109500View attachment 109501View attachment 109502View attachment 109503View attachment 109504View attachment 109505View attachment 109506View attachment 109507View attachment 109508View attachment 109509View attachment 109510View attachment 109511View attachment 109512View attachment 109513View attachment 109514
(1) Even in the absence of having to remove the Driver's Side Steering Suspension Knuckle, Outer Ball Joint and Strut connection along with the Wheel, Caliper Brake and CV Half Shaft... the presence of the Support Framing prevents being able to have clear access and literally...enough Elbow Room... to work with any Bolt Extraction tools of any kind due to the lack of having any real Mechanical Advantage..
(2) The Power Rack & Pinion Unit needs to have the Inlet and Outlet ports on the Cast Manifold plugged up to prevent getting any Drill Dross (metal detritus) from invading the hydraulic oil ports.
(3) The Old Power Steering Inlet and Outlet Seals need to be gently pried out and the manifold will need a thorough Cleaning of Rust, Oil and Dirt before introducing the Brand New Seals.
(4) The Retention Bolt is NOT an 8mm Fastener, per se... its Shank Dimensions make it an M6 X 1.00 X 25mm 10.9 Hard Bolt that requires drilling into the center of the remaining Broken Bolt Shaft with a Very Small Left Hand Thread Drill Bit FIRST in order to see if it will unscrew it without any fanfare. If at all possible... This work is Best if Performed in a Bench Top Setting.
(5) The important thing to realize is that once the Bolt has Snapped Off... THERE IS NO LONGER ANY STRESS BEING APPLIED IN BETWEEN THE REMAINING MALE BOLT THREADS AND THE FEMALE THREADED PORTION INSIDE OF THE POWER R&P MANIFOLD. Ergo... it should not require a great deal of counter-clockwise force to unwind the Broken Bolt Remnant.
(6) The Old Seals can be coaxed out with a Sturdy Hook and Pick Set because of the presence of a Steel Lip that you can catch hold of with little difficulty. Study these close up images to observe that when NEW SEALS are being installed... the Two Pipes must be wedged into the Manifold in order to Puncture the Seals WITHOUT USING THE REPLACEMENT RETENTION BOLT TO DRAW THE PIPES AND RETENTION FLANGE PLATE INWARDS.
(7) Instead, Use a Long PRY BAR to gradually coax the Two Pipes and Flange Plate inwards from the TOP SIDE by applying Pressure from the Frame as a Fulcrum... just a little at a time until BOTH Pipes have penetrated well into the Rubber Seals. THEN Install the New Metric Retention Bolt and consider that it is the Rubber Seals that do the sealing ...NOT using Excessive Torque being applied to the Pipe Flange Plate that does the work.
These Two Videos demonstrate just how tight the close quarters really are down there and thus... recommending the Removal of the Power Rack & Pinion Unit to do ALL of this work... PRIOR to Re-Installing the Unit:
The closest images I can find that emulate an "X-RayProfile" image of the Manifold Inlet and Outlet Ports are shown among these below and it appears to have "Standard Openings" for Fluid Flow Uniformity:


Last edited:
Thanks. The pic I was referring to were the ones you sent from the video. It's at the 3:42 mark and through the red fluid it looks like what I see in my inlet port: some sort of valve that appears to open under the fluid pressure?The closest images I can find that emulate an "X-Ray" of the Manifold Inlet and Outlet Ports are shown below and they appear to have "Standard Openings" for Fluid Flow Uniformity:
View attachment 109781View attachment 109782View attachment 109783
If you mean the differences between what the Red Arrow (Pressure Side?) and the Blue Arrow (Return Side?) are pointing at... I can only speculate that in order to prevent "Fluid Jacking" harmonics from jamming up the Power Steering Pump Export Pressure side because "all liquids are incompressible" and thus, Unregulated Hydraulic Pulsations can literally ...Hammer Pumps To Pieces... Or perhaps equally important, to prevent any Air Cavitation when the Engine is not running due to Gravity Line Fluid Bleed Downs... so they may have added a One Way Poppet Style Check Valve. If presently disassembled, you might take a Close Up Image in High Definition and compare these two in appearance:

For around $30.00 + S&H... Replacing the entire Power Steering Pressure Side Hose & Line obviates any need to try to straighten out the Bent (Out Of Shape) Hold Down Plate section of the Old Line:
Courtesy RockAuto:

For around $30.00 + S&H... Replacing the entire Power Steering Pressure Side Hose & Line obviates any need to try to straighten out the Bent (Out Of Shape) Hold Down Plate section of the Old Line:
Courtesy RockAuto:
2004 CHEVROLET TRAILBLAZER 4.2L L6 Power Steering Pressure Hose | RockAuto
RockAuto ships auto parts and body parts from over 300 manufacturers to customers' doors worldwide, all at warehouse prices. Easy to use parts catalog.
www.rockauto.com
Last edited:
Yup... even by a cursory visual comparison... You can see that they are a "DBOM". Take notice of the Off-Set for the Threaded Plate Hold Down Fastener which means that there is ONLY ONE WAY to install the Line and prevent the accidental reversal of Proper Power Steering Fluid Flow.
(Dead Balls On Match)
(Dead Balls On Match)
Last edited:
When you are completely finished with this work and after Leak and Performance Testing everything, you might consider making a Technical Write Up and "How To" and include ALL of Your Images, as everything you've done so far has been Very Comprehensive and Informative. Many other Members (and Lurkers) will benefit from knowing these observations in the future. This is a very difficult place on the GMT360s to perform Service and Repairs, so every single piece of data that informs and smooths the way for us all when "Down THERE" will be quite beneficial.