Hello, I have a 2003 TB LTZ. The liftgate was rotting in the usual spots, only had 4 lines for the defroster work, and would not lock/unlock. I found a nice liftgate from a 2006 TB LT. While I was disconnecting the electrical connector, I could hear the lock for the liftgate making noise as I was disconnecting it. Ok, here’s the problem now. The liftgate is locked along with the glass and won’t unlock, my key fob no longer works any of the doors, the interior lights are illuminated, and the rear wiper doesn’t work. All that does not work now used to work before I swapped the liftgate. Is it possible that I need to install the original liftgate control module into the “new” liftgate ? I did get the liftgate to open manually through the access hole. Now the electrical connector is disconnected and having the same things not work as when it’s connected. Could a broken wire or bad connector be the problem here ? For now I pressed the interior override button on the dash to shut off the interior lights. Any ideas on what happened since I swapped liftgates ? Thanks
You are using an out of date browser. It may not display this or other websites correctly.
You should upgrade or use an alternative browser.
You should upgrade or use an alternative browser.
SOLVED! Replaced liftgate - now electrical problems
- Thread starter Adjustso3
- Start date
xavierny25
Member
The lift gate module has to get swapped over. Its seems you do have an electrical wire break so pull the boots and go over all the wire with a continuity test from the gate to the inside of the truck. Also check your fuses.
The Tailgate Lift Gate Module is on the GM Class 2 Serial Network in all GMT360 Vehicles... and if the single 'Signal Wire' feed handling the 5-7 Volts for Low Voltage on the Network leading to the BCM is either broken or shorted to Ground or even to 12 VDC Power anywhere in between... it can actually affect a whole lot of other "Module Members" and make them malfunction, too.
Since the Lift Gate Module is attached directly to the inside of the Lift Gate under the Plastic Cover Panel... The one that you bought may already have a damaged LGM inside and/or cut or shorted wires in the harnesses (there are THREE of them that get plugged into it...) One for the Lift Gate Locking Latch, One for the Windshield Wiper Circuit and One for the Upper Rear Window Release.
So... any number of Shorted or Broken wires could be involved. If you Trace The Harness Leads to which of these Three Gate Components is giving you the trouble... you can narrow the field and know where to start after pulling the Harness Connectors from the LGM to Probe... or... Back Probing with a Small Pin Inserted through the Back of each Wire in the Connector(s) for your Light Probe.
Also... Your OWN Vehicle Grommet Tube that feeds the wiring through the Upper Right Roof area and passes into the Lift Gate could ALSO have 'work hardened' and have broken wires up inside there as well, so ...as originally suggested by @xavierny25 ... Using a lighted "Scope on a Rope" or a Digital Multi-Meter to probe for Continuity should reveal the Culprit(s) . These images provide the Harness Layout of the LGM (Inverted here for the Installed LGM Image so you can read the White Label) to give you a better idea of where to isolate them for probing. The Broken Wire Images show which wires to probe for 12VDC leading from the upper Right Body Feed Through into the Lift Gate:
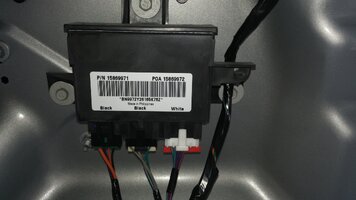
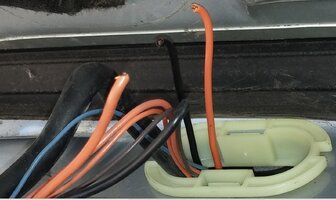
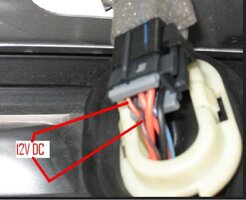
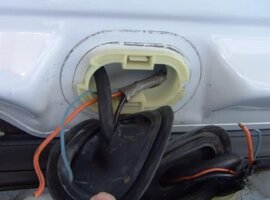
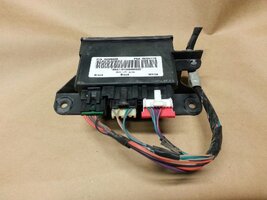
The Wiring Color - Location Codes related from this List are Hi-Lighted Below:
Audio/Mobile Video
WIRE COLOR POLARITY LOCATION
Battery ORANGE (+) RADIO HARNESS
Accessory ORANGE (DATA) RADIO HARNESS
THE RADIO HARNESS DOES NOT PROVIDE A SWITCHED POWER SOURCE. RUN A WIRE TO THE FUSE-BOX FOR SWITCHED POWER. THE ACCESSORY TURN-ON IS CONTROLLED BY THE CLASS 2 SERIAL NETWORK.
Ground BLACK/WHITE (-) RADIO HARNESS
LF Speaker (+) TAN
THESE WIRES ALSO GO TO THE FRONT LEFT TWEETER
LF Speaker (-) GRAY
RF Speaker (+) LIGHT GREEN
THESE WIRES ALSO GO TO THE FRONT RIGHT TWEETER
RF Speaker (-) DARK GREEN
LR Speaker (+) BROWN
LR Speaker (-) YELLOW
RR Speaker (+) DARK BLUE
RR Speaker (-) LIGHT BLUE
Steering Cntrls OPTIONAL
THIS VEHICLE MAY BE EQUIPPED WITH ONSTAR® AND MAY LOSE DOOR CHIME AND OTHER VEHICLE MONITORING FUNCTIONS WHEN OEM RADIO IS REPLACED. USE PROPER INTEGRATION PIECE TO MAINTAIN THESE FEATURES.
Speed Cntrl OPTIONAL
Radio Security YES
Security
WIRE COLOR POLARITY LOCATION
Battery RED OR RED/WHITE (+) AT IGNITION SWITCH HARNESS
Ignition 1 PINK (+) AT IGNITION SWITCH HARNESS
Starter 1 YELLOW (+) AT IGNITION SWITCH HARNESS
All Door Trigger GRAY/BLACK (-) IN HARNESS IN DRIVERS SIDE WINDSHIELD PILLAR
TO AVOID THE DOME LIGHT DELAY FUNCTION, USE INDIVIDUAL DOOR TRIGGERS AND DIODE ISOLATE EACH WIRE,
Dome light Super GRAY/BLACK (-) IN HARNESS AT VEHICLE LIGHT SWITCH
LF Latch GRAY/BLACK (-) IN THE DRIVERS DOOR
RF Latch BLACK/WHITE (-) IN THE PASSENGERS DOOR
LR Latch LIGHT BLUE/BLACK (-) IN THE PASSENGERS DOOR
RR Latch LIGHT GREEN/BLACK (-) IN THE PASSENGERS DOOR
Trunk Trigger PINK/BLACK (-) AT MODULE IN REAR HATCH
VIOLET (-) WILL MONITOR THE GLASS AT THE MODULE IN THE REAR HATCH
Hood Trigger PINK/BLACK (-) ON LEFT INNER FENDER
NOT ON ALL MODELS
Alarm Disarm LT. GREEN (-) IN DRIVERS DOOR AT MODULE
Parking Lights GREY/BLACK (-) AT SWITCH
OR BCM TAN PLUG PIN E5
Low Ctr Pk Lights GRAY/BLACK (-) AT VEHICLE LIGHT SWITCH HARNESS
Data Bus VIOLET (-) AT PIN 2 OF THE DIAGNOSTIC CONNECTOR UNDER THE DRIVERS SIDE DASH
Convenience
WIRE COLOR POLARITY LOCATION
Headlights-Lo WHITE (+) IGNITION SWITCH HARNESS
LF Pk Lt Bulb BROWN (+) AT FRONT LEFT PARKING LAMP
RF Pk Lt Bulb BROWN (+) AT FRONT RIGHT PARKING LAMP
LR Pk Lt Bulb BROWN (+) AT REAR LEFT TAIL LIGHT ASSEMBLY
RR Pk Lt Bulb BROWN/WHITE (+) AT REAR LEFT TAIL LIGHT ASSEMBLY
All Hazrd Lights WHITE (-) AT VEHILCE HAZARD SWITCH
LF Hazrd Bulb LIGHT BLUE (+) AT FRONT LEFT TURN LAMP
RF Hazrd Bulb DARK BLUE (+) AT FRONT RIGHT TURN LAMP
LR Hazrd Bulb LIGHT BLUE (+) AT REAR LEFT TAIL LIGHT ASSEMBLY
RR Hazrd Bulb DARK BLUE (+) AT REAR RIGHT TAIL LIGHT ASSEMBLY
Wipers-Lo PINK (+) AT VEHICLE WIPER CONTROL SWITCH
Wipers-Hi DARK BLUE (-) AT VEHICLE WIPER CONTROL SWITCH
Parking Brake LIGHT BLUE (-) AT VEHICLE PARKING BRAKE SWITCH
Seat Mem 1 WHITE (+) AT MODULE IN DRIVER DOOR
Seat Mem 2 VIOLET (+) AT MODULE IN DRIVER DOOR
Remote Start
WIRE COLOR POLARITY LOCATION
Battery RED OR RED/WHITE (+) AT IGNITION SWITCH HARNESS
Ignition 1 PINK (+) AT IGNITION SWITCH HARNESS
Ignition 2 WHITE (+) AT IGNITION SWITCH HARNESS
Accessory 1 ORANGE (+) AT IGNITION SWITCH HARNESS
Accessory 2 BROWN (+) AT IGNITION SWITCH HARNESS
Starter 1 YELLOW (+) AT IGNITION SWITCH HARNESS
Anti-Theft Type GM PASSLOCK II® ANTI-THEFT SYSTEM
Anti-Theft Descript PASSLOCK II
Key Sense LIGHT GREEN (-) AT THE STEERING COLUMN HARNESS
Tachometer UNCOMMON COLOR (AC) ANY FUEL INJECTOR NOT PINK
Speed Sense DK. GREEN/WHITE (AC) AT RADIO 24 PIN GREY PLUG
OR PCM BLUE CONN. PIN 21
Parking Lights GREY/BLACK (-) AT SWITCH
OR BCM TAN PLUG PIN E5
Low Crr. Pk Lights GRAY/BLACK (-) AT VEHICLE LIGHT SWITCH HARNESS
Brake Lights WHITE (-) AT BRAKE SWITCH ABOVE BRAKE PEDAL
Reverse Lights GRAY (+) IN HARNESS IN DRIVERS KICK-PANEL
Horn BLACK (-) BCM TAN CONN. PIN E12
ALSO BLACK (-) AT BCM MODULE UNDER REAR LEFT SEAT
Modules
WIRE LOCATION
Module 1 BCM-ATTACHED TO THE REAR FUSE BLOCK, BENEATH THE LEFT REAR SEAT
Module 2 ECM-NEAR THE LOWER LEFT FRONT OF THE ENGINE
Module 3 PCM-MOUNTED TO THE UPPER LEFT OF THE ENGINE
Module 4 EBCM- FRONT DRIVER SIDE FRAME RAIL
Doorlocks/Windows
WIRE COLOR POLARITY LOCATION
Databus Wire VIOLET (-) AT PIN 2 OF THE DIAGNOSTIC CONNECTOR UNDER THE DRIVERS SIDE DASH
Power Unlock DATA BUS SYSTEM (REV) AT MOTOR IN DOORS
THE DOOR LOCKS IN THIS VEHICLE ARE MULTIPLEXED. WIRE AS A REVERSING POLARITY SYSTEM IN EACH FRONT DOOR OR ACQUIRE A MULTIPLEX INTERFACE ADAPTER FROM A SECURITY MANUFACTURER.
PowerLock DATA BUS SYSTEM (REV) AT MOTOR IN DOORS
THE DOOR LOCKS IN THIS VEHICLE ARE MULTIPLEXED. WIRE AS A REVERSING POLARITY SYSTEM IN EACH FRONT DOOR OR ACQUIRE A MULTIPLEX INTERFACE ADAPTER FROM A SECURITY MANUFACTURER.
Driver Mtr Unlock TAN (REV) AT THE DRIVERS DOOR MODULE IN THE DRIVERS DOOR 24 PIN CONNECTOR PIN B2
Driver Mtr Lock GREY (REV) AT THE DRIVERS DOOR MODULE IN THE DRIVERS DOOR 24 PIN CONNECTOR PIN B3
Pas Mtr Unlock TAN (REV) AT MOTOR IN DOOR
Pas Mtr Lock GREY (REV) AT MOTOR IN DOOR
LF Window Up DARK BLUE (REV) DRIVER DOOR MODULE
LF Window Dn BROWN (REV) DRIVER DOOR MODULE
RF Window Up LIGHT BLUE (REV) PASSENGER DOOR MODULE
RF Window Dn TAN (REV) PASSENGER DOOR MODULE
LR Window Up DARK BLUE (REV) REAR LEFT WINDOW SWITCH IN REAR LEFT DOOR
LR Window Dn BROWN (REV) REAR LEFT WINDOW SWITCH IN REAR LEFT DOOR
RR Window Up DARK BLUE (REV) REAR RIGHT WINDOW SWITCH IN REAR RIGHT DOOR
RR Window Dn BROWN (REV) REAR RIGHT WINDOW SWITCH IN REAR RIGHT DOOR
Since the Lift Gate Module is attached directly to the inside of the Lift Gate under the Plastic Cover Panel... The one that you bought may already have a damaged LGM inside and/or cut or shorted wires in the harnesses (there are THREE of them that get plugged into it...) One for the Lift Gate Locking Latch, One for the Windshield Wiper Circuit and One for the Upper Rear Window Release.
So... any number of Shorted or Broken wires could be involved. If you Trace The Harness Leads to which of these Three Gate Components is giving you the trouble... you can narrow the field and know where to start after pulling the Harness Connectors from the LGM to Probe... or... Back Probing with a Small Pin Inserted through the Back of each Wire in the Connector(s) for your Light Probe.
Also... Your OWN Vehicle Grommet Tube that feeds the wiring through the Upper Right Roof area and passes into the Lift Gate could ALSO have 'work hardened' and have broken wires up inside there as well, so ...as originally suggested by @xavierny25 ... Using a lighted "Scope on a Rope" or a Digital Multi-Meter to probe for Continuity should reveal the Culprit(s) . These images provide the Harness Layout of the LGM (Inverted here for the Installed LGM Image so you can read the White Label) to give you a better idea of where to isolate them for probing. The Broken Wire Images show which wires to probe for 12VDC leading from the upper Right Body Feed Through into the Lift Gate:


The Wiring Color - Location Codes related from this List are Hi-Lighted Below:
Audio/Mobile Video
WIRE COLOR POLARITY LOCATION
Battery ORANGE (+) RADIO HARNESS
Accessory ORANGE (DATA) RADIO HARNESS
THE RADIO HARNESS DOES NOT PROVIDE A SWITCHED POWER SOURCE. RUN A WIRE TO THE FUSE-BOX FOR SWITCHED POWER. THE ACCESSORY TURN-ON IS CONTROLLED BY THE CLASS 2 SERIAL NETWORK.
Ground BLACK/WHITE (-) RADIO HARNESS
LF Speaker (+) TAN
THESE WIRES ALSO GO TO THE FRONT LEFT TWEETER
LF Speaker (-) GRAY
RF Speaker (+) LIGHT GREEN
THESE WIRES ALSO GO TO THE FRONT RIGHT TWEETER
RF Speaker (-) DARK GREEN
LR Speaker (+) BROWN
LR Speaker (-) YELLOW
RR Speaker (+) DARK BLUE
RR Speaker (-) LIGHT BLUE
Steering Cntrls OPTIONAL
THIS VEHICLE MAY BE EQUIPPED WITH ONSTAR® AND MAY LOSE DOOR CHIME AND OTHER VEHICLE MONITORING FUNCTIONS WHEN OEM RADIO IS REPLACED. USE PROPER INTEGRATION PIECE TO MAINTAIN THESE FEATURES.
Speed Cntrl OPTIONAL
Radio Security YES
Security
WIRE COLOR POLARITY LOCATION
Battery RED OR RED/WHITE (+) AT IGNITION SWITCH HARNESS
Ignition 1 PINK (+) AT IGNITION SWITCH HARNESS
Starter 1 YELLOW (+) AT IGNITION SWITCH HARNESS
All Door Trigger GRAY/BLACK (-) IN HARNESS IN DRIVERS SIDE WINDSHIELD PILLAR
TO AVOID THE DOME LIGHT DELAY FUNCTION, USE INDIVIDUAL DOOR TRIGGERS AND DIODE ISOLATE EACH WIRE,
Dome light Super GRAY/BLACK (-) IN HARNESS AT VEHICLE LIGHT SWITCH
LF Latch GRAY/BLACK (-) IN THE DRIVERS DOOR
RF Latch BLACK/WHITE (-) IN THE PASSENGERS DOOR
LR Latch LIGHT BLUE/BLACK (-) IN THE PASSENGERS DOOR
RR Latch LIGHT GREEN/BLACK (-) IN THE PASSENGERS DOOR
Trunk Trigger PINK/BLACK (-) AT MODULE IN REAR HATCH
VIOLET (-) WILL MONITOR THE GLASS AT THE MODULE IN THE REAR HATCH
Hood Trigger PINK/BLACK (-) ON LEFT INNER FENDER
NOT ON ALL MODELS
Alarm Disarm LT. GREEN (-) IN DRIVERS DOOR AT MODULE
Parking Lights GREY/BLACK (-) AT SWITCH
OR BCM TAN PLUG PIN E5
Low Ctr Pk Lights GRAY/BLACK (-) AT VEHICLE LIGHT SWITCH HARNESS
Data Bus VIOLET (-) AT PIN 2 OF THE DIAGNOSTIC CONNECTOR UNDER THE DRIVERS SIDE DASH
Convenience
WIRE COLOR POLARITY LOCATION
Headlights-Lo WHITE (+) IGNITION SWITCH HARNESS
LF Pk Lt Bulb BROWN (+) AT FRONT LEFT PARKING LAMP
RF Pk Lt Bulb BROWN (+) AT FRONT RIGHT PARKING LAMP
LR Pk Lt Bulb BROWN (+) AT REAR LEFT TAIL LIGHT ASSEMBLY
RR Pk Lt Bulb BROWN/WHITE (+) AT REAR LEFT TAIL LIGHT ASSEMBLY
All Hazrd Lights WHITE (-) AT VEHILCE HAZARD SWITCH
LF Hazrd Bulb LIGHT BLUE (+) AT FRONT LEFT TURN LAMP
RF Hazrd Bulb DARK BLUE (+) AT FRONT RIGHT TURN LAMP
LR Hazrd Bulb LIGHT BLUE (+) AT REAR LEFT TAIL LIGHT ASSEMBLY
RR Hazrd Bulb DARK BLUE (+) AT REAR RIGHT TAIL LIGHT ASSEMBLY
Wipers-Lo PINK (+) AT VEHICLE WIPER CONTROL SWITCH
Wipers-Hi DARK BLUE (-) AT VEHICLE WIPER CONTROL SWITCH
Parking Brake LIGHT BLUE (-) AT VEHICLE PARKING BRAKE SWITCH
Seat Mem 1 WHITE (+) AT MODULE IN DRIVER DOOR
Seat Mem 2 VIOLET (+) AT MODULE IN DRIVER DOOR
Remote Start
WIRE COLOR POLARITY LOCATION
Battery RED OR RED/WHITE (+) AT IGNITION SWITCH HARNESS
Ignition 1 PINK (+) AT IGNITION SWITCH HARNESS
Ignition 2 WHITE (+) AT IGNITION SWITCH HARNESS
Accessory 1 ORANGE (+) AT IGNITION SWITCH HARNESS
Accessory 2 BROWN (+) AT IGNITION SWITCH HARNESS
Starter 1 YELLOW (+) AT IGNITION SWITCH HARNESS
Anti-Theft Type GM PASSLOCK II® ANTI-THEFT SYSTEM
Anti-Theft Descript PASSLOCK II
Key Sense LIGHT GREEN (-) AT THE STEERING COLUMN HARNESS
Tachometer UNCOMMON COLOR (AC) ANY FUEL INJECTOR NOT PINK
Speed Sense DK. GREEN/WHITE (AC) AT RADIO 24 PIN GREY PLUG
OR PCM BLUE CONN. PIN 21
Parking Lights GREY/BLACK (-) AT SWITCH
OR BCM TAN PLUG PIN E5
Low Crr. Pk Lights GRAY/BLACK (-) AT VEHICLE LIGHT SWITCH HARNESS
Brake Lights WHITE (-) AT BRAKE SWITCH ABOVE BRAKE PEDAL
Reverse Lights GRAY (+) IN HARNESS IN DRIVERS KICK-PANEL
Horn BLACK (-) BCM TAN CONN. PIN E12
ALSO BLACK (-) AT BCM MODULE UNDER REAR LEFT SEAT
Modules
WIRE LOCATION
Module 1 BCM-ATTACHED TO THE REAR FUSE BLOCK, BENEATH THE LEFT REAR SEAT
Module 2 ECM-NEAR THE LOWER LEFT FRONT OF THE ENGINE
Module 3 PCM-MOUNTED TO THE UPPER LEFT OF THE ENGINE
Module 4 EBCM- FRONT DRIVER SIDE FRAME RAIL
Doorlocks/Windows
WIRE COLOR POLARITY LOCATION
Databus Wire VIOLET (-) AT PIN 2 OF THE DIAGNOSTIC CONNECTOR UNDER THE DRIVERS SIDE DASH
Power Unlock DATA BUS SYSTEM (REV) AT MOTOR IN DOORS
THE DOOR LOCKS IN THIS VEHICLE ARE MULTIPLEXED. WIRE AS A REVERSING POLARITY SYSTEM IN EACH FRONT DOOR OR ACQUIRE A MULTIPLEX INTERFACE ADAPTER FROM A SECURITY MANUFACTURER.
PowerLock DATA BUS SYSTEM (REV) AT MOTOR IN DOORS
THE DOOR LOCKS IN THIS VEHICLE ARE MULTIPLEXED. WIRE AS A REVERSING POLARITY SYSTEM IN EACH FRONT DOOR OR ACQUIRE A MULTIPLEX INTERFACE ADAPTER FROM A SECURITY MANUFACTURER.
Driver Mtr Unlock TAN (REV) AT THE DRIVERS DOOR MODULE IN THE DRIVERS DOOR 24 PIN CONNECTOR PIN B2
Driver Mtr Lock GREY (REV) AT THE DRIVERS DOOR MODULE IN THE DRIVERS DOOR 24 PIN CONNECTOR PIN B3
Pas Mtr Unlock TAN (REV) AT MOTOR IN DOOR
Pas Mtr Lock GREY (REV) AT MOTOR IN DOOR
LF Window Up DARK BLUE (REV) DRIVER DOOR MODULE
LF Window Dn BROWN (REV) DRIVER DOOR MODULE
RF Window Up LIGHT BLUE (REV) PASSENGER DOOR MODULE
RF Window Dn TAN (REV) PASSENGER DOOR MODULE
LR Window Up DARK BLUE (REV) REAR LEFT WINDOW SWITCH IN REAR LEFT DOOR
LR Window Dn BROWN (REV) REAR LEFT WINDOW SWITCH IN REAR LEFT DOOR
RR Window Up DARK BLUE (REV) REAR RIGHT WINDOW SWITCH IN REAR RIGHT DOOR
RR Window Dn BROWN (REV) REAR RIGHT WINDOW SWITCH IN REAR RIGHT DOOR
Last edited:
Thanks for the reply’s guys. The first thing I’ll do is swap the liftgate module from the old rusted liftgate to the new one. For all I know, the lock “clicking” before may only of been because I was wiggling the connector to get it to come apart. If everything doesn’t work like before, I’ll check for power on the 3 or 4 wires in the top boot. Last of course I’ll check fuses. I’ll report back. It’s raining and I only have a driveway so it may be a day or two. Thanks for the help.
Mooseman
Moderator
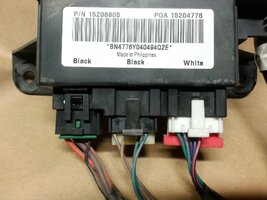
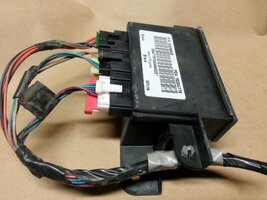
These are a few images of a Disassembled Lift Gate Module (...$15.00 via eBay) that I took apart (See Post #31 at the Link below…) with relative ease to discover that one of the Power Tangs (Both Female in the Plug...and Male from the Logic Board side) displayed serious damage due to Electrical Arcing that destroyed the Cadmium Plating on the both the Male & Female sides of their contact points and was sufficiently Violent enough to melt and Carbonize the LGM Plastic Case. Vehicles being driven constantly on Rough Roads and Harsh Terrain can 'Jounce and Bounce' around enough to move the Harnesses and Wire Bundles around enough to cause these Connector to LGM loosening and vibration problems to occur.
These artifacts are NOT easily seen and the LGM needs disassembly in order to assess the problem. Once the Cadmium Plating has been “Sparked and Arced” and melts or vaporizes off… the Mild Steel Tine soon rusts up once exposed to moist air afterwards… further complicating the conductivity issues that prevent the LGM from working right. The additional images are pretty good closeups of the Wire Harness Colors.
It is highly unlikely that the Bread Board inside of the LGM unit ever suffers failure from any surface mounted or wave soldered components. The weakest link here… seems to be the mix and match of male and female connectors as a point of focus where they are supposed to plug up and stay in close contact...without inviting 12 VDC Arcing. I would NOT be the least bit surprised if many of these kinds of Harness and Connector problems are caused by Excessive Body Vibrations from having Bad Motor Mounts :
By the way... I'm attaching a Full Size Color Diagram of the Entire Class 2 Network in your vehicle to assist you with your Network Wire Tracing:
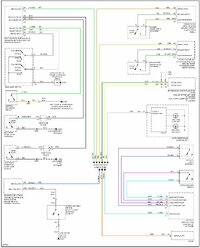
https://gmtnation.com/forums/threads/how-to-make-a-gymko-tech-2-bench-top-test-harness.18272/
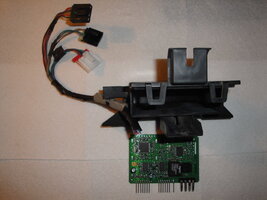
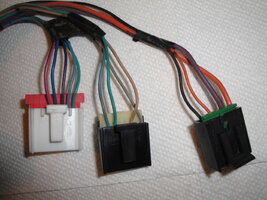
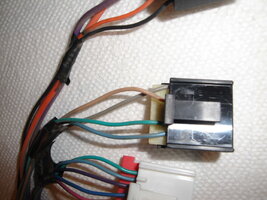
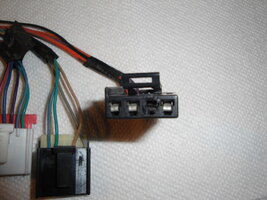
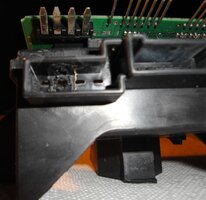
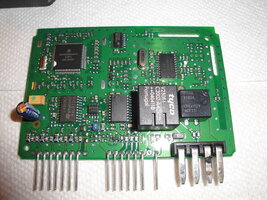
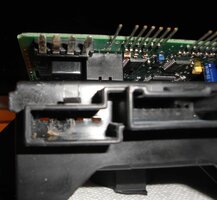
These artifacts are NOT easily seen and the LGM needs disassembly in order to assess the problem. Once the Cadmium Plating has been “Sparked and Arced” and melts or vaporizes off… the Mild Steel Tine soon rusts up once exposed to moist air afterwards… further complicating the conductivity issues that prevent the LGM from working right. The additional images are pretty good closeups of the Wire Harness Colors.
It is highly unlikely that the Bread Board inside of the LGM unit ever suffers failure from any surface mounted or wave soldered components. The weakest link here… seems to be the mix and match of male and female connectors as a point of focus where they are supposed to plug up and stay in close contact...without inviting 12 VDC Arcing. I would NOT be the least bit surprised if many of these kinds of Harness and Connector problems are caused by Excessive Body Vibrations from having Bad Motor Mounts :
By the way... I'm attaching a Full Size Color Diagram of the Entire Class 2 Network in your vehicle to assist you with your Network Wire Tracing:

https://gmtnation.com/forums/threads/how-to-make-a-gymko-tech-2-bench-top-test-harness.18272/


Last edited:
Thanks for the reply’s. I sure hope the modules and wiring are the same. I’m still surprised that when I disconnected the connector for the liftgate on top, that the key fobs, interior lights would continue to work as they should. Still raining here, sure wish I had a garage. Thanks again.
I just wanted to let any readers know that my swapped liftgate is now completely functional and the problems with the key fobs not working etc are now back to normal. All I did was swap the “new” liftgate module with the original one from the rusted out liftgate. The wiring harness was the same and they appeared to be the same. I’m not sure if the “new” LGM was bad or my TB just needed the original LGM for everything to function back to normal.
Forum Statistics
Staff Online
-
MoosemanModerator
Members Online
Total: 587 (members: 8, guests: 579)
