Sorry to keep hitting this sub-forum with threads but I've got another project now. As some may have seen, I purchased those gold TBSS 20" replica wheels from 05tbowner.
I was kind of delirious from exhaustion when we talked, but I think tbowner said they were painted flat black by the manufacturer (factory repros, I think), and then the previous owner used rattle can gold paint on them (tbowner, hop in here if I'm screwing this up brother).
So I decided to plasti-dip the wheels, as I don't really have it in my budget to have them professional sand-blasted and painted/powder-coated. For those curious, I hear the prices for that range from $80 a wheel to $150 a wheel, and sometimes you get a slight discount for having them do all four.
I'm totally new to painting. I tried to do a bunch of research as well as pester the heck out of my uncle who is a professional painter (houses and commercial buildings, not cars). One piece of advice that seems to keep coming up is that you need to spend the majority of the time properly preparing the surface, called "prep." I figure that means that if I want my plasti-dip to have a smooth surface, I need the wheels to have a smooth surface before I ever start spraying the plasti-dip (by smooth I mean not visibly uneven like the pictures above, if you were hypothetically to make the wheels like glass with 5000 grit sandpaper or something, the plastidip would have a hard time adhering, or that's at least my understanding of it).
For those really new to this, 100 is coarser and therefore will abrade the surface more quickly, but the drawback is that it will leave the surface less smooth. It's a heavy-handed approach and is used for paint stripping, and some may question my using such a coarse sandpaper. It definitely caused me trouble, but I also believe it saved me a huge amount of time.
The 320 grit sandpaper is finer and will not abrade the paint as fast, which means using it can take longer especially when there is a lot of paint to get through, but this can be an advantage because it allows you to be more cautious. Furthermore, it leaves the surface even smoother than is possible with the 100 grit, yet not so smooth that the plasti-dip won't adhere. Therefore it's the perfect grade for our purposes.
I think my mistake was not having a clear game plan of what I wanted to do with it. Originally I wanted to simply smooth out the runs so I would have a good surface to dip. I wanted to get that done before the Mid-Atlantic meet tomorrow. Well obviously it was too late for that because I would have to complete a lot of prep-work and then the plasti-dip requires multiple layers as well as 24-48 of drying time, so that wasn't happening. Then I figured I could at least sand off the gold paint to expose the black paint, which I preferred if having to choose between the two. I don't think I was really thinking that decision through because I had read elsewhere that stripping only the top layer of paint while leaving the bottom intact is really hard to do. Anyway, I jumped right in without thinking.
I went to the 100 grit to see what it would do. It actually started making pretty quick work of gold and got through to the black coat underneath pretty fast.
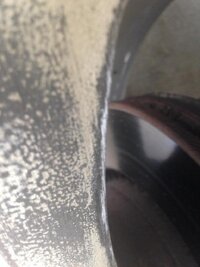
I was using the sandpaper just with my fingers instead of using a sanding block, which for you guys new to this is pretty much just a block you wrap the sandpaper around so that you apply even pressure throughout the sandpaper instead of just the contact points of your fingers. Because of this, I was applying too much pressure at the edges, such as the edges of the spokes, and this, combined with the fact that edges are usually very thinly painted compared to the rest of the piece, meant that I went too far and got straight through to the silver colored aluminum underneath the black:
The going quickly got tough and certain areas were awkward to reach and were not coming off as fast. I realized this was going to take a lot longer than expected (everyone reading this is probably like, ).
).
However, this didn't seem to do much except do a great job of cleaning the wheels from the sanding dust. Maybe I will use this as prep before I paint to make sure the wheels are extra clean? Obviously I would make sure to wipe it off so the wheels are dry before actually spraying them. So I resigned to using the 100 grit to get all of the bumps, runs, and pitting out as best I could. Once that was done, I went back over everything with 320 grit just to generally smooth stuff out as well as better feather the edges of areas where I had gone through the black to the aluminum.
I can feel no bumps, edges, flakes, etc. with my fingers except for the very outer edge of the rim which I guess I still need to do, but I'm worried about scratching up my beautiful new tires! I guess I will tape them?
Because I went through the black in several places, the temporarily black wheels idea is out. I only got through the one wheel, so the other 3 are still gold and this one looks like, well it just looks really bizarre. I guess I will plasti-dip it later this weekend or later this week, assuming I have completed the necessary prep-work (see below), as well as do the same thing for the other 3 wheels.
I have several questions if someone could help me:
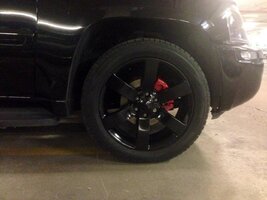
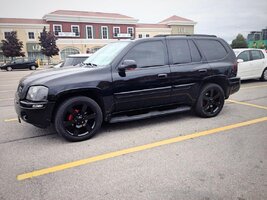
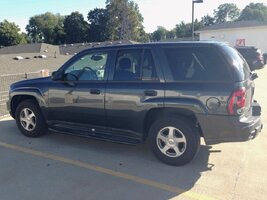
This:
View attachment 31057
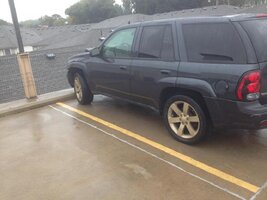
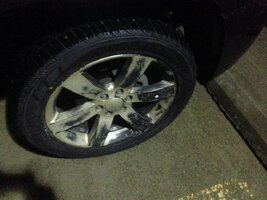
To this (I removed the running boards at the same time I put the new wheels on, just because I was tired of them and they were getting pretty dumpy):
View attachment 31058
View attachment 31057
To this (I removed the running boards at the same time I put the new wheels on, just because I was tired of them and they were getting pretty dumpy):
View attachment 31058
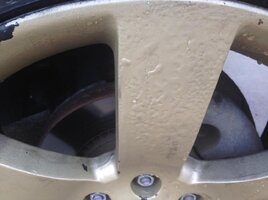
I was kind of delirious from exhaustion when we talked, but I think tbowner said they were painted flat black by the manufacturer (factory repros, I think), and then the previous owner used rattle can gold paint on them (tbowner, hop in here if I'm screwing this up brother).
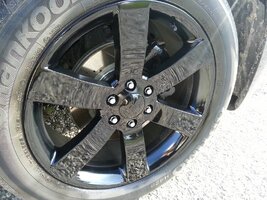
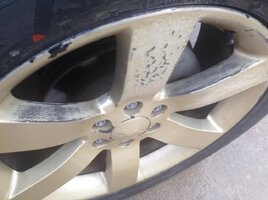
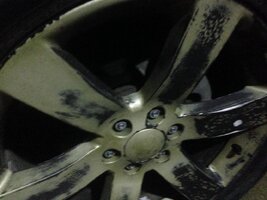
The rattle can job wasn't very good because there are many areas on the wheels with runs and uneven paint:
View attachment 31059
View attachment 31059
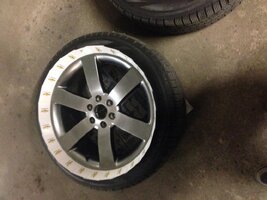
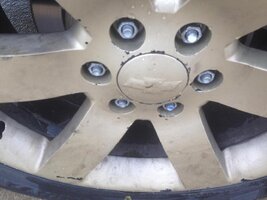
There are also many places where the gold paint has already come off:
View attachment 31060
View attachment 31060
So I decided to plasti-dip the wheels, as I don't really have it in my budget to have them professional sand-blasted and painted/powder-coated. For those curious, I hear the prices for that range from $80 a wheel to $150 a wheel, and sometimes you get a slight discount for having them do all four.
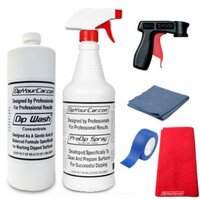
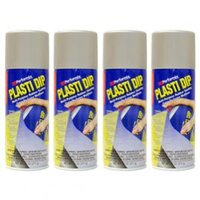
This is what my GF got me for our anniversary:
View attachment 31071
View attachment 31070
View attachment 31071
View attachment 31070
I'm totally new to painting. I tried to do a bunch of research as well as pester the heck out of my uncle who is a professional painter (houses and commercial buildings, not cars). One piece of advice that seems to keep coming up is that you need to spend the majority of the time properly preparing the surface, called "prep." I figure that means that if I want my plasti-dip to have a smooth surface, I need the wheels to have a smooth surface before I ever start spraying the plasti-dip (by smooth I mean not visibly uneven like the pictures above, if you were hypothetically to make the wheels like glass with 5000 grit sandpaper or something, the plastidip would have a hard time adhering, or that's at least my understanding of it).
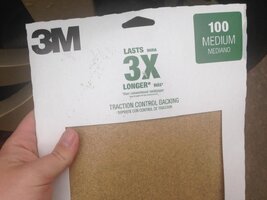
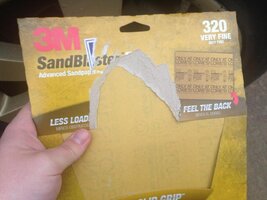
So I went out and bought some 100 grit sandpaper and some 320 grit sandpaper:
View attachment 31063
View attachment 31064
View attachment 31063
View attachment 31064
For those really new to this, 100 is coarser and therefore will abrade the surface more quickly, but the drawback is that it will leave the surface less smooth. It's a heavy-handed approach and is used for paint stripping, and some may question my using such a coarse sandpaper. It definitely caused me trouble, but I also believe it saved me a huge amount of time.
The 320 grit sandpaper is finer and will not abrade the paint as fast, which means using it can take longer especially when there is a lot of paint to get through, but this can be an advantage because it allows you to be more cautious. Furthermore, it leaves the surface even smoother than is possible with the 100 grit, yet not so smooth that the plasti-dip won't adhere. Therefore it's the perfect grade for our purposes.
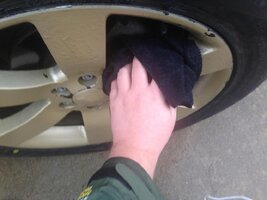
So I started working on my front passenger wheel today, first making sure to get it as clean as possible:
View attachment 31065
View attachment 31065
I think my mistake was not having a clear game plan of what I wanted to do with it. Originally I wanted to simply smooth out the runs so I would have a good surface to dip. I wanted to get that done before the Mid-Atlantic meet tomorrow. Well obviously it was too late for that because I would have to complete a lot of prep-work and then the plasti-dip requires multiple layers as well as 24-48 of drying time, so that wasn't happening. Then I figured I could at least sand off the gold paint to expose the black paint, which I preferred if having to choose between the two. I don't think I was really thinking that decision through because I had read elsewhere that stripping only the top layer of paint while leaving the bottom intact is really hard to do. Anyway, I jumped right in without thinking.
I went to the 100 grit to see what it would do. It actually started making pretty quick work of gold and got through to the black coat underneath pretty fast.
Here was my progress after only 3 minutes:
View attachment 31062
View attachment 31062
I was using the sandpaper just with my fingers instead of using a sanding block, which for you guys new to this is pretty much just a block you wrap the sandpaper around so that you apply even pressure throughout the sandpaper instead of just the contact points of your fingers. Because of this, I was applying too much pressure at the edges, such as the edges of the spokes, and this, combined with the fact that edges are usually very thinly painted compared to the rest of the piece, meant that I went too far and got straight through to the silver colored aluminum underneath the black:
The going quickly got tough and certain areas were awkward to reach and were not coming off as fast. I realized this was going to take a lot longer than expected (everyone reading this is probably like,
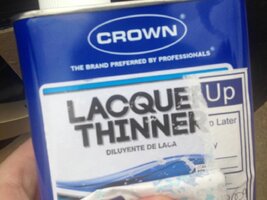
). I was hoping I could take a shortcut by using lacquer thinner, which I read on the internet was good at removing the types of paint that came in rattle cans:
View attachment 31069
View attachment 31069
However, this didn't seem to do much except do a great job of cleaning the wheels from the sanding dust. Maybe I will use this as prep before I paint to make sure the wheels are extra clean? Obviously I would make sure to wipe it off so the wheels are dry before actually spraying them. So I resigned to using the 100 grit to get all of the bumps, runs, and pitting out as best I could. Once that was done, I went back over everything with 320 grit just to generally smooth stuff out as well as better feather the edges of areas where I had gone through the black to the aluminum.
3 hours of work later after I relocated to the bottom of the parking garage because it started pouring:
View attachment 31066
View attachment 31067
View attachment 31066
View attachment 31067
I can feel no bumps, edges, flakes, etc. with my fingers except for the very outer edge of the rim which I guess I still need to do, but I'm worried about scratching up my beautiful new tires! I guess I will tape them?
Because I went through the black in several places, the temporarily black wheels idea is out. I only got through the one wheel, so the other 3 are still gold and this one looks like, well it just looks really bizarre. I guess I will plasti-dip it later this weekend or later this week, assuming I have completed the necessary prep-work (see below), as well as do the same thing for the other 3 wheels.
I have several questions if someone could help me:
- Is there a faster, DIY way to be doing this, such as with a power tool accessory, or a different chemical stripper than lacquer thinner? I have a Flex 3401 dual action polisher (probably no help here) as well as a corded drill and a cordless impact drill.
- Should I also do the inside of the wheel wells, or just worry about the face and sides of the spokes?
- How the hell do I remove the center cap lol?
- Is it okay to stop at the point that this wheel is at, or do I need to go further with the prep?
- Any additional tips on plasti-dipping and plasti-dipping wheels would be much appreciated.
Attachments
-
 2013-09-23 16.46.58.jpg93.9 KB · Views: 20
 -
 2013-10-11 15.34.51.jpg83.2 KB · Views: 18
 -
 2013-10-11 15.35.22.jpg59.3 KB · Views: 19
 -
 2013-10-11 15.35.11.jpg64.6 KB · Views: 19
 -
 2013-10-11 17.05.59.jpg70.6 KB · Views: 19
 -
 2013-10-11 17.02.57.jpg63.6 KB · Views: 19
 -
 2013-10-11 17.03.29.jpg69.6 KB · Views: 21
 -
 2013-10-11 17.03.36.jpg54.7 KB · Views: 22
 -
 2013-10-11 20.19.46.jpg88.9 KB · Views: 23
 -
 2013-10-11 20.19.54.jpg74.1 KB · Views: 22
 -
 2013-10-11 17.06.06.jpg65 KB · Views: 19
 -
 2013-10-11 17.02.39.jpg68.6 KB · Views: 21
 -
 accessory bundle.jpg17.3 KB · Views: 19
 -
 TM Wheel Kit.jpg15.2 KB · Views: 20