Here is what I did and what I’d do differently with the 3” body lift... hope it helps someone.
Pucks
I ordered up some 3” pucks from Zone via the auction site.

Just look at the Zone 2” lift kit and find out how many you need and become familiar with the install process. You can find the install instructions in PDF form with a quick google search. In it you’ll find a parts list.
Bolts, Nuts, Washers
The body bolts are the next challenge. I went to my local Fastenal to order. They wanted a ridiculous price at first, but the rep marked them as “construction use” and saved me a ton. Tractor Supply didn’t have the length I needed. You might be able to get nuts and washers at a better price and get bolts from Fastenal to save a few bucks. Came out to ~$78 for nuts, bolts, washers at Fastenal. I think they were grade 8 or 10. I can’t remember. I found the appropriate sizing on this site. If I can find the invoice, I’ll list sizes here.
Steering extension
As many of you know, Zone used to make a steering extension that they sold for $60 but have since stopped selling it outside of a kit. So, per Joey and some others on here (forgive me for not crediting where due, I’ve read a lot on the site... THANK YOU), I went with the suburban steering shaft as it is a direct fit. $20 at the yard for it and miscellaneous odds and ends.
Pic from this site:

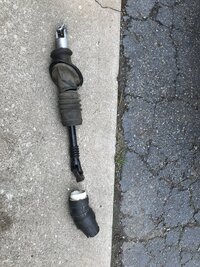
Here is mine:

I pulled it from the yard, and it appears that it is an aftermarket top piece that connects to the steering wheel side. Not sure if that affected anything, but more on that later.
Mistake #1... At first I just installed as is. But the steering was binding. I knew I had to shorten it. Sooo...
After some back and forth with Joey, he suggested ... Cut the top off (red) then cut out ribbed section (teal) then pound top into new section (yellow) drill hole and your done.
I did this and was afraid the bolt would sheer off so I ended up welding it after taking it to pound town...

Steering strong like bull.
Rattle canned it black so it wouldn’t rust and installed it...
But whoops, the bolt I used to connect both pieces together was a little too long and ripped the rubber boot.

I re installed to find that the boot was too short!
So I went to a big box store and got a 3” rubber coupling. Haven’t looked at it to see how it is holding up, but it closed the gap fairly well. Just wanted to keep water and salt out.
After final install... I think too much was taken out. I have another shaft I’m going to re-do and leave a few ribs in. She’ll like that.
Here is what I’m looking at. I don’t like the splines showing, so I’m going to see where I land with replacing it. It could be due to it being aftermarket 🤷♂️ But it drives with no binding. So good for now.

Front Bumper
Next is the front bumper... I managed to source Barton’s 3” BL steel weld it yourself bumper kit from another member, but I haven’t had a good weekend to weld it up. In the meantime, it’s pretty simple to relocate the front bumper. Just need your longer bolts from above and I used a 2” steel pipe cut to 3” long as a spacer. It required some trimming and I ditched the tow hooks. Overall I’m happy with it. It’s temporary but you could run it full time.
Rear Bumper
So... by divine intervention, I sourced the last uninstalled 3” BL relocation brackets made by Barton. And only 45 min from my house. Thanks Joey!
I followed the Zone instructions as they used Mark MCs design and the brackets are the same install instructions between 3” and and 2” lift.


There were additional instructions for install but no need to repost here. Consult the PDF Zone instructions.
For your build, plan on welding up a steel rear bumper. It’s pretty straight forward for a simple one. Otherwise try to source brackets.
So here is where I’m at right now. 3” BL and Marks 3” suspension lift. Loving the lift. Waiting on tires. Going to 285/75r17 Cooper all-terrains. They come in at just over 34” per their website. The 265/70/17s on there now just don’t cut it.


Hope this helps!
Good luck!
Pucks
I ordered up some 3” pucks from Zone via the auction site.
Just look at the Zone 2” lift kit and find out how many you need and become familiar with the install process. You can find the install instructions in PDF form with a quick google search. In it you’ll find a parts list.
Bolts, Nuts, Washers
The body bolts are the next challenge. I went to my local Fastenal to order. They wanted a ridiculous price at first, but the rep marked them as “construction use” and saved me a ton. Tractor Supply didn’t have the length I needed. You might be able to get nuts and washers at a better price and get bolts from Fastenal to save a few bucks. Came out to ~$78 for nuts, bolts, washers at Fastenal. I think they were grade 8 or 10. I can’t remember. I found the appropriate sizing on this site. If I can find the invoice, I’ll list sizes here.
Steering extension
As many of you know, Zone used to make a steering extension that they sold for $60 but have since stopped selling it outside of a kit. So, per Joey and some others on here (forgive me for not crediting where due, I’ve read a lot on the site... THANK YOU), I went with the suburban steering shaft as it is a direct fit. $20 at the yard for it and miscellaneous odds and ends.
Pic from this site:
Here is mine:
I pulled it from the yard, and it appears that it is an aftermarket top piece that connects to the steering wheel side. Not sure if that affected anything, but more on that later.
Mistake #1... At first I just installed as is. But the steering was binding. I knew I had to shorten it. Sooo...
After some back and forth with Joey, he suggested ... Cut the top off (red) then cut out ribbed section (teal) then pound top into new section (yellow) drill hole and your done.
I did this and was afraid the bolt would sheer off so I ended up welding it after taking it to pound town...
Steering strong like bull.
Rattle canned it black so it wouldn’t rust and installed it...
But whoops, the bolt I used to connect both pieces together was a little too long and ripped the rubber boot.
I re installed to find that the boot was too short!
So I went to a big box store and got a 3” rubber coupling. Haven’t looked at it to see how it is holding up, but it closed the gap fairly well. Just wanted to keep water and salt out.
After final install... I think too much was taken out. I have another shaft I’m going to re-do and leave a few ribs in. She’ll like that.
Here is what I’m looking at. I don’t like the splines showing, so I’m going to see where I land with replacing it. It could be due to it being aftermarket 🤷♂️ But it drives with no binding. So good for now.
Front Bumper
Next is the front bumper... I managed to source Barton’s 3” BL steel weld it yourself bumper kit from another member, but I haven’t had a good weekend to weld it up. In the meantime, it’s pretty simple to relocate the front bumper. Just need your longer bolts from above and I used a 2” steel pipe cut to 3” long as a spacer. It required some trimming and I ditched the tow hooks. Overall I’m happy with it. It’s temporary but you could run it full time.
Rear Bumper
So... by divine intervention, I sourced the last uninstalled 3” BL relocation brackets made by Barton. And only 45 min from my house. Thanks Joey!
I followed the Zone instructions as they used Mark MCs design and the brackets are the same install instructions between 3” and and 2” lift.
There were additional instructions for install but no need to repost here. Consult the PDF Zone instructions.
For your build, plan on welding up a steel rear bumper. It’s pretty straight forward for a simple one. Otherwise try to source brackets.
So here is where I’m at right now. 3” BL and Marks 3” suspension lift. Loving the lift. Waiting on tires. Going to 285/75r17 Cooper all-terrains. They come in at just over 34” per their website. The 265/70/17s on there now just don’t cut it.
Hope this helps!
Good luck!