Opinions Wanted - 4.2 Cylinder Head

Manquesa

Original poster
Member
Jun 9, 2019
11
Tx
I have a 2002 Trailblazer that has been neglected as far as oil changes go. Had an oil leak for some time now that I hadn't gotten around to fixing. The vacuum hose that connects to the bottom of the air box resonator on top of the engine from the front of the valve cover has been broken and i've been losing oil there. Also i'm pretty sure the valve cover gasket has been leaking for a while as well. Anyway, i've been getting a metallic rattling sound coming from the engine for quite some time now that was most noticeable just after accelerating when letting off the gas pedal. Recently the sound has gotten much louder and is heard during any RPM's higher than idle in addition to when letting off the gas pedal. The vehicle lacks power now as well and takes longer to get up to speed. I've finally parked the vehicle and stopped driving it so I can try to fix it.

I've pulled the intake manifold and was surprised to see a bunch of oil all over the gasket as well as caked on the inside of the cylinder head intake ports. Also, when pulling the coil packs on top of the valve cover several had a bit of oil which I already knew about but the #5 cylinder had oil just pouring out of the spark plug boot and i'm amazed that cylinder was even working at all now.

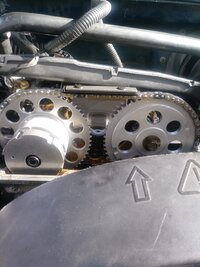
I removed the valve cover and got a look at the cylinder head. I've seen several photos that others have posted of their cylinder head after removing the valve cover and i'm a bit surprised how different mine looks as far as the oil or oil residue that's in the head. I haven't drained the oil yet and my cylinder head looks pretty dry to me. Like it hasn't really been getting the oil it needs in quite some time.
89251

Also, in the front of the cylinder head in the timing chain area the walls are covered in a thick tar like substance, presumable burned oil but really thick and caked on in a way i've never seen in an engine before.

89252

I'm concerned now that maybe there's been a bit more wear and tear in the cylinder head due to lack of oil than I was hoping. I took a close up pic of that shows some of the wear on one of the camshafts.

89253

Does this look like normal camshaft wear?

Nothing so far appears to be physically broken. Would it be a good assumption that the loud rattle like noise i'm hearing when accelerating and decelerating could be lifter noise from lifters not getting the oil they need or maybe even dry?

So far i'm thinking a new oil pump and maybe sump filter will be needed. Maybe replace the lifters and possibly the timing chain assembly. Then of course replace gaskets and clean everything up as best I can.

I do plan on removing the oil pan and front cover to get a good look in those areas as well.

Thanks in advance for any feedback anyone may have to offer for me.
 

Sparky

Member
Dec 4, 2011
12,927
Noise could be from the cam phaser in front and not necessarily from lifters etc. @Moohad that before I think?
 

Mooseman

Moderator
Dec 4, 2011
25,344
Ottawa, ON
The replacement engine I got for my 02 was similar to that but not quite as bad. I wound up replacing the cam phaser twice and the timing set due to a broken chain tensioner.

The cams may be OK but the lifters might be gummed up. I would replace the phaser, CPAS, timing chain set and tensioner, oil pump and clean out the pickup tube, which is likely clogged as well.

I would first do a general mechanical health check of the engine with a compression test and/or a leakdown test to see if it's even worth throwing these parts and time at it. It might be beyond saving and probably easier and cheaper to just swap out the engine with a good used one. This is especially true if the head has to come off as head bolts always break in the block and are a PITA to get out.
 
  • Like
Reactions: mrrsm

mrrsm

Lifetime VIP Donor
Supporting Donor
Member
Oct 22, 2015
7,727
Tampa Bay Area
The excessive Black Carbon and 'Ashy Aluminum Powder' looking Silvery Residue on the OD of the Cam Phaser makes me think that your Timing Chain has been rolling over the Timing Chain Guides Metal Scaffolds AFTER their Nylon Guides have either fractured and broken loose ... and has made 'Metal to Metal' Contact with their ALUMINUM undersides.

Remember that the the Timing Chain is always heading UPWARDS in a Clockwise turning pattern on the Passenger side of the Block, so those Metal Particles would naturally be subject to getting Slung or Cast Off around the outer upper Cam Phaser Area as the Timing Chain Rounds the Turn. An inoperative Cam Phase and-or Loose Timing Chain would require that you follow @Mooseman's Dedicated Thread on "How to R&R the Cam Phaser (VVT)" :


...and sadly, I'm guessing that it will also become even more involved with the need to replace the Timing Chain Set including Timing Chain Guides, Timing Chain Tensioner, and Intake Camshaft Sprocket.. That involved task requires the removal of the Crankcase-Oilpan and Front Timing Cover in order to access EVERYTHING mentioned above. These are all difficult time consuming and expensive prospects to consider involving Specialty Tools as well.

The Gerotor Oil Pump is attached to the Inside of the Timing Cover Casement and the whole thing can be replaced as a unit from gmpartsdirect.com. Look up the Most Recent Threads by @gmcman for his Hands-On Experience with recently performing everything mechanical that presently needs doing inside the Front and Upper Areas of your Motor.

That Gunk can also accumulate in the presence of Dirty, Organic Motor Oil from a Clogged Oil Filter and from Blow-By Gases from poor maintenance with not having the requisite amount of (7) Quarts of Mobil1 or any other Quality Full Synthetic filling up the Crankcase.

The Oil leaking into and filling up the Spark Plug Wells happens when the INSIDE Lower "O"Ring Style Valve Cover Seals (NOT the Seal around the Coil On Plugs) flattens out and wears enough to allow the Engine Oil lubricating the Valve Train and Top End Camshafts to ooze through those opening and "Drown The Plugs". The Valve Cover replacement "O" Ring Kit will fix that problem. Please... Do NOT exceed 87 INCH POUNDS when tightening the Trapped Valve Cover Fasteners Back Down.

Following @Mooseman 's Guidance... If your Compression Checks prove Nominal... I would AVOID CHANGING THE ENGINE HEAD AT ALL COSTS; and quite frankly... since you have not described seeing any Galled Camshaft Lifter Lobes or Broken Valve Roller Rockers, Do NOT 'head off' and Buy a Replacement One just yet. If it comes down to cases... I agree with the idea of finding a Low Mileage (around 160,000 Miles and Below) Engine between 2002 and 2004 out of a Wrecked Vehicle rather than from one sitting around in a Junk Yard. This approach will save you the endless and quite expensive headaches of tearing into the Motor while it is still resting inside of your SUV. If you are determined there is a need to Replace the Engine Head... I've had Good Luck with this Company:

42494510945_590325fdb8_z.jpg

With the lack of proper Oil Changes ... the innards of the CPAS Screens will probably be VERY Gunked Up. So Pulling the Three Bolts holding in the Power Steering Reservoir to the Engine Block will provide the clearance you need to remove and clean it well with some Spray Solvent. However... if the the CPAS Electrical Connector shows signs of Oil Buildup... Replacing it will be in order. In some cases... the Metal Screen(s) inside of the CPAS will be gone; ingested either into the Cam Phaser through the Solenoid Oil Passages in the upper Engine Head... or washed out onto the top areas of the Inner Engine Head by the Valve Train. If so... You will not be able to locate and retrieve them.

If the Engine Cylinders show signs of Low Compression... you could try using ACDelco Top Engine Cleaner as described an a half-dozen other Threads and loosen up the trapped Piston Compression Rings... then try the Compression Test all over again. If you want to browse all of my Images for the tear downs of the various sections of the GM 4.2L LL8 Engine ...Visit my various Image Albums and go through them ALL for information covering the Old Parts post-disassembly, New Parts, New Components, GM OEM Part Numbers and Images of their Box Ends to become better informed about what you will need to purchase if you decide to leap over the edge and fall endlessly into this Engine Repair Abyss:

 
Last edited:
  • Like
Reactions: Redbeard

Manquesa

Original poster
Member
Jun 9, 2019
11
Tx
Appreciate the info from all of you. Will check compression next I think. Was already planning on removing the oil pan and front cover to look at everything anyway and yes I realize that's it's all major PITA to get to everything. I've suspected a clogged oil pickup and or oil pump for a long time now but have never wanted to deal with whats required to access the oil pan to look at it. I've used motor flushes and Marvels mystery oil hoping to clear things out, may have actually clogged things up worse though. I now have proper motivation to do the work.

I was thinking of removing the head to finally be able to get to the 2 broken exhaust manifold bolts I have but after seeing all the issues with the head bolts breaking i'm not sure I want to mess with that.

So I will do the compression check then assuming all is okay I will pull the oil pan and front cover. Still thinking it will need a new oil filter and pickup, and a timing set with cam phaser and maybe even intake sprocket. Will look at the CPAS as well, i've replaced and cleaned that out in the past, it's easy. I will get a better look at the lifters before deciding on replacing those. Hopefully that will be all I need other than new gaskets and a good cleaning.

Thanks again for all the really helpful info!
 
  • Like
Reactions: mrrsm

mrrsm

Lifetime VIP Donor
Supporting Donor
Member
Oct 22, 2015
7,727
Tampa Bay Area
If you decide to perform the Complete Front Timing Cover/Gerotor Oil Pump Replacement... Get the UPDATED Version... and then purchase the necessary UPGRADE Oil Pump Pick-UP Tube from Melling as you will NOT be able to use the Old 2002 GM OEM Original OPPUT with the New Timing Cover Case-Gerotor Oil Pump that Doess NOT use a "Blue" Viton "O" Ring Design in-dwelling in the Original Oil Pump Manifold.

Here are some images of the CORRECT Pick-Up Tube and Part# available from Melling. The New OPPT comes with the correct Orange Flange Gasket as well. Again... I'd like to stress that by inviting @gmcman into your Thread and Discussion for the LATEST and BEST Information on how to perform all this work... his recent experiences will be of enormous help to you, Brother:

43350752192_87fb9cfd2c_z.jpg42681914194_3fd6b6dc60_z.jpg43350752052_d2d45c1908_z.jpg42681914074_2ff6e46ed8_z.jpg43350751782_f99ba20c04_z.jpg42681914044_cf88e90823_z.jpg42681913964_6a78caef4d_z.jpg43350751382_c74ac8c284_z.jpg42681913844_e8e96cd81c_z.jpg43350751212_226f71f291_z.jpg
 
Last edited:

gmcman

Member
Dec 12, 2011
4,656
Welcome to the club!

How many miles on your 2002? Do you have 4WD?

I would advise against any harsh flushing as of now, you may not have as much crud in there as you may think. However if you do, then you could possibly dislodge large amounts causing more issues...you would want a slow gradual cleaning.

Did you by chance get a video clip before you removed the valve cover?

I agree to get a dry compression test before you move forward. I just went through a similiar issue but I had a plugged PCV system which likely caused most of my issues...along with high mileage.


I used this to take a peek into the cylinders, could also be useful to possibly check the pick up tube through the drain.

https://www.amazon.com/dp/B0785H3XR7/?tag=gmtnation-20


Check to see if you can pass air into the crankcase through the PCV tube at the block, just under the center of Cyl 3&4 intake.

I personally would try this myself...but of course at your own risk...you could use a shop vac to suck up the crud on top of the timing chain area, just try to catch anything that may fall.

I would take a piece of foam and wedge it between the timing gear and the head just under where the crud is to trap anything that may break free and fall before you vacuum it. Not recommended at this point, but if you feel good about it it's worth a try.

For the lash adjusters, you will need this tool, along with a momentary push-button engine starter.

Screenshot_20190613-152837_Gallery.jpg


Screenshot_20190613-153204_Amazon Shopping.jpg


Let us know what the compression readings are.
 

Manquesa

Original poster
Member
Jun 9, 2019
11
Tx
Stupid question. What's the minimum needed to have connected to crank the engine for the compression test? I had already removed the intake manifold and valve cover to get a look at things which also involved removing most of the electrical connections, pcm, throttle body, and alternator as well as fuel lines and fuel pump relay. I've reconnected the PCM but I can't crank the engine. Nothing happens when I turn the key except for the a/c blower turning on. I'm not really wanting to reinstall everything if I don't need to. It just needs to crank over for the compression test right?
 

mrrsm

Lifetime VIP Donor
Supporting Donor
Member
Oct 22, 2015
7,727
Tampa Bay Area
You do not need to use the Ignition Key or the Internal Starter PCM Equipment... Just make Certain that your Shifter Lever is in PARK. Chock The Wheels... and that the Truck Battery is Fully Charged. When using the Remote Starter Switch... Don't Crank Over the Motor longer than 15-20 Seconds at a Time.. (See @gmcman 's Last Image ABOVE)... and watch this Video for the Hands-On Exemplar "How-To":

 
  • Like
Reactions: Redbeard

gmcman

Member
Dec 12, 2011
4,656
I wouldn't use the key to crank the engine. I forgot to mention this, and it may not even be possible unless everything is connected, but these vehicles...as in many GM's, have a feature that when you turn the key to start, the engine will continue to crank for a few seconds with the key released from the start position.

I don't know for sure if this happens when you just bump the starter, but if you hold it on start for about a sexond...that's when I believe it happens.

Are you doing this to remove the lash adjusters?

You really need the remote switch. This way you can use it while watching the cam lobe get the valve at the fully opened position.

You also need the Kent Moore tool to hold the valves opened. This works very well and you can have a lash adjuster out in about every 3-4 min once you get a rhythm going.

Screenshot_20190615-130506_Gallery.jpg


Bump the starter until the valve is fully opened, place the tool over the valve, then finger tighten the small bolt to hold the tool down, then bump the starter to release the cam lobe pressure. Lift the roller rocker out of the way, then use a small pair of pliers like these to remove the lash adjuster.

Screenshot_20190615-130025_Amazon Shopping.jpg


You also really dont want to have the battery connected while all the wires are laying loose....especially the alternator wires, even if still attached to the alternator.
 
  • Like
Reactions: mrrsm

gmcman

Member
Dec 12, 2011
4,656
If you're not pressed for time, PM me your address and I'll send you that Kent Moore tool.....just pay return shipping.
 
  • Like
Reactions: Blckshdw

Reed

Member
Sep 21, 2015
21
If you have 4 wheel drive; in order to remove the oil pan and timing cover, you will need to remove the CV axles and intermediate shaft, that goes through the oil pan.
Remove the brush plate underneath. Loosen the 35mm axle nut, and lug nuts, before jacking up the vehicle (Note: the loaner socket set from the auto parts stores only have a 36mm socket, but it will work without damaging the nut). Unclip the wheel speed sensor, and brake line. You may want to remove the rotor and brake caliper, and tie it out of the way. Remove the nuts, in the engine compartment, holding the strut tower. Remove the bolt holding the upper ball joint. Remove the tie rod and sway bar end link. Knock the upper control arm off of the upper ball joint. Tilt the steering knuckle out. Knock the CV axle loose from the wheel bearing. Use a hammer and a drift (long screwdriver, pipe, long socket extension, etc) to knock the axle out from the disconnect. The axles have just enough room to be removed from the vehicle, but they are a real pain in the ***.
If I recall; you will need to unclip the transmission cooling lines, and remove the 4WD actuator on the passenger side, and possibly the front differential on the driver's side, because it has a couple of bolts going to the oil pan. Maybe someone else can verify this for you.
The best advice I can give you is this: If you pound away with a drift, and you are unable to knock the CV axle(s) out of the axle disconnect, roll the axle 180 degrees and try again. The axle retaining ring is a "C" clip, and if the opening of the clip is in the wrong position it is almost impossible to remove the axle.
I'm guessing you have already cussed the design engineers, when you removed the PCM, bracket, and air intake, but you are likely about to come up with a whole new vocabulary. Best of luck to you.
 

Manquesa

Original poster
Member
Jun 9, 2019
11
Tx
Again, everyone's advice/info here is super helpful. I'm very glad I came here with this issue.

My 02 Trailblazer LS is a 2WD so that'll make the oil pan a little bit easier but still not fun. And it has just over 255k miles on it. I really appreciate the offer on the Kent Moore tool. I did a quick search online and found some options for the tool for as cheap as $9 (Also found one company asking over $160 for the same tool). I'm sure I can get one of the cheap used ones so I might as well just do that. Wouldn't be too much more than shipping anyway. Seriously thank you again for the offer.

I finally found time to get the compression readings.

Cyl 1 - 142
Cyl 2 - 137
Cyl 3 - 145
Cyl 4 - 119
Cyl 5 - 160
Cyl 6 - 165

So the cylinder 4 would be the lowest and the biggest cause for concern. I think cylinders 5 and 6 are higher than the others because there is likely a bit of oil on top of the piston. The cyl 5 spark boot was just gushing out oil when removed and 6 had a bit as well. I siphoned out what I could with a manual fluid pump I have though I don't think I was able to get out as much as I thought I did.

I don't know how accurate my compression tester is and i'm not 100% sure what the specs for compression are for this engine. I found one source online that says a normal reading should be 215 psi. If that's the case then how worried should I be about these readings?

I was happy to see that oil was coming in to the top of the cylinder head while cranking over the engine for this test. So at least it wasn't running as dry as I thought it might have been.

My work schedule and family obligations leave me very little time to work on this. Luckily I have another vehicle I can drive in the meantime. Will post updates as they come but it may be slow going. I'm not going to work on it today and will instead just try to enjoy Fathers Day.
 

mrrsm

Lifetime VIP Donor
Supporting Donor
Member
Oct 22, 2015
7,727
Tampa Bay Area
Those Compression Test Readings all look to be very low... and they're all over the map... indicating High Mileage Piston Compression Ring Wear on all of the Cylinders. Before you relax and enjoy FD... Consider First... With Coating your Entire Valve Train with Kroil Spray Oil "The Oil That CREEPS!" or some other Very Durable Spray Lubricant... even Cutting Oil... just something Very Sticky and Adhesive if you plan on leaving the Engine exposed to Moist Ambient Air for ANY length of time ...starting on Fathers' Day..

ALL of the Hardened Steel and Cast Iron surfaces of Each and Every Camshaft Lobe on BOTH Camshafts WILL completely RUST UP in only a few days if the Engine is left open, exposed and untreated ...and without a Valve Cover. You will be astonished at how just fragile those uncoated, untreated and well worn Camshaft Lobe Surfaces will become, once their Oil Coatings Evaporate and the Rusting Begins. One or two Cool, Damp nights or a few Rainy Days is really all it would take.

You WILL have to regularly keep performing this task as long as the upper engine is exposed to the Open Air. So, Seal up the Engine afterwards with Saran Wrap after coating the works with enough Gooey Oil to make certain no corrosion issues develop between the time you quit working on things now and the next opportunity you have to lay hands on your Engine and avoid any 'shocking surprises' by seeing all those lobes turning a bright Orange & Crystalline Brown ...with RUST.

A few years back, I charted the GM Atlas Engine LL8 4.2L Oiling System in Color so people would be able to understand How the Gerotor Oil Pump Based Oiling System REALLY Works in this unique, All Aluminum Engine. It is a very Simple and Straightforward Design as you can see from the attached image... with the Motor Oil leaving the Oil Filter and bifurcating to head Vertically to the Upper Engine and diverting only once (highlighted in Yellow) in the outer engine head and at the same time, it also runs horizontally straight to the back of the Engine Block, just above and to the Right of the Engine Center line of the Block in order to feed pressurized and gravity feed the numerous Main Journals on this exceptionally long Crankshaft.

There are a series of M16X2.00 Journal Gallery Access Plugs that traverse the Passenger Side of the Engine Block, The Intake (Drivers Side)of the Upper Head is fed via an Oil Feed Line from the Upper Engine Block and Lubricates the Intake side of the Valve Train. When the Oiling System is "Well Nourished" and in Tip Top Shape... This Engine is capable of circulating over 11 Gallons of Motor Oil Per Minute at or above 3,500 RPM from a range as low as 12 PSI at Idle... all the way up to around 65 PSI.

After that, the 'waste oil' oozing out from the radii between the Main Bearings and Con-Rod Bearing Journals gets slung upwards into the bottom areas of all (6) Cylinders and lubes the Connecting Rod Wrist Pins, propelled along by the centrifugal force generated by the High Speed Rotation and motions of the Crankshaft Counter-weights.

So if you can see that Oil flowing easily into the Upper Engine Head... its because it has to get there rapidly from a long way down in the Lower Bowels of the Oil-Pan ASAP directly into the Gerotor Oil Pump Manifold first. Then it moves upwards and laterally after passing though the Oil Filter. With all of that said... The immediate presence of Motor Oil oozing around within the valleys of the Upper Engine Head does NOT necessarily indicate that the entire Engine Block is being properly fed with Engine Oil:


GM42LOILFLOW1.jpg
 
Last edited:

Manquesa

Original poster
Member
Jun 9, 2019
11
Tx
Good info there. Nice to see where the oil flow should be. I will definitely add some spray oil of some kind to the exposed cylinder head and I think i'll also at least set the valve cover back on top of it while it's not being worked on.

Wondering about the compression test numbers. From what I understand compression tests should be done on a warmed up engine after running it for a bit. My tests were done with a cold engine that hasn't been run in about a week. Would the fact that the engine is cold and not warmed up result in lower numbers as well?
 

Sparky

Member
Dec 4, 2011
12,927
Yes it would. Warmed up the numbers would be higher. The lower compression of cyl 4 could still indicate something a bit gummy (whether ring gummed up, valve not quite seating 100% due to crud buildup, etc). Cleaning things out hopefully will clear that up.
 
  • Like
Reactions: Manquesa

gmcman

Member
Dec 12, 2011
4,656
I had just gone through a good top end cleaning, I strongly suggest some Berrymans B12 as well as some GM top engine cleaner in the aerosol can.

The GM cleaner seemed lore aggressive, so maybe start there. Only issue was they don't offer a straw to get the cleaner easily into the chambers. I had to get creative and drill out a smaller nozzle and use a clear tube.

I would get 3 or 4 cans and let it soak overnight, repeat 2 or 3 times.

May get lucky and free up some rings, but that's some low compression.

I would like to also strongly suggest a leak down test. This may help you better in finding exactly where the pressure is going...this is probably where you should start.
 
  • Like
Reactions: Manquesa

Mooseman

Moderator
Dec 4, 2011
25,344
Ottawa, ON
Those compression numbers are really low. I recently did a compression test on mine with about 1/3 the mileage and yours is over 100psi down from some of those.

With the poor maintenance it suffered and what you're faced with, I would condemn that engine. I think it's too far gone. If the rest of the truck is worth it, I would suggest a complete engine swap with a good used one. Pull the valve cover to check its condition before laying down the cash.
 

gmcman

Member
Dec 12, 2011
4,656
I agree with @Mooseman about the likelihood of needing another motor. If you wanted to confirm, a breakdown test should give you an idea.

If air bleeds from the dipstick tube or from the timing chain area then the rings are the culprit. You may get lucky and have buildup on the valve seats but doubtful.

I've heard some success stories about freeing up stuck rings but that would be a stretch. Really comes down to wanting to know.

Keep us posted.
 

Manquesa

Original poster
Member
Jun 9, 2019
11
Tx
Been a really long time I know. But, this project is still going, just slow.

So, I did end up obtaining a replacement used long block engine and I pulled out the old engine and installed the new replacement engine. Not my first time swapping an engine but the Trailblazer definitely is a bit more of a PITA to work on than I would like.

Anyway, after finishing up bolting up and reconnecting everything I went to turn the key and the engine started right up with no hesitation or anything, so that was good. I did end up finding out that my cam position sensor was bad so I replaced that. But I now have an issue that in my experience should be an easy fix but i'm having no luck with it.

Cylinder 6 is all non-stop mis-fire, just not firing at all apparently. I've done the usual swapping of the coil packs and plugs but the mis-fire stays with cylinder 6 no matter what. I've check the wiring all the way from the coil pack back to the PCM and there are no breaks in the wiring, full continuity. I'm definitely getting a full 14v at the coil pack power pin. Though i'm realizing now as I type this that I haven't check the voltage at the signal pin yet. But continuity is good so I doubt thats bad.

So best I can tell there is no electrical issue at cylinder 6. leaving only fuel and air to check. I'm wondering if the fuel injector may be clogged or just not working for some reason. I did leave the fuel rail sitting on the back porch for a while when everything was taken apart.

Before I go and remove the intake manifold again to get access to the fuel rail is there something else I may be missing?

Thanks in advance
 
  • Like
Reactions: mrrsm

Mooseman

Moderator
Dec 4, 2011
25,344
Ottawa, ON
You likely need a CASE relearn so your PCM can learn this crankshaft's angles. You need a Tech 2 or other high end scanner to do this.

If still missing, I would also do a compression test just to eliminate that. Then, run the engine with the #6 coil out but connected, insert a spare spark plug and check for an actual spark.

This will then leave only fuel and possibly the injector.
 

Manquesa

Original poster
Member
Jun 9, 2019
11
Tx
I will do the visual check for spark with an extra spark plug in and the coil pack out like you mentioned. Was thinking of trying that but haven't yet. So long as that's good I guess i'll move on to checking the injector. As annoying as it is, I don't mind removing the intake manifold it's not really difficult but is a time consuming task. Will save the CASE relearn for last since I don't have the proper high end scanner and don't want to pay for that if I don't have to.

Thanks again.
 

mrrsm

Lifetime VIP Donor
Supporting Donor
Member
Oct 22, 2015
7,727
Tampa Bay Area
Glad to see you made the choice of the Swap Engine and that all of your Hard Labour is paying off. It is unclear why you think removing the Intake Manifold has become necessary... but if that is so, Jacking Up and Supporting the Front End to remove the Left Front Wheel will give you more angles from underneath to access the IM Bolts and that Damned Bracket to R&R the IM. If possible... once you pull the #6 Plug... Please take and post up some Close Up Images of the 'working end' of the Electrode.
 

Mooseman

Moderator
Dec 4, 2011
25,344
Ottawa, ON
  • Like
Reactions: Manquesa and mrrsm

Manquesa

Original poster
Member
Jun 9, 2019
11
Tx
Okay, i'm extremely pissed and frustrated right now. I pulled the injectors and they all test out fine. I hooked up each injector to a momentary switch while still on the rail and I ran carb cleaner through rail and every injector fired flawlessly. Also check all the wiring for the injectors back to the pcm and all checks out fine as well.

I did break a coil pack bolt off in the #6 cylinder, not sure how as I know I didn't tighten it that much, must have been the multiple on and off that was going on. So, I figured while the intake manifold is off I might as well go ahead and take off the valve cover to get better access to the broken bolt and try to remove it.

Upon removing the valve cover I immediately notice that my timing chain marks are now 1 link offset from where they should be on both upper sprockets. I'm now guessing that this may be the actual cause of the misfiring

I'm thinking my only course of action here is to remove the front cover again which means a whole lot of other things need to come off again just to fix the timing chain.

I think I need to take a break from this project and come back at it later. I'm really tired of working on it.
 

Attachments

  • Engine_Timing_1.jpg
    Engine_Timing_1.jpg
    352.5 KB · Views: 17

Mooseman

Moderator
Dec 4, 2011
25,344
Ottawa, ON
Trying turning the engine a few times just to be sure. IIRC, it takes a few revs to line them all up.

Btw, those gears and chain look new so the possibility of them being off is pretty good. Not sure where on the stroke the crank sprocket mark is supposed to be. If at all possible to know this to avoid taking the timing cover off because it's a bitch of a job.
 

Manquesa

Original poster
Member
Jun 9, 2019
11
Tx
Well, the flats at the back of both camshafts are almost at the facing straight up position right now so I would think it's about at TDC and where everything should align. Will rotate the engine a bit to double check though. If can avoid taking everything apart again that'd be great. Will see when I get back at it. Gonna take a little break for now.
 

mrrsm

Lifetime VIP Donor
Supporting Donor
Member
Oct 22, 2015
7,727
Tampa Bay Area
Hold On There for Half-A-Tick, Brother!

What has been causing the Persistent Misfire on the #6 Cylinder has probably NOT been coming from any Timing Chain Misalignment problem ...but rather due to the lack of any Holding Power of the Broken-Off COP Fastener to maintain enough Downward Pressure on the #6 COP Internal "Spring" and maintain a Solid Electrical Contact Path between the COP to to the Upper Spark Plug as the result.

Do Not Despair over the Snapped Off #6 COP Hold Down Fastener. After removing the Resonator, Throttle Body, Intake Manifold, 5 remaining Coil On Plugs and finally, the Valve Cover... Just use a HF "Pick Set" and a Bright Flashlight and try to grab, unthread and coax out the Broken-Off COP Bolt Piece left inside the Threaded Hole in the #6 COP position of the Engine Head.

Barring that approach... Use a Spring-Loaded Center Punch and Mark the DEAD CENTER of the Busted-Off Bolt Shank. Then use a Very Small Drill to get a tiny hole started in the top of the #6 COP Snapped-Off Bolt Shank. It follows that you should try to VERY GENTLY use a Tiny EZ -Out ...or even try using a slightly larger Hex Wrench tap-hammered into the Drill Hole of the Broken-Off Fastener and then try to unscrew the Broken Bolt End.

After Extracting the Broken Piece, re-install the Valve Cover and purchase a NEW ACDelco Coil On Plug for the #6 Spark Plug and install it along with the other (5) COPS while tightening them all down to ONLY 87 Inch Pounds. Then continue re-installing the Intake Manifold, Throttle Body and Resonator Box.

However, if the Threads in the #6 COP Bolt Hole somehow get Stripped Out... Visit these two links to point you towards a Write Up I recently penned that will explain the best way to get out of trouble with THAT problem by using the TIME-SERT Method:

https://gmtnation.com/forums/threads/how-to-repair-stripped-out-coil-on-plug-fasteners.20017/

https://gmtnation.com/forums/threads/ignition-coils.20015/

If you think it will be necessary and still insist upon Removing The Front Timing Cover... This Next Information might help to confirm that the #1 Piston really is positioned at Top Dead Center BEFORE removing the Timing Chain Set and-or Exhaust Cam Phaser-Intake Sprockets:

The attached GM Atlas LL8 4.2L Timing Chain and Sprocket Layout image shows the Alignment of the Black Timing Chain Marks (15 Links Apart, Starting with a Black Link and Ending the full count in between on a Black Link). The image also shows what the 'LEVEL WITH THE UPPER HEAD' appearance of the word DELPHI on the Cam Phaser should look like. This Correct Timing Alignment Position can ONLY be achieved between the way the set up looks in that picture... and then circulating and returning to this Exact Alignment after completing 14 Clockwise Rotations of the Crankshaft... Tedious... but quite reliable.

In the case of the Timing Chain shown in your Last Photo... it appears to have an ADDITIONAL COLORED LINK IN BETWEEN those 15 Links. The Three Black Links of the ORIGINAL OEM TIMING CHAIN in the Image below illustrate the proper Alignment with Both Camshaft Sprockets and the Crankshaft Sprocket Timing Marks. Your Chain will also work on the 4 &5 Cylinder Variants... But in the case of the LL8 I-6 Engine... it will look very confusing when cycling around through the required (14) Crankshaft Rotations... until it finally comes back to rest as shown below in this image:

ATLASLL8TCALIGNMENT.jpg

As with all variants of the Atlas 4.5 & 6 Cylinder Engines, the two Flat Camshaft Notches at the very back of the Cams should be nearly horizontal and level... and holding them in that position can be properly achieved with THIS $30.00 Specialty Tool available on eBay:

http://rover.ebay.com/rover/1/711-5...0001&campid=5338077216&icep_item=183575193996

ATLASLL8TCALIGNMENTOOL.jpg

It will become Very Important to Double Check Your Work Field and REMEMBER TO REMOVE THIS TOOL AND ANY OTHERS BEFORE MAKING ANY ATTEMPTS AT ROTATING THE CRANKSHAFT WITH A BREAKER BAR... OR RE-INSTALLING THE VALVE COVER ON THE MOTOR AND TRYING TO KEY-START THE ENGINE!

The Best Tool to determine TDC in the Atlas DOHC Engine Head with the Deep Spark Plug Well is the Innova Model# 7886 Spring-Loaded Tool. Unlike the difficulties of using similar TDC confirming devices on V8 Engines... THIS Tool makes Locating Top Dead Center a BREEZE on the In-line Six Cylinder Engine Block:


INNOVALONGTDCTOOL.jpg
 

Attachments

  • COLORADOTIMINGCHAIN.jpg
    COLORADOTIMINGCHAIN.jpg
    69.2 KB · Views: 4
  • Engine_Timing_1.jpg
    Engine_Timing_1.jpg
    352.5 KB · Views: 3
Last edited:
  • Like
Reactions: Mooseman

Manquesa

Original poster
Member
Jun 9, 2019
11
Tx
Okay, so yeah I guess I was jumping to conclusion when I saw the timing chain marks not lining up properly. Ya'll were right, after rotating the crank a few more times they eventually aligned again.

So I went ahead and reassembled everything. I was able to remove the broken coil pack bolt with a small flat tip screwdriver. There was just enough of an uneven surface on the top of the broken bolt that I was able to push the high parts of it with the screwdriver and get it turning. Luckily it wasn't very tight. I caught a break there.

I did go ahead and replace the coil pack with a new one for good measure. So the #6 cylinder now has a brand new coil pack and spark plug. However, i'm still getting constant misfires on that cylinder.

I went ahead and took it out for a drive today around the neighborhood. Kept on expecting to see the check engine light to come on for the cylinder 6 misfire codes but it never did. And it seemed to be driving and running good too. I have a bluetooth dongle in my OBD2 port and connect to it using the Torque Pro app on my phone. I went ahead and pulled that up while driving so I could watch the live feed of the misfires. And it was still showing constant misfires which didn't make sense seeing as I wasn't getting the check engine code for it.

Then I noticed that when I would accelerate and the rpm would get to about 3k or more the misfires would go away. I tested that multiple times and the same thing kept happening, getting to about 3k or more rpms would result in zero misfires but anything below that and especially at idle it would be non-stop misfiring.

So, i'm guessing now that it's a fuel pressure issue? Need advice on how best to proceed from here before I just take this thing in to the shop to have the professionals look at it.

Also, thanks again for everyone's input and help on this. I've received a tremendous amount of info and support from the people here and just the website in general.
 
  • Like
Reactions: mrrsm

Mooseman

Moderator
Dec 4, 2011
25,344
Ottawa, ON
I went through the exact same thing.


I still haven't found the cause (I haven't been looking at it lately though). Still haven't replaced the crank or O2 sensors. I just don't idle it too much and the light stays off.

- Have you done a CASE relearn yet?
- Check the fuel pressure
- Compression test
- Check for proper spark
- If possible, an injector balance test using a Tech 2 would be good
 
  • Like
Reactions: mrrsm

mrrsm

Lifetime VIP Donor
Supporting Donor
Member
Oct 22, 2015
7,727
Tampa Bay Area
That Good News is a Relief!

As it concerns the subsequent "Misfires" you experienced... it is worth noting that during the period that the engine was running with Constant Misfires, ostensibly caused by the lack of Solid Electrical Contact with the #6 Spark-Plug to COP S/S Spring... The EFI feeding the #6 Intake Port was CONTINUOUSLY FIRING AND INJECTING FUEL INTO THE CYLINDER. The implication is that for however long all of that was taking place... the Carbon inside the Upper Cylinder Head and on the Piston Top probably soaked up great quantities of gunked up, unburned Fuel. Ergo... it may take it a little while longer to clear out all of that build up and more or less... Dry Out the #6 Cylinder.

I'd also like to suggest that at some time in the future... perform a Carbon Busting ACDelco TEC Treatment (Top Engine Cleaner) to dissolve and remove all of the residual Carbon in ALL of the Cylinders. Doing so can improve Performance and Fuel Economy. There are quite a few GMTN Threads covering the procedures and what you can expect as a result.

Incidentally, Pull the Dipstick and smell the tip for any excessive signs of Fuel to Motor Oil Contamination that may have occurred when the #6 Plug was inoperative...as the Unburned Fuel will invariably by-pass the #6 Piston Rings and migrate down into the Oil Pan... contaminating the Engine Oil and Oil Filter. This "Fuel Dilution" reduces the lubricity and protection that 5W-30 Mobil1 and Mobil1 Oil Filter can afford.

Searching the site for "acdelco TEC top engine cleaner" in the Search String should yield the presence of the TEC Topic being covered in great procedural details.

As for the Issue of Testing Fuel Pressure, unlike the Later Model Trailblazers and Envoys where the Fuel Filter dwells INSIDE of the Fuel Tank and likewise the Single Line Return-less Fuel Line Delivery involving a Check Valve on the Newer Model Fuel Pump inside of the Tank ... Your Trailblazer has an access Pressure Test Schrader Port adjacent the External Fuel Filter Mounted on the Drivers Side under frame... Just aft of the Driver's Door.

This Video from MAY03LT displays the procedures for testing Fuel Pressure of your 2002 Trailblazer. You should consider changing the Fuel Filter at the same time...and consider replacing the Fuel Pressure Regulator located ON the Fuel Rail and fairly accesible and easy to work on if that component proves to be involved as well:

 
Last edited:

Forum Statistics

Threads
23,330
Posts
637,965
Members
18,530
Latest member
jvest

Members Online