Notes from The Edge... of Nissan Hell...

mrrsm

Original poster
Lifetime VIP Donor
Supporting Donor
Member
Oct 22, 2015
7,700
Tampa Bay Area
Part I of III:

Notes from The Edge of Nissan Hell… But the Lessons Learned here WILL have Universal Value:

https://www.flickr.com/photos/126111508@N07/sets/72157677401630977

On February 1st, 2019… I ventured up to North Florida on a Mission of Mercy for what I thought would be “...just a few days...” to help my son by attempting to repair his 2007 Nissan Quest 3.5L Engine after it suffered a catastrophic failure of its entire Timing Chain System. 24 Days later… I emerged battered but intact from this ‘Port of Hades’; but only after great difficulty in successfully disassembling and then rebuilding the entire top end and the entire operational front area of this absurdly complex and very touchy ‘Interference Engine’.

The GM Atlas engine cannot hold a candle to the difficulties I encountered here when trying to replace (3) Sets of Timing Chains (4) Timing Chain Guides and (3) Timing Gear Cogs and get them all exactly right… but from personal experience here now after working on BOTH of these “Interference Engine” platforms… the prior encounters of working on the 4.2L Engine made all the difference in my being able to understand all of the problems and implications concerning the Nissan 3.5L V6 Engine...and to getting all of this work done right.

I somehow managed to accomplish this ridiculously troublesome task while working out of an exposed Metal Building nested on farmland property situated in a depressed bowl of the landscape that invited Cold, Damp and foggy air to constantly cascade down inside of that building, night after night. The net effects of these conditions explained why every single tool and metal surface even vaguely related to Ferrous Metals therein… were Rusted Solid and made useless!

It followed on that once the Engine sealed areas were opened up… every single thing similarly made of Cast Iron and Steel both on and inside of the exposed areas of this engine; post dis-assembly, tried to do likewise and Rust Up. In the end ...the only solution to preventing that artifact from repeating the “Rust Ups” day after day...was to constantly run a Space Heater close to the front of and underneath the work area for over three weeks… Nothing else worked to stave off these damaging elements. Using a regular source of heat cut down on my having to constantly chase all over the engine with wipes and cans of Freeze-Off, Kroil and WD-40 Penetrating Oil that nightly mixed into an ungodly damp slurry after all those surfaces coming into contact with Ice Cold “Mountain Dew”...FOR REAL!

More to Follow in (10) Minutes.
 

mrrsm

Original poster
Lifetime VIP Donor
Supporting Donor
Member
Oct 22, 2015
7,700
Tampa Bay Area
Part II of III:

Notes from The Edge of Nissan Hell…

https://www.flickr.com/photos/126111508@N07/sets/72157677401630977

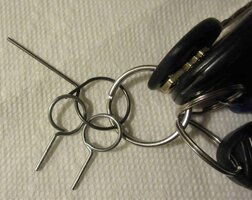
This is about as much as I care to extemporize about this “Fix” except to say that after living for almost three quarters of a Century… I’m finally cured of my altruistic behavior that, “I CAN Fix Everything… and I’m ALWAYS willing to...”. The proof of this comes in the form of Three Talismans connected to my Key Chain as The ‘Steel Grenade Pins’ being reminders NEVER to Volunteer to work on anything as complicated and difficult that would eventually need to be confined by the Three New Timing Chain Tensioners serving Three New Timing Chains that installed to eventually get all three rolling, but solidly tight while riding on their (4) New Timing Chain Guides. These actions allowed this 3.5L motor to once again, run as smoothly and quietly as a Church Mouse would inside of a Gerbil Exercise Wheel fitted with Well Oiled Ball Bearings!

THREEGRENADEPINS.jpg

Henceforth… anytime I even get an inkling that helping someone… anyone… even family members … with repairing anything remotely defined as ‘A Complicated Machine’… I will insert all three of these Grenade Pins under my fingernails and push them in as far as they’ll go until the very thought of offering any such assistance passes clear from my mind... or I pass out on the Deck from the pain. However… it would be very wrong of me to miss the chance to list some things and pass along some suggestions that WILL prove very useful if you EVER have to repair ANY “Interference Engine(s)”:

(1) Get a decent Loose Leaf Notebook with Boo-Koo Plastic Sleeves (over 100) and Page By Page… Print Out the relevant Chapters of the Downloadable Digital Manuals. You will NOT regret being able to pull out the individual plastic shielded pages for each sub-set of job tasks and keep them handy … especially when your hands are Filthy and Oil Soaked or covered in fresh RTV. This will bear out in high value when it comes time to perform the tasks such as doing the ‘Sequential Torques of Fasteners’. For example… the Nissan 3.5L Engine Timing Cover alone first… had to be all Goo-ed Up on its flanges and innards with a Permatex Gray High Quality 700 Degree RTV and quickly required installing (22) Different Size Fasteners; in Two Tightening Sub-Sets that required different levels of Torque. So handling let alone using ANY kind of Digital Device as a guide and reference during such repair conditions will prove very much less convenient if not impossible to touch and handle them and NOT get the Goo all over the Cell Phone, IPad or Laptop devices.

(2) Download ALL of the Manual Chapters and park them on an accessible and reliable USB Drive… because you WILL need to bounce all over the place and actually print out OTHER Chapters that won’t seem initially as important as the one dedicated to JUST the central repair… but IF what you are working on is a vehicle designed as nefariously and deviously as the Nissan Engineers did with ALL of the systems made to interfere with each other in order to deter ‘Linear Repairs’ on the Nissan Quest… You will Kick Yourself in The Cods for NOT downloading and PRINTING them all. The Nissan Manual Chapters combined to make up 1,586 Pages in Total!

EDIT: 09/11/2020

Regardless of which NISSAN Vehicle is involved, if you need to work on ANY Nissan 3.5L V-6 Engine... While its still exists, Visit THIS Link ASAP and Download a COMPLETE Set of Nissan OEM Shop Manuals relevant to the particular Years Covered and BURN THEM ON A DVD:


(3) When working on the Motor INSIDE OF THE ENGINE BAY...Don’t forget to look over the ENTIRE construction of the areas adjacent to the ONE thing you THINK must be removed next in the disassembly sequence BEFORE torturing yourself by trying to work around OTHER components that WILL eventually need to be removed. This will NOT make any sense ...until you encounter an obstructive component… and then focus so much on just getting that ONE part out ...that you miss the chance to clear the path with just a little more work that will become necessary anyway by and by.

More to Follow in (10) More Minutes...
 
Last edited:

mrrsm

Original poster
Lifetime VIP Donor
Supporting Donor
Member
Oct 22, 2015
7,700
Tampa Bay Area
Part III of III:

Notes from The Edge of Nissan Hell…

https://www.flickr.com/photos/126111508@N07/sets/72157677401630977

(4) After having sprayed down the Camshaft Lobes on Bank 1 (Right Bank) with CRC Freeze-Off Lubricant to prevent them from Rusting Solid… They SNAPPED Free under the tension of some of the the Highly Compressed Valve Springs. Consequently, I wound up requiring (4) Crescent Wrenches to UNFUBAR the situation by wrangling and gaining control over the Intake and Exhaust Camshafts on BOTH Banks, simultaneously even after achieving a PERFECT Top Dead Center on Cylinder #1 AND by using 0.041” Stainless Steel Safety Wire woven in between all four wrench ‘handle hollows’ and manage to to fix the camshafts rigidly in place. This was necessary because unlike the GM Atlas Vortec I-6 Engine Camshafts having and available Fixation Tool… neither was mentioned in the Nissan OEM Factory Service Manual nor was any such tool available to me during this repair.

(5) Download and save ALL the videos on similar repairs from as many sources as possible that have the identical engine to your own...regardless of the Vehicle Model. There are only so many of them available that will be complete...so getting to view the R&R of certain major components that focus on the Engine and the parts of dis-assembly and re-assembly that concern you will prove indispensable to your understanding. TAKE STILL IMAGES OF EVERYTHING YOU ENCOUNTER...ON THE WAY IN… AND ON THE WAY OUT. In the weeks leading up to the final Start to Finish Repair… I must have reviewed those films at LEAST One Hundred Times ...until I was damned near dreaming about that engine and could work on certain components in tight places totally blind and by feel alone because I had Good Mental Imagery of where things were oriented in and out of the very confined engine compartment.

(6) Make a COMPLETE list of every single Part, Make/Model/Serial Number of EVERYTHING connected to this repair and anticipate needing to purchase only OEM Components from the Vehicle Manufacturer directly (from Nissan in Japan) and use Rock-Auto as needed for things like replacing Motor Mounts and Upper-Lower Water Hoses if they turn out to be worn, etc. The last thing you want to have happen is to discover that your Hand Written Notes on the Parts and Pieces list was either partial... incomplete ...or just plain inadequate to finish the job COMPLETELY. Place all of your Notes and Receipts into an easily accessible Chapter inside of the Loose Leaf Notebook along with a Print Out of the Factory Torque Values for all important Fasteners… as you will need to frequently double check your Parts vs. the Parts List and ensure that you have everything you need before you even loosen one bolt!

(7) Also… I wound up ordering and using Three Large White Seal-able Food Grade Buckets to isolate all of the new Parts and Pieces and protect them all from the Rain/Rust Damp Air Elements while keeping them all separated from the Old Parts. Same thing with the Fasteners… have Three Sizes of Zip Lock Baggies and a Thick Black Magic Marker to identify the HUNDREDS of fasteners you will have to remove and install over time. Keep things organized from the very beginning and you will have a very smooth re-assembly process as the work progresses.

(8) After installing All Three Timing Chain-Cog and Guide Sets and prior to pulling out all three Grenade Pins... I used Permatex ULTRA-SLICK Engine Assembly Lubricant AND some CRC Molybdenum Di-Sulfide Grease to thoroughly coat the Chains, Guides and Cogs well enough to reduce the problem and damage due to Friction during the initial Post-Rebuild Engine Start. This procedure of hand Turning over the Engine MANY times also served to Prime the Oil Pump with ACDelco 5w-20 Full Synthetic Motor Oil as called for by the OEM Service Manual and get some much needed lubrication into and onto both ine Head EngValve Train Banks

(9) I must confess that just before starting the repaired engine for the first time... I was quite nervous that the violent “Camshaft Snap-Back” incident had me worried that it may have allowed some of the Valve Stems to either get bent ...or possibly damage the Piston Tops. But… after manually turning the engine over enough times with a Breaker Bar and a Ratcheting Adapter with a 19MM Socket… and I could feel six (6) distinct incidents of developing very strong compression that confirmed that all six cylinders were building up enough pressure due to properly seated valves on each individual compression stroke.

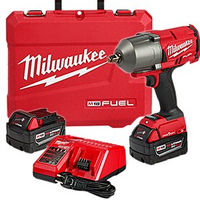
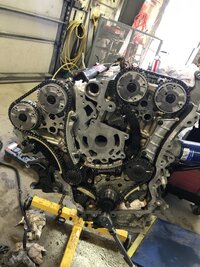
(10) Finally… here are just a few images of this repair for anyone who thinks I just concocted this repair matter out of whole cloth. When I mention here that this was one of the most complex and difficult repairs I have EVER had to perform… it is without even the slightest bit of exaggeration. I spent nearly three whole days just trying to get “The Jesus Nut” holding the Harmonic Balancer to the Crankshaft off after trying EVERYTHING under the Sun before finally having to resort to buying a very expensive Milwaukee 1,400 FPT (Foot Pounds of Torque) Brush-less, Battery Powered Impact Tool Kit to finally be able get the damned thing off … and it somehow managed to do so... with remarkable ease. At $500… the Impact Tool Kit was VERY Pricey… but still, well worth the money in this case to achieve this hard removal of "The Jseus Nut" and will prove to be useful later for my GM Truck and SUV Tire R&Rs.

What is crazy about this ….along with so many other problems I encountered that must have been created by the “Last Mechanic” that apparently had worked on this engine on a prior occasion ...is that since the Nissan 3.5L Crankshaft sports a Woodruff Key Design … the installation of the TTY “Jesus Nut” only required 32 Foot Pounds of initial torque ...followed by being tightened with a Breaker Bar to a mere 90 Degrees for the final TTY… so some Idiot must have used an GD Impact Wrench to re-install that Damned HB Bolt and applied Lok-Tite as well!

https://www.amazon.com/dp/B078VDL8Y5/?tag=gmtnation-20

MILWAUKEEIMPACTTOOLKIT.png
 
Last edited:

TollKeeper

Supporting Donor
Member
Dec 3, 2011
8,053
Brighton, CO
I have said it before, and I will say it again, I will never own a Nissan. Their influence for all those timing chains comes straight from the Ford Triton playbook. I hate Nissan.

And you can see the Nissan influence on Ford under the hood of a Ford Taurus.

They are no longer in bed together, but the influence remains..
 

Eric04

Member
Dec 3, 2014
392
West Michigan
That impact purchase will definitely be a silver lining for years to come. I've a friend with a similar one and he's yet to find anything it won't rip apart, and he does a ton of wrenching.
 
  • Like
Reactions: mrrsm

mrrsm

Original poster
Lifetime VIP Donor
Supporting Donor
Member
Oct 22, 2015
7,700
Tampa Bay Area
Yeah... While it can certainly be expected to happen at any time now... probably sooner than later ... Recent Rumors of My Death... have been Greatly Exaggerated... LOL . While I was away... I had to sleep rough on a couch and keep a 'minimal footprint' in my son's home so as not to disrupt family life for my Grand Kids. I became a Ghost during all of the workman-like days that ran from 05:00 AM to around 6:00 PM day after day for each and every day that I was up there.

There are a few more things that come to mind that bear mentioning about performing this $4,500.00 Repair (... if done by any Nissan Dealership) that are specific to the Nissan 3.5L Engine:

(1) Purchase at a least 10 cans EACH of Gunk Engine Cleaner, Gunk Carburetor Cleaner and Brake Cleaner, and obtain a Very Large Black Concrete Mixing Tub to slide under the engine in order to De-Grease and capture all that Sand, Oil and Crap covering the Engine and under-carriage areas and everywhere that any two flange or sealing cover places are located on the Engine Block, well before you begin to open up the motor. Slide that Tub outside and well away from your work area and collect the remnants of the 20 or so Rolls of Blue Scott Shop Towels you'll wind up needing for daily cleanups and then bag it all up each day in durable Large Garbage Bags. Otherwise... the noxious and toxic fumes will become overwhelming, making you feel dizzy and sick to your stomach after too many long exposures in a confined space.

(2) Obtain a Metric Hex Key Set that includes very tiny sizes in order to be able to slip one end into the Timing Cover and sub-cover plates Grooves and extract the almost impossible to remove left-over RTV. If you look closely at the image I included of the Timing Cover at my "Flickr-Bucket" link... you will get some idea of how much real and difficult labor was required to prepare all of the surfaces between the Engine Block and the Cover Flanges. Nothing else will work; save another hundred or so single bladed Razors needed for scraping dirt and RTV out of the myriad Bolt Holes and off of all the flat surfaces of the Flange areas. I spent days on end prepping everything in order to prevent any chance of Oil Leaks and Dirt Invasion into the Engine prior to assembly and torquing down all of the Fasteners.

(3) Besides removing the Hood, Upper and Lower Engine Cowling and Windshield Wipers and Motor-armatures just for openers, EVERYTHING ELSE adjacent the top of the engine had to be removed to access and take off the Valve Covers. This was needed in order to gain access to and remove the Main Front Cam Bearing Caps in order to R&R the two Camshaft Cog and Secondary Timing Chain Set Tensioners. The Lower Oil Pan also had to be removed in order to take out the two Bolts securing the Timing Cover to the Engine Crankcase. The Manual makes no mention of the fact that when you re-install the Timing Chain Cover... the ONLY way to properly align the Case Cover holes to the matching threaded holes in the block face... is to slowing thread in those two lower bolts from under the engine. Then GRADUALLY... I used the Two Bolts to draw in the lower flange of the Timing Cover downawrds far enough to compress the thick Half Seal Solid Rubber Grommet that seals off the under side of the TC with the Upper Oil Pan. I had to repeat the process of glomming onto the cleaned up TC with New RTV... THREE TIMES in a row after experiencing two failed attempts at aligning the cover to the block... and smearing RTV all over everything. The Clean Up and Re-Prep for this installation consecutively was mentally and physically exhausting. But re-doing it all from scratch was the only way to get it right. Finally, I reasoned out that by trying the "Bolt Tightening Pull Down Method" as a last resort... THAT was what made the alignment of the Timing Chain Cover with the Block Bolt Holes possible.

(4) I had purchased two necessary but expensive Nissan Factory Engine Assembly Tools in order to (A) Cut the RTV sealant from in between the Case and Covers to the Engine Block... which worked.... and (B) Use the Nissan Factory Flex Plate Holding Tool that required the complicated removal of the Engine Starter first... BUT it did NOT work to hold the Flex-Plate at all! Thanks to having practically every Tool I own on hand, I resorted to using a slender pair of Long Nosed Vise Grips to reach into the opening between the back of the Engine Block and the Bell Housing and carefully lock down the Flex-Plate just at the Flame Treated Gear Ring and NOT touch the attached delicate Reluctor Ring and physically pin the Crankshaft EXACTLY in the TDC of the #1 Piston. This VG Tool held well enough for the difficult R&R of Harmonic Balancer- Serpentine Pulley "Jesus Nut". This action caused no damage to the Flex-Plate as there was JUST enough room available to get the the Vice Grips into that locale and secure the Ring Gear solidly in place.

(5) My HF 2 Ton Floor Jack failed almost as soon as I started to jack up the right side of the Nissan Quest. I wound up buying an ACDelco 3.5 Ton Jack that while also very expensive... it displayed some very remarkable fine control over being able to SLOWLY lower the Vehicle and/or elevate and lower the Engine into place as needed during this debacle of having to suspend the Engine with one of the four Motor Mounts completely removed to gain access to and remove the Front Timing Chain Cover. A small section of 2" X 6" Board was required and fit nicely into the frame space where the lower Tin Pan Oil Reservoir was bolted to the lower block and not have the New Jack interfere with the Engine Frame Cradle. This ACDelco Jack is MUCH better suited for the likes of jacking up Full Sized Pick-Up Trucks like my 00' Long Bed Silverado and my 02' Trailblazer and will eventually find good use for those purposes.

(6) Its worth mentioning that since I had to travel a great distance and wind up working in a foreign space with no expectation of having access to any Tools... I literally emptied EVERYTHING out of all of my Tool Chests into Large Plastic Orange Buckets with Lids and I do mean EVERYTHING. The strangeness is that before all was said and done... I wound up using it all.... every single Tool I brought ...eventually found some use or a purpose in rescuing me from each and every problem that arose. You name it... I brought it along. This is just Food For Thought if you ever wind up getting 'Horn-Swaggled' into performing a similar task in a distant land as was the case here. My favorite one was the Battery Powered 3/8" Drive Ratcheting Tool Set with Two Batteries available to speed up the removal and installation of Soooooo Maaaaany Fasteners... You just would NOT Believe it! @Mooseman 's suggestion a few months ago about getting this kit prompted me to do so some time back and my responses are covered in a post over in the "Tool Talk" Thread (... I got Chastised by @djthumper for Raving Too Much In Favor of an "untested" Tool... But trust me Larry... THIS was One Helluva Performance Test...and it Passed with Flying Colors. And so my unbridled enthusiasm for this Tool Rig ...was Right On The Money!)

 
Last edited:

m.mcmillen

Member
Apr 29, 2016
554
Wisconsin
That doesn't sound like a very fun getaway! I used to work for a a construction company and I don't miss the days of having to go out and repair equipment in the field (sometimes literally a field).

I replaced timing chains and everything a while back in an Impala with a 3.6 in it. I took one look at the manual and decided pulling the engine was the best way to make sure it was done right. I'm glad that I did. Most V6 engines with chains now days have 3 chains.

IMG_4389.JPG
 

Forum Statistics

Threads
23,314
Posts
637,846
Members
18,520
Latest member
Firebaugh86

Members Online

No members online now.