Here are a few photos of my attempts to repair my liftgate latch. I'm sure that there is a better, more appropriate technical term for this latch, so feel free to let me know.
The issue that I was trying to solve was difficulty and unreasonable force was required to securely close the liftgate. In other words, in order to get the thing to close safely, I had to slam it. I figured that the issue was likely related to a problem in the latch locking mechanism, which is not surprising given my daily commute on a dirt road.
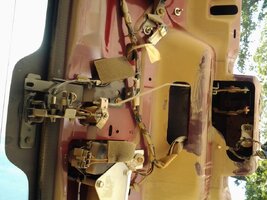
The first thing that I did was to remove the plastic trim on the lower interior portion of the liftgate. Unfortunately, I didn't take pictures of that entire process, but it was fairly painless. The trim was secured by about half a dozen little clips, as well as a "plunger" type of black clip on top. The uninstalled trim looks like this: View attachment 22195
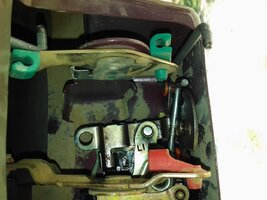
Here is a test of your spacial orientation - the latch is in the dark area of the photo, with the electrical connectors (two) already removed: View attachment 22197. The small, red plastic piece is a little retaining clip that you will have to disconnect in order to remove the module. There are actually a few that must be disconnected - just rotate the clip off the metal rod and around the axis . . . it will be easy to figure out how to remove it after you see it.
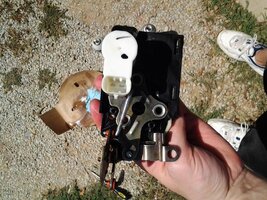
Here are a few more angles of the latch, for your viewing pleasure:View attachment 22198
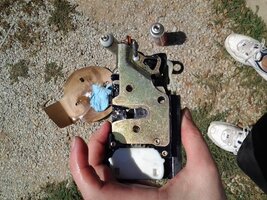
View attachment 22199
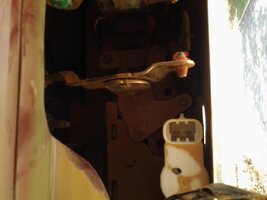
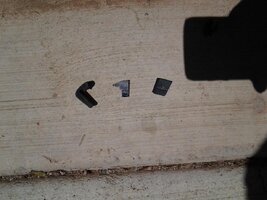
Here is a photo showing how the little plastic rod clips can be rotated and removed: View attachment 22200
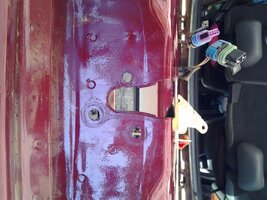
After the clips are removed, you can unscrew the module using three torx connectors - pretty big ones, actually. It seems like they were t-30 or something, but you will just have to size and see. The entire unit will come out without much of a fight. It will leave your liftgate looking a bit like this: View attachment 22202
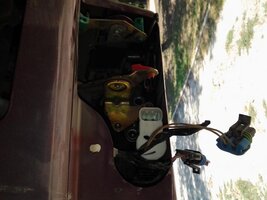
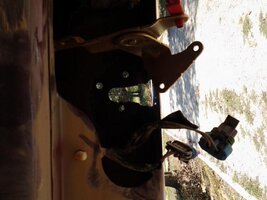
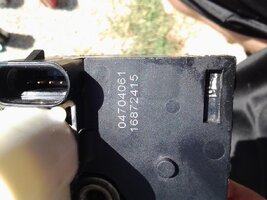
The latch was very dirty, as expected, so I cleaned it, lubricated it, and recorded the part number. View attachment 22205. The parts cleaned up quite well. The locking mechanism is quite similar to a hammer and sear on a trigger assembly, so it was pretty easy to understand after looking at it for a minute.
During the cleaning process, I discovered that a part had broken from the inside of the latch: View attachment 22206. I'm not sure how well you will be able to see from the picture, but basically it is an "L" shaped rubber piece, which was held in place by a thin piece of plastic (parts of which are next to the rubber). This rubber is designed to remain along the edge of the slot of the latch that actually grabs the "U" shaped connector on the vehicle. I suspect (but do not know) that rubber is used as a damper of some kind (noise, vibration, both?). Anyway, when the plastic retaining piece broke, the rubber piece began to interfere with the way that the latch interacted with the anchor point on the vehicle - hence the poor connection. Finding no reasonable way to repair the broken pieces, and that the latch would close securely without them, I removed them from the latch.
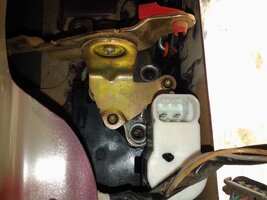
After additional cleaning and reassembly, the latch works wonderfully. I haven't noticed additional vibration or noise without the rubber piece, but that is my subjective assessment. If it becomes too much of a problem, or if it turns out that the latch has become unreliable, I can always replace the assembly.
The issue that I was trying to solve was difficulty and unreasonable force was required to securely close the liftgate. In other words, in order to get the thing to close safely, I had to slam it. I figured that the issue was likely related to a problem in the latch locking mechanism, which is not surprising given my daily commute on a dirt road.
The first thing that I did was to remove the plastic trim on the lower interior portion of the liftgate. Unfortunately, I didn't take pictures of that entire process, but it was fairly painless. The trim was secured by about half a dozen little clips, as well as a "plunger" type of black clip on top. The uninstalled trim looks like this: View attachment 22195
Here is a test of your spacial orientation - the latch is in the dark area of the photo, with the electrical connectors (two) already removed: View attachment 22197. The small, red plastic piece is a little retaining clip that you will have to disconnect in order to remove the module. There are actually a few that must be disconnected - just rotate the clip off the metal rod and around the axis . . . it will be easy to figure out how to remove it after you see it.
Here are a few more angles of the latch, for your viewing pleasure:View attachment 22198
View attachment 22199
Here is a photo showing how the little plastic rod clips can be rotated and removed: View attachment 22200
After the clips are removed, you can unscrew the module using three torx connectors - pretty big ones, actually. It seems like they were t-30 or something, but you will just have to size and see. The entire unit will come out without much of a fight. It will leave your liftgate looking a bit like this: View attachment 22202
The latch was very dirty, as expected, so I cleaned it, lubricated it, and recorded the part number. View attachment 22205. The parts cleaned up quite well. The locking mechanism is quite similar to a hammer and sear on a trigger assembly, so it was pretty easy to understand after looking at it for a minute.
During the cleaning process, I discovered that a part had broken from the inside of the latch: View attachment 22206. I'm not sure how well you will be able to see from the picture, but basically it is an "L" shaped rubber piece, which was held in place by a thin piece of plastic (parts of which are next to the rubber). This rubber is designed to remain along the edge of the slot of the latch that actually grabs the "U" shaped connector on the vehicle. I suspect (but do not know) that rubber is used as a damper of some kind (noise, vibration, both?). Anyway, when the plastic retaining piece broke, the rubber piece began to interfere with the way that the latch interacted with the anchor point on the vehicle - hence the poor connection. Finding no reasonable way to repair the broken pieces, and that the latch would close securely without them, I removed them from the latch.
After additional cleaning and reassembly, the latch works wonderfully. I haven't noticed additional vibration or noise without the rubber piece, but that is my subjective assessment. If it becomes too much of a problem, or if it turns out that the latch has become unreliable, I can always replace the assembly.
Attachments
-
 20120728_111057.jpg99.7 KB · Views: 7
 -
 20120728_111105.jpg91.5 KB · Views: 7
 -
 20120728_111113.jpg48.9 KB · Views: 6
 -
 20120728_114149.jpg71.6 KB · Views: 5
 -
 20120728_114155.jpg88.5 KB · Views: 5
 -
 20120728_114159.jpg88.7 KB · Views: 5
 -
 20120728_113406.jpg95.1 KB · Views: 5
 -
 20120728_113357.jpg85 KB · Views: 5
 -
 20120728_113334.jpg96.1 KB · Views: 5
 -
 20120728_113340.jpg100.9 KB · Views: 5
 -
 20120728_113345.jpg101.2 KB · Views: 5
 -
 20120728_124124.jpg96.6 KB · Views: 6

