It all started when I changed a plug

jekern1015

Original poster
Member
Feb 2, 2014
6
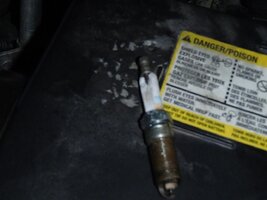
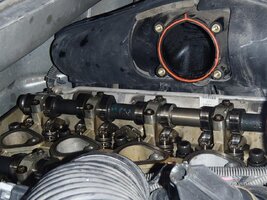
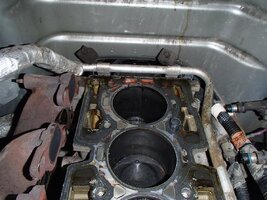
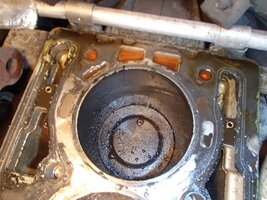
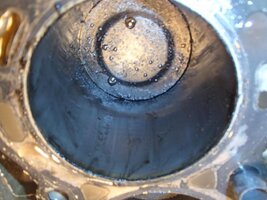
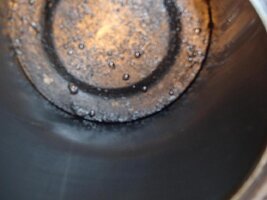
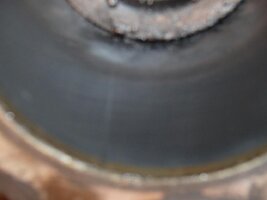
My 03 Trailblazer threw a p0302 code. I decided to go ahead and change the plugs while I replaced the coil pack. When I pulled out the plug in the #6 cylinder there was porcelin missing. I looked in to the hole and sure enough it was in there. Trying to fish it out the porcelin made it into the cylinder. Using mechanical fingers I felt around try to find it with no luck. I manually turned the motor so the piston was up top and used a shop vac to suck it out. I checked the shop vac and relized i hadn't dumped it, went and bought a camera to look inside of cylinder. I didn't see anything, I bolted it all back up and started the engine. A couple of rattles and a rough idle the engine died. I did a compression check on that cylinder and had none. Hooked up a leak down tester and the cylinder would not hold anything. My thought was that the porcelin was stuck up inside one of the valves so I spent the rest of the afternoon trying to remove the valve cover. What a pain in the behind that turned out to be. Once the valve cover was off I noticed one of the rollers was no longer conected. What caused the roller to come apart, Do I replace the head, repair the head or opt for a new or used engine.
 

IllogicTC

Member
Dec 30, 2013
3,452
Sorry about your luck man. The deep wells that our plugs go down into certainly makes doing this kind of thing a real pain. Others have sometimes had a bad gasket allowing oil into the well, or some have gotten water in which seeped in past the coil pack's gasket. I would imagine taking care of that is bad enough! I never thought to check my plugs before I started putting the ratchet to them, maybe it'd be best to advise a precaution like inspecting each plug with a mirror or something before starting removal to ensure everything's okay. I did a basic debris check but didn't look with a mirror toward the back two cylinders, I guess my luck wasn't too bad off since everything was clean.

If it had been noticed before the plug was pulled, I guess have a retrieval set on-hand. $5 at Wal-Mart nets a magnetic tool, an inspection mirror, and one of those little claw things with the plunger on one side to actuate it, I grabbed the set a while back and after hearing this story I'm pretty glad I have it. Magnet tool made removing the plugs a lot easier for sure!
 

STLtrailbSS

Member
Dec 4, 2011
1,617
Are you comfortable pulling the head? I know its a different animal on the i6 but that is where the answers are going to be waiting for you.
 

MichEnvoyGuy

Member
Dec 3, 2011
522
Jekern, I have nothing to add here except dont feel bad - we have the same type of luck.

When I was 16/17, my Dad asked me to change the plugs on his new (at the time) Dodge Ram. It was the redesign and he built it up at the dealer (special order) so it was his BABY. I dropped a bolt down the throttle body into the intake manifold :frown: :hissyfit:

I thought I was dead meat. My Dad put a flexible magnet down there and found it right away. Buuut I thought 'for sure' I cost my Dad a new motor.....
 

Texan

Member
Jan 14, 2014
622
Here are my thoughts on this. The loose roller (rocker arm in old days) is because the piece of porcelain is stuck in that valve seat.
Before you tear it apart, you might try this. Put it all back together and start it up. This might blow or crush the piece of porcelain
out of the cylinder. Butt lets see if others on this site have a better idea. Best of luck to you.
 

IllogicTC

Member
Dec 30, 2013
3,452
I myself would find hoping the porcelain would be crushed without damaging any internal components to be too much of a risk.

Tearing apart everything is a pretty big job, there are service manuals available in the Technical Discussion subforum that can help a bit, a Haynes manual helps a ton, too. For a tear-down that includes the head you're forced to buy new parts, namely a new gasket and a set of bolts since the head bolts are Torque-To-Yield. Also included with the TTY bolts is the common problem of bolts snapping as you're trying to remove them, leading to buying an extraction set usually.
 

jekern1015

Original poster
Member
Feb 2, 2014
6
Here is a pic. of the #6 plug and a pic of the roller missing from #4. I thought it might be easier to replace engine but was told you have to drop the front end to get the engine out. Any truth to this.
 

Attachments

  • P2040015.jpg
    P2040015.jpg
    49.1 KB · Views: 49
  • P2040017.jpg
    P2040017.jpg
    96.3 KB · Views: 57

IllogicTC

Member
Dec 30, 2013
3,452
That missing part is a real shame. On a sidenote, your cam area looks really clean - do you run any sort of cleaner, or did you just wipe it out as you were digging into it?
 

Texan

Member
Jan 14, 2014
622
Thanks for the pictures. Cyl #4 may have a collapsed hyd. lifter. Just a guess.
I think that I would try to relocate the roller back to where it belongs.
Then I would rotate the engine by hand and observe the movement of all
the valves, particularity Cyl #6.
 

IllogicTC

Member
Dec 30, 2013
3,452
Shouldn't have a collapsed lifter, because overhead cams don't use lifters most of the time. Ours doesn't. Just a chain linked up to two cams, pressing on the valves directly which creates downward motion, to be returned by the springs as is the norm.
 

jekern1015

Original poster
Member
Feb 2, 2014
6
I do run seafoam thru the gas every now and then but that is all. Nothing was wiped down. I did turn the motor by hand and the #6 never closed, the spring was always loose regardless of where cam lobe was.
 

Texan

Member
Jan 14, 2014
622
IllogicTC said:
Shouldn't have a collapsed lifter, because overhead cams don't use lifters most of the time. Ours doesn't. Just a chain linked up to two cams, pressing on the valves directly which creates downward motion, to be returned by the springs as is the norm.

My bad. Should have said hydraulic lash adjuster. The roller (rocker arm) is between the cam and valve. It contacts the
valve stem and lash adjuster.
 

Texan

Member
Jan 14, 2014
622
jekern1015 said:
I do run seafoam thru the gas every now and then but that is all. Nothing was wiped down. I did turn the motor by hand and the #6 never closed, the spring was always loose regardless of where cam lobe was.

I assume that you are saying that only one of the four valve springs on Cyl. #6 is always loose.
Is it because of a broken valve, spring retainer or broken spring.
 

bobdec

Member
Apr 19, 2013
233
To me you may have two problems. I can't see any way a piece of porcelain in #6 cylinder will effect a #4 intake valve/hardware. Since the 4200 has 4 valves per cyl you could have been running on 5 1/2 cylinders with only 1 intake valve working on #4 cylinder for a while.

Back to #6 , you have two intake valves on the side your picture shows. I am assuming only one has a loose spring, the one in the rear that we can't see in the pic. And the two valves on the passenger side (exhaust) valves are also working OK. A valve spring should never be loose unless the keepers or valve (stem) are broken, or the the spring is broken. If the porcelain jammed the valve opened and the piston hit the valve it it could caused mechanical damage or other parts to fail. Hard to guess w/o further diagnosis. If damage is all up top, maybe you could come out lucky. You have to get that bad valve and/or spring ironed. We can help but ,from here on some special tools and knowledge is needed in order not to make things worse. Do you have tools to work on the valve train ? You will need to remove the keepers, retainers and spring to manually see if the valve moves up down/rotates/ is not binding and fees OK WITHOUT dropping it into the cylinder. How familiar are you with internal engine work ?

How accurate is that camera you bought, can you inspect cylinder at bottom of intake stroke and observe the other 3 valves are seated OK, and what does bad valve seating look like, any holes on piston, or severe cylinder wall damage ??
 
  • Like
Reactions: Flatbroke

jekern1015

Original poster
Member
Feb 2, 2014
6
I finally managed to get the head off this past weekend. I found a piece of porcelain stuck between the valve and the head. I now know why I didn't have any compression in #6 cylinder. There was also a piece still bouncing around in the cylinder. There are scratches in the cylinder wall that you can feel with your thumbnail. They occur in both the top of the cylinder wall as well as the bottom of the wall all in different places. The concern I have is the deepest scratch is in #5 cylinder but all the cylinder walls have scratches in them. I asked three friends as to what there opinion was for my next move. One told me to quit messing with it and replace the whole motor, another told me to hone out the cylinders put it all back together and add a for sale sign to it. My dad says advertise it as a mechanics special get what you can and put that money on a beater until I can afford another car payment. Chevy dealer quoted me $4400 on there remanufactured motor, NAPA quoted me $3300 on there remanufactured and O'Rielly's quoted me $2900. A local repair shop quoted me $3000 for a used motor with 50k on it and it was an installed price. My pictures aren't very good but it gives you an idea of what I'm looking at. What's your opinion. Thanks for all your help.
 

Attachments

  • P2100018.jpg
    P2100018.jpg
    95.6 KB · Views: 26
  • P2100020.jpg
    P2100020.jpg
    93.8 KB · Views: 27
  • P2100021.jpg
    P2100021.jpg
    81.5 KB · Views: 27
  • P2100022.jpg
    P2100022.jpg
    56.6 KB · Views: 25
  • P2100023.jpg
    P2100023.jpg
    34.1 KB · Views: 25
  • P2100024.jpg
    P2100024.jpg
    38.9 KB · Views: 23

Texan

Member
Jan 14, 2014
622
Just thinking out loud. This started out as a P0302. Misfire on Cyl #2.
Does this mean that roller(rocker arm) on Cyl #4 was in place?
Could it have been knocked out of place when engine was started and ran ruff?
How many miles on engine? The pistons look relatively clean. Was there a broken
valve spring. Can you remove the porcelain stuck in the valve?
I can not see the scratches, but could they be removed using fine wet & dry
sand paper using diesel or gasoline for a solvent? That would be the low budget
way that I would try. Any comments welcomed.
Did any bolts twist off?
 

IllogicTC

Member
Dec 30, 2013
3,452
I'd be willing to bet that the scratches are within spec for a honing to remove. It's a fairly precision job, not exactly shade-tree unless that particular shade-tree has good knowledge of what they're attempting and of course has or can rent the proper tools, but I noticed you really gotta zoom to really see the scratches. Perhaps Texan's idea would work, I don't know such things because I myself have never been this deep in any engine (aside from a lawnmower engine for shop class once).
 

Texan

Member
Jan 14, 2014
622
IllogicTC said:
I'd be willing to bet that the scratches are within spec for a honing to remove. It's a fairly precision job, not exactly shade-tree unless that particular shade-tree has good knowledge of what they're attempting and of course has or can rent the proper tools, but I noticed you really gotta zoom to really see the scratches. Perhaps Texan's idea would work, I don't know such things because I myself have never been this deep in any engine (aside from a lawnmower engine for shop class once).

Fortunately I have never been inside a I6, but have been inside SB Chevy V8's, when I was younger.
From what I have read about this engine, it appears that one of the complications of the head removal
is the timing chain/OHC set up. I wonder if this vehicle is a 4/4. Honing might be possible, but it is
normally done with the pistons removed. I think it would be worth a try, if a person was careful, but
remember that there will be a ridge at the top of the cylinder.
 

IllogicTC

Member
Dec 30, 2013
3,452
Well, he does already have the head off, lol. It should have been done with cylinder 1 at TDC, so the dark chain links line up in the three positions they're present. It's how to ensure timing isn't completely screwed when you put it all back together.
 

jekern1015

Original poster
Member
Feb 2, 2014
6
I was able to remove the porcelain stuck in the valve by tapping on the spring with a hammer. I am guessing that the roller came off while it was running rough, there was a loud bang right before I turned it off. I snapped all but 2 of the head bolts. Most of the scratches could probably be removed that way, but there are a few that I believe are to deep. The last time I was this deep into a motor was 25+ years ago.
 

Harpo

Member
Dec 4, 2011
411
Sweden
I have done quite a lot of engine work in my days.

This is what i would do if it was my engine.

You got the porcelain piece out, good. Now i would put it all back together again and start it up to see if there is any
other damage such as a bent valve or something else you cant really see if you not getting it totally apart and measure things.

I know, it's seems like a waist of new bolts and gaskets and everything. But look at it this way, if you try to hone the cylinders and put in
a lot of other work and then get it all assembled and THEN find out you have a bent valve or a busted valve guide you would be in a much worse position.

If everything seems OK and there is no unwanted knocks or taps, i would do a compression test and see what it is like and then decide if you have to rebuild it or by a new engine or sell the truck.


This is just my :twocents:

Been there done that:duh:
 

Texan

Member
Jan 14, 2014
622
I agree with Harpo, more or less.
To clarify one comment I made, wet & dry sand paper should be called emery paper, I think.
I would clean up scratches as well as possible, and take a chance.
To me, the broken studs would be a challenge, but can be over come.
Also study the manual to be sure that you get the cams timing correct.
Good luck.
 

triz

Member
Apr 22, 2013
746
Harpo said:
I have done quite a lot of engine work in my days.

This is what i would do if it was my engine.

You got the porcelain piece out, good. Now i would put it all back together again and start it up to see if there is any
other damage such as a bent valve or something else you cant really see if you not getting it totally apart and measure things.

I know, it's seems like a waist of new bolts and gaskets and everything. But look at it this way, if you try to hone the cylinders and put in
a lot of other work and then get it all assembled and THEN find out you have a bent valve or a busted valve guide you would be in a much worse position.

If everything seems OK and there is no unwanted knocks or taps, i would do a compression test and see what it is like and then decide if you have to rebuild it or by a new engine or sell the truck.


This is just my :twocents:

Been there done that:duh:

The head is off, why not just get it inspected. There is nothing to putting it back together since its off already. Not sure if they have ARP head studs for our trucks but something to look into.

I do agree on the compression test after the head is inspected.

Not sure about the scratches on the cylinder walls and the honing. If it was left as is you might just burn a bit of oil between changes. If your lucky none at all.
 

bobdec

Member
Apr 19, 2013
233
Had a few engines apart in my time.. It's decision time Either rebuild it, replace it and drive a classic truck for 10 more years, or slap it back together. If was in your shoes with a '03 and probably over 100K miles I'd slap it back together. You'r not playing with an Indy 500 engine, these I6's are near bullet proof. I would make sure that porcelain did not nick the valve or valve seat. If you don't have the tools to compress the spring to remove and inspect valve and seat any cylinder head or machine shop can check it out for you. If damaged they can re-do the seat and replace the valve. A full head re-build may be advised, but I'd reject that, find a shop that will inspect it and just fix what's broke. I would ignore trying to mess with (reaming/honing) the cylinders with engine in the truck. Slap it together and run it another 100K till it dies. Hopefully what caused those scratches is long gone, they are so small that I doubt you will see any problems. If real bad they would be burning oil, or causing blow-by.
 
  • Like
Reactions: mrrsm

TollKeeper

Supporting Donor
Member
Dec 3, 2011
8,146
Brighton, CO
Put it back together with new gaskets, and head bolts, and see what happens. just get all those timing marks back in line before you do anything.
 

bobdec

Member
Apr 19, 2013
233

Texan

Member
Jan 14, 2014
622
bobdec said:
Hopefully you used the tools or whatever to keep the chain tensioner from slipping and kept the chain on the crank sprocket and marked the chain & sprockets on each cam to keep timing intact. Otherwise it's pull the front end time.. OR POSSIBLY here's a thread with an alternative . Read entire thread as there is some good info there. [SOLVED] Timing chain slipped off. What are my options? - Chevy TrailBlazer, TrailBlazer SS and GMC Envoy Forum

This is a very good link. I hope that it helps you get this engine back together.
My 2003 TB has been the best vehicle I have ever owned (knock on wood).
At my age, I am not sure I could do what you are doing.
 

jsheahawk

Member
Jan 16, 2013
533
Kansas City
jekern1015 said:
I thought it might be easier to replace engine but was told you have to drop the front end to get the engine out. Any truth to this.
When I replaced the engine in my 2002 (with a 2004 engine), every shop quoted the same number of hours for the swap. They said it was pretty labor intensive as far as engine swaps go. I ended up getting a used 40k engine for $500 though. $1500 for the swap, and I was happy with $2k for a new engine. I found my engine on car-parts.com. Here's a link to engines: Search Results

Jared
 

IllogicTC

Member
Dec 30, 2013
3,452
bobdec said:
Hopefully you used the tools or whatever to keep the chain tensioner from slipping and kept the chain on the crank sprocket and marked the chain & sprockets on each cam to keep timing intact. Otherwise it's pull the front end time.. OR POSSIBLY here's a thread with an alternative . Read entire thread as there is some good info there. [SOLVED] Timing chain slipped off. What are my options? - Chevy TrailBlazer, TrailBlazer SS and GMC Envoy Forum

You know there's dots on the sprockets and three darkened chain links (one for each sprocket) to assist in this, right?
 

bobdec

Member
Apr 19, 2013
233
Agree.... I hoping correct removal procedure was followed... If engine was not cranked manually to the dot/link alignment points on both cams before taking it apart. Or removal did no mark the chain and sprockets manually ( if not using the dot alignment procedure). Any doubt whatsoever about proper alignment would require pulling cover.
 

IllogicTC

Member
Dec 30, 2013
3,452
Indeed it would unless cylinder 1 was brought to TDC and the chain retention tool used. Sounds like this job just got much bigger maybe :rotfl:
 

jekern1015

Original poster
Member
Feb 2, 2014
6
I got the head in the shop and they are going to do a valve job and resurface it. How hard is it to remove the head bolts from the block. All but 2 busted in the head removal process. Are those bolts still under torque in the block? Will an easy out work with a cobalt drill, or would I be better off with a portable drill press and drill them out.
 

NJTB

Member
Aug 27, 2012
612
Flemington, NJ
What's always worked for me has been LEFT turning drill bits. Usually crates enough heat during the drilling process to spin the bolt out. There's several other methods, but breaking an EZ out scares me. There's no other way to remove it (broken) than to smash it into pieces and take it out.
If you have access to a portable drill press (with a magnetic base) that is what I'd go with. Hopefully it reverses for the left turning bit.
 

Texan

Member
Jan 14, 2014
622
NJTB said:
What's always worked for me has been LEFT turning drill bits. Usually crates enough heat during the drilling process to spin the bolt out. There's several other methods, but breaking an EZ out scares me. There's no other way to remove it (broken) than to smash it into pieces and take it out.
If you have access to a portable drill press (with a magnetic base) that is what I'd go with. Hopefully it reverses for the left turning bit.

I have not had to do this in a long time, and never with a aluminum block, but I agree with the above comment.
I think that I have seen comments about this in others threads, but do not remember where. Could have the other (old) site.
If you have to take off the front cover to line up the timing marks, you may have to remove the oil pan.
 

Forum Statistics

Threads
23,390
Posts
638,736
Members
18,602
Latest member
Chris Moore

Members Online