Whether Members in Good Standing... Or Visitors... Or perhaps, even Shy Lurkers... We all have had to put on our Thinking Caps and go on a Mad Scramble and Search to find information about the Unique Fasteners and Torques that hold these Amazing Atlas Vortec 4, 5 and of course, our intrepid 6 Cylinder Engines together. I've memorialized a separate folder on my "Flickr-Bucket" Account providing Public Access to Images that not only show the appearance of these Fasteners, but included their GM and/or ACDelco Packing and OEM Part Numbers as well. Here is the Link to these Fastener Images and Data:
 www.flickr.com
If you find yourself in the middle of any Engine 'dis-assembly - re-assembly' situation and are missing some of them, a trip to the Local Salvage Yards will provide a chance to get the Factory Versions, as most of these Non-TTY Bolts, etc. are otherwise unavailable or very hard to locate. The Dealerships may carry some of them... but often at a Premium Price. Please remember... You CANNOT Re-USe TTY Fasteners. Yup... Someone will alwyays chime in and say, "I've used Used TTY Fasteners before and NEVER had any Problems..." Yeah...Well... Okay... Good Luck with THAT. (Don't Do It...!)
But to address a more recent and immediate concern coming from @Tankcruiser about The Fasteners for the Intake Manifold ... Here is Rundown on them that will cover MOST of what is Commonly Known about these "Bolts":
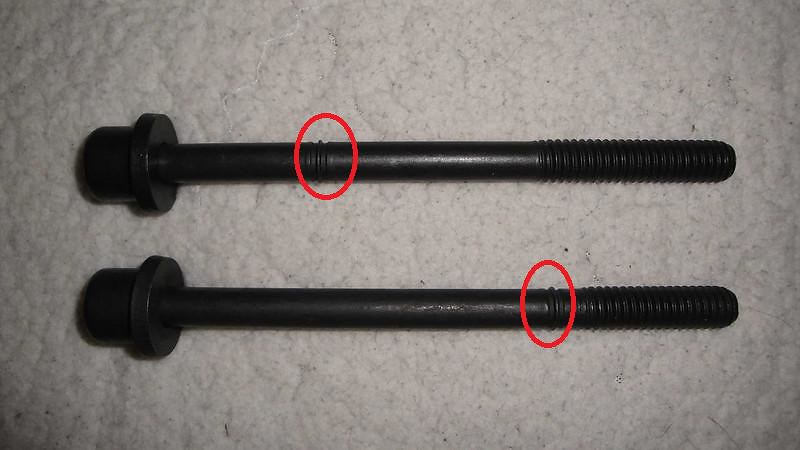
The Dimensions and Specs of the GM Atlas LL8 Vortec Engine IM Fasteners: (M6 X 1.00 X 43-44mm)
Bolt Type: Flange Cap Screw, 10mm Hex Head 10.9 Hard Black Phosphor Steel
Length: 43.3 mm
Thread Type: Metric
Thread Count: M6
Thread Pitch: 1.00
The Fasteners that hold the Intake Manifold to the GM 4.2L LL8 Engine are not simply "Bolts" ... but rather a system ...a Complete Suspension System in fact that holds the IM against the Intake Manifold section on the Driver's Side of the 4.2L engine, sandwiched in between Two Distinct Sets of Rubber Grommets.
There are Three "Dual Port Figure 8" - like Plump, Rubber "O" Ring Style Gaskets nested into the grooves on the inside flange area of the Black Plastic IM that seal tightly around the Intake Ports in the Engine Head against Engine Vibrations, Changes in Atmospheric Pressure and Temperature. These act to resist the innumerable repeated Suction and Vacuum events that occur as All Six Cylinders draw in Air and Mix it with Injected Atomized Fuel when the Pistons head down into the bottom of those Cylinders. This Air Control idea demands a Good Seal... and those "O" Ring Style Grommets work very well when NEW ...and not-so-much when they Age and FLATTEN OUT:


The Second Half of this "Suspension System" involves the complex arrangement of the 10 "Trapped" Fasteners arrayed around the Perimeter of the Outer IM Flange. Take a close look at the design of these Fasteners to understand that at NO time during the relationship between the Inner Flat Flange of the Black Plastic Intake Manifold and the Outer Surface of the Engine Head Intake Ports EVER actually touch each other. Note how there are small "nubs" on the narrower inner portion of these Hard Rubber "Trapped Fasteners" that do the HOLDING to KEEP these 10 Bolts from falling out either during the IM Installation or during its Removal:


As you can see from its design, these are much more robust than the 'thinner' inner Plastic "O" Ring IM Gasket seals. And unlike the Solid Metal to Metal Contact necessary between the Exhaust Manifold, the MLS Gasket and the Exhaust Ports on the Passenger Side of the Engine head, the threaded portion of the IM Bolts remotely snugs these two opposing surfaces together using this Strange Curved Grommet slid over each bolt Washer-Cylinder.
They act to support the Rubber Grommets and secure hold the Black Rubber "Shock Absorbers" in between. Buffering these tightening force are the Very Wide Dimensions of the upper Grommet supported by those Steel Washer-Cylinders having a matching outside diameter. It makes sense to do it this way as the Principle of "As AREA Increases PRESSURE Decreases" making the use of Excessive Torque of the 10 IM Fasteners into the Soft Aluminum Engine Head Substrate ...completely unnecessary.
"The Plastic Never Touches Metal" was the idea behind this design from Mr. Ron Kociba's Atlas Vortec Engine Team and it seems have to worked well enough... most of the time ...until perhaps the Rubber "O" Ring Grommet-Gaskets in between begin to "Lose Their PLUMP" and the 10 Fasteners begin to " Lose Their GRIP". One symptom of this occurring on High Mileage 4.2L Engines is the presence of an Inexplicable Repeat P0300 that will NOT be mitigated either by "A Change of Spark Plugs" or "A Change of Coils" or even after the insightful application of "A CASE Re-Learn" via a Tech 2 Scan Tool or an Autel MAXI-DAS DS-708 Scan Tool. Ergo, these other actions are often taken first, before ever checking on whether or not All Ten Bolts have loosened up over time. On occasion, this problem CAN remedied by the gentle application of a mere 89 Inch Pounds of re-tightening force... and NO More!
Broken IM Bolts? Do NOT Despair!
If you ever Break Off any IM Bolts Off without realizing it, just know that if you KEEP Turning the Ratchet Wrench endlessly... the Removal of the Intake Manifold WILL become necessary. The first solution ...IIANM... comes from @Mounce, @littleblazer and @Sparky all having mentioned in other related IM Threads of using a "Dental Pick" or ""O" Ring Pick Tools to coax the Broken Bolt Shanks OUT of the Engine Head W/O the Need to DRILL THEM OUT.
However... If the Threaded Holes in the Engine Head HAVE been damaged, I've penned a few Threads about "How to Use The TIME-SERT System" for installing Matching Thread Line Replacement Steel Cylinders into those Damaged Holes for a Better-Than-NEW Repair. And by this I mean..I HAVE personally done this work with complete success... so if needs be, please refer to THESE Links:
GM ATLAS 4.2L ENGINE FASTENERS
These Images include the Major TTY Engines Fasteners and Gasket Sets for the GM Atlas 4.2L In Line Six Cylinder Engine.
www.flickr.com
If you find yourself in the middle of any Engine 'dis-assembly - re-assembly' situation and are missing some of them, a trip to the Local Salvage Yards will provide a chance to get the Factory Versions, as most of these Non-TTY Bolts, etc. are otherwise unavailable or very hard to locate. The Dealerships may carry some of them... but often at a Premium Price. Please remember... You CANNOT Re-USe TTY Fasteners. Yup... Someone will alwyays chime in and say, "I've used Used TTY Fasteners before and NEVER had any Problems..." Yeah...Well... Okay... Good Luck with THAT. (Don't Do It...!)
But to address a more recent and immediate concern coming from @Tankcruiser about The Fasteners for the Intake Manifold ... Here is Rundown on them that will cover MOST of what is Commonly Known about these "Bolts":
The Dimensions and Specs of the GM Atlas LL8 Vortec Engine IM Fasteners: (M6 X 1.00 X 43-44mm)
Bolt Type: Flange Cap Screw, 10mm Hex Head 10.9 Hard Black Phosphor Steel
Length: 43.3 mm
Thread Type: Metric
Thread Count: M6
Thread Pitch: 1.00
The Fasteners that hold the Intake Manifold to the GM 4.2L LL8 Engine are not simply "Bolts" ... but rather a system ...a Complete Suspension System in fact that holds the IM against the Intake Manifold section on the Driver's Side of the 4.2L engine, sandwiched in between Two Distinct Sets of Rubber Grommets.
There are Three "Dual Port Figure 8" - like Plump, Rubber "O" Ring Style Gaskets nested into the grooves on the inside flange area of the Black Plastic IM that seal tightly around the Intake Ports in the Engine Head against Engine Vibrations, Changes in Atmospheric Pressure and Temperature. These act to resist the innumerable repeated Suction and Vacuum events that occur as All Six Cylinders draw in Air and Mix it with Injected Atomized Fuel when the Pistons head down into the bottom of those Cylinders. This Air Control idea demands a Good Seal... and those "O" Ring Style Grommets work very well when NEW ...and not-so-much when they Age and FLATTEN OUT:
The Second Half of this "Suspension System" involves the complex arrangement of the 10 "Trapped" Fasteners arrayed around the Perimeter of the Outer IM Flange. Take a close look at the design of these Fasteners to understand that at NO time during the relationship between the Inner Flat Flange of the Black Plastic Intake Manifold and the Outer Surface of the Engine Head Intake Ports EVER actually touch each other. Note how there are small "nubs" on the narrower inner portion of these Hard Rubber "Trapped Fasteners" that do the HOLDING to KEEP these 10 Bolts from falling out either during the IM Installation or during its Removal:
As you can see from its design, these are much more robust than the 'thinner' inner Plastic "O" Ring IM Gasket seals. And unlike the Solid Metal to Metal Contact necessary between the Exhaust Manifold, the MLS Gasket and the Exhaust Ports on the Passenger Side of the Engine head, the threaded portion of the IM Bolts remotely snugs these two opposing surfaces together using this Strange Curved Grommet slid over each bolt Washer-Cylinder.
They act to support the Rubber Grommets and secure hold the Black Rubber "Shock Absorbers" in between. Buffering these tightening force are the Very Wide Dimensions of the upper Grommet supported by those Steel Washer-Cylinders having a matching outside diameter. It makes sense to do it this way as the Principle of "As AREA Increases PRESSURE Decreases" making the use of Excessive Torque of the 10 IM Fasteners into the Soft Aluminum Engine Head Substrate ...completely unnecessary.
"The Plastic Never Touches Metal" was the idea behind this design from Mr. Ron Kociba's Atlas Vortec Engine Team and it seems have to worked well enough... most of the time ...until perhaps the Rubber "O" Ring Grommet-Gaskets in between begin to "Lose Their PLUMP" and the 10 Fasteners begin to " Lose Their GRIP". One symptom of this occurring on High Mileage 4.2L Engines is the presence of an Inexplicable Repeat P0300 that will NOT be mitigated either by "A Change of Spark Plugs" or "A Change of Coils" or even after the insightful application of "A CASE Re-Learn" via a Tech 2 Scan Tool or an Autel MAXI-DAS DS-708 Scan Tool. Ergo, these other actions are often taken first, before ever checking on whether or not All Ten Bolts have loosened up over time. On occasion, this problem CAN remedied by the gentle application of a mere 89 Inch Pounds of re-tightening force... and NO More!
Broken IM Bolts? Do NOT Despair!
If you ever Break Off any IM Bolts Off without realizing it, just know that if you KEEP Turning the Ratchet Wrench endlessly... the Removal of the Intake Manifold WILL become necessary. The first solution ...IIANM... comes from @Mounce, @littleblazer and @Sparky all having mentioned in other related IM Threads of using a "Dental Pick" or ""O" Ring Pick Tools to coax the Broken Bolt Shanks OUT of the Engine Head W/O the Need to DRILL THEM OUT.
However... If the Threaded Holes in the Engine Head HAVE been damaged, I've penned a few Threads about "How to Use The TIME-SERT System" for installing Matching Thread Line Replacement Steel Cylinders into those Damaged Holes for a Better-Than-NEW Repair. And by this I mean..I HAVE personally done this work with complete success... so if needs be, please refer to THESE Links:
