How To: Replace Burnt Out Window Switch Lights on 02-05 Envoy

Envoy_04

Original poster
Member
Jul 1, 2013
749
This article will show you how to replace the burnt out window switch lights on your 02-05 GMC Envoy with the direct replacement style incandescent bulbs. Bulbs can be found here: DNW1-DW10 JKL Components | Mouser.

Summary: Fix your burnt out window switch lights
Difficulty: Easy
Estimated Time: 20-30 minutes
Part Numbers: JKL Components DNW1-DW10
Cost: Varies with quantity

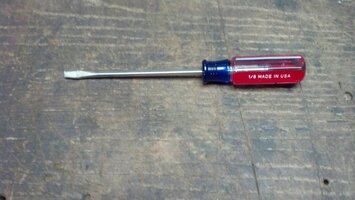
Step 1: Obtain a thin flat-blade screwdriver

View attachment 32317

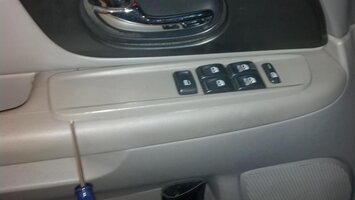
Step 2: Pop the switch plate up by inserting the screwdriver under the rear of the plate, and then again in the front

View attachment 32318

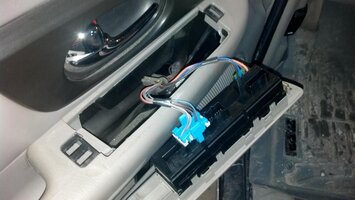
Step 3: Unplug the wires going to the back of the switches, when this is done take the now loose switch assembly to a workbench or table - someplace that is small parts-friendly (there are several and you don't want to lose them). Please excuse my dirty Weathertechs - it isn't always that way.

View attachment 32319

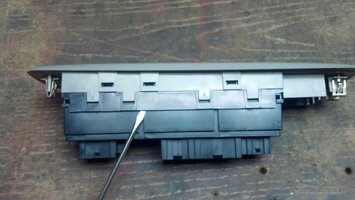
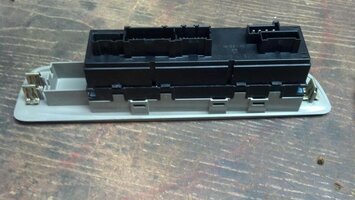
Step 4: Use the same screwdriver to pop the assembly apart all around the seam where shown, be gentle and take your time. Also, don't gap it very far apart yet.

View attachment 32320

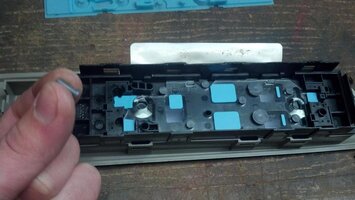
Step 5: Set the whole thing just like this once you have it popped loose all the way around, and lift the loose part away. This is done to ensure you don't lose any small pieces that we'll see momentarily.

View attachment 32321

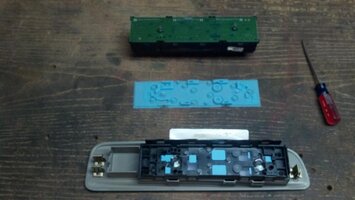
Step 6: You should now have 3 pieces: the circuit board, a blue gasket, and the actual switches with all their little plungers inside

View attachment 32322

These little plungers are the small pieces that you'll be forever finding if you drop them and they scatter. (Ask me how I know)

View attachment 32323
 

Attachments

  • IMG_20140125_183604_157.jpg
    IMG_20140125_183604_157.jpg
    67.5 KB · Views: 90
  • IMG_20140125_183838_217.jpg
    IMG_20140125_183838_217.jpg
    37.9 KB · Views: 85
  • IMG_20140125_184032_571.jpg
    IMG_20140125_184032_571.jpg
    65.8 KB · Views: 93
  • IMG_20140125_184243_198.jpg
    IMG_20140125_184243_198.jpg
    58.8 KB · Views: 102
  • IMG_20140125_184531_210.jpg
    IMG_20140125_184531_210.jpg
    72.4 KB · Views: 108
  • IMG_20140125_184738_336.jpg
    IMG_20140125_184738_336.jpg
    70 KB · Views: 135
  • IMG_20140125_184628_676.jpg
    IMG_20140125_184628_676.jpg
    54.7 KB · Views: 140

Envoy_04

Original poster
Member
Jul 1, 2013
749
Step 7: Now we'll be taking this piece loose - GENTLY pop it loose from the 4 black clips along the sides. Don't try to lift it up very far as it is attached by ribbon to the underside. I don't know if it matters to the board or not, but I always wear a thin pair of disposable rubber gloves when handling circuit boards - just in case.

View attachment 32324

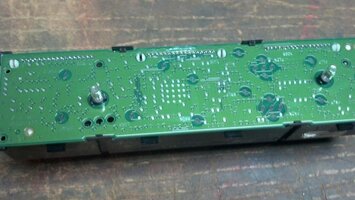
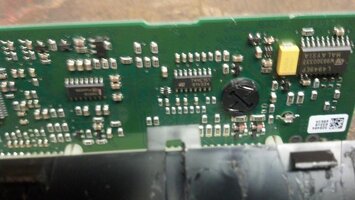
These bulbs are what you'll be replacing; looking at the base you can see it is a twist-lock style base.

View attachment 32325

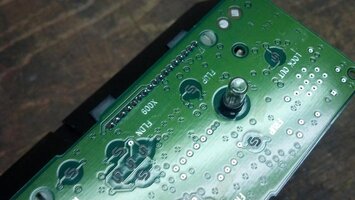
Step 8: Lift up the side of the circuit board the ribbon isn't attached to and you'll see this. The round piece is the base of the bulb - rotate it and take the bulb out.

View attachment 32326

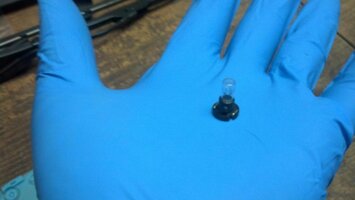
This is what the bulb looks like. Your new ones should be the same and will plug right back in where this one just came from.

View attachment 32327

Final Step: Do everything you've just done in reverse to reassemble the assembly and reinstall it. Enjoy your now working window switch lights.
 

Attachments

  • IMG_20140125_184940_499.jpg
    IMG_20140125_184940_499.jpg
    70.9 KB · Views: 120
  • IMG_20140125_185112_632.jpg
    IMG_20140125_185112_632.jpg
    72.9 KB · Views: 130
  • IMG_20140125_185135_916.jpg
    IMG_20140125_185135_916.jpg
    72.8 KB · Views: 127
  • IMG_20140125_185234_595.jpg
    IMG_20140125_185234_595.jpg
    40.2 KB · Views: 130

IllogicTC

Member
Dec 30, 2013
3,452
I found this to be very informative (I was kinda assuming you'd have to take a lot more than just that out of the door itself). And also the site linked, I never realized such a site existed, and it made me a lot happier than I thought I would have been. :tongue:
 

Mark20

Member
Dec 6, 2011
1,630
Thank you very much for the article. Exactly what I need to fix mine.
 

Envoy_04

Original poster
Member
Jul 1, 2013
749
IllogicTC said:
I found this to be very informative (I was kinda assuming you'd have to take a lot more than just that out of the door itself). And also the site linked, I never realized such a site existed, and it made me a lot happier than I thought I would have been. :tongue:

Mark20 said:
Thank you very much for the article. Exactly what I need to fix mine.

Thanks for the kind words guys.

I've been hitting my rear windows after dark thinking they were the front ones ever since I've had the Envoy because the front ones are burnt out. I was told they were replaceable, but searching here and the rest of the internet turned up no results on how to replace them. If GM had their way they'd just sell you a whole new switch assembly and let you think the part is "non-serviceable." I finally decided to tear into it and fix it once and for all - and decided that I'd do something to contribute back to this community that's been so good to me while I was going. Hopefully this bit of info can be used by a lot of owners who see it before they give in and buy a whole new switch assembly, with our aging platform this issue is bound to become more and more common.
 
  • Like
Reactions: David Keener
Dec 4, 2011
520
Great job. Perfect pictures. Insightful commentary. This should make it almost "idiot proof" for the majority of folks.

A couple of questions and comments. Where did you get the bulbs and what was the part number. If GM doesn't consider them serviceable then I wouldn't expect part numbers in the manual (sorry didn't check). An approximate cost would also be informative.

Again, good job, I'm sure that this will get viewed over and over again for some time to come. :thumbsup::thumbsup::thumbsup:
 

Envoy_04

Original poster
Member
Jul 1, 2013
749
Envoy_04 said:
This article will show you how to replace the burnt out window switch lights on your 02-05 GMC Envoy with the direct replacement style incandescent bulbs. Bulbs can be found here: DNW1-DW10 JKL Components | Mouser.

Summary: Fix your burnt out window switch lights
Difficulty: Easy
Estimated Time: 20-30 minutes
Part Numbers: JKL Components DNW1-DW10
Cost: Varies with quantity

At the top of the first post. :wink:

The bulbs are from Mouser Electronics, forum member Matt pointed them out to me. I believe they cost 63 cents a piece for one, 56 cents a piece for 10, and 50 cents a piece for 50. Larger quantities are also available. I can't give a good estimate on cost since the amount everyone orders might be different and shipping to different regions will factor into the cost.

Thanks for the compliments.
 

Mark20

Member
Dec 6, 2011
1,630
Do you know how many bulbs are in each side?

Edit:
Looking on a real computer it looks like two on the driver side and I'll guess one on the passenger side.
 

IllogicTC

Member
Dec 30, 2013
3,452
Mark20 said:
Do you know how many bulbs are in each side?

Edit:
Looking on a real computer it looks like two on the driver side and I'll guess one on the passenger side.

It may actually vary with different options installed (heated vs. unheated seats), however it kinda looks like the circuitry is all there on Envoy's module for the heated seats even though I remember seeing another photo he's got cloth (unheated). I myself would just buy a ten-pack and be done with it, then you have some spares and if you have any buddies with a 360 can help them out.
 
Dec 4, 2011
520
Envoy_04 said:
At the top of the first post. :wink:

The bulbs are from Mouser Electronics, forum member Matt pointed them out to me. I believe they cost 63 cents a piece for one, 56 cents a piece for 10, and 50 cents a piece for 50. Larger quantities are also available. I can't give a good estimate on cost since the amount everyone orders might be different and shipping to different regions will factor into the cost.

Thanks for the compliments.

Sorry you caught me in a skimming moment. :redface: I stopped reading when I got to 20-30 min. Still appreciate your work.
 

Envoy_04

Original poster
Member
Jul 1, 2013
749
Mark20 said:
Do you know how many bulbs are in each side?

Edit:
Looking on a real computer it looks like two on the driver side and I'll guess one on the passenger side.

IllogicTC said:
It may actually vary with different options installed (heated vs. unheated seats), however it kinda looks like the circuitry is all there on Envoy's module for the heated seats even though I remember seeing another photo he's got cloth (unheated). I myself would just buy a ten-pack and be done with it, then you have some spares and if you have any buddies with a 360 can help them out.

I have just the four window switches, the lockout, and the door locks on the driver's side of my Envoy (no heated seat option), and there are two bulbs on that side. I'm going to guess that there's one on the passenger side due to the close proximity of the window switch and the door lock switch. I didn't tear into that side or the rear ones because they still work, but I will do so soon to see exactly what and how many are there so I can add it to this article. Plus I'm curious about the rear switches, I read a post on the OS that said on an 05 the lights in the rear switches were a single SMD LED from the factory - I want to know now if it's the same on my 04.
 

Mark20

Member
Dec 6, 2011
1,630
All switches on the driver's door are lit! It took longer to get the halves apart than change the bulbs. One note, you'll need a thin but not narrow screwdriver to twist the bulbs out and put them back. The blade on my little pocket Leatherman fit the bill. I would have liked to go LED but the recent thread on getting them to work well made me decide just replacing the bulbs was the way to go.
 

Blckshdw

Moderator
Nov 20, 2011
10,681
Tampa Bay Area, FL
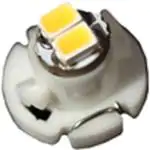
Very helpful, while looking for the JKL Components DNW1-DW10 bulbs, I found they also make them with LEDs instead of incandescent. The Mouser link is https://www.mouser.com/ProductDetail/560-LE-DNW1-01W

This option is a good one if the buttons were truly back lit by individual bulbs, but in this application, the light from the filament bulbs travels horizontally through the clear acrylic piece, and gets reflected upwards to the button faces by the light blue areas seen in the last 2 pics of post #1. Using these would yield the same result as members received in the past who put 5mm LEDs in the stock positions. Very little, to no light output on their button faces. :frown:

90054
 

Daniel644

Member
Feb 27, 2015
574
My original window switch crapped out on me (and I didn't realize it when I parked it because it was dark out and ended up with my driver window rolled down all week before I went to get in the next weekend) and so I bought a used one on Ebay, got into the truck for the first time tonight and the front half had basically no light, seeing these pictures I assumed it was a bad bulb (and removing and testing appeared to confirm this, so I swapped the bulbs from my original switch (which tested as good, both lit up fine on there own when directly connected to 12v power source, I have a PC power supply I converted to a 12 volt test bench so I can put 12v power to anything to see if it turns on) but once everything was reassembled the front switches are just barely lighting up, does anybody know which pins on which harness are the back lights so I can bench test it inside the house? I think that front bulb connection on the circuit board might not be getting juice.
 

Mooseman

Moderator
Dec 4, 2011
25,332
Ottawa, ON
That should be in the manual by the wire colour. This would also allow you to test the wiring from the harness to make sure you're getting 12V.
 

Forum Statistics

Threads
23,319
Posts
637,895
Members
18,519
Latest member
chirobo1

Members Online