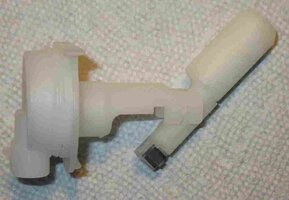
My 2000 Chevrolet Silverado 1500 does THIS (See the Video) whenever I turn on the Windshield Washer. The VOP (Video Original Poster) shows 'How To Do' this Windshield Washer Reservoir & Pump Repair on his 2003 Silverado. However, these instructions will apply to most GMT-800 Full Size Trucks and SUVs. I’m including images of ALL the Parts required for a Complete Replacement of all this stuff from Top To Bottom that I just purchased via Amazon:
Time Required:
With Complete Prep and Post Time Testing? 45-60 Minutes
Tools Required:
3/8” Drive Ratchet and an Assortment of Metric Sockets and Drive Extensions
10mm Box End (Off-Set Wrench is Handy) and/or in 3/8” Drive 10mm Socket
13mm & 15mm 3/8” Drive Sockets (Just In Case You NEED them).
8mm (5/16”) Box End or Battery Terminal Specific Ratcheting Tool
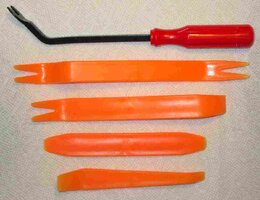
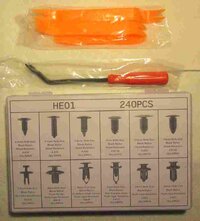
Plastic Fender Well Retainer Tools & Replacement Retainers
A Flashlight or a Head-Band Lamp
Having a Milwaukee M12 3/8" Drive Battery Powered Right Angle Ratchet SAVES TIME!
New Parts (POSSIBLY) Required:
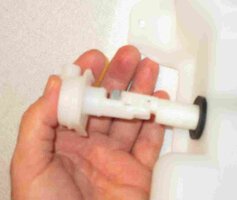
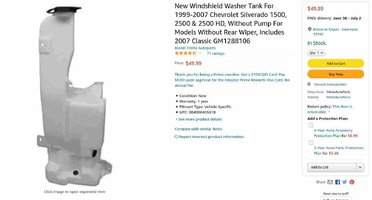
Windshield Washer Reservoir - GM Part # 1288106 Amazon @ $49.99
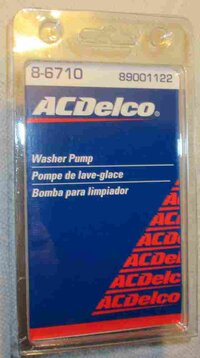
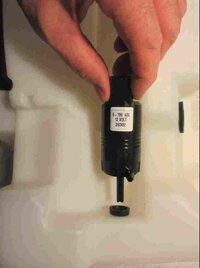
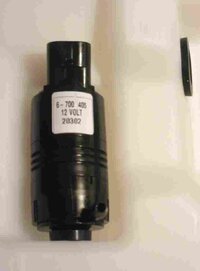
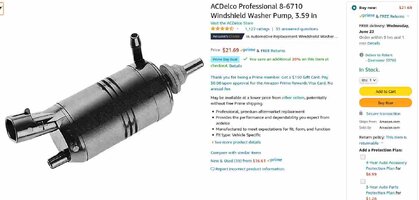
Windshield Washer Pump - ACDelco Professional Part # 8-6710, 3.59” Amazon @ $21.69
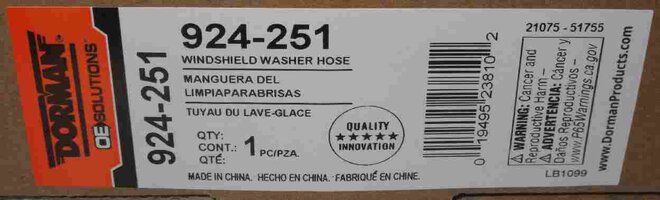
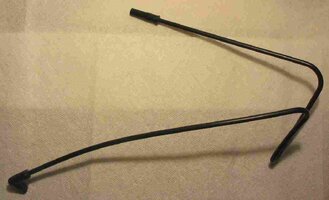
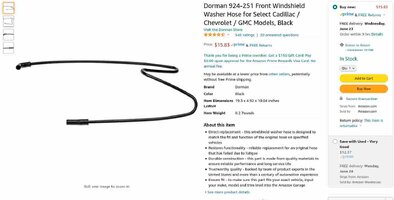
Windshield Washer Hose (Front) Dorman Part # 924-251 Amazon @ $15.83
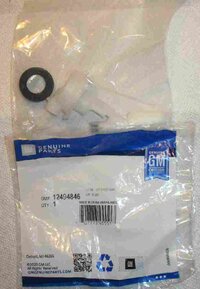
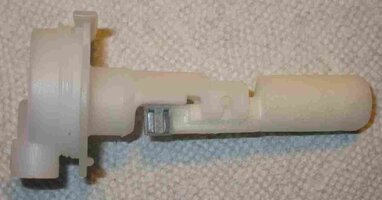
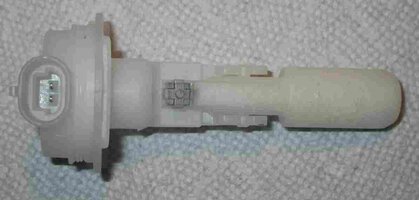
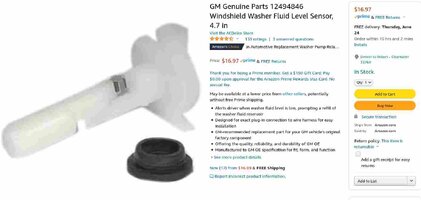
Windshield Washer Low Level Sensor GM Genuine Part # 12494846 4.7” Amazon @ $16.97
R&R Steps to Follow:
(1) Remove the Diagonal Brace Bar (Heavy Battery Restraint) via (2) 10mm Bolts.
(2) Remove the (2) 8mm Battery Post Connectors ... Ground FIRST!
(3) Remove the Battery Black Plastic Hold Down Bracket and Tilt & Lift out the Battery.
(4) Remove the [7] 10mm Bolts holding in the Battery Support Tray and Lift it Out.
(5) Remove the 10mm Bolt securing the Reservoir to the Upper Front End Frame.
(6) Check that the Upper Reservoir is Free and then move to the Lower Left Front Wheel Well.
(7) Locate and Remove the 3-4 Plastic Fender Well Retainers & carefully bend it Back & Away.
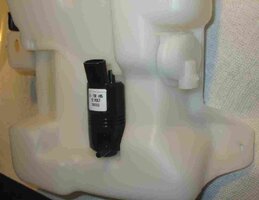
(8) Unplug the Low Washer Fluid Level Sensor Electrical Connector underneath the Tank.
(9) Remove the Lower 10mm Bolt holding the Reservoir to the Lower Front End Frame.
(10) From the Top, Lean the Tank to Rear and Remove the Power Connector to the Fluid Pump.
(11) Disconnect the Fluid Line to the Pump Motor Line from the Body Fluid Line-Tube.
(12) Lower the Windshield Washer Reservoir through the Bottom of the Wheel Well.
(13) Replace the Damaged Reservoir as a Unit or R&R the Fluid Level Sensor and the Fluid Pump.
(14) Reverse the Installation of the Body of the Newly Repaired Reservoir Unit from the Bottom Up.
(15) Re-Attach all Electrical Harness Connections and Fluid Line Connection(s).
(16) Re-Install the Tank Bolts (2), Battery Tray & Bolts (7), Battery, Hold-Down Bracket & Bolt (1) and the Diagonal Brace & Bolts (2) AND Battery Cables.
(17) FILL THE RESERVOIR BEFORE TRYING TO TEST OUT THE NEW WINDSHIELD WASHER MOTOR!
(18) Re-Position the Left Wheel Well Plastic Weather Liner and Re-Insert and-or Replace any Damaged-Missing Plastic Retainer Pins.
(19) Check for Tools and Debris BEFORE Starting the Truck and while Idling the Engine,
(20) Run-Test the Windshield Washer Unit for proper Spray Flow and Volume. CHECK-4-LEAKS.
(21) Check the condition of the Windshield Wiper Blades and Replace them as a Pair if Needed.
"Extra Duty":
Check for any Damage to the Windshield from Hazing or Sand Glazing via the prior lack of Windshield Washer Fluid.
Carefully Polish the Glass lightly with Bon-Ami BUT KEEP IT CONSTANTLY WET DURING THIS ENTIRE EFFORT!
After Watching the VOP... A Word To The Wise…
NEVER Wear any Wedding Rings, Bracelets or Watches & Metal Bands around ANYTHING Electrical or when working on anything from a Ladder.
If your Wedding Band EVER gets caught on anything and you happen to FALL at the same time… you can lose Fingers (and Tendons) on the way DOWN.
Time Required:
With Complete Prep and Post Time Testing? 45-60 Minutes
Tools Required:
3/8” Drive Ratchet and an Assortment of Metric Sockets and Drive Extensions
10mm Box End (Off-Set Wrench is Handy) and/or in 3/8” Drive 10mm Socket
13mm & 15mm 3/8” Drive Sockets (Just In Case You NEED them).
8mm (5/16”) Box End or Battery Terminal Specific Ratcheting Tool
Plastic Fender Well Retainer Tools & Replacement Retainers
A Flashlight or a Head-Band Lamp
Having a Milwaukee M12 3/8" Drive Battery Powered Right Angle Ratchet SAVES TIME!
New Parts (POSSIBLY) Required:
Windshield Washer Reservoir - GM Part # 1288106 Amazon @ $49.99
Windshield Washer Pump - ACDelco Professional Part # 8-6710, 3.59” Amazon @ $21.69
Windshield Washer Hose (Front) Dorman Part # 924-251 Amazon @ $15.83
Windshield Washer Low Level Sensor GM Genuine Part # 12494846 4.7” Amazon @ $16.97
R&R Steps to Follow:
(1) Remove the Diagonal Brace Bar (Heavy Battery Restraint) via (2) 10mm Bolts.
(2) Remove the (2) 8mm Battery Post Connectors ... Ground FIRST!
(3) Remove the Battery Black Plastic Hold Down Bracket and Tilt & Lift out the Battery.
(4) Remove the [7] 10mm Bolts holding in the Battery Support Tray and Lift it Out.
(5) Remove the 10mm Bolt securing the Reservoir to the Upper Front End Frame.
(6) Check that the Upper Reservoir is Free and then move to the Lower Left Front Wheel Well.
(7) Locate and Remove the 3-4 Plastic Fender Well Retainers & carefully bend it Back & Away.
(8) Unplug the Low Washer Fluid Level Sensor Electrical Connector underneath the Tank.
(9) Remove the Lower 10mm Bolt holding the Reservoir to the Lower Front End Frame.
(10) From the Top, Lean the Tank to Rear and Remove the Power Connector to the Fluid Pump.
(11) Disconnect the Fluid Line to the Pump Motor Line from the Body Fluid Line-Tube.
(12) Lower the Windshield Washer Reservoir through the Bottom of the Wheel Well.
(13) Replace the Damaged Reservoir as a Unit or R&R the Fluid Level Sensor and the Fluid Pump.
(14) Reverse the Installation of the Body of the Newly Repaired Reservoir Unit from the Bottom Up.
(15) Re-Attach all Electrical Harness Connections and Fluid Line Connection(s).
(16) Re-Install the Tank Bolts (2), Battery Tray & Bolts (7), Battery, Hold-Down Bracket & Bolt (1) and the Diagonal Brace & Bolts (2) AND Battery Cables.
(17) FILL THE RESERVOIR BEFORE TRYING TO TEST OUT THE NEW WINDSHIELD WASHER MOTOR!
(18) Re-Position the Left Wheel Well Plastic Weather Liner and Re-Insert and-or Replace any Damaged-Missing Plastic Retainer Pins.
(19) Check for Tools and Debris BEFORE Starting the Truck and while Idling the Engine,
(20) Run-Test the Windshield Washer Unit for proper Spray Flow and Volume. CHECK-4-LEAKS.
(21) Check the condition of the Windshield Wiper Blades and Replace them as a Pair if Needed.
"Extra Duty":
Check for any Damage to the Windshield from Hazing or Sand Glazing via the prior lack of Windshield Washer Fluid.
Carefully Polish the Glass lightly with Bon-Ami BUT KEEP IT CONSTANTLY WET DURING THIS ENTIRE EFFORT!
After Watching the VOP... A Word To The Wise…
NEVER Wear any Wedding Rings, Bracelets or Watches & Metal Bands around ANYTHING Electrical or when working on anything from a Ladder.
If your Wedding Band EVER gets caught on anything and you happen to FALL at the same time… you can lose Fingers (and Tendons) on the way DOWN.
Attachments
Last edited: