Last year I spent a lot of time trying to pull TCCM codes from an 02 trailblazer. At the end I was able to access them manually via the command line. Below is the writeup on it. Hopefully this helps some folks diagnose their own 4WD issues  There is a lot of info below, if you are looking for a quick answer read up to the quick example which will provide the command and show you how to decode it. enjoy!
----------------------------------------
Good news You can pull TCCM codes with a fairly inexpensive scanner.
NOTE that this works on our trailblazer. From all the reading i did this should work for anyone. As all with the internet, proceed at your own devices!
If you do this or expand on it (reading values from sensors etc) please let everyone know!
To do this you need a scanner which lets you send a message by manually typing in the message. There are several of these out there, no idea which is better, worse, or the same. if you have the scantool, you need software to control it. There are free versions out there, though i opted to pay to get something which works with less hassle. The scantool.net scanner with Scan XL pro SW is on sale for $149 (not sure how often they run sales, or if this is an all the time price)
I went with the ODBLink Scan Tool from scantool.net with the scanXL Pro SW with the GM package add on since we have 3 GM vehicles.
so in summary you need a computer based scanner and software that lets you send messages manually (sometimes called terminal mode)
I figured out the messages to send to get codes from the TCCM on an 02 trailblazer, should be the same for all years.
this seems complicated, though just about anyone can do this. quite frankly you can just send the messages I listed and not delve into the details of what it all means
the messages are in Hexadecimal, don't let that scare you
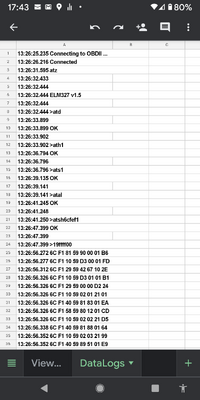
I started to tool, selected ODB-II->connect and followed the instructions, then selected the "tool" tab and clicked on "ODB-II terminal", select "custom send tab", check the box "enable ODB-II terminal" in the top left. now you are ready to send messages!
quick example:
with the 4WD service light on:
send message: 6C 1A F1 19 C2 ff 00
Received: $6C $F1 $1A $59 $43 $79 $93 $6A
the $43 $79 is the code, and the $93 is the status indicating the code is turning on the 4WD service light
code list:
$43 $00 = C0300
$43 $05 = C0 305
$43 $06 = C0306
$43 $21 = C0321
$43 $27 = C0327
$43 $59 = C0359
$43 $74 = C0374
$43 $79 = C0379 ***** the code indicated in the message above
$45 $50 = C0550
$87 $70 = B0770
$87 $75 = B0775
$87 $80 = B0780
$87 $85 = B0785
$87 $90 = B0790
$A7 $25 = B2725
$D3 $01 = U1301
here are the messages I figured out that seem useful:
message: 6C 1A F1 14 - turn off 4WD service light (clears codes)
message: 6C 1A F1 19 D2 ff 00 - return current and pending codes
message: 6C 1A F1 19 c2 ff 00 - returns current code
message: 6C 1A F1 19 ff ff 00 - return all code status (what I prefer)
you can stop here or get into the details:
each group of 2 below is what is called a "byte"
the address of the TCCCM is 1A
the address of the scantool is F1
$6C $1A $F1 $19 $C2 $FF $00
$GG $HH $JJ $KK $LL $MM $NN <- use these to look through the list
GG - 6C = node to node GM message
HH - 1A = address of scanner
JJ - F1 = address of TCCM
KK - 19 = what kind of request (19) Request Diagnostic Trouble Codes
by Status (14) to clear codes
LL - C2 = what data you want to get. (C2) return current codes (D2)
return current and pending codes (FF) everything
MM - FF = (FF) send to all groups (not sure why 40 chassis doesn't
work)
NN - 00 = extra padding, leave at 00
The response should be formatted as follows:
Byte1 Byte2 byte3 Byte4 Byte5 Byte6 Byte7 Byte8
sample response:
$6C $F1 $1A $59 $43 $79 $93 $6A
$PP $QQ $RR $SS $XZ $ZZ $YY $VV <- use these to look through the list
below
Byte1 - PP - 6C - same as the first byte you sent
Byte2 - QQ - F1 - address of the scan tool (indicates the recipient)
Byte3 - RR - 1A - address of the TCCM module (indicates the originator)
Byte4 - SS - 59 - will be the byte4 you sent with 40 added to it
Byte5 - XZ - 43 - first part of code
Byte6 - ZZ - 79 - second part of code
Byte7 - YY - 93 - status (01) good, no issue (93) current code causing service light to illuminate (11) not sure, seemed to be associated to the last code raised, though I'm not sure
Byte8 - VV - 6A - check sum (ignore this, it is used to make sure the message made it without loosing data)
so bytes 4 and 5 have the code, to decipher:
$43 $79 <- from recceived message
$XZ $ZZ <- use this to decode based on the list below
the X is the first part of the code
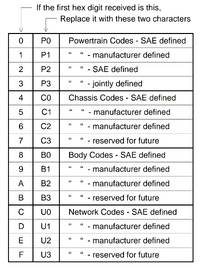
4 = C0
8 = B0
A = B2
D = U1
ZZZ = code
for complete code put together XZZZ
so the $43 $79 is:
4 = C0
ZZZ = 379
code = C0379
if you get 00 00 for a code, then it is the end of the list - 00 00 is not a code, but an indicator teh end of the code list.
the status of this code (YY) in the example is 93 which seems to indicate the current fault. if you see 01 then that code is not currently active
examples:
no 4WD service light:
send message: 6C 1A F1 19 c2 ff 00 - returns current code
response: $6C $F1 $1A $59 >>$00 $00<< $93 $BB 00 00 means no code
after turning on the 4WD service light response:
send message: 6C 1A F1 19 c2 ff 00 - returns current code
Received: $6C $F1 $1A $59 $43 $79 $93 $6A 93 -- indicates current code (43 79) with a status of 93 which seems to be the current code lighting the 4WD service light
Received : $6C $F1 $1A $59 $00 $00 $93 $BB -- 00 00 indicates end of list
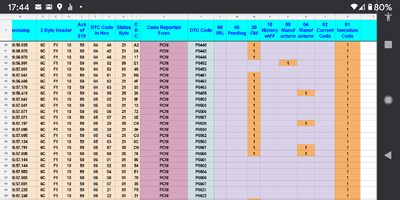
send message 6C 1A F1 19 ff ff 00 - return all code status - 01 in before last means all is well. in this example the before last byte is 01 for all the entries except the last which has code 00 00 indicating the end of the list, therefor there are no codes present.
as a neat aside - I believe these to be every possible code that can be generated!
Received OBD-II message: $6C $F1 $1A $59 $43 $00 $01 $86
Received OBD-II message: $6C $F1 $1A $59 $43 $05 $01 $E7
Received OBD-II message: $6C $F1 $1A $59 $43 $06 $01 $33
Received OBD-II message: $6C $F1 $1A $59 $43 $21 $01 $BF
Received OBD-II message: $6C $F1 $1A $59 $43 $27 $01 $0A
Received OBD-II message: $6C $F1 $1A $59 $43 $59 $01 $CE
Received OBD-II message: $6C $F1 $1A $59 $43 $74 $01 $80
Received OBD-II message: $6C $F1 $1A $59 $43 $79 $01 $BB
Received OBD-II message: $6C $F1 $1A $59 $45 $50 $01 $DD
Received OBD-II message: $6C $F1 $1A $59 $87 $70 $01 $0B
Received OBD-II message: $6C $F1 $1A $59 $87 $75 $01 $6A
Received OBD-II message: $6C $F1 $1A $59 $87 $80 $01 $E9
Received OBD-II message: $6C $F1 $1A $59 $87 $85 $01 $88
Received OBD-II message: $6C $F1 $1A $59 $87 $90 $01 $5D
Received OBD-II message: $6C $F1 $1A $59 $A7 $25 $01 $04
Received OBD-II message: $6C $F1 $1A $59 $D3 $01 $01 $12
Received OBD-II message: $6C $F1 $1A $59 $00 $00 $93 $BB
- - - Updated - - -
Some of the hardware from scantool.net:
$49 ODBLink SX - the catch with this is that they charge more for the SW, the next step up seemed like a better deal: http://www.scantool.net/scan-tools/p...bdlink-sx.html
$99 ODBLink Scan Tool: http://www.scantool.net/scan-tools/p...d/obdlink.html there are also bluetooth and wireless versions.
there is a special running to get the Pro SW with the $99 tool (and wireless/blue version) for a $149
I bought the wireless, though it is probably a waste of money as i use the USB cable, so the $99 would probably be a wiser choice. the wireless and bluetooth are for using a phone, though i since learned that required additional SW and is considerably limited compared to the ScanXL SW for the windows laptop.
Software - You need software which lets you send custom messages. If you are computer savy you can use hyperterminal. Since I wanted a fully featured scanner I purchased the ScanXL Pro with the GM add on. the PRO version lets you send custom message (terminal mode), the regular version does NOT - so if you go this route get ScanXL Pro
comparison: http://www.scantool.net/ppe-software-comparison.html
 There is a lot of info below, if you are looking for a quick answer read up to the quick example which will provide the command and show you how to decode it. enjoy!
----------------------------------------
Good news You can pull TCCM codes with a fairly inexpensive scanner.
NOTE that this works on our trailblazer. From all the reading i did this should work for anyone. As all with the internet, proceed at your own devices!
If you do this or expand on it (reading values from sensors etc) please let everyone know!
To do this you need a scanner which lets you send a message by manually typing in the message. There are several of these out there, no idea which is better, worse, or the same. if you have the scantool, you need software to control it. There are free versions out there, though i opted to pay to get something which works with less hassle. The scantool.net scanner with Scan XL pro SW is on sale for $149 (not sure how often they run sales, or if this is an all the time price)
I went with the ODBLink Scan Tool from scantool.net with the scanXL Pro SW with the GM package add on since we have 3 GM vehicles.
so in summary you need a computer based scanner and software that lets you send messages manually (sometimes called terminal mode)
I figured out the messages to send to get codes from the TCCM on an 02 trailblazer, should be the same for all years.
this seems complicated, though just about anyone can do this. quite frankly you can just send the messages I listed and not delve into the details of what it all means
the messages are in Hexadecimal, don't let that scare you
I started to tool, selected ODB-II->connect and followed the instructions, then selected the "tool" tab and clicked on "ODB-II terminal", select "custom send tab", check the box "enable ODB-II terminal" in the top left. now you are ready to send messages!
quick example:
with the 4WD service light on:
send message: 6C 1A F1 19 C2 ff 00
Received: $6C $F1 $1A $59 $43 $79 $93 $6A
the $43 $79 is the code, and the $93 is the status indicating the code is turning on the 4WD service light
code list:
$43 $00 = C0300
$43 $05 = C0 305
$43 $06 = C0306
$43 $21 = C0321
$43 $27 = C0327
$43 $59 = C0359
$43 $74 = C0374
$43 $79 = C0379 ***** the code indicated in the message above
$45 $50 = C0550
$87 $70 = B0770
$87 $75 = B0775
$87 $80 = B0780
$87 $85 = B0785
$87 $90 = B0790
$A7 $25 = B2725
$D3 $01 = U1301
here are the messages I figured out that seem useful:
message: 6C 1A F1 14 - turn off 4WD service light (clears codes)
message: 6C 1A F1 19 D2 ff 00 - return current and pending codes
message: 6C 1A F1 19 c2 ff 00 - returns current code
message: 6C 1A F1 19 ff ff 00 - return all code status (what I prefer)
you can stop here or get into the details:
each group of 2 below is what is called a "byte"
the address of the TCCCM is 1A
the address of the scantool is F1
$6C $1A $F1 $19 $C2 $FF $00
$GG $HH $JJ $KK $LL $MM $NN <- use these to look through the list
GG - 6C = node to node GM message
HH - 1A = address of scanner
JJ - F1 = address of TCCM
KK - 19 = what kind of request (19) Request Diagnostic Trouble Codes
by Status (14) to clear codes
LL - C2 = what data you want to get. (C2) return current codes (D2)
return current and pending codes (FF) everything
MM - FF = (FF) send to all groups (not sure why 40 chassis doesn't
work)
NN - 00 = extra padding, leave at 00
The response should be formatted as follows:
Byte1 Byte2 byte3 Byte4 Byte5 Byte6 Byte7 Byte8
sample response:
$6C $F1 $1A $59 $43 $79 $93 $6A
$PP $QQ $RR $SS $XZ $ZZ $YY $VV <- use these to look through the list
below
Byte1 - PP - 6C - same as the first byte you sent
Byte2 - QQ - F1 - address of the scan tool (indicates the recipient)
Byte3 - RR - 1A - address of the TCCM module (indicates the originator)
Byte4 - SS - 59 - will be the byte4 you sent with 40 added to it
Byte5 - XZ - 43 - first part of code
Byte6 - ZZ - 79 - second part of code
Byte7 - YY - 93 - status (01) good, no issue (93) current code causing service light to illuminate (11) not sure, seemed to be associated to the last code raised, though I'm not sure
Byte8 - VV - 6A - check sum (ignore this, it is used to make sure the message made it without loosing data)
so bytes 4 and 5 have the code, to decipher:
$43 $79 <- from recceived message
$XZ $ZZ <- use this to decode based on the list below
the X is the first part of the code
4 = C0
8 = B0
A = B2
D = U1
ZZZ = code
for complete code put together XZZZ
so the $43 $79 is:
4 = C0
ZZZ = 379
code = C0379
if you get 00 00 for a code, then it is the end of the list - 00 00 is not a code, but an indicator teh end of the code list.
the status of this code (YY) in the example is 93 which seems to indicate the current fault. if you see 01 then that code is not currently active
examples:
no 4WD service light:
send message: 6C 1A F1 19 c2 ff 00 - returns current code
response: $6C $F1 $1A $59 >>$00 $00<< $93 $BB 00 00 means no code
after turning on the 4WD service light response:
send message: 6C 1A F1 19 c2 ff 00 - returns current code
Received: $6C $F1 $1A $59 $43 $79 $93 $6A 93 -- indicates current code (43 79) with a status of 93 which seems to be the current code lighting the 4WD service light
Received : $6C $F1 $1A $59 $00 $00 $93 $BB -- 00 00 indicates end of list
send message 6C 1A F1 19 ff ff 00 - return all code status - 01 in before last means all is well. in this example the before last byte is 01 for all the entries except the last which has code 00 00 indicating the end of the list, therefor there are no codes present.
as a neat aside - I believe these to be every possible code that can be generated!
Received OBD-II message: $6C $F1 $1A $59 $43 $00 $01 $86
Received OBD-II message: $6C $F1 $1A $59 $43 $05 $01 $E7
Received OBD-II message: $6C $F1 $1A $59 $43 $06 $01 $33
Received OBD-II message: $6C $F1 $1A $59 $43 $21 $01 $BF
Received OBD-II message: $6C $F1 $1A $59 $43 $27 $01 $0A
Received OBD-II message: $6C $F1 $1A $59 $43 $59 $01 $CE
Received OBD-II message: $6C $F1 $1A $59 $43 $74 $01 $80
Received OBD-II message: $6C $F1 $1A $59 $43 $79 $01 $BB
Received OBD-II message: $6C $F1 $1A $59 $45 $50 $01 $DD
Received OBD-II message: $6C $F1 $1A $59 $87 $70 $01 $0B
Received OBD-II message: $6C $F1 $1A $59 $87 $75 $01 $6A
Received OBD-II message: $6C $F1 $1A $59 $87 $80 $01 $E9
Received OBD-II message: $6C $F1 $1A $59 $87 $85 $01 $88
Received OBD-II message: $6C $F1 $1A $59 $87 $90 $01 $5D
Received OBD-II message: $6C $F1 $1A $59 $A7 $25 $01 $04
Received OBD-II message: $6C $F1 $1A $59 $D3 $01 $01 $12
Received OBD-II message: $6C $F1 $1A $59 $00 $00 $93 $BB
- - - Updated - - -
Some of the hardware from scantool.net:
$49 ODBLink SX - the catch with this is that they charge more for the SW, the next step up seemed like a better deal: http://www.scantool.net/scan-tools/p...bdlink-sx.html
$99 ODBLink Scan Tool: http://www.scantool.net/scan-tools/p...d/obdlink.html there are also bluetooth and wireless versions.
there is a special running to get the Pro SW with the $99 tool (and wireless/blue version) for a $149
I bought the wireless, though it is probably a waste of money as i use the USB cable, so the $99 would probably be a wiser choice. the wireless and bluetooth are for using a phone, though i since learned that required additional SW and is considerably limited compared to the ScanXL SW for the windows laptop.
Software - You need software which lets you send custom messages. If you are computer savy you can use hyperterminal. Since I wanted a fully featured scanner I purchased the ScanXL Pro with the GM add on. the PRO version lets you send custom message (terminal mode), the regular version does NOT - so if you go this route get ScanXL Pro
comparison: http://www.scantool.net/ppe-software-comparison.html


 That brings back memories...


