- Dec 4, 2011
- 242
Summary: How to Change Brake Pads and Rotors
Difficulty: Moderate
Estimated Time: 4 hours
Part Numbers: Varies
Cost: Varies
NOTE: All pictures are of the right rear brake assembly. All instructions apply to my 2005 Trailblazer I6 4x4; they may be different on other years or models. Many options of pads and rotors are available, I chose Raybestos professional grade pads (PGD882C and PGD883C) and Raybestos advanced techology rotors (580029 and 580019). I have been happy with them.
MAY03LT authored an easy reference guide for brake related specifications here.
Tools:
10mm end wrench
1/2" drive 13mm socket (front brakes)
1/2" drive 14mm socket (rear brakes)
1/2" drive 18mm socket (if removing rotors)
1/2" drive 19mm deep socket
1/2" driver
1/2" breaker bar
1/2" torque wrench(es) capable of 23 ft/lbs up to 148 ft/lbs
One-person brake bleed kit OR 4' of 1/4" OD clear vinyl tube, clear container, and an assistant to push the pedal
Large C-Clamp or caliper spreader
Rags
Parts:
New brake pads
New rotors (if needed)
Brake Cleaner
Blue Loctite
Disc brake grease/anti-squeal
DOT 3 or DOT 4 Brake Fluid (small bottle if just bleeding, 2 large bottles if flushing)
1. Put the vehicle is in park and disengage the e-brake. Do the brakes/flush in this order: Rear Right, Rear Left, Front Right, Front Left.
2. Remove center cap.
3. Slightly loosen all six lug nuts using a 19mm socket.
4. Position your jack's saddle under the frame. A 3-ton jack is recommended. Lift the tire off the ground as high as possible. Insert jack stand(s) under the frame. 3-ton or larger stands are recommended. Lower the truck slowly onto the stand(s).
5. Remove the loosened lug nuts, and lay the wheel flat.
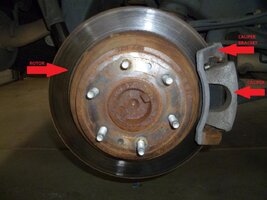
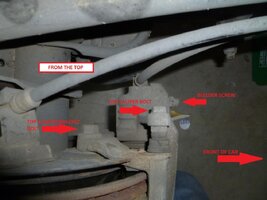
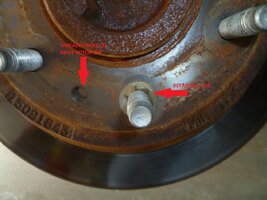
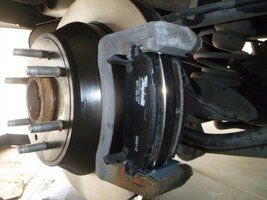
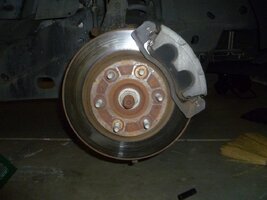
6. Inspect the brake assembly and do a thorough general inspection of everything that's difficult to see when the wheel is on the car. Locate the two caliper mounting bolts, the two caliper bracket bolts, and the brake bleeder screw.
View attachment 17614
View attachment 17615
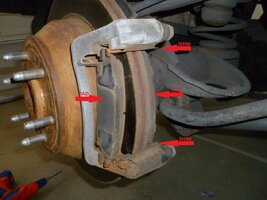
7. Using a 14mm socket (rear) or 13mm socket (front), remove the two caliper mounting bolts.
View attachment 17616
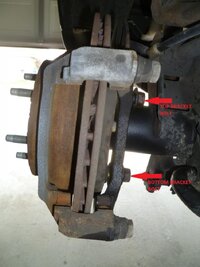
8. Swing the caliper up and out of the way, taking care to avoid stressing the brake fluid line. You may be able to sit it on the e-brake assembly in the rear, but you will have to support it in mid-air with a wire coat hanger or rope in the front.
9. Slide the two old brake pads out of the caliper bracket. Slide the metal adjustable shims out and discard if you have new replacements.
View attachment 17617
10. Compare your new brake pads to the old ones. Do not install pads if they don't match the size of the old ones.
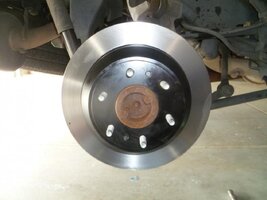
11. Carefully inspect the brake rotor. Any other serious degradation of the rotor mandates replacement. If there is only minor wear, I still recommend taking your rotors to the local auto parts store to have them turned, typically for $8-12 each. With the reasonable price of new rotors, many people just choose to replace the rotors without trying to reuse the old ones regardless of condition.
12. If you are not going to replace or turn the rotors, skip to step 22.
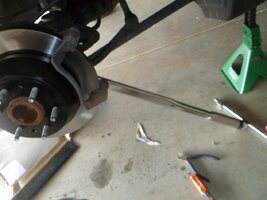
13. Remove the two caliper bracket bolts using an 18mm socket. These are notoriously difficult to remove on the rear; they are loaded with yellow loctite from the factory. I recommend spraying them with PB Blaster and letting that soak for a period of time. You will need as much leverage as possible, so a long breaker bar or similar will be necessary.
View attachment 17618
14. Slide the caliper bracket off the rotor.
15. You may have two of these retaining clips on opposite lugs. I removed them with a screwdriver and a pair of pliers, and I did not reuse them with no ill effects.
View attachment 17619
16. Shimmy the brake rotor off the lugs. It may require some gentle encouragement from the back. If you are completely stuck, note there are two threaded holes in the front of the rotors. You can drive a small bolt through these holes to force the rotor forward.
17. Inspect the emergency brake assembly; address any problems if necessary.
18. Thoroughly wipe down the friction surface of your new/newly turned rotor with brake cleaner and a rag. New rotors often are shipped in oil, so you want to ensure all of that lubricant is completely removed.
19. Slide the rotor onto the lugs. You may want to hand-tighten two lug nuts onto the rotor to ensure the rotor stays in place while you assemble the caliper assembly.
View attachment 17620
20. Clean the mounting surfaces of the caliper bracket. Squeeze a small bead of brake grease onto the connective metal surfaces around the bolt holes. Slide the caliper bracket onto the rotor, taking care not to get grease on the rotor itself. Line up the mounting holes.
21. With a wire brush and brake fluid, clean the old loctite and any rust off the bracket bolts. Add grease and blue loctite to the bolts, then thread them into the bracket. In the rear of the vehicle, tighten to 148 ft/lbs using your 18mm socket and torque wrench. On the front brakes, tighten to 118 ft/lbs.
View attachment 17621
22. Test fit the new top and bottom adjustable shims into the bracket. They have bendable tabs on either side to adjust position. Ensure the inner sides of the shims are away from the rotor, then adjust the outer tabs so the shim can not slide from side to side. Remove the shim and apply grease to the entire back side including the bendable tabs, then reinstall.
View attachment 17622
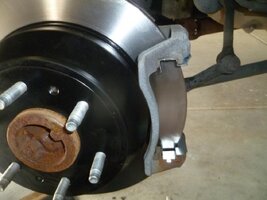
23. Grease the ends of the brake pad chassis; you should only be greasing the two tabs that insert into the shims. Take caution that you do not get grease on the brake pad itself or any friction surface. Insert the pads into the bracket; they should fit tight against the rotor.
View attachment 17623
24. You will need to compress the brake caliper pistons (one piston in rear brakes, two pistons in front brakes) to make room for the new thicker pads. You may either use a caliper spreader or a large c-clamp and one of the old brake pads to protect the piston from the concentrated force of the clamp. You may want to stick your vinyl tube onto the bleeder screw to direct the released fluid into your collection container instead of letting it drip down onto the floor. After you get the clamp or spreader in place, use your 10mm end wrench to open the bleeder screw 1/4 turn to alleviate fluid pressure. Continue tightening your clamp until the piston is fully compressed, then close the bleeder screw.
25. Apply a generous amount of disc brake grease around the caliper bolt holes, the piston ring, and the portions of the caliper that will make contact with the back sides of the pads. Slide the caliper onto the pads, lining up the mounting holes.
26. Apply grease and blue loctite to the caliper bolts, and thread into the caliper. On the rear brakes, tighten to 23 ft/lbs with your 14mm socket. In the front of the vehicle, tighten to 31 ft/lbs with your 13mm socket. There may be a little movement of the pads/caliper if the piston is compressed too far. Push a few times on the brake pedal to engage the piston to tighten the pads to the rotor. There should be no movement of the caliper at this point.
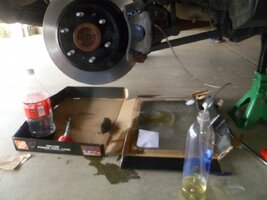
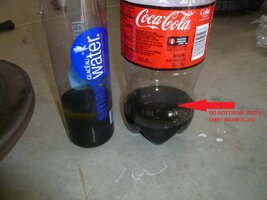
27. You will at least need to bleed the brakes at this point, which can be as simple as running your vinyl tube from the bleeder valve into a container with a couple inches of clean brake fluid in it, then opening the bleeder valve 1/4 turn, having an assistant press the brakes down and hold while you close the valve, then lifting off the brakes. Repeat until no tiny bubbles are visible in the fluid. Most brake pads last long enough that you really should perform a full brake fluid flush when changing pads. This is a sample of my brake fluid at 82k miles. If you're not familiar with brake fluid, it should not look like coke! There are different ways to perform a flush, which have been detailed elsewhere.
View attachment 17624
View attachment 17625
28. Wipe off any spilled brake fluid, and perform a thorough visual inspection of your work. I recommend re-torquing all bolts to be on the safe side.
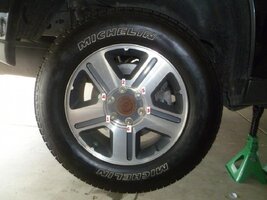
29. Reinstall the wheel on the hub, hand-tightening the lug nuts evenly in a star pattern, illustrated below. Using your torque wrench and 19mm socket, tighten the nuts to 103 ft/lbs in the same pattern.
View attachment 17626
30. Jack the truck high enough to remove the jack stands, then gently lower down to the ground. Re-torque the lug nuts down to 103 ft/lbs in a star pattern.
31. Repeat to replace the other pads.
32. Start the vehicle, and pump the brakes several times to ensure they feel right. Test drive the vehicle gently and bed in the pads and rotors using your preferred method. I performed 10 slow-downs from 30 MPH to 5 MPH with moderate pressure, then 3 hard stops from 40 MPH to zero. After cooling, I consider them bedded in. There are many different methods and recommendations how to bed in brakes.
33. A few days later and again a few weeks later, re-torque your lug nuts to 103 ft/lbs.
Congratulations, you just saved a lot of money over the local dealership's service department!
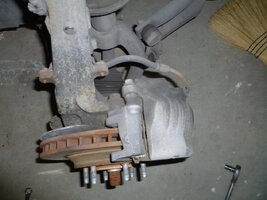
Here are a couple pictures of the front right brake assembly for your situational awareness. Other than the second piston, there is not any difference other than noted socket size/torque values.
View attachment 17627
View attachment 17628
Difficulty: Moderate
Estimated Time: 4 hours
Part Numbers: Varies
Cost: Varies
NOTE: All pictures are of the right rear brake assembly. All instructions apply to my 2005 Trailblazer I6 4x4; they may be different on other years or models. Many options of pads and rotors are available, I chose Raybestos professional grade pads (PGD882C and PGD883C) and Raybestos advanced techology rotors (580029 and 580019). I have been happy with them.
MAY03LT authored an easy reference guide for brake related specifications here.
Tools:
10mm end wrench
1/2" drive 13mm socket (front brakes)
1/2" drive 14mm socket (rear brakes)
1/2" drive 18mm socket (if removing rotors)
1/2" drive 19mm deep socket
1/2" driver
1/2" breaker bar
1/2" torque wrench(es) capable of 23 ft/lbs up to 148 ft/lbs
One-person brake bleed kit OR 4' of 1/4" OD clear vinyl tube, clear container, and an assistant to push the pedal
Large C-Clamp or caliper spreader
Rags
Parts:
New brake pads
New rotors (if needed)
Brake Cleaner
Blue Loctite
Disc brake grease/anti-squeal
DOT 3 or DOT 4 Brake Fluid (small bottle if just bleeding, 2 large bottles if flushing)
1. Put the vehicle is in park and disengage the e-brake. Do the brakes/flush in this order: Rear Right, Rear Left, Front Right, Front Left.
2. Remove center cap.
3. Slightly loosen all six lug nuts using a 19mm socket.
4. Position your jack's saddle under the frame. A 3-ton jack is recommended. Lift the tire off the ground as high as possible. Insert jack stand(s) under the frame. 3-ton or larger stands are recommended. Lower the truck slowly onto the stand(s).
5. Remove the loosened lug nuts, and lay the wheel flat.
6. Inspect the brake assembly and do a thorough general inspection of everything that's difficult to see when the wheel is on the car. Locate the two caliper mounting bolts, the two caliper bracket bolts, and the brake bleeder screw.
View attachment 17614
View attachment 17615
7. Using a 14mm socket (rear) or 13mm socket (front), remove the two caliper mounting bolts.
View attachment 17616
8. Swing the caliper up and out of the way, taking care to avoid stressing the brake fluid line. You may be able to sit it on the e-brake assembly in the rear, but you will have to support it in mid-air with a wire coat hanger or rope in the front.
9. Slide the two old brake pads out of the caliper bracket. Slide the metal adjustable shims out and discard if you have new replacements.
View attachment 17617
10. Compare your new brake pads to the old ones. Do not install pads if they don't match the size of the old ones.
11. Carefully inspect the brake rotor. Any other serious degradation of the rotor mandates replacement. If there is only minor wear, I still recommend taking your rotors to the local auto parts store to have them turned, typically for $8-12 each. With the reasonable price of new rotors, many people just choose to replace the rotors without trying to reuse the old ones regardless of condition.
12. If you are not going to replace or turn the rotors, skip to step 22.
13. Remove the two caliper bracket bolts using an 18mm socket. These are notoriously difficult to remove on the rear; they are loaded with yellow loctite from the factory. I recommend spraying them with PB Blaster and letting that soak for a period of time. You will need as much leverage as possible, so a long breaker bar or similar will be necessary.
View attachment 17618
14. Slide the caliper bracket off the rotor.
15. You may have two of these retaining clips on opposite lugs. I removed them with a screwdriver and a pair of pliers, and I did not reuse them with no ill effects.
View attachment 17619
16. Shimmy the brake rotor off the lugs. It may require some gentle encouragement from the back. If you are completely stuck, note there are two threaded holes in the front of the rotors. You can drive a small bolt through these holes to force the rotor forward.
17. Inspect the emergency brake assembly; address any problems if necessary.
18. Thoroughly wipe down the friction surface of your new/newly turned rotor with brake cleaner and a rag. New rotors often are shipped in oil, so you want to ensure all of that lubricant is completely removed.
19. Slide the rotor onto the lugs. You may want to hand-tighten two lug nuts onto the rotor to ensure the rotor stays in place while you assemble the caliper assembly.
View attachment 17620
20. Clean the mounting surfaces of the caliper bracket. Squeeze a small bead of brake grease onto the connective metal surfaces around the bolt holes. Slide the caliper bracket onto the rotor, taking care not to get grease on the rotor itself. Line up the mounting holes.
21. With a wire brush and brake fluid, clean the old loctite and any rust off the bracket bolts. Add grease and blue loctite to the bolts, then thread them into the bracket. In the rear of the vehicle, tighten to 148 ft/lbs using your 18mm socket and torque wrench. On the front brakes, tighten to 118 ft/lbs.
View attachment 17621
22. Test fit the new top and bottom adjustable shims into the bracket. They have bendable tabs on either side to adjust position. Ensure the inner sides of the shims are away from the rotor, then adjust the outer tabs so the shim can not slide from side to side. Remove the shim and apply grease to the entire back side including the bendable tabs, then reinstall.
View attachment 17622
23. Grease the ends of the brake pad chassis; you should only be greasing the two tabs that insert into the shims. Take caution that you do not get grease on the brake pad itself or any friction surface. Insert the pads into the bracket; they should fit tight against the rotor.
View attachment 17623
24. You will need to compress the brake caliper pistons (one piston in rear brakes, two pistons in front brakes) to make room for the new thicker pads. You may either use a caliper spreader or a large c-clamp and one of the old brake pads to protect the piston from the concentrated force of the clamp. You may want to stick your vinyl tube onto the bleeder screw to direct the released fluid into your collection container instead of letting it drip down onto the floor. After you get the clamp or spreader in place, use your 10mm end wrench to open the bleeder screw 1/4 turn to alleviate fluid pressure. Continue tightening your clamp until the piston is fully compressed, then close the bleeder screw.
25. Apply a generous amount of disc brake grease around the caliper bolt holes, the piston ring, and the portions of the caliper that will make contact with the back sides of the pads. Slide the caliper onto the pads, lining up the mounting holes.
26. Apply grease and blue loctite to the caliper bolts, and thread into the caliper. On the rear brakes, tighten to 23 ft/lbs with your 14mm socket. In the front of the vehicle, tighten to 31 ft/lbs with your 13mm socket. There may be a little movement of the pads/caliper if the piston is compressed too far. Push a few times on the brake pedal to engage the piston to tighten the pads to the rotor. There should be no movement of the caliper at this point.
27. You will at least need to bleed the brakes at this point, which can be as simple as running your vinyl tube from the bleeder valve into a container with a couple inches of clean brake fluid in it, then opening the bleeder valve 1/4 turn, having an assistant press the brakes down and hold while you close the valve, then lifting off the brakes. Repeat until no tiny bubbles are visible in the fluid. Most brake pads last long enough that you really should perform a full brake fluid flush when changing pads. This is a sample of my brake fluid at 82k miles. If you're not familiar with brake fluid, it should not look like coke! There are different ways to perform a flush, which have been detailed elsewhere.
View attachment 17624
View attachment 17625
28. Wipe off any spilled brake fluid, and perform a thorough visual inspection of your work. I recommend re-torquing all bolts to be on the safe side.
29. Reinstall the wheel on the hub, hand-tightening the lug nuts evenly in a star pattern, illustrated below. Using your torque wrench and 19mm socket, tighten the nuts to 103 ft/lbs in the same pattern.
View attachment 17626
30. Jack the truck high enough to remove the jack stands, then gently lower down to the ground. Re-torque the lug nuts down to 103 ft/lbs in a star pattern.
31. Repeat to replace the other pads.
32. Start the vehicle, and pump the brakes several times to ensure they feel right. Test drive the vehicle gently and bed in the pads and rotors using your preferred method. I performed 10 slow-downs from 30 MPH to 5 MPH with moderate pressure, then 3 hard stops from 40 MPH to zero. After cooling, I consider them bedded in. There are many different methods and recommendations how to bed in brakes.
33. A few days later and again a few weeks later, re-torque your lug nuts to 103 ft/lbs.
Congratulations, you just saved a lot of money over the local dealership's service department!
Here are a couple pictures of the front right brake assembly for your situational awareness. Other than the second piston, there is not any difference other than noted socket size/torque values.
View attachment 17627
View attachment 17628
Attachments
-
 1.jpg74 KB · Views: 78
 -
 2.jpg60.3 KB · Views: 72
 -
 3.jpg63.8 KB · Views: 76
 -
 4.jpg81 KB · Views: 73
 -
 5.jpg76.2 KB · Views: 80
 -
 6.jpg82.4 KB · Views: 77
 -
 7.jpg58.9 KB · Views: 72
 -
 8.jpg59 KB · Views: 71
 -
 9.jpg69 KB · Views: 70
 -
 10.jpg79.2 KB · Views: 75
 -
 11.jpg64.4 KB · Views: 72
 -
 12.jpg74.4 KB · Views: 68
 -
 13.jpg75.6 KB · Views: 63
 -
 14.jpg66.9 KB · Views: 64
 -
 15.jpg75.7 KB · Views: 56
