Pictorial Overview:
https://www.flickr.com/photos/126111508@N07/albums/72157715258946131
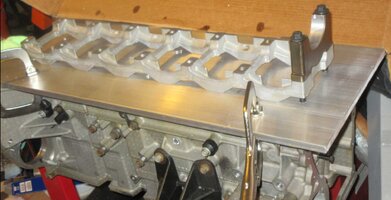
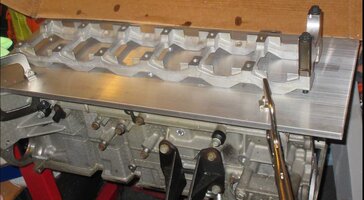
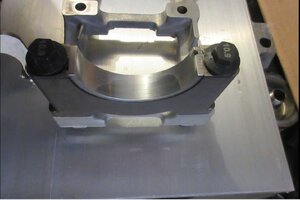
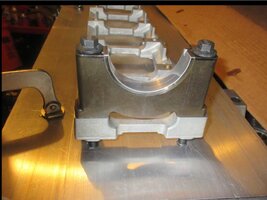
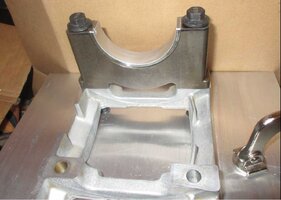
A few years back, I made this Youtube Video roughly describing How to Use the GM Atlas 4.2L LL8 Engine Cradle and Three Inverted Mains Caps along with the (6) GM OEM Long M10 X 1.50 Mains Bolts and the like Fasteners and Washers necessary to hold this apparatus together. The purpose I had in mind was to afford the opportunity to lay out the Vortec 4200 Crankshaft just as it is arranged in the Engine Block so that I could more easily Examine the Crankshaft for any Damage AND be able to effectively Polish and Re-Condition the Journals as needed in preparation for Re-Assembly:
But the problem that I had to consider later after coming up with this notion was that my idea was only half-formed. This is because at the time, I had not realized that the Sheer Mass of the Crankshaft is so Large and Top Heavy while just resting only on the Narrow Engine Cradle that this would make it VERY susceptible to tipping over as soon as it got manipulated. This would obviously bring on Very Bad Implications for Safety of the person working on the thing… and the intolerable Risk of Dropping the 100 + Lb Asymmetric Chunk of Nodular Cast Iron ...Right Down on the Deck.
But recently, after giving this problem a little more thought and with some added investigation, I realized that I could take advantage of the LL8 Engine in still ANOTHER manner due to it being Absolutely FLAT on its Lower Machined Flange Surfaces. So it was THIS fact that lent itself to the Idea of using Other Flat Metal Surfaces that could be laid out across the Smooth, Even Plane of the Lower Engine Block and modified accordingly. This Idea proved to be fairly easy thing to do, once the Engine was Inverted on the Engine Stand and secured with the Lock Pin:
The other motivating aspect of this was that even if I HAD managed to set up the Inverted Mains Caps and Cradle while having them Bolted Together… I’d STILL have to locate and set up a fairly Long and Sturdy Work Bench and have it properly arranged in order to support its combined weight and have access to the Necessary Tools quite nearby. This would have proven VERY inconvenient for me and I suspect that others may soon agree with me on this issue.
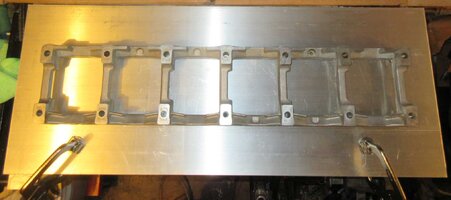
The second part of this Idea is now being Documented here since I was able to locate the Right Size Flat Piece of Aluminum that was at least 30” Long , 12” Wide and at least ½” Thick. I knew I could Mark Out the Hole Pattern from the Mains Caps, and then Drill and Tap Out the Six necessary Threaded Holes to the Metric Dimensions of M10 X 1.50 and then be able to Assemble and Bolt the Mains Caps on top of the Engine Cradle ...Right onto the Aluminum “Board” as soon as I got them all arranged right.
As planned, I would now be able to use the (6) GM OEM M10 X 1.50 Mains Bolts to Secure the Three Mains Caps Inversely Mounted on the Engine Cradle and hold that entire apparatus together. It followed from there that I was able to locate and purchase the right Aluminum Plank and set it atop the Inverted Motor. Then I used a few Vice-Grips Large, Square Clamps to align and secure the Plank to the Engine Block Right Angle Flanges. Those Aluminum Support areas are plentiful around the Block Perimeter and allow for a lot of freedom to adjust and re-position Aluminum Plate as needed.
Probably the COOLEST part of all of this was the fact that I would also be able to use the Engine Block on the Stand to Support the Plank while performing all of the necessary Drilling and Tapping into it … and at a VERY Stable and Convenient Height, too. I just had to use Plenty of Rags placed underneath the Aluminum Plank in order to catch all of the Metal Shavings and Cuttings left over while performing this build. Once completed, I noted that the Vacant Space underneath the Plank allowed the (6) Bolts to be situated in Pairs in the Middle Journal and on either End Journals to become Threaded In without hitting or interfering with anything in the underside of the Engine Block or cause any damage there.
The Size of this Aluminum Plank is actually PERFECT, because it COMPLETELY covers the Engine Block; such that if the Engine first gets enveloped inside of a Large Plastic Yard Bag… The Aluminum Plank can then be Mounted over the bottom of the Motor and Clamped firmly in place. Then, after the Crankshaft is laid out across the Open Half- Bearing Cavities… any Clean Up Work being done with Sprays, Liquids or Light Abrasives will NOT Drain back down inside of the Motor!
Tools and Materials Required:
(1) GM 4.2L LL8 Engine (Dis-Assembled and Inverted on a STABLE & STRONG Engine Stand.
(2) Aluminum Plank 12" Width X 30" Length X 1/2" Depth.
(3) Hardened Steel Metric Drill Guide.
(4) Battery Powered 1/2" Hand Drill with LED Light is possible.
(5) 11/32" Cobalt or HSS Drill Bit along with Graduated Drill Bits from Small to Large, but UNDER 8.7mm.
(6) M10 X 1.50 HSS Tap.
(7) Ratcheting, Dual Handle Tap Holding Tool.
(8) Three GM 4.2L LL8 Engine Steel Main Caps.
(9) GM 4.2L LL8 Steel-Hard Zinc Plated Engine Cradle.
(10) Assorted Vice-Grips for Clamping Security (Cantilever- Square-Deep with Hinged Wide Pads).
(11) Six M10 X 1.50 X 135mm Main Caps Screws (Bolts).
(12) Cutting Fluid-Oil, Brake-Kleen Spray, Scott "Blue" Shop Towels.
(14) Spring Loaded Center Punch, Clear Plastic Tape, Ink Pen, Hardened Tipped Metal Scribe.
The Linked Photo-Play takes the Viewer through this Work...Step By Step using these Images:
https://www.flickr.com/photos/126111508@N07/albums/72157715258946131
All in All... I was finally able to Kill THREE Birds with ONE Stone with this Project and They ALL WORK!
https://www.flickr.com/photos/126111508@N07/albums/72157715258946131


A few years back, I made this Youtube Video roughly describing How to Use the GM Atlas 4.2L LL8 Engine Cradle and Three Inverted Mains Caps along with the (6) GM OEM Long M10 X 1.50 Mains Bolts and the like Fasteners and Washers necessary to hold this apparatus together. The purpose I had in mind was to afford the opportunity to lay out the Vortec 4200 Crankshaft just as it is arranged in the Engine Block so that I could more easily Examine the Crankshaft for any Damage AND be able to effectively Polish and Re-Condition the Journals as needed in preparation for Re-Assembly:
But the problem that I had to consider later after coming up with this notion was that my idea was only half-formed. This is because at the time, I had not realized that the Sheer Mass of the Crankshaft is so Large and Top Heavy while just resting only on the Narrow Engine Cradle that this would make it VERY susceptible to tipping over as soon as it got manipulated. This would obviously bring on Very Bad Implications for Safety of the person working on the thing… and the intolerable Risk of Dropping the 100 + Lb Asymmetric Chunk of Nodular Cast Iron ...Right Down on the Deck.
But recently, after giving this problem a little more thought and with some added investigation, I realized that I could take advantage of the LL8 Engine in still ANOTHER manner due to it being Absolutely FLAT on its Lower Machined Flange Surfaces. So it was THIS fact that lent itself to the Idea of using Other Flat Metal Surfaces that could be laid out across the Smooth, Even Plane of the Lower Engine Block and modified accordingly. This Idea proved to be fairly easy thing to do, once the Engine was Inverted on the Engine Stand and secured with the Lock Pin:
The other motivating aspect of this was that even if I HAD managed to set up the Inverted Mains Caps and Cradle while having them Bolted Together… I’d STILL have to locate and set up a fairly Long and Sturdy Work Bench and have it properly arranged in order to support its combined weight and have access to the Necessary Tools quite nearby. This would have proven VERY inconvenient for me and I suspect that others may soon agree with me on this issue.
The second part of this Idea is now being Documented here since I was able to locate the Right Size Flat Piece of Aluminum that was at least 30” Long , 12” Wide and at least ½” Thick. I knew I could Mark Out the Hole Pattern from the Mains Caps, and then Drill and Tap Out the Six necessary Threaded Holes to the Metric Dimensions of M10 X 1.50 and then be able to Assemble and Bolt the Mains Caps on top of the Engine Cradle ...Right onto the Aluminum “Board” as soon as I got them all arranged right.
As planned, I would now be able to use the (6) GM OEM M10 X 1.50 Mains Bolts to Secure the Three Mains Caps Inversely Mounted on the Engine Cradle and hold that entire apparatus together. It followed from there that I was able to locate and purchase the right Aluminum Plank and set it atop the Inverted Motor. Then I used a few Vice-Grips Large, Square Clamps to align and secure the Plank to the Engine Block Right Angle Flanges. Those Aluminum Support areas are plentiful around the Block Perimeter and allow for a lot of freedom to adjust and re-position Aluminum Plate as needed.
Probably the COOLEST part of all of this was the fact that I would also be able to use the Engine Block on the Stand to Support the Plank while performing all of the necessary Drilling and Tapping into it … and at a VERY Stable and Convenient Height, too. I just had to use Plenty of Rags placed underneath the Aluminum Plank in order to catch all of the Metal Shavings and Cuttings left over while performing this build. Once completed, I noted that the Vacant Space underneath the Plank allowed the (6) Bolts to be situated in Pairs in the Middle Journal and on either End Journals to become Threaded In without hitting or interfering with anything in the underside of the Engine Block or cause any damage there.
The Size of this Aluminum Plank is actually PERFECT, because it COMPLETELY covers the Engine Block; such that if the Engine first gets enveloped inside of a Large Plastic Yard Bag… The Aluminum Plank can then be Mounted over the bottom of the Motor and Clamped firmly in place. Then, after the Crankshaft is laid out across the Open Half- Bearing Cavities… any Clean Up Work being done with Sprays, Liquids or Light Abrasives will NOT Drain back down inside of the Motor!
Tools and Materials Required:
(1) GM 4.2L LL8 Engine (Dis-Assembled and Inverted on a STABLE & STRONG Engine Stand.
(2) Aluminum Plank 12" Width X 30" Length X 1/2" Depth.
(3) Hardened Steel Metric Drill Guide.
(4) Battery Powered 1/2" Hand Drill with LED Light is possible.
(5) 11/32" Cobalt or HSS Drill Bit along with Graduated Drill Bits from Small to Large, but UNDER 8.7mm.
(6) M10 X 1.50 HSS Tap.
(7) Ratcheting, Dual Handle Tap Holding Tool.
(8) Three GM 4.2L LL8 Engine Steel Main Caps.
(9) GM 4.2L LL8 Steel-Hard Zinc Plated Engine Cradle.
(10) Assorted Vice-Grips for Clamping Security (Cantilever- Square-Deep with Hinged Wide Pads).
(11) Six M10 X 1.50 X 135mm Main Caps Screws (Bolts).
(12) Cutting Fluid-Oil, Brake-Kleen Spray, Scott "Blue" Shop Towels.
(14) Spring Loaded Center Punch, Clear Plastic Tape, Ink Pen, Hardened Tipped Metal Scribe.
The Linked Photo-Play takes the Viewer through this Work...Step By Step using these Images:
https://www.flickr.com/photos/126111508@N07/albums/72157715258946131
All in All... I was finally able to Kill THREE Birds with ONE Stone with this Project and They ALL WORK!
Last edited:
