First attempt to start after engine rebuild. Starter will not engage.

Gearheadvr4

Original poster
Member
Apr 17, 2013
63
I dropped in a new engine, and first attempt to turn over the starter I got not response from the starter. What at a minimum needs hooked up to get the starter to engage? Since I had the engine out, everything was disconnected. I do not have the O2 sensors or the trans connectors on but everything in the engine bay is connected. I do have the 58x to 28x conversion box from Lingenfelter and I am getting a signal there.

I am only at this point trying to prime the engine with oil thru the galley port and need to turn the engine over.

I had a thought that maybe I needed a case relearn, but the security light goes out and I did not change the ECU. I do have a 08 SS block in an 06 SS but I am not sure that would make a difference. Is there something in the block that communicates with the ECU? Does the ECU know its not the same block. I know it's a stretch but I am just grasping for a reason.

Thanks!
 
Last edited:

mrrsm

Lifetime VIP Donor
Supporting Donor
Member
Oct 22, 2015
7,697
Tampa Bay Area
Since you well know that pre-lubing the engine is absolutely necessary, then you have probably also put in something like this stuff into the crankcase:

http://www.compperformancegroupstor...Store_Code=CC&Product_Code=159&Category_Code=

...and you have also probably wisely decided to fiill the oil pan with something like Valvoline Racing Oil (Very High in the high pressure protection additive ZDDP)...Yes?

What kind of a device are you using to pressurize the oil galleys through one of the ports? The reason I ask is, a few years ago... I was trying to invent an External Engine Pre-Oiler Machine and have some images that might be helpful if you are still working on the priming portion of your Pre-Start. If it helps...You are welcome to everything I have on the subject here:

http://s557.photobucket.com/user/60dgrzbelow0/library/ANEWV6OILPUMPRIMINGTOOL?sort=3&page=1
 
Last edited:

mrrsm

Lifetime VIP Donor
Supporting Donor
Member
Oct 22, 2015
7,697
Tampa Bay Area
I know these probably sound like stupid questions... but... if this engine is not a Complete Rebuild but a Used Engine...prior to dropping in the vehicle... did you remove the spark plugs and turn the engine over manually? Even if a motor sits dormant for short periods of time... if the gasoline you burn has even the smallest fraction of Ethanol in the fuel... there will be enough residue of unburned fuel inside the cylinders to allow them the chance to rust above each piston head and as such can cause high resistance to being turned over by the average starter motor. If this a Used Engine and you are uncertain... it would probably help to pull all of the plugs and spray something really great at dissolving rust and lubricating as it does its penetration... So you would spray a goodly amount and leave it sit for say an hour and LEAVE THE SPARK PLUGS OUT... Double check the Oil Level Dip Stick and pull the left and right bank EFI Relays so no fuel will pump into the cylinders. If the motor turns over... allow the engine to cycle in rotation for 10 seconds at a time with about a 30 second break in between for three of four times.

Then spray more Kroil or CRC Freeze Off down inside the cylinder(s) again. The reason for doing this is to give the piston rings the chance to break loose without fracturing if they were stuck inside the piston grooves. It will help to have a rag draped near each spark plug hole to prevent the rust freeing solvent from getting all over the engine. It is important to allow all of the solvent the chance to be purged before you re-install the spark plugs...otherwise you run the risk of hydro-locking the engine and bending connecting rods. You should see most of the fluid squirting back out after cycling the motor another three to four times in ten second intervals. There are so many vehicles that have been completely submerged under water in flooding events around the country that many of these "Gray Market" salvaged motors are being sold to very unsuspecting buyers for top dollar with no warranty...and so this cylinder lubrication tactic is a necessary precaution.
 
Last edited:

Gearheadvr4

Original poster
Member
Apr 17, 2013
63
I did use a break in oil and I have a priming tank. That isn't really the issue. I just cannot get a signal to the starter. I pulled the starter out and it won't move even off the block.

Just to be sure I did manually turn over the engine several times and no problems. It was a fresh build with everything cleaned and used lots of assembly lube on all moving parts.
 

mrrsm

Lifetime VIP Donor
Supporting Donor
Member
Oct 22, 2015
7,697
Tampa Bay Area
I'm glad to hear it. There is no doubt that you are a cautious and thoughtful mechanic. If you'd care to post some images of your Priming Tank when time permits, I'd be grateful. It might just be that either the starter solenoid or the starter itself went sideways during the time of inactivity from when the older engine stopped running until you put the re-build back in.

FWIW... I have on occasion forgotten to install a Starter Motor Spacer and subsequently encountered a lock-up and alignment problem between the throw gear and the Flex-Plate flame hardened geared ring. As for any electrical issues... a systematic Unplug/Replug of all Power and PCM related items along with a double check that all your bonding straps have been cleanly re-attached might reveal a solution to the problem, too. Oh...and another strangely obvious question to ask is... Was the Battery fully charged prior to the efforts to turn the motor over? Somehow it will come down to a simple solution in the end. Even that small wire from the power harness that attaches to the solenoid can get loose enough to stop it from functioning.
 
Last edited:

littleblazer

Member
Jul 6, 2014
9,265
So you're not getting power to the starter? if you are I would then check the fuse block relays and fuses to make sure they are working? Do the gauges come on? (The motor is in the truck I assume?) If you aren't getting power to the starter, I think there is a fuse-able link in the positive running to it.
 

Mooseman

Moderator
Dec 4, 2011
25,322
Ottawa, ON
Have you tried hooking up a scanner and see if you can communicate with the PCM? Can you hear/feel the relay click when you try to engage the starter? Grounds are a common problem on these trucks. You probably saw them during the R&R. Check to be sure you reconnected all of them and they're making good clean contact. Like LB said, check ALL fuses (actual voltage, not visual) and relays. Battery good with good clean contacts. Next would be to replace the ignition switch. Cheap and easy job.
 
  • Like
Reactions: mrrsm

Gearheadvr4

Original poster
Member
Apr 17, 2013
63
I am concerned with the grounds. I honestly do not remember where all the grounds are connected on the block or chassis. I am charging the battery again now to eliminate that as an issue. I did visually check all the fuses, which fuses would I need to verify with a meter?

I've never swapped the ignition switch. It seems odd that could be an issue. The SS was running and everything was working directly before the engine threw a rod thru the block. Didn't change anything other than the engine itself.
 
Last edited:

mrrsm

Lifetime VIP Donor
Supporting Donor
Member
Oct 22, 2015
7,697
Tampa Bay Area
This isn't a very popular method for discovery...but sometimes...merely slightly pulling and very, very gently tugging upon the related wires and connections, it will reveal the one that is loose. But this is best done after the Ground Wire is first removed from the Battery. The other thing that is worth trying is if the vehicle is jacked up and on Jack Stands or ramps for safety... get underneath with a flashlight and look and feel around for anything loose on the starter...which does not have much elbow room unless you access it through the Driver's Side Wheel Well. With that wheel removed and with that damned rubber flap taped up and out of the way with a piece of duct tape... you might be able to spy on and feel anything loose or disconnected, too.
 

Mooseman

Moderator
Dec 4, 2011
25,322
Ottawa, ON
The link to the manuals is in my signature. That's why I suggested the switch last since it was working before. Grounds are a good possibility.
 
  • Like
Reactions: mrrsm

Gearheadvr4

Original poster
Member
Apr 17, 2013
63
Wow, thanks for the link mooseman! That will help with the O2 sensors also, don't have them hoocked up yet. I will try to dig thru the manuals tonight and find the section on the grounds.

It is on jack stand at the moment so I will be able to verify every connection. At a minimum what is needed just to start it? Which sensors have to be hooked up? Will it start if the trans harness is disconnected?
 

mrrsm

Lifetime VIP Donor
Supporting Donor
Member
Oct 22, 2015
7,697
Tampa Bay Area
This is VERY Basic:

12-15 Volts in 600-700 Cold Cranking AMP Battery with GOOD ground
Key-ON...and is rotated to START connects Battery Voltage to the Starter Solenoid
Starter Solenoid Electromagnetically shoves Starter Gear into Flex-Plate gear alignment
Thick power Cable carries High Amperage current flow into Starter Windings for Turning
Starter actuates Flex-Plate Ring Gear to rotate the engine during sufficient # of 4 Cycle Actions
Air is ingested by partial vacuum while, Fuel Pump pressurizes Fuel Rail, COP Sparks
Key-On-Start is relaxed as soon as the motor RPM rises and runs
Key-ON allows electrical flow to PCM control of Timed EFI & Spark & Reads Sensors
Key-ON allows PCM power to run Fuel/Air Ratio and RPMs based upon Throttle Position & O2
PCM continues controlling all engine conditions until Key-OFF cuts power to Fuel and Spark.
 
Last edited:

Mooseman

Moderator
Dec 4, 2011
25,322
Ottawa, ON
It should start with one sensor disconnected, maybe two. More than that, it might just think there's a bigger problem and not want to start but I think it should still crank regardless.
 

mrrsm

Lifetime VIP Donor
Supporting Donor
Member
Oct 22, 2015
7,697
Tampa Bay Area
Without knowing which transmission you are using in your drive train... there is a possibility that if its a 4L60E and the Neutral Safety Park/Lock Switch is disconnected or is out of alignment with the actual gear-engaged or parked position of the Gear Selection Lever... it could prevent a START CONDITION because the gear box is engaged and the switch is doing its job of not allowing the engine to be started in this dangerous condition. I am completely unfamiliar with any Manual Transmission Safety Park Switches so others with more knowledge will need to advise you.

This video will show you how to make the necessary adjustments:

 
Last edited:
  • Like
Reactions: NJTB and Mooseman

Gearheadvr4

Original poster
Member
Apr 17, 2013
63
You could be onto something. The trans was in neutral when the engine was pulled. Now the trans is physically bolted to the engine but none of the linkage or electronics are installed. Wonder if it needs that signal from the trans to know if it's in park or not.
 
Last edited:

mrrsm

Lifetime VIP Donor
Supporting Donor
Member
Oct 22, 2015
7,697
Tampa Bay Area
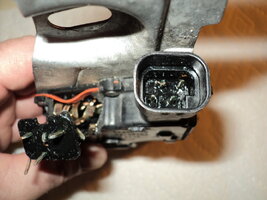
Okay... That seems hopeful...Now... unless you have kept the original transmission (assuming its a 4L60E) and the switch is still present on the driver's side of the transmission... DO NOT ATTEMPT TO REMOVE THE TWO ELECTRICAL WIRING HARNESS CONNECTORS BECAUSE THEY ARE HOT-GLUED WITH GORILLA GLUE AT THE FACTORY TO PREVENT EXCESS SERVICE CALLS FOR THESE PLUGS COMING LOOSE!

If you try too vigorously to get the plugs out all you will accomplish is destroying them!


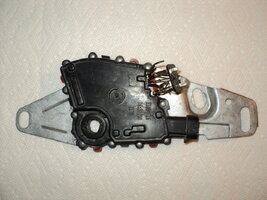
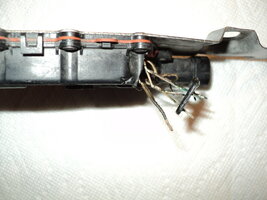
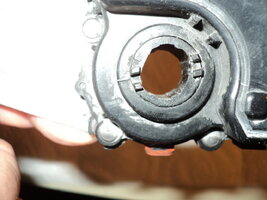
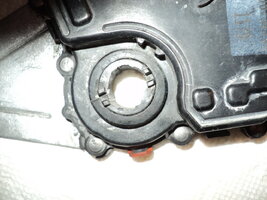
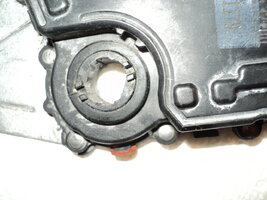
I am suggesting that IF you find out that the switch is misaligned, then just loosen the two small end of bracket bolts and rotate the body of the switch to find the "Sweet Spot" ONLY IF THE ENGINE DOES NOT START AFTER A NORMAL HOOK UP! Try things in place first and if you determine the switch is completely inoperative and needs to be replaced... most local Autozone stores carry these items. Unfortunately... you will have to virtually destroy the body of the old switch with Needle Nose Pliers and even small Vise Grips a little at a time in order to remove the two wire harness plugs and not damage them in any way.

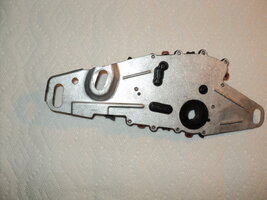
The new switch will come with a thin galvanized metal "safety bar" that holds the switch in the correct internal position (whether in Neutral or Park) But frozen and in the right place... all you need to do is look at the standard Youtube video of how the Shift Lever cycles manually from Park, Reverse, 4,3,2,1 and after rotating by hand a few times you will know when it is EXACTLY correct before you slide the switch straight onto the shaft. As soon as the switch is pushed on in place, just thread the two bracket end bolts in place and tighten them both snugly. At that point you can remove the "safety bracket" easily.

Depending up whether the new switch is secured in either the Neutral or Park position, this will determine where the driver shift lever inside the car will be set before attaching the shift lever cable to the transmission. Next install the Shift Cable Lever bracket with the small castle nut then slide in/insert a new Nylon Grommet, followed by connecting the Shift lever cable to that lever. That cable housing is held stationary to the support bracket with a large staple-looking retainer... just push it through the fat round end of the housing and then bend the tabs over and it will done. Now... the test here is for you to sit in the vehicle with the battery disconnected and and turn ignition key to the ON/RUN position and then cycle the Shift Lever through the entire shifter range slowly and FEEL each engagement from PARK, REVERSE,4,3,,2,1, etc, until you are confident in the accuracy of these shifts. After that, Reconnect the battery and try to start your new engine.

FOLLOW YOUR REBUILD BREAK-IN INSTRUCTIONS ...RELIGIOUSLY:

In the absence of anyone knowing those instructions, I offer the following suggestions:

If your engine is using a solid lifter or hydraulic flat tappet camshaft instead of a full roller to roller lifter to roller rocker camshaft design... then it would be wise that once the engine begins to run... to maintain your engine speed consistently at around 2,000 RPM for at LEAST 25-30 minutes to give the lobes of the camshaft a better than even chance of NOT being WIPED before the surfaces can harden up in the presence of the Motor Oil with ZDDP helping to strengthen and harden each lobe. After that, shut off the engine and change your oil and oil filter for some fresh "Break-In Oil".

It is important to remember that if you used any Engine Assembly Lube that contained MDS&G (Molybdenum Di-Sulphide and Graphite) then your oil filter will become so badly blocked very quickly that if left in the motor, will cause the oil bypass valve to open and allow unfiltered oil to circulate throughout the galleys, journals and bearing surfaces inside this brand new engine. Changing the oil filter and oil right away after that 25-30 Minutes @ 2,000 RPM Routine will prevent any possibility of damaging the motor via an MDS clogged filter. Its best to use Valvoline Racing Oil or its equivalent for the first 500 and 1,500 mile oil changes and then switch to a full synthetic (Mobil 1) and K&N Oil Filter every 3,000 miles thereafter to prevent your O2 Sensors from being plated with zinc from the oil and rendering their function useless.
 
Last edited:

mrrsm

Lifetime VIP Donor
Supporting Donor
Member
Oct 22, 2015
7,697
Tampa Bay Area
Here are the "Proof of Death" images of the actual Parking Safety Switch I described above as having to literally be very carefully ripped to shreds to salvage the Dual Wiring Harness on the Driver's Side of the Transmission. If there is a Stronger Glue out there in the Universe than the Super Gorilla Glue that was Gooped up inside this unit at the factory... then I don't know how that could be. Pay particular attention to the appearance of the oval adjustment holes on the outer edge of the brackets and also to the fact that the inner position of this unit must be precisely set and aligned B4 being pushed onto the flat-sided Shift Control Arm lever post.

As I said before, after you remove the old version of this thing...when it comes time to put the brand new one on to the side of the transmission... before that happens... place the cable Shift Linkage lever arm that attaches to the shifter cable BACK on the Cable Linkage shifting rod and tighten down the 15MM X 1.25 nut fastener, Then, using your whole hand and all fingers... gradually rotate the Cable Linkage shift lever arm backwards and forward one clicking sensation at a time until you master its location and have it set according to the Parking Switch manufacturers recommendation on where to set the position of the rod (Neutral? Park?) and move the rod by using the Cable Shift Linkage Arm to THAT position well before you try to push the switch on over the rod.

The sensation is that this damned switch will feel very resistant to being installed...so you will have to be patient and NOT change the factory setting by accident as you do this! You will only get one chance to get this right... so double check everything one last time before you commit. I'll try to find a short video of say... some tech on Youtube doing a full re-build of a 4L60E Transmission and he can demonstrate how the lever moves and the positional changes for PRNDL321 are supposed to be in inside the transmission as the lever cycles back and forth. Once it is in place, plug the Dual wiring harness in AFTER you install the two 13 MM Bolts through the ends of the bracket. Try to rotate the switch slightly enough to place the two 13MM Bolts roughly centered in the middle of their oval holes. That way, you will have a baseline measured position to work with if you need to make slight adjustments. If you have concerns about the security of the Wire Harness plugs staying in place and being weather-proof beyond the design of the Metripac, get creative with three nylon zip ties per plug and then you'll know that they are in for place for good and then apply a generous bead of Clear Silicone around the OUTER perimeter of both plugs..

Safety Start Test
The way you test this is to first ensure the that the vehicle is completely elevated and supported by four sturdy jacks and then you can get in and try to start the engine with the shift lever in PARK...but DO NOT STEP ON THE BRAKE. The vehicle SHOULD NOT START LIKE THIS! If the engine roars to life without you having to step on the brake pedal... turn the motor off and go underneath the vehicle and loosen the two 13MM bolts and at first rotate the body of the switch counter-clockwise just a bit...and then lock it down and test using the same procedures. If the engine only starts when you place the Shift Level in the PARK position AND you also need to put your foot on the brake... then Okay...stay in the same position and place the shifter in the NEUTRAL position and try to start the engine again without stepping on the brake.

If the engine only starts after you step on the brake... Okay. Last but not least you should move the shift position to DRIVE and try to start the engine both with and without your foot on the brake pedal. THE ENGINE SHOULD NEVER START UNDER ANY CIRCUMSTANCES WHEN THE SHIFT POSITION LEVER IS IN DRIVE! If this happens, then you will need to shut off the engine and go underneath the vehicle and loosen the Parking Safety Switch bolts and rotate the switch clockwise and after lightly tightening down the two 13 MM bolts, repeat all of these tests again until you achieve STARTS WHEN IN THE PARK AND NEUTRAL POSITIONS AND ONLY AFTER THE BRAKE PEDAL IS BEING DEPRESSED.

If the tests all go well, the next thing to do is to go back underneath the vehicle and Magic Mark the positions of the two 13 MM Bolts and then Very Carefully loosen only one BOLT at a time and squeeze out some Red Thread Locker on the bolt threads and then tighten the fastener back down snugly. Repeat this procedure for the other side. Now... The last thing you need to test is the vehicle in DRIVE, and lower gears while it is still elevated to test that the drive train actually works correctly at a idling speed.

BE CAREFUL NOT TO TRY AND SHIFT THE TRANSMISSION INTO EITHER NEUTRAL OR PARK WHILE THE TRANSMISSION IS IN DRIVE AND ACTUATING THE DRIVE SHAFT AND REAR AXLES ARE STILL TURNING. TAKE YOUR FOOT OFF OF THE GAS, WATCH THE ENGINE RPM AND SPEEDOMETER SPEED DECLINE TO ZERO SPEED WHILE STEPPING SLOWLY ON THE BRAKE AND SLOW THE DRIVE TRAIN DOWN GRADUALLY TO A COMPLETE STOP AND EVEN THEN... OPEN THE DRIVER'S SIDE DOOR TO LISTEN AND CONFIRM THAT THE ENTIRE DRIVE TRAIN HAS COME TO A STANDSTILL. IF YOU FORGET THIS SITUATION WHILE TESTING IN DRIVE WITH THE VEHICLE ELEVATED ON JACK STANDS WHILE THE DRIVE TRAIN IS CYCLING AS IF YOU WERE DRIVING DOWN THE ROAD AND YOU SUDDENLY SHIFT INTO THE PARK POSITION,,,YOU WILL TURN YOUR 4L60E TRANSMISSION INTO A 200 POUND GRENADE!

After shutting down the engine, this is your chance to look the vehicle over from underneath for transmission fluid leaks, missing or loose Bell Housing and Transmission Shock Mount and Drive-shaft fasteners for tightness and search around looking for anything that is not correct. After lowering the vehicle to the ground , when you do your first test drive... take it slowly through the neighborhood for a slow test drive and give the transmission a chance to cycle completely before taking it out on the road. Remember... you are trying to cycle almost 12 quarts of Dexron throughout a complicated set of plates, passages and clusters of friction discs and gear clusters and fluid lines to a cooler for a fully functional first test drive and so you should give The Baby a chance to warm up and wake up before trying anything strenuous on its first day outside.

Don't over-do the speeds going up and down roadways and when you get back from the Test Drive, park the vehicle on a level area and slide a large plain piece of cardboard under the vehicle and note its exact position and allow the vehicle to idle in PARK with the Emergency Brake engaged for around 10 minutes to investigate any possible leaks or other problems. It is not unusual for some residual fluid to drain down from the filler neck tube at the grommet fit hole point or to have fluid leaks from the Passenger side locations of the two Transmission Cooler lines and also from the tail-shaft housing. Climb out of the vehicle...look things over and if you spot any leaks... keep the cardboard for post-test drive analysis to pinpoint any serious leaks and deal with them. Just wipe down the leaks with a clean rag after shutting down the engine to check on the level of the transmission fluid. BE CAREFUL NOT TO OVERFILL THE TRANSMISSION WHILE IT IS HOT!
 

Attachments

  • DSC04321.jpg
    DSC04321.jpg
    144 KB · Views: 6
  • DSC04322.jpg
    DSC04322.jpg
    88.7 KB · Views: 5
  • DSC04325.jpg
    DSC04325.jpg
    117 KB · Views: 6
  • DSC04326.jpg
    DSC04326.jpg
    97.5 KB · Views: 7
  • DSC04327.jpg
    DSC04327.jpg
    144.8 KB · Views: 6
  • DSC04328.jpg
    DSC04328.jpg
    116.2 KB · Views: 7
  • DSC04329.jpg
    DSC04329.jpg
    140.9 KB · Views: 6
  • DSC04330.jpg
    DSC04330.jpg
    132.5 KB · Views: 6
  • DSC04331.jpg
    DSC04331.jpg
    134.7 KB · Views: 6
  • DSC04332.jpg
    DSC04332.jpg
    130.3 KB · Views: 6
  • DSC04333.jpg
    DSC04333.jpg
    138.5 KB · Views: 6
  • DSC04334.jpg
    DSC04334.jpg
    145.7 KB · Views: 4
Last edited:

mrrsm

Lifetime VIP Donor
Supporting Donor
Member
Oct 22, 2015
7,697
Tampa Bay Area
Okay... I think I found what is arguably The Perfect Demonstration Video that suits our purposes to a Tee. Please be mindful that the OP (Curt...from "Curt's Corner" at Monster Transmission) has made a purpose minded instructional video here that you do NOT have to follow and do regarding any portion of his instructions, other than the part concerning the R&R of the Park-Safety Neutral Switch. That said... Curt gives you an uncommonly great look at the actual Flame Hardened Steel "Rooster Comb" and Spring Steel Roller Mechanism inside the case that controls and ensures the distinct rotational shifting positions necessary to properly engage the the transmission gears in all positions of the PRNDL21 sequence. You can also see him manually move the shift linkage and get a better understanding of where the Shift Linkage Arm should be B4 you install your new Park-Neutral Safety Switch. The rest of his instructions are interesting... but NOT necessary for you to do to complete those portions in order to correctly install your 4L60E Transmission.

The ONLY point of disagreement I might have with him is that when he describing and showing you how to remove the Dual Harness Connector wires on the back of the PNSS... He is not actually having to fight against the same level of adhesion that you are bound to encounter. I doubt seriously that the average mechanic laying in dirt under his truck is going to encounter a switch-to-plug circumstance that he has laid out for viewing convenience on his nice, clean work bench with tons of elbow room, using plugs that seemed to cooperate with ease for him:

 
Last edited:

Forum Statistics

Threads
23,313
Posts
637,837
Members
18,518
Latest member
bobby2175